background image

WAVBAND WRISTBAND AUDIO RECORDER USER GUIDE

3

Double click on the drive to see two folders: SetUDiskTime and Record. The former 
contains a utility to set the date and time on the WAVband; the latter will contain your 
recordings.

To synchronize the current date and time from your computer to the WAVband, 
double click on SetUDiskTime. Then double click on the SeUDiskTime(9X) 
application. A confirming message that you’ve successfully set the date and time will 
appear. (See image on previous page.) You can now remove the WAVband from your 
computer and insert it in the wrist strap.

Wearing and Operating

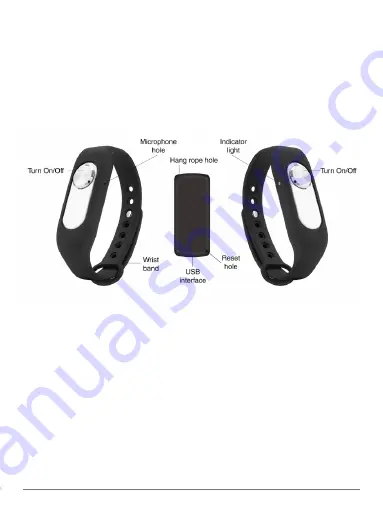
When you insert the recorder into the wristband, make sure to line up the microphone 
with the hole on the edge of the band. The mic is on the opposite side of the On 
button from the LED indicator. So, if you’re looking at the recorder with the On label 
pointed up, the mic is on the right edge from the button.

Place the rubberized band over your wrist. Pull the metal-button tip through the other 
end and tug the band into a tight but comfortable position so that you can push the 
fastener into one of the holes and it stays in place.

Tip:

 Unless you’re doing self-dictation, mount the band on either wrist so that the mic 

points outward to pick up voices in front of you.

As an alternative to wearing the recorder in the band, you can thread string or floss 
(not included) through the rope hole in a corner of the WAVband and create a loop to 
hang the device from clothing or a fashion accessory.

Summary of Contents for WAVBAND WRISTBAND AUDIO RECORDER

Page 1: ...rsations meetings dictation notes or ambient sounds The tiny recorder slips into a rubberized wristband that adjusts to your wrist size The rechargeable battery can power a recording for up to 20 hours and the built in 8GB of memory can store up to 140 hours of audio The WAVband comes with a USB cable for charging and transferring recordings into a Windows computer ...

Page 2: ...he tip of the WAVband and a standard USB port on your computer It should take between one and two hours to charge the WAVband While charging a red LED will flash on an edge of the WAVband When fully charged the LED will turn a steady red Note If you use an AC adapter USB charger not included see Specifications pg 5 A typical phone charger may destroy the WAVband Don t use a charger with current hi...

Page 3: ...and make sure to line up the microphone with the hole on the edge of the band The mic is on the opposite side of the On button from the LED indicator So if you re looking at the recorder with the On label pointed up the mic is on the right edge from the button Place the rubberized band over your wrist Pull the metal button tip through the other end and tug the band into a tight but comfortable pos...

Page 4: ...ording slide the button towards the Off position The LED will turn from white to red then shut off If the LED indicator turns red and blinks during recording it means the WAVband is almost out of power Stop recording and charge the device Playback and File Management Plug the WAVband into a USB port on a Windows compatible computer Slide the WAVband s button to the On position then to the Off posi...

Page 5: ...he WAVband stops working Assuming you ve charged the device use a pin to press the reset hole located on the rear of the WAVband around the edge from the micro USB port See diagram on pg 3 What happens when the WAVband s memory capacity is reached When the memory fills up the device cannot continue to record unless the user first transfers desired files to a computer then deletes the files in the ...

Page 6: ...or the beginning of the recording to be picked up and saved Does the WAVband contain an earphone jack or a speaker No Files must be played through a connected computer Why isn t the date time stamp always accurate You must run the SetUDiskTime utility with the WAVband connected to your computer prior to the first recording of the day even if the WAVband is charged How can I keep the WAVband from f...

Page 7: ...m approved resellers only Devices that are covered will be repaired or replaced at STI s discretion Devices requiring replacement will be fulfilled with a new or refurbished unit or a similar unit if the original unit is no longer available To take advantage of our warranty go to http www spytecinc com return policy and review our returns policy If your device meets the above guidelines as well as...

Page 8: ...WAVBAND WRISTBAND AUDIO RECORDER USER GUIDE 8 ...

Reviews: