background image


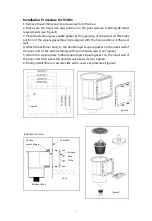
Installation Procedure for Eyeball Parts

1. Cut a round hole in reflow connection position
(2.4"). 
2. First put a round gasket on the 
the wall of the pool, and the threaded end faces the outer wall.


3. At the outer wall of the swimming pool, put the round 
into the threaded end, tighten with an octagonal nut, and then wrap the raw tape 
around the joint and screw it into the 


4. At the inner wall of the swimming
ball set bush, and tighten the eye


Hose Adaptor 

Octagonal Nut

Installation Procedure for Eyeball Parts  

reflow connection position with a hole diameter of 61MM 

on the ball set bush, then put it into the round hole on 

all of the pool, and the threaded end faces the outer wall. 

At the outer wall of the swimming pool, put the round gasket and paper 

into the threaded end, tighten with an octagonal nut, and then wrap the raw tape 
around the joint and screw it into the ball set bush. 

At the inner wall of the swimming pool, put the eye ball base and eye ball into the 

, and tighten the eye ball ring. 

Ball  Set 

Round Gasket 

Round Gasket 

Paper Gasket 

Octagonal Nut 

Eye  Ball 

Eye Ball 

Eye Ball Ring 

with a hole diameter of 61MM 

, then put it into the round hole on 

paper gasket 

into the threaded end, tighten with an octagonal nut, and then wrap the raw tape 

ball into the 

5

Summary of Contents for 91001

Page 1: ...OWNER S MANUAL ReadThisManualBeforeAssemblingandUse PleaseKeepThisManualforFutureReference THE WALL SKIMMER 91002 91001 ...

Page 2: ...1 Products Description 2 2 Warnings 2 3 Installation Procedure for 91001 3 4 Installation Procedure for 91002 4 5 Installation Procedure for Eyeball Parts 5 6 Product Explosion Diagram and List of Accessories 6 1 ...

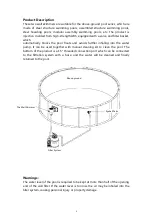
Page 3: ... further inhaling into the water pump It can be used together with manual cleaning kit to clean the pool The bottom of the product is a 1 5 threaded connection port which can be connected to the filtration system with a hose and the water will be cleaned and finally returned to the pool Warnings The water level of the pool is required to be kept at more than half of the opening end of the wall fil...

Page 4: ...y Installation Cut View 3 Procedure for 91001 and its accessories from the box the holes size and position on the pool wall are matching skimmer square gasket at the openings of the pool wall The hole has to be aligned with the hole positions of the pool body to the double layers square gasket on the outer wall of body with 4 pan head screws see Figure2 5 Attach the square plate to the double laye...

Page 5: ...sition on the pool wall are matching skimmer layer square gasket into the small end groove of the skimmer skimmer body and finally tighten with 8 pan head screws rectangle gasket at the opening of the pool wall The rectangle gasket has to be aligned with the hole position body to the double layers rectangle gasket on the outer wall skimmer body with 4 pan head screws see Figure6 plate to the doubl...

Page 6: ...tion with a hole diameter of 61MM on the ball set bush then put it into the round hole on all of the pool and the threaded end faces the outer wall At the outer wall of the swimming pool put the round gasket and paper into the threaded end tighten with an octagonal nut and then wrap the raw tape around the joint and screw it into the ball set bush At the inner wall of the swimming pool put the eye...

Page 7: ...le Layers Square Gasket 1 8 49100701 Square Face Plate 1 9 5862055000 91001 Screw Kit 1 10 49100911 Single Layer Square Gasket 1 11 49100301 Skimmer Base 1 12 49101801 Double Layers Rectangle Gasket 1 13 49100601 Rectangle Face Plate 1 14 5862056000 91002 Screw Kit 1 15 49102101 Octagonal Nut 1 16 5435001087 Paper Gasket 1 17 49101001 Round Gasket 2 18 49101901 Ball Set Bush 1 19 49102201 Eye Ball...

Page 8: ...SAVE THESE INSTRUCTIONS SAVE THESE INSTRUCTIONS ...

Reviews: