background image

S o u n d P e r c u s s i o n L a b s . c o m

1.

  Place black bass drum head with the SPL logo on front of the bass 

drum shell. 

2.

 Place bass drum hoop onto drum head. 

3.

  Insert long tension rod / washer / bass drum claw hook assembly 

into bass drum lug. Make sure claw hook is secure on the bass 
drum hoop. Tighten with your fingers.

4.

   Repeat this for all the lugs on one side of the drum. 

5.

  After all tension rods on one side are finger tight, use the drum key 

to tighten the #1 tension rod 3 turns. Follow these steps for tension 
rods #2 through #8 in a criss-cross pattern as shown. Repeat this 
pattern, tightening each rod one half turn until the drum head is 
taut and wrinkle free. 

6.

  Repeat for the clear batter head on the opposite side of the drum. 

BassDrumHeadAssembly

Washer

Bass Drum Hoop

Bass Drum Claw

Long Tension Rod

Shell

Bass Drum Lug

1

2

3

4

5

6

7

8

FRONT - Audience Side

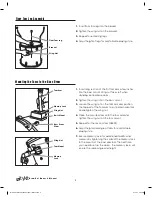
BassDrumLegAssembly(Spurs)

1.

 Loosen wing nut on spur assembly. 

2.

 Rotate the bass drum spur down and forward. 

3.

 Tighten the bass drum spur into the forward position.

Wing Nut

Spur Assembly

TomandFloorTomHeadAssembly

Drum Key

Washer

Hoop

Short Tension Rod

Shell 

Lug

1.

 Place drum head on top of the drum shell.

2.

  Place the metal hoop over the drum head, aligning the holes in the 

hoop with the drum lugs. 

3.

  Insert short tension rods with metal washers through the holes  

in the hoop. 

4.

  Thread the tension rods into the lugs and finger tighten.

5.

  Using the drum key, gradually tighten each tension rod in equal 

amounts using the same criss-cross pattern as done on the  
bass drum until the head is taut and wrinkle free.

6.

  Repeat above steps for the bottom of the drum with the resonant 

side drum head.

4

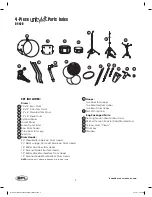
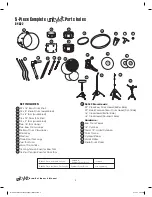
AssemblyInstructions:

D4420,D4522

D4522 Drum Heads:


22” Clear Bass Drum Head (Batter Side) 
22” Black Resonant Bass Drum Head (Front Side) 
16” Clear Head (Batter Side) 
16” Clear Head (Resonant Side)

Hardware

*

:


Bass Drum Pedal 
18” Cymbal 
Pair of 14” Hi-Hat Cymbals 
Drum Throne 
Cymbal Stand 
Hi-Hat Stand 
Snare Drum Stand

10186 SPL D4420 D4522 Assembly Manual.indd   5

6/12/14   4:20 PM

Summary of Contents for D4420

Page 1: ...mplete Drum Kit D4522 4 Piece Shell Pack Plus Drum Kit D4420 D4420 D4522 Drum Set Owner s Manual unitykit S o u n d P e r c u s s i o n L a b s c o m 10186 SPL D4420 D4522 Assembly Manual indd 1 6 12...

Page 2: ...g style Experimentation can lead to unique and great experiences in your playing and your music So experiment with your setup and enjoy Also be sure to visit www soundpercussionlabs com for more infor...

Page 3: ...ad 14 Resonant Side Floor Tom Head 12 Batter Side Mounted Tom Drum Head 12 Resonant Side Mounted Tom Drum Head NOTE Snare drum heads are already installed on snare Hoops Two Floor Tom Hoops Two Mounte...

Page 4: ...ort Tension Rods for Floor Tom D4522 Drum Heads 22 Clear Bass Drum Head Batter Side 22 Black Resonant Bass Drum Head Front Side 16 Clear Head Batter Side 16 Clear Head Resonant Side Hardware Bass Drum...

Page 5: ...Bass Drum Claw Long Tension Rod Shell Bass Drum Lug 1 2 3 4 5 6 7 8 FRONT Audience Side Bass Drum Leg Assembly Spurs 1 Loosen wing nut on spur assembly 2 Rotate the bass drum spur down and forward 3 T...

Page 6: ...second tom D4522 6 Adjust height and angle of toms for comfortable playing style 7 Secure memory locks for additional stability and memory by tightening the collar of the memory lock to the mounts of...

Page 7: ...gle with the tilter assembly 4 Place drum in snare basket The basket can be adjusted to grip and fit the drum Snare Basket Tilter Assembly Height Adjustment Stand Base Adjustment Cymbal Stand Assembly...

Page 8: ...cymbal and reassemble the rubber washer and retaining nut under the cymbal The cymbal should rest between the two rubber washers 5 Place the hi hat clutch assembly and cymbal onto the hi hat rod Tight...

Page 9: ...base and tighten height adjustment wing nut Use the second hole position as shown for comfortable playing style 3 Place seat top and tighten wingnut D4420 drum throne sold separately Top View of Drum...

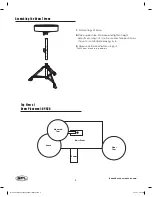
Page 10: ...u m S e t O w n e r s M a n u a l Top View of Drum Placement D4522 Bass Drum Pedal Drum Throne Mounted Tom Cymbal Floor Tom Snare Hi Hat Mounted Tom 9 10186 SPL D4420 D4522 Assembly Manual indd 10 6 1...

Page 11: ...r commercial loss or any other incidental or consequential damages including but not limited to lost profits downtime goodwill damage to or replacement of equipment and property and any costs of recov...

Page 12: ...S o u n d P e r c u s s i o n L a b s c o m 10186 SPL D4420 D4522 Assembly Manual indd 12 6 12 14 4 20 PM...

Reviews: