background image


SpinetiX SA, Switzerland 


17


Checking the HMP configuration 

Your HMP has a built-in On Screen Display which is triggered via a brief press of the push button. 

1.


Connect a screen

 through a VGA, HDMI

TM

 or DVI converter cable, to the HMP. 

2.


Check

 that some content is displaying on the screen. If your HMP has never been used before you should see the animated 

SpinetiX logo on the screen. 

3.


Press

 the HMP’s push button briefly. 

4.


Check

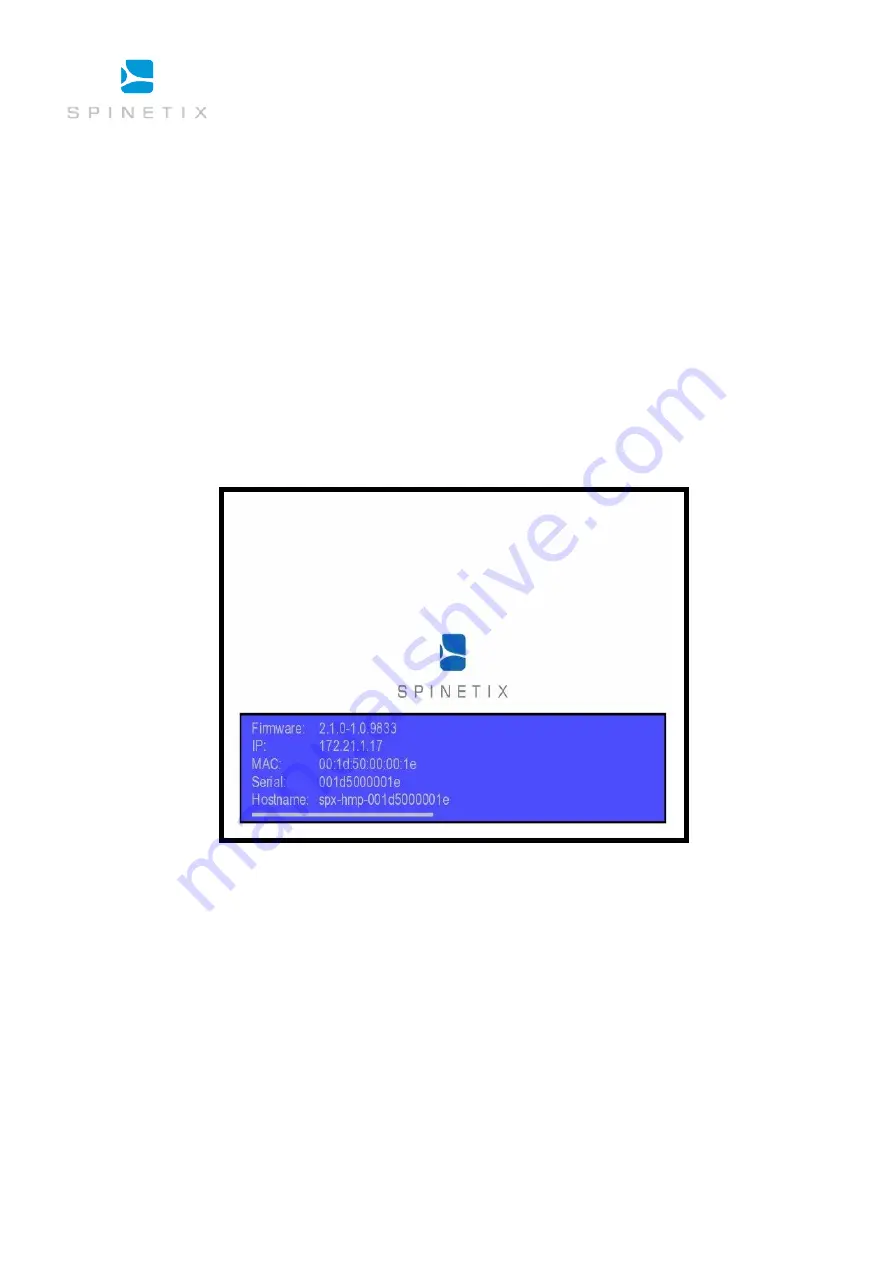
 the screen. The following information will be displayed on the screen for 10 seconds: 

1.


Firmware version 

2.


IP Address 

3.


MAC Address 

4.


Serial number 

5.


Hostname (you can reach the unit using 

http://[hostname].local

 from any PC on the network) 

Note: Make sure you press only briefly the push button. Pressing the button for longer will cause the player to reboot. 


Troubleshooting 

If you cannot display HMP information, please check the following before contacting [email protected] 

1.


The screen displays nothing: 

a.


Check the cables connecting the HMP to the screen.  

b.


If the LED of the player is not blinking, it might be malfunctioning. 

2.


The screen displays a fix SpinetiX logo with the text "Recovery System". 

Your HMP is in recovery mode. In this case, unplug 

the unit and wait for one minute before powering up again. If the HMP remains in recovery mode, contact your distributor. 

3.


The HMP displays the SpinetiX logo on a blue background and then the screen switched to black

. You are probably using a 

VGA cable and your screen is not detected by the HMP. Go to the HTTP configuration interface, and under the "

Display Settings

page, set "

Power mode for VGA output

" to "

Always On

". 


Summary of Contents for Hyper Media Player

Page 1: ...Revision July 2013 Hyper Media Player User Manual ...

Page 2: ... EVENT SHALL SPINETIX OR ITS SUPPLIERS BE LIABLE FOR ANY INDIRECT SPECIAL CONSEQUENTIAL OR INCIDENTAL DAMAGES INCLUDING WITHOUT LIMITATION LOST PROFITS OR LOSS OR DAMAGE TO DATA ARISING OUT OF THE USE OR INABILITY TO USE THIS MANUAL EVEN IF SPINETIX OR ITS SUPPLIERS HAVE BEEN ADVISED OF THE POSSIBILITY OF SUCH DAMAGES SpinetiX and HMP Hyper Media Player are registered trademarks and all logo and g...

Page 3: ...set an HMP to factory default settings 14 Get Connected 15 Getting started 15 Requirements 15 Troubleshooting 16 Checking the HMP configuration 17 Troubleshooting 17 Fixed IP configuration 18 Troubleshooting 18 HMP Control Center overview 19 Set Display settings 19 Controlling the display power 20 Controlling the content displayed by the HMP 20 Control content via Fusion software 20 Use a USB driv...

Page 4: ...Wikipedia A movie or video clip is a typical piece of linear content it watched from beginning to the end The content of a web page is a typical example of non linear content multiple media elements are available dynamically and interactively Web servers use scripts and databases to retrieve content on the fly allowing the browser to display live information The HMP range allows you to achieve the...

Page 5: ...ts with high quality video audio images animations and text Any assets on the player can exist locally or on at network locations and can be combined and rendered on any type of digital display What are the some of the ways in which Hyper Media can bring life to presentations Access public or private databases including SQL Sharepoint SAP and Domino and manipulate data on the fly to selectively di...

Page 6: ... and components are worn out quickly HMPs have been designed to simplify both the installation and the maintenance tasks by offering Complete Plug Play no proprietary driver installation Top reliability five nines annual uptime Smallest form factor smaller than a PC hard drive Remote monitoring peace of mind Complete Plug Play setup As dedicated appliances the SpinetiX HMPs are truly plug and play...

Page 7: ...ing top quality and standards of reliability The unit is protected by a sealed lightweight and compact aluminum case Smallest form factor The HMPs are the smallest digital signage hyper media players on the market Integrate them behind screens underneath technical flooring or above suspended ceilings with minimal fixtures required No moving parts mean very high tolerance of dust and heat Remote Mo...

Page 8: ...s and retrieve media elements In particular Ethernet 10 100 Mbit s IPv4 DHCP or fixed address HTTP configuration server password protected HTTP client for web content retrieval WebDAV server password protected SNMP v2c Zero Configuration Networking Zeroconf NTP The HMPs support USB2 0 Hi Speed with maximum bandwidth up to 10 MByte s The USB interface can be used to extend the local storage through...

Page 9: ...content from the Hyper Media Director software Front panel connectors RS232 interface used for sending and receiving commands to from peripherals Ethernet RJ45 plug the Ethernet cable in this socket USB 2 0 for storage expansion and HID peripherals Push button multi functional button for rebooting and shutting down HMP200 only Back panel connectors 5V DC input power socket where the power adapter ...

Page 10: ...lay 5 Power up the HMP Use the cables and the regional power adapter in the HMP package Connect the plug adapter to one side of the 110 220V outlet the other end to the back panel DC jack on the HMP Shortly after power up the screen displays the SpinetiX splash screen HMP splash screen power up The first time an HMP boots the automatic configuration procedure takes about 1 minutes The process will...

Page 11: ...HMP does respond as described check the following 1 Check the display is functional and that the right input has been selected 2 Check the cables connecting the HMP to the screen and try alternative cables 3 If the HMP displays the SpinetiX logo on a blue background and then the screen signal disappears your screen is not being properly detected by the HMP Open the web interface then under the Dis...

Page 12: ...re Update under the Administration menu on the left of the page 3 Check that the field Server URI is set to the default 4 In the section Manual Update select the update source From server and click the Check for Update button A new page will open At the end of the check the page reports the current update status of your unit Three cases are possible No updates are available Updates are ready to in...

Page 13: ...web browser the new firmware version will be reported under section Current Versions If you click the Check for Update button again the page will report that no updates are available Automatic update If your HMP has automatic update enabled and has direct access to the Internet it will update its firmware in an automatic and transparent manner as soon as a firmware is available The check and updat...

Page 14: ...check for updates button Settings tab Reset an HMP to factory default settings This procedure depends on the HMP type and on the firmware improvements The procedure is therefore described on our website Support Wiki keyword Reset Factory Defaults ...

Page 15: ...isplay allow about 90 seconds for the HMP boot to complete 4 Configure the network on your PC to use DHCP Note that your PC might indicate the only limited network connectivity is available This will not prevent you from connecting to the HMP 5 Make sure that the Bonjour client is installed on your PC either install Elementi software from SpinetiX or download the Bonjour installer from the Apple w...

Page 16: ...s The Support Wiki also details the latest recommended 3rd party plug ins that can assist with device discovery A simply way to directly open HMP Control Center for a given HMP is via Elementi or HMD software 1 If you are using Safari then the list of HMPs can be found under the bookmark menu All devices compatible with Bonjour will be listed in My Devices Support Wiki keyword Get Connected Suppor...

Page 17: ...briefly the push button Pressing the button for longer will cause the player to reboot Troubleshooting If you cannot display HMP information please check the following before contacting support spinetix com 1 The screen displays nothing a Check the cables connecting the HMP to the screen b If the LED of the player is not blinking it might be malfunctioning 2 The screen displays a fix SpinetiX logo...

Page 18: ...e current network configuration of the HMP including the IP address host name and MAC address If the player is configured to use DHCP then these details will not be shown see the Status page 4 Enter the static IP address and the subnet mask Select the Static radio button Configured the HMP to use a static IP address in the range of the free IP addresses of your network Ensure that the subnet mask ...

Page 19: ...osen resolution You can modify it by checking the Force aspect ratio check box 3 Choose your display orientation If you are using a vertical display ensure you select the correct rotation direction 4 If you require audio output enable it using the Enable audio output checkbox Audio is disabled by default for performance reasons The preview icon helps you to choose the correct settings for your dis...

Page 20: ... using a WebDAV server For example Elementi uses the push mode to publish an Hyper Media Project to a HMP USB drive Files are stored on a external USB drive The HMP displays the files of the drive currently plugged into the device Client Server mode The HMP accesses files from a remote HTTP server The internal storage will be used as a cache Configuring the client mode is explained in Use network ...

Page 21: ... a USB storage device into the USB port of the HMP Wait for a few seconds and then press the Reload button The page should indicate that the local storage is currently set to USB storage By default most USB storage is formatted using the FAT16 or FAT32 file system This has the advantage that the storage is readable both by the HMP and any PC and many other devices However FAT formatted file system...

Page 22: ... download the content of a network server to its internal storage see the Pull Mode section of this document 1 In the main page of HMP Control Center select from the left menu Media Sources 2 Change the Primary source to Network Project 3 Enter the URI of your network project The HMP will open the index svg file in the root of the entered URI Note you can use HTTP or HTTPS servers 4 Press Apply Yo...

Page 23: ...ng the content of the server must be available Pull mode scheduling can be configured either directly from HMP Control Center or by using a custom built iCalendar file There are two ways to configure Pull mode on a HMP unit Using HMP Control Center This option is easy to configure but has some limitations For example it forces a daily project publishing at a specific timing Moreover the options fo...

Page 24: ...rotected by a password enter o The full URI to the resource optionally including a port number o The username o The password o You can specify multiple username and password for the same server but for different realms 4 If you need to add additional server credentials press the Add server row button 5 Press Apply to save your changes Note that networks credentials are used by the HMP player when ...

Page 25: ...onitoring Controls the access to the logs and snapshot of the player Configuration guide 1 In the main page of HMP Control Center open the Security page The current security settings will be shown 2 Choose the type of access you would like to configure Note it is recommended to always setup a password for the Administrative area By default no password is set and the administrative area is not prot...

Page 26: ...e done on a PC using the Serial Port Protocol Studio application installed with HMD The protocol file must be uploaded to the HMP and enabled A pre built or serial port cable you have constructed to connect your appliance to the HMP Special SpinetiX elements auxCmd in your content to control the appliance Enabling control of external devices Enabling the RS232 USB IO support is done via HMP Contro...

Page 27: ... is disabled disabled A system version of the Sharp Aquos protocol sys sharp_aquos An uploaded protocol file for the LG LF65 screen LG LF65 An uploaded protocol file for the Sharp Aquos monitors sharp_aquos Once a protocol file is selected you may change the serial port configuration and or enable automatic power on and power off of the attached screen see Display ...

Reviews: