background image

S P I K E   N A N O   U S E R   G U I D E

30

Brew Day – 

Cleaning

1. 

Before CIP (Clean In Place), we recommend 
opening the bottom drain on each of the three 
kettles, and rinsing all loose material (hops, malt, 
etc) onto the drip tray. Also, remove the false 
bottom and scrub the kettle walls in the MT and 
BK with a soft brush.

2. 

Backflush the wort chiller by pumping hot water 
through it in the opposite direction. Send the 
water into the “Wort Out” port and out through the 
“Wort In” port then into a drain.

3. 

Your MT will have hot reclaimed water from the 
knockout stage; 10 gallons of reclaimed water will 
be enough. The water should be roughly 150F, 
which is the heat recommended for most caustic 
cleaning chemicals. If the water is below 150F, 
use the MCS heater to raise it. You can add your 
caustic to the MT as prescribed by the caustic 
instructions.

4. 

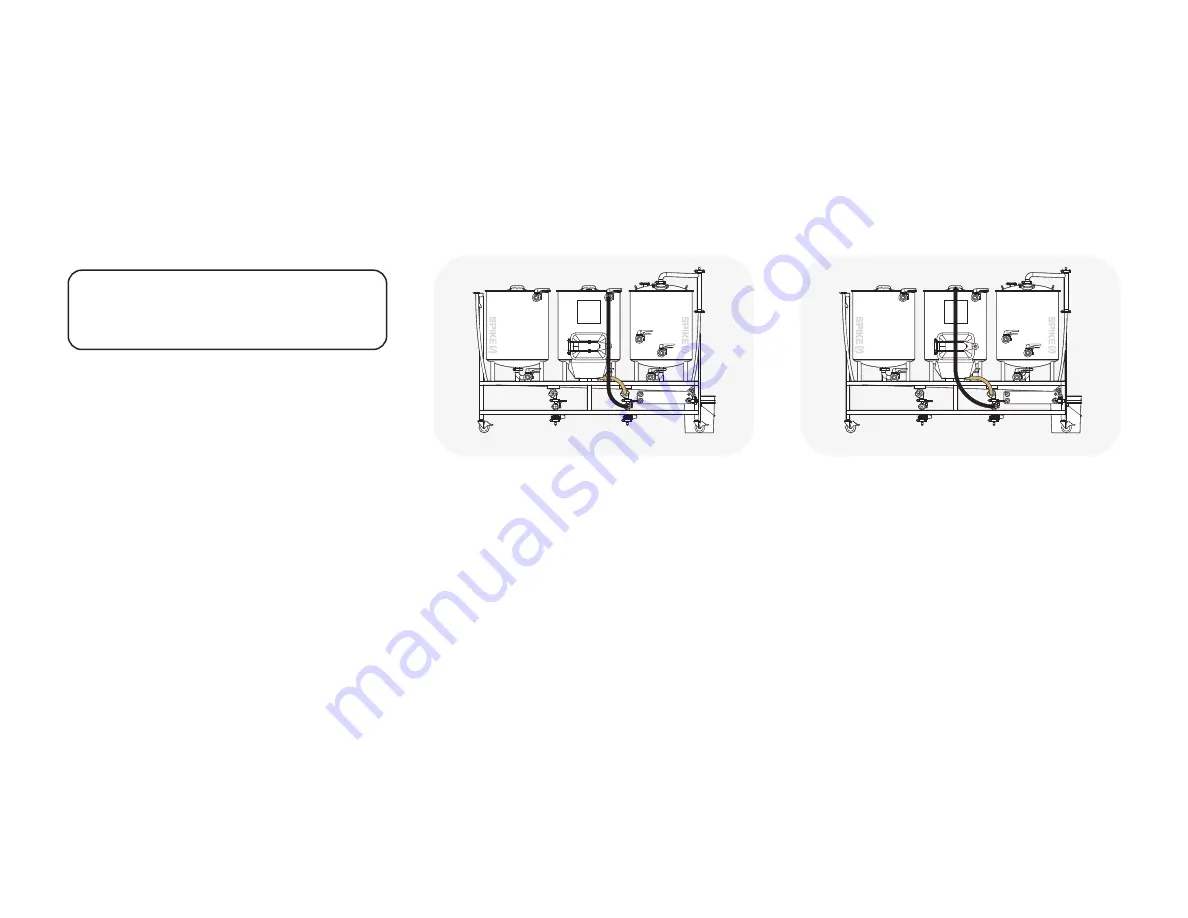
Move the hose (

Gold

) from the heat exchanger 

‘Water Out’ to the wort pump inlet. (see 

Figure 8

)

5. 

Move the hose (

Black

) from the wort pump inlet 

to the wort pump outlet. Move the other end from 
the BK racking port to the top port on the MT. (see 

Figure 8

)

Follow these steps to speed through the cleanup process and keep 
your equipment running smoothly for your next Brew Day. 

6. 

Attach the vorlauf arm to the inside of the MT and 
turn the wort pump on. Let this run for a minute or 
until the plate and tube have been cleaned.

7. 

Turn the wort pump off.

8. 

Close the 3-piece valve and open the 
bottom bleed valve. This will ensure the 
bleed system is cleaned.

9. 

3 piece valves are great at giving precise 
flow control but they are a little harder to 
clean. Turn the pump on, open and close the 
3 piece valve slowly to make sure the ball 
and seats are cleaned thoroughly.

10. 

Turn off the pump and attach the CIP ball to the flat 
lid with the 1.5” TC port. Add this lid to the MT.

11. 

Move the hose (

Black

) from the top port on the MT 

to the CIP ball. (see 

Figure 9

)

Figure 8

Figure 9

12. 

Turn the wort pump on and let the CIP ball 
clean the inside of the tank for about 5 
minutes. Turn the wort pump off and inspect 
inside for any areas that didn’t get cleaned. 
If there are areas that are still dirty a quick 
hand scrub with a brush or more time with 
the CIP ball might be needed.

13. 

Once the MT is cleaned move all the liquid from the 
MT to the BK.

14. 

Move the hose (

Black

) from the top CIP ball port to 

the bottom drain of the BK. (see 

Figure 10 

on next 

page)

15. 

Turn on the wort pump until all the liquid is drained 
from the MT.

Continued on next page.

PRO TIP: 

Since the HLT and water pump 

are only used for clean water, they do not 
need to be cleaned after brewing. 

Summary of Contents for Nano System

Page 1: ...Nano System User Guide...

Page 2: ...19 Heating HLT 20 Strike Water to MT 21 Mash Control System 22 Vorlauf 24 Sparging 25 Using the Steam Condenser 26 Boiling 27 Whirlpool 28 Knockout Transfer 29 Cleaning 30 Congrats on securing your n...

Page 3: ...1 Ready to get your Nano up and running This guide will show you how to assemble each piece of equipment with step by step instructions and key visuals Hot Liquor Tank Mash Tun Boil Kettle Steam Conde...

Page 4: ...g down on the element connection Taking these actions will certainly extend the life of your power cords Before installing parts into quick connect QC fittings be sure to lubricate them with water Thi...

Page 5: ...S P I K E N A N O U S E R G U I D E 4 Assembly Hot Liquor Tank...

Page 6: ...Liquor Tank 1 B Hot Liquor Tank Bottom Drain Piping 1 C TC Clamp 7 D TC Gasket 7 E TC Butterfly Valve 2 F TC Side Pickup 2 G 6000w Heating Element 2 H Temp Sensor 1 I Power Cord 15 not pictured 2 A B...

Page 7: ...S P I K E N A N O U S E R G U I D E 6 Assembly Mash Tun...

Page 8: ...TEM DESCRIPTION QTY A Mash Tun Tank 1 B Manway Door 1 C Grain chute 1 D False Bottom 1 E Mash Tun Bottom Piping 1 F Mash Tun TC Quick Connect Fitting 2 G 3000w Heating Element 1 H TC Clamp 6 I TC Gask...

Page 9: ...S P I K E N A N O U S E R G U I D E 8 Assembly Boil Kettle...

Page 10: ...E E C H C D C C F C B B B B G B B B ITEM DESCRIPTION QTY A Boil Kettle Tank 1 B TC Clamp 9 C TC Gasket 9 D Boil Kettle Bottom Piping 1 E Butterfly Valve 3 F 1 Boil Kettle Racking Arm 1 G TC Side Picku...

Page 11: ...til it becomes too hot to touch Starting with ice in the drain bucket can increase the amount of time the recirculation water can be used for until it gets too hot NOTE Make sure you keep the drain ho...

Page 12: ...C Gasket 4 D TC Cap 1 E Condenser Piping 1 F 90 Barb 1 G Condenser Mister 1 H 4 TC Clamp 1 I 4 TC Gasket 1 J 4 TC Clear Cap 1 K 1 5 TC Barb 3 4 1 Assembly Steam Condenser Lid A B G F C I C C C H B K E...

Page 13: ...tly as possible It also has its own dedicated temp sensor You ll be able to see the chiller exit temp on the control panel and adjust the flow rate to achieve your perfect yeast pitch temp NOTE Be sur...

Page 14: ...S P I K E N A N O U S E R G U I D E 13 ITEM DESCRIPTION QTY A Nano Plate Chiller 1 B Temp Sensor 1 C 1 TC Tee 1 D TC Clamp 2 E TC Gasket 2 F Mounting Nuts 2 Assembly Wort Chiller F F A B C E D D E...

Page 15: ...E R G U I D E 14 Assembly Pumps NOTE Assemble the outlet valve and air bleed manifold completely before attaching to the pump head Since the cross members of the cart are tight to the pump this will e...

Page 16: ...G U I D E 15 Assembly Pumps ITEM DESCRIPTION QTY A Pump 2 B TC Clamp 8 C TC Gasket 8 D TC Butterfly Valve 2 E 1 5 TC x 5 8 Barb 90 2 F 1 TC Tee 2 G 1 5 TC 3pc Valve 2 H Mounting Nuts Not Pictured 8 A...

Page 17: ...2 D Condenser Exit Hose 1 We use oversized barbs so the silicone tubing will be securely attached without a need for hose clamps Also this oversized barb creates a full port which doesn t restrict flo...

Page 18: ...J K C D C D D C B I E H G A A F A A To install the casters 1 Lock the brake on the caster and then tighten the caster into the cart leg By locking the brake it makes the caster its own wrench and it...

Page 19: ...lly assembled it s time to get brewing Follow the steps in this user guide for a simple and easy Brew Day experience Auotune the Control Panel Heating HLT Strike Water to MT Mash Control System Vorlau...

Page 20: ...and press to set the output Press again to see the temperature readout screen 3 To begin your boil we recommend setting the temperature to 100 output to get the boil started When the BK is nearing bo...

Page 21: ...d input hose Red of air To purge the pump with the HLT drain valve open open the air bleed valve on the pump until a solid liquid stream flows Close the valve your pump is now purged of air Figure 1 5...

Page 22: ...n If your strike water is too hot you can add cold water If your strike water is too cold use the Mash Control System discussed in Recirculating the Mash step on page 25 heater to heat to desired stri...

Page 23: ...s setting the pump and element will turn on once the mash tun drops below 1F of your desired temp 3 Recirculated Mash Mash Element On Wort Pump On After mashing in install the vorlauf arm into the top...

Page 24: ...fill the HLT and bring the water up to the desired temperature for sparging The excess water can be used for double batching or cleaning PRO TIP Ramp speed is roughly 75 F min Set the mash element to...

Page 25: ...connect fitting on the top port of the MT see Figure 4 Be sure to wet the fitting first to ease installation 3 Vorlauf for 15min or until the wort runs clear When the mash is completed it is time to v...

Page 26: ...top port on the BK see Figure 5 The green hose will stay in this position for the Whirlpool later 3 Remove the vorlauf arm and install the sparge arm see Figure 5 4 Open both the water and wort pump o...

Page 27: ...aching boil to avoid any boil over Once the hot break has subsided you can place the steam condenser lid on 6 Run the condenser lid output hose into a floor drain or collection container 7 Make sure t...

Page 28: ...wer output and press to set the output Press again to see the temperature readout screen 3 To begin your boil we recommend setting the temperature to 100 output to get the boil started When the BK is...

Page 29: ...I D E 28 Brew Day Whirlpool Figure 6 1 Move the short hose Black from the bottom port of the MT to the BK see Figure 6 2 Turn wort pump on and whirlpool for 15 minutes Lastly let wort stand for 10 min...

Page 30: ...grain and rinsed down The water exiting the heat exchanger will be roughly 155F and can be used for CIP PRO TIP The best way to lower Wort Out temps is to slow the flow from the wort pump by using the...

Page 31: ...r next Brew Day 6 Attach the vorlauf arm to the inside of the MT and turn the wort pump on Let this run for a minute or until the plate and tube have been cleaned 7 Turn the wort pump off 8 Close the...

Page 32: ...nd racking valve 19 Move the hose Gold from the BK racking port to the BK whirlpool port see Figure 12 20 Turn on the wort pump for about 5 minutes This will clean the whirlpool arm and whirlpool valv...

Page 33: ...still dirty a quick hand scrub with a brush or more time with the CIP ball might be needed 26 Drain the BK After the BK is drained rinse the MT and BK with hot water Figure 14 27 Step 1 27 should be r...

Reviews: