


7.
TURNING UNIT ON AND CONTROL
NEVER ATTEMPT TO RAISE HIGH VOLTAGE WITHOUT HIGH VOLTAGE
CABLE BEING INSTALLED AND SECURED IN THE POWERS SUPPLY
CABLEWELL! THE OTHER HIGH VOLTAGE CABLE END MUST BE
CONNECTED TO AN X-RAY TUBE OR OTHER LOAD!
There are two ways the HVPS can be controlled. One is using RS-232 interface and connecting
the HVPS to a computer, which supports the command structure outlined below. The second
way is connecting the unit to a manual analog control via J4. The Analog controller must meet
the interface requirement as indicated specification sheet (J2 Analog Interface) for both analog
and digital logic signals.
HVPS control using the X-Ray Power Supply Controller software
Check all connections, interlocks and grounds.
Check that the Tube Cooling System is On and functioning normally.
Turn On the mains power to the System.
See Manual for installation and control instruction.
HVPS control using Analog Control
The Analog controller must meet the interface requirement as indicated on page 20, J2
Analog I/O for both analog and digital logic signals.
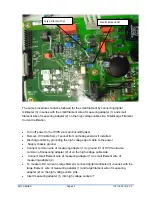
Select analog control on install jumper JP12 on System Control Assembly 46130-XXX.
On the system control Assembly 460130-XXX has a user jumper logic level selection. Select
JP11 1-4 for 5v logic JP11 2-5 for 15v logic and JP11 3-6 for 24v logic
Check all connections, interlocks and grounds
Check that the Tube Cooling System is ON and functioning properly
XRV SERIES
Page 27
118116-001 REV C


