background image

SpectraPure

SpectraPure®Inc.


480.894.5437   Call us toll-free  1.800.685.2783    

2167 East Fifth St,    Tempe, Arizona   85281

®

12

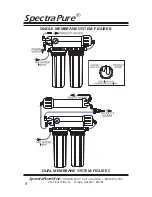
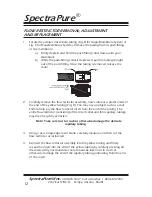
1.  Locate the yellow concentrate tubing (Fig. B for Single-Membrane System or 
 

Fig. C for Dual-Membrane System). Remove the tubing from its push-fitting    


at  the membrane:


a.)  Firmly depress and hold the push-fitting collar down with your

   thumbnail.


b.)  While the push-fitting collar is depressed, pull the tubing straight


out of the push-fitting. Once the tubing is removed, release the 

   collar.

2.  Carefully remove the flow restrictor assembly, now visible as a plastic insert In  
 

the end of the yellow tubing (Fig. D). You may use an object such as a dull 


knife to help pry the flow restrictor insert from the end of the tubing. The


entire flow restrictor (consisting of the insert collar and thin capillary tubing) 


may then be gently extracted.


Note:  Take care not to crush or otherwise damage the delicate 

capillary tubing

.

 
3.  Using a new single-edge razor blade, carefully measure and then cut the
 

flow restrictor as instructed.

4.  Re-insert the flow restrictor assembly into the yellow tubing and firmly
 

re-seat the insert into the end of the yellow tubing by carefully pressing on 


the insert with your thumbnail. Care should be taken not to crush or 


other-wise damage the end of the capillary tubing protruding from the end


of  the insert.

FLOW RESTRICTOR REMOVAL, ADJUSTMENT 

AND REPLACEMENT

Summary of Contents for The Eliminator

Page 1: ... Membrane Models The Eliminator RO System INSTALLATION AND OPERATING MANUAL WARNING Please read carefully before proceeding with installation Failure to follow any attached instructions or operating parameter may lead to the product s failure and possible damage to property ...

Page 2: ... Product to Waste Ratio 10 11 Flow Restrictor Adjustment 12 13 Maintenance Sediment Diagnostic 14 Carbon Diagnostic 15 RO Membrane Diagnositc 16 RO Membrane Replacement 17 18 Troubleshooting Guide Troubleshooting for the Drinking Water Kits 19 23 Replacement Parts 24 COPYRIGHT 2002 2009 BY SPECTRAPURE INC ALL RIGHTS RESERVED TABLE OF CONTENTS Thank You for your purchase of a SpectraPure System Wit...

Page 3: ...ge prices without notice when necessary All prices in the catalog are quoted in US dollars 7 Claims for error in quantity or condition must be made within 10 days of receipt of material SpectraPure Inc Will not be responsible for any claimed shortages not reported within 10 days Returns other than warranty claims may be subject to 20 restocking fee 8 SpectraPure Inc Cannot be held liable for damag...

Page 4: ... water parameters listed in the applicable product manual refer to detailed membrane warranty information SpectraPure will on confirmation of loss of performance during the warranty period credit the pro rated amount of the current catalog price of the element The disposable filters and cartridges are not covered under the warranty To obtain service under this warranty the defective system or comp...

Page 5: ...membrane into the solution of lower concentration See Figure 3 This is the basis of Reverse Osmosis Figure 2 WHAT DOES THE SYSTEM DO SpectraPure s ELIMINATOR RO System uses household water pressure to reverse a natural physical process called osmosis Water under pressure is forced through a semi permeable membrane where minerals and impurities are screened out and sent down the drain with waste wa...

Page 6: ...se Osmosis Feed Water Requirements For the 1 year TFC membrane pro rated warranty to be honored the following conditions must be met Operating Pressure 40 80 psi 2 75 5 5 bar pH Range 3 11 Maximum Temperature 100 F 38 C Maximum Turbidity 1 0 NTU Maximum Silt Density Index 5 0 based on 15 min test time Maximum Chlorine less than 0 1 ppm Maximum TDS 1500 ppm Maximum Hardness 16 grains 272 ppm as CaC...

Page 7: ...arbon filter to plug up The next stage of filtration is a 1 micron carbon block pre filter This filter is used to remove organics and chlorine from the feed water that can damage the membrane The final stage of the system is the R O membrane A high rejection Thin Film Composite TFC membrane is used in this system This removes as much as 98 of most inorganic salts all micro organisms and almost all...

Page 8: ...SpectraPure SpectraPure Inc 480 894 5437 Call us toll free 1 800 685 2783 2167 East Fifth St Tempe Arizona 85281 8 SINGLE MEMBRANE SYSTEM FIGURE B DUAL MEMBRANE SYSTEM FIGURE C ...

Page 9: ... and leak free before leaving the system unattended If anything is leaking contact SpectraPure for assistance Note It is recommended that at least 2 gallons 7 57 liters of purified water be discarded now before collecting purified water for use If the unit is not used for several days run the system for at least 10 minutes before collecting any water This will flush out any stale water in the syst...

Page 10: ...y disconnects use in place of the Garden Hose Adapter FEED WATER ADAPTER VA FD 4 Connects the BLACK input line to the tap water line under the sink use in place of the Garden Hose Adapter that comes with the system DRAIN SADDLE DS 4T Connects the YELLOW waste line to a drain line TOTAL CHLORINE TEST KIT TK CL 5 KIT The Chlorine Test Kit contains 5 tablets for five tests Test the waste water stream...

Page 11: ...ed the 90 GPD Encapsulated Membranes Procedure 1 Locate the Yellow waste line Direct the waste line into a sink drain 2 Locate the Blue product line Direct the product line into a sink drain 3 Turn on the Feed Supply Valve and let the system run for 20 min 4 Collect product water from the blue line into a measuring cup marked in milli liters for one minute Measure the collected amount in milli lit...

Page 12: ... the yellow tubing Fig D You may use an object such as a dull knife to help pry the flow restrictor insert from the end of the tubing The entire flow restrictor consisting of the insert collar and thin capillary tubing may then be gently extracted Note Take care not to crush or otherwise damage the delicate capillary tubing 3 Using a new single edge razor blade carefully measure and then cut the f...

Page 13: ... inch 6 35 mm further into the fitting to completely seat the line into the fitting and past the O ring seal 6 Turn on the system water supply and check for leaks prior to further use or testing If a leak is observed you may not have pushed the yellow tubing into the push fitting far enough to seal the tubing against the O ring Turn off the system water supply and re seat the tubing as described a...

Page 14: ...o be replaced If you remove the sediment and the pressure does not return to normal the carbon filter may be plugged Sediment Pre Filter Replacement Materials Required 1 micron MicroTec Sediment Filter ELIM SF 1 Filter Wrench Procedure 1 Turn off water supply to the system 2 Refer to Fig A System Diagram Using the provided filter housing wrench remove the first housing on the left Unscrew it count...

Page 15: ...ut a carbon filter can also drop production if its covered with extremely fine sediment If the carbon becomes plugged with sediment it will no longer be able to remove chlorine Carbon Block Filter Replacement Materials Required 1 micron Carbon Block Filter ELIM CF 1 Filter Wrench Chlorine Test Kit TK CL 5 KIT Procedure 1 Turn off water supply to the system 2 Refer to Fig A System Diagram Using the...

Page 16: ...e All water sources are different and are subject to changes in conductivity from season to season which could affect the monitor reading depending on the time of the year For this reason we recommend the use of a conductivity tester in order to register the most accurate measurement for determining the condition of the RO membrane MEMBRANE WARNING All replacement SpectraPure RO mem branes except ...

Page 17: ...ash the empty housing with soapy water Rinse thoroughly with hot clean water 7 Insert the new membrane into the housing with the double O ring end first Fig G The o rings and tube must fit into the recess at the bottom of the membrane housing When the membrane is aligned with the hole firmly push the membrane into the hole until it bottoms out 8 Place the black housing O ring on the housing rim an...

Page 18: ...inutes to remove any loose particles 12 Turn off the water supply to the system Remove the yellow tubing from the membrane housing and replace the flow restrictor assembly as described on page 12 13 13 Re insert the flow restrictor end of the yellow tubing into its push fitting at the RO membrane housing 14 Turn on the water supply to the system and check for leaks Check and if necessary adjust th...

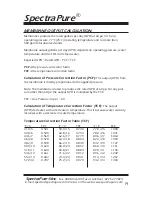
Page 19: ...essure Note The membrane is rated to produce the rated GPD at 60 psi For any pres sure other than 60 psi the output GPD is multiplied by the PCF PCF Line Pressure in psi 60 Calculation of Temperature Correction Factor TCF The output GPD decreases with a decrease in temperature This is because water viscosity increases with a decrease in water temperature Temperature Correction Factor Table TCF F C...

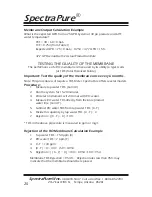
Page 20: ... once every 6 months Note This procedure will require a TDS Meter SpectraPure offers several models Procedure 1 Measure tap water TDS Call it X 2 Run the system for 15 20 minutes 3 Rinse test instrument cell 2 3 times with RO water 4 Measure RO water TDS directly from the blue product water line Call it Y 5 Subtract RO water TDS from tap water TDS X Y 6 Divide this quantity by tap water TDS X Y X ...

Page 21: ...presents only rough guidelines for determin ing performance of RO membrane Depending on your tap water chemistry the rejection characteristics of the membrane may vary significantly Method of Calculate Test Results Conclusion Testing Rejection TDS Measure feed water X Is Rejection No Replace Membrane Conductivity RO product water Y greater than Yes Membrane OK Tester for TDS Conductivity 95 Alkali...

Page 22: ... protect the membrane from chlorine damage 3 Membrane should not be operated at lower than the recommended concentrate to purified water ratios as described on page 11 4 Operating reverse osmosis systems on softened feed water greatly reduces the chances of membrane fouling 5 Use the optional flush valve kit after each use of the system to extend membrane life This may be difficult to do with auto...

Page 23: ...t light from the sun and other sources such as metal halide lighting 2 Algae is more likely to thrive inside the clear filter housings when exposed to bright light 3 Avoid installing this unit in bright light or direct sunlight Temperature Extremes 1 The unit must be kept out of areas that are subject to freezing temperatures 2 High temperatures greater than 100 F 38 C must be avoided If the unit ...

Page 24: ...k Pre Filter ELIM MEM 0100 100 gpd TFC Membrane Use 2 for 200 gpd systems ELIM FR 100 Flow Restrictor for 100 gpd System ELIM FR 200 Flow Restrictor for 200 gpd System ELIM GHA 4 1 4 6 35 mm Garden Hose Adapter WR UNIV Filter Wrench REPLACEMENT PARTS When replacing your RO membrane if you have an encapsulated housing you will need to replace it with the ELIM MEM 100 GRIP We no longer offer encapsu...

Reviews: