Spectra Precison GL412N Hands-On Training Download Page 35


Any error message can be deleted with a short press of button E. The table shows the related description and 
possible solutions. 
The next service center should be contacted if a different error message as shown at the table will be displayed.  
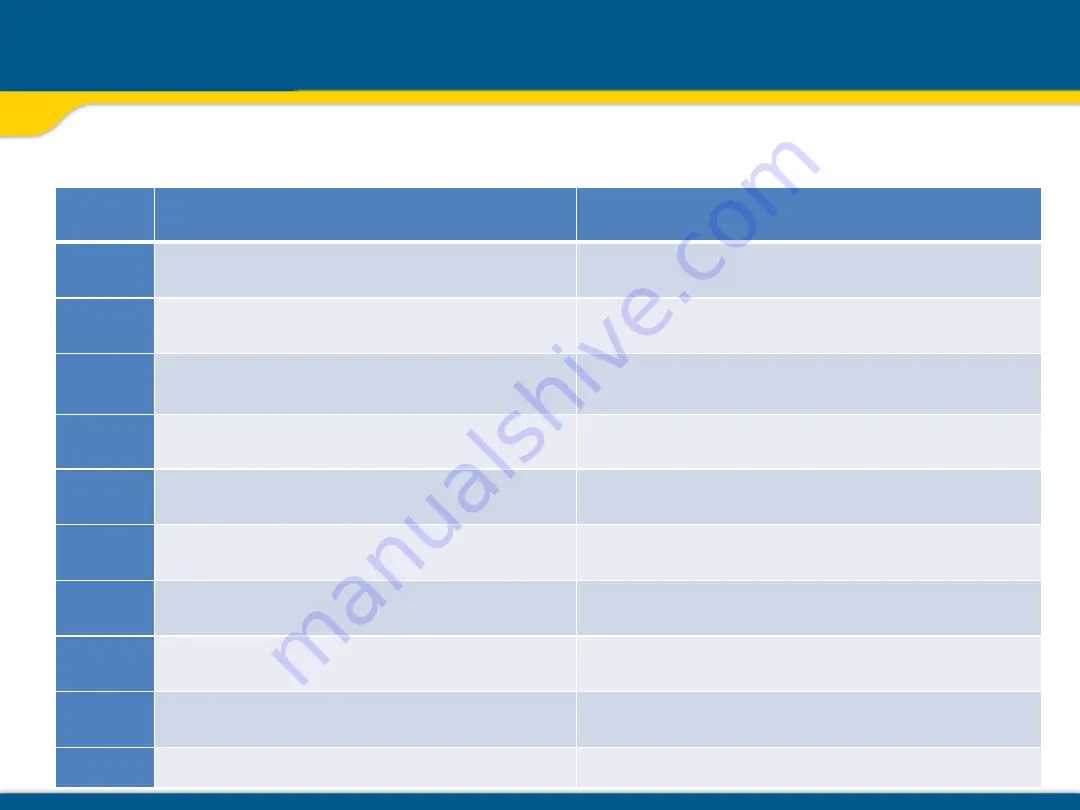
Troubleshooting 

Error 
codes 

Description 

Solution 

21


Temporary EEprom problem 

Press the E button to deletet the error message 

120


HI alert - Unit Height changed  

Check laser beam elevation 

130 

Mechanical Limit during Grade Match / PlaneLok 

Check if existing slope is above +/-9%  

140 

Laser beam blocked  

Make sure there are no obstacles between the 
transmitter and the HL760 

141  

Time Out - Alignment could not be completed in 
the allowed time 

Check radio operating range/ connection; check stable 
laser setup 

150 

No receiver – HL760 Receiver not available for 
single axis automatic function 

Make sure the HL760 is on and paired 

152 

No receiver - The laser searched for the receiver 
but could not find it 

Check the operating range for auto function and restart 
the auto alignment 

153 

Lost Receiver - The laser searched and found the 
receiver but then lost it 

Check the operating range for auto function and restart 
the auto alignment 

155 

More than two paired receivers are available 
during automatic alignment function. 

Make sure only two receivers are turned on. 

160 

X or Y level sensor defect  

Contact service center  

Summary of Contents for GL412N

Page 1: ......

Page 2: ...GL412N GL422N Controls Battery Status LED Level LED Manual Mode Escape Standby Button Power Button HI Manual Standby LED Slope Alignment Buttons Menu button Enter button Enter button Menu button...

Page 3: ...GL412N GL422N Peripherals Rubber Feet Serial Number 5 8 x 11 Beam Exit Metal Sunshade Sighting Guides...

Page 4: ...GL412N GL422N Peripherals Plastic Feet Rubber Foot Laser Safety Labels 5 8 x 11...

Page 5: ...ise Install remove the rechargeable battery Pack It is keyed to prevent miss insertion The cage prevents accidental charging of Alkaline batteries Do not try to open the cage for exchanging the rechar...

Page 6: ...ram on the battery door Do NOT try to install Alkaline batteries in the rechargeable battery Pack Special screws are used to ensure only autorized service centers can replace the batteries Trying to o...

Page 7: ...RC402N Radio Remote Control Left Right Buttons Menu button Up Down Buttons LCD Display On Off Button RC402N Battery status LED Enter button Hand loop Manual Mode Escape Standby Button...

Page 8: ...oting the plus and minus diagrams inside the battery housing 3 Close the battery door Push down until it clicks into the locked position Turning On Off the Radio Remote Control Press the button to tur...

Page 9: ...n the transmitter The laser s battery LED flashes fast During the next 6 seconds repeat the same steps on the remote control The Laser s red battery LED flashes fast then the laser and RC402N display...

Page 10: ...election Press and release the B button display shows PAIR Press the C button again the display shows PAIR and a rotating bar Then press and hold the button and turn on the transmitter Battery LED fla...

Page 11: ...veling mode The LCD shows Initialisation and then for one second the model number and Software Rev All LEDs are turned on for 2 seconds At the LCD the last used grade values the mask mode and battery...

Page 12: ...has been activated If a grade value has been dialed in the unit starts the temperature reference check while the thermometer symbols are flashing When the temperature reference check has been finishe...

Page 13: ...will be turned off while the HI alert is still active Press and hold the button at the laser or remote control for 3 seconds to activate the Standby mode The HI MAN LED at the laser flashes red every...

Page 14: ...rol Manual LED will flash red once a second Horizontal setup change the slope using the arrow buttons at the laser or remote control Y axis X axis When set up vertical the buttons adjust the vertical...

Page 15: ...button at the laser or remote control then within 1 second press and release the button To activate the mask mode on the or X axis press the button at the laser or remote control then within 1 second...

Page 16: ...ure as well as using the menu Pressing and releasing the buttons simultaneously starts Line Scan while the rotor checks the limits of the X axis beeps and stops at the center position all laser LEDs a...

Page 17: ...g the arrow button After going to the next menu row an up down arrow at the the right site indicates that the user can scroll up down through the menu using the buttons Pressing and releasing button c...

Page 18: ...simultaneously starts Y axis quick change mode Note An asterisk at the right side indicates which grade value will be changed The speed of the grade value change increases with the amount of time the...

Page 19: ...grade reverse and set the desired digit For quick toggling the cursor between the X only GL422N and Y axis press and release button Press and hold the button for 2 seconds sets the grade value of the...

Page 20: ...s will be shown while the actual rotation speed is marked in brackets Press release button escape return to the standard display Repeatedly pressing buttons toggles between 300 and 600 rpm Default reg...

Page 21: ...tach the HL760 receiver to a grade rod Check the laser beam elevation close to the laser Automatic Grade Match mode The Grade Match mode can be activated in horizontal automatic mode In Grade Match mo...

Page 22: ...slope elevation hub NOTE DO NOT change the receiver position at the rod 5 Press and release button to open the Grade Match submenu then press button to start Grade Match GM Y Exiting of Grade Match ca...

Page 23: ...beam to the on grade position 7 When Grade Match has been completed the HL760 goes back to the standard elevation display while the laser goes back to automatic grade mode The remote control as well a...

Page 24: ...keeping vertical alignments fixed to a direction or slope position PlaneLok can be used on the Z axis only GL422N or X axis 1 Set up the laser at the first elevation point and align it to the second...

Page 25: ...e all displays show a flashing PL The HL760 display shows a flashing PL during the time the laser is searching and adjusting the beam to the on grade position 6 When PlaneLok is complete PL stops flas...

Page 26: ...r 1 attach the HL vertical adapter to the receiver 2 attach the adapter for the receiver to the HL vertical adapter 3 HL vertical adapter receiver combo ready for vertical applications 3 mount the HL...

Page 27: ...Lok X Note When used in vertical mode the receiver has to be placed with the Photocell on the bottom side For getting the best performance and a longer operating range set up the HL760 at least 0 5 m...

Page 28: ...he button the mask symbol occurs For selecting the side press and release one of the arrow buttons When all areas have been set press button to store the mask sector selection The displays indicate wh...

Page 29: ...ference Check considering the current temperature inside the housing While the rotor checks the correct position the rotation will be stopped for a short moment Info Press and release the button and s...

Page 30: ...Line Scan The rotor checks the limits of the X axis and stops at the center position in automatic mode LS is flashing while all laser LEDs are turned off Pressing the button at the laser or RC402N st...

Page 31: ...o open the selected submenu function OR start the selected function The unit falls always back to the standard display when a selected submenu function has been confirmed with the button HI Alert sele...

Page 32: ...d Digit Select Default and Step Go can be selected using the buttons Press and release button to confirm he selected method Grade Display selection Select Grade Display using the buttons then press an...

Page 33: ...ddle Default and High can be selected using the buttons Press and release button to confirm the selected Sensitivity Language selection Select Language using the buttons then press and release button...

Page 34: ...Select Radio Channel using the buttons then press and release button to open the Radio Channel menu The desired Radio Channel 0 to 5 can be selected using the buttons Press and release button to confi...

Page 35: ...etween the transmitter and the HL760 141 Time Out Alignment could not be completed in the allowed time Check radio operating range connection check stable laser setup 150 No receiver HL760 Receiver no...

Reviews: