background image

13

POWER SUPPLY

Installing Batteries

Remove the battery housing cover


by loosening the four screws. Insert

(rechargeable) batteries into the housing so that the negative pole is on the

battery spiral springs

.Install the cover and fix one screw. Tighten the other

screws.

When using standard batteries, be careful not to charge
them. The charger does not differentiate between standard
batteries and rechargeable batteries.  DANGER OF
EXPLOSION.

Operating Time

Rechargeable batteries (NiCd) permit an operating time of appr. 10 hours.

Alkaline batteries (AIMn) permit an operating time of appr. 15 hours.

The following factors reduce the operating time:

• frequent self-leveling due to wind or vibration;
• extreme temperatures;
• old rechargeable batteries, rechargeable batteries with Memory-effect;
• using batteries of different capacities.

Remove batteries only together, never use batteries with different
capacities, only use new (charged) batteries (rechargeable).

Charging rechargeable batteries

The charger requires appr. 14 hours to charge empty rechargeable batteries.
For this charging, connect the plug of the charger to the recharge jack of
the unit. The charging function is indicated by a red display at the charger.
New or long time out of use rechargeable batteries are reaching their best
performance after being charged and recharged five times.

Never charge the unit without rechargeable batteries. The
charging process does not finish automatically. However,
both the charger and batteries are protected against
overcharging.

PROTECTING THE UNIT

Do not expose the unit to extreme temperatures or temperature changes
(do not leave inside the car).

The unit is very rigid and can resist damage if dropped even from tripod
height. Before continuing your work, always check the leveling accuracy.
See 

Accuracy Check 

section.

Indoor and outdoor use.

CLEANING AND MAINTENANCE

Dirt and water on the glass parts of the laser will influence beam quality
and operating range considerably. Clean with cotton swabs.

Remove dirt on the housing with a lint-free, warm, wet and smooth cloth.
Do not use harsh cleansers or solvents. Allow the unit to air dry after cleaning
it.

PROTECTING THE ENVIRONMENT

This manual is made of non-chlorine recycling paper.
All plastic parts are marked for recycling according to material type.

Do not throw used batteries into the garbage, water or fire.
Remove them in compliance with environmental
requirements.

Summary of Contents for 1452GC

Page 1: ...Manual de funcionamiento Gebruiksaanwijzing Operat rshandbok Brugermanual Guia do Usu rio 2002 Trimble Navigation Limited All rights reserved Reorder PN Q102405 Rev A 10 02 www trimble com www trimble...

Page 2: ...Manual de funcionamiento Gebruiksaanwijzing Operat rshandbok Brugermanual Guia do Usu rio 2002 Trimble Navigation Limited All rights reserved Reorder PN Q102405 Rev A 10 02 www trimble com www trimble...

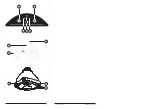
Page 3: ...3 Q102405 Rev A Printed in Germany 4 2 3 1 5 7 8 8 6 9 10...

Page 4: ...3 Q102405 Rev A Printed in Germany 4 2 3 1 5 7 8 8 6 9 10...

Page 5: ...25 1 1993 Niemals in den Laser Strahl blicken oder anderen Personen in dieAugen leuchten Dies gilt auch in gr eren Abst nden vom Ger t Ger t immer so aufstellen da Personen nicht inAugenh he angestrah...

Page 6: ...ten neu ausrichten und wieder einschalten Rotation Nach dem Einschalten des Lasers und dem automatischen Einnivellieren befindet sich das Ger t im Rotationsmodus Der Laser rotiert mit einer Geschwindi...

Page 7: ...d richten sie den Laser in X Achsen Richtung zur nahen Wand A Nach dem Einnivellieren wird die H he mittels Detektor an der Wand angetragen Dann das Ger t um 180 drehen nivellieren und das Niveau an d...

Page 8: ...eeren Akkus Dazu Ladeger testecker in Ladebuchse des Ger tes einstecken Die Ladefunktion wird durch eine rote Anzeigenlampe am Steckerladeger t angezeigt Neue bzw l ngere Zeit nicht gebrauchteAkkus br...

Page 9: ...5 V Babyzellen Typ C LR 14 Betriebstemperatur 20 C 50 C Lagertemperatur 20 C 70 C Stativanschluss 5 8 Masse und Gewicht 248 x 182 x 184 mm 2 1 kg Niederspannungsanzeige Blinken der Betriebsanzeige Ni...

Page 10: ...m the unit The laser is subject to class 2 1mW 600 680 nm Never look into the laser beam or direct it to the eyes of other people Always operate the unit in a way that prevents the beam from getting i...

Page 11: ...set in Rotation mode The unit starts rotating at a speed of 550 1 min Self leveling out of level alert Once turned on the unit automatically levels itself in ranges of 8 0 8 m 10 m In order to recogni...

Page 12: ...A and switch it on with the X axis pointing towards wall A After the unit is level mark the height of the laser plane at wall A Turn the entire unit 180 let it self level and mark the laser plane at...

Page 13: ...he recharge jack of the unit The charging function is indicated by a red display at the charger New or long time out of use rechargeable batteries are reaching their best performance after being charg...

Page 14: ...y cells type C LR14 Operating temp 4 F 122 F 20 C 50 C Storage temp 4 F 158 F 20 C 70 C Tripod attachments 5 8 Measurements Weight 248 x 182 x 184 mm 2 1 kg Low voltage indication blinking of the powe...

Page 15: ...vitr es appareil prisme veiller ne pas placer l appareil proximit de surfaces refl chissantes A propos du manuel Ce manuel d utilisation a t r alis avec la plus grande attention La soci t n est en auc...

Page 16: ...sa position et rallumer Mode Rotation En appuyant sur la touche 1 et apr s le nivellement automatique le mode rotation est d clench D s que la fonction est enclench e l appareil se met tourner 550 1 m...

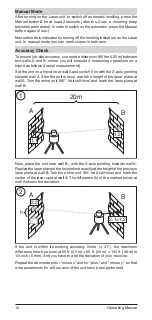
Page 17: ...teur du faisceau sur le mur A Tourner ensuite l appareil de 180 et noter la hauteur du faisceau sur le mur B plus loign quand le laser est ajust A B 20m 1 1 1 1 2 Placer d sormais l appareil pr s du m...

Page 18: ...ou non utilis s depuis longtemps cinq cycles de d charge recharge sont n cessaires afin de retrouver la puissance maximale Ne jamais recharger l appareil sans ses accus Le processus de charge ne s ar...

Page 19: ...au 1 ca 5 mm au point de sortie du rayon Alimentation lectrique 4 x 1 5 V piles rondes C LR14 Temp rature d utilisation 20 C 50 C Temp rature de stockage 20 C 70 C Vis de raccord tr pied 5 8 Dimension...

Page 20: ...izionare l apparecchio nel centro dell area di lavoro Controllare periodicamente la precisione dello strumento Per un esercizio sicuro posizionare lo strumento su un supporto stabile Mantenere le supe...

Page 21: ...rcizio con Modo rotazione Il laser viene inserito sulla velocit di rotazione di 550 1 min Autolivellamento e dispositivo di sicurezza Dopo l inserimento l apparecchio compensa in maniera automatica le...

Page 22: ...ivellamento verr registrata l altezza sulla parete Adesso ruotare l apparecchio di 180 quindi eseguire il livellamento e marcare il raggio sulla parete lontana B Adesso invece posizionare l apparecchi...

Page 23: ...tore necessita di circa 14 ore per ricaricare gli accumulatori scarichi Per questo scopo inserire la spina dell alimentatore della presa dell apparecchio per la ricarica La funzione di ricarica viene...

Page 24: ...classe 2 Campo autolivellamento appr 8 appr 4 8 Tempo livellamento appr 30 sec Indicazione livellamento 2 LED lampeggio laser Diametro raggio 1 ca 5 mm nell apparecchio Alimentazione di corrente 4 x...

Page 25: ...jam s en el rayo l ser ni iluminar los ojos de terceras personas Ello tambi n es v lido para personas que se encuentren situadas a gran distancia del aparato Colocar el aparato siempre de tal manera...

Page 26: ...earse y volver a conectarse Modo de rotaci n Despu s de conectar el l ser y de nivelarlo autom ticamente el aparato ya se encuentra en el modo de rotaci n El l ser se inicia con la velocidad de 550 1...

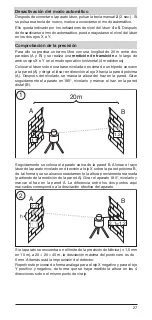
Page 27: ...se marca la altura del haz en la pared Girar seguidamente el aparato en 180 nivelarlo y marcar el haz en la pared distal B Seguidamente se coloca el aparato cerca de la pared B Alinear el rayo l ser...

Page 28: ...aparato cuando se est cargando se ilumina una luz roja indicadora en el enchufe del cargador Los acumuladores nuevos o no utilizados durante largo tiempo s lo alcanzan la potencia m xima al cabo de c...

Page 29: ...emperatura de servicio 20 C 50 C Temperatura de almacenamiento 20 C 70 C Conexiones del tr pode 5 8 Peso 248 x 182 x 184 mm ca 2 1 kg Indicador de baja tensi n Parpadea el indicador de servicio Descon...

Page 30: ...nm IEC 825 1 1993 Nooit direct in de laserstraal kijken of met de laserstraal in de ogen van iemand anders stralen ongeacht de afstand tussen de persoon en het toestel Het toestel altijd hoger of lage...

Page 31: ...elen opnieuw afstellen en opnieuw inschakelen Rotatiemode Na het inschakelen van de laser en het automatisch waterpassen bevindt het toestel zich in de rotatiemode De laser start met 550 1 min Automat...

Page 32: ...g van de x as naar de dichtste muur A Na het waterpassen wordt de hoogte op de muur aangebracht Dan het toestel 180 draaien waterpassen en het straal op de verste muur B markeren Nu plaatst u het toes...

Page 33: ...wordt door een rode weergavelamp aan het stekkerlaadtoestel weergegeven Nieuwe of lange tijd niet gebruikte accu s zorgen pas na vijf laad en ontlaadbeurten voor een maximaal vermogen Nooit laden zon...

Page 34: ...rt Straaldiameter1 ca 5 mm aan het toestel Stroomvoorziening 4 x 1 5 V babycellen type C LR 14 Gebruikstemperatuur 20 C 50 C Opslagtemperatuur 20 C 70 C Statiefaansluitingen 5 8 Gewicht 248 x 182 x 18...

Page 35: ...lomr det beaktas och s kras ven p st rre avst nd Rikta aldrig blicken mot str len och lys aldrig andra personer i gonen Detta g ller ven p st rre avst nd fr n apparaten St ll alltid upp apparaten s a...

Page 36: ...erkommande Fr nkoppla d apparaten inrikta in p nytt och inkoppla apparaten igen Rotationsmod Efter inkopplingen av lasern och den automatisk avv gningen befinner sig apparaten i rotationsmod Lasern st...

Page 37: ...a v ggen A Efter avv gningen m rks h jden in p v ggen Vrid sedan apparaten 180 avv g och markera str len p den bortre v ggen B Placera nu apparaten i n rheten av v gg B Rikta den avv gda apparatens la...

Page 38: ...f r att ladda tomma ackumulatorer Stick h rf r i laddarens kontakt i apparatens laddningsuttag Laddningsfunktionen visas genom en r d signallampa p laddaren Nya resp ackumulatorer som inte anv nts en...

Page 39: ...rjning 4x1 5VmellantjockarundabatteriertypC LR14 Driftstemperatur 20 C 50 C Lagertempeatur 20 C 70 C Stativanslutningar 5 8 Vikt 248 x 182 x 184 mm ca 2 1 kg L gsp nningssignallampa Funktionslampan b...

Page 40: ...Laseren er underlagt klasse 2 maks 1 mW 600 680 nm IEC 825 1 1993 Se aldrig ind i laserstr len og ret den aldrig direkte i jnene af andre personer Dette g lder ogs ved st rre afstande fra apparatet Op...

Page 41: ...h ldningsvinkel p mere end 8 selvnivelleringsniveau blinker laserstr len og nivelleringslamperne vedvarende 4 gange hurtigt efter hinanden Apparat skal slukkes justeres igen og t ndes Rotationsmode E...

Page 42: ...etning mod den n rmeste v g A Efter nivelleringen markeres h jden p v ggen Derefter drejes apparatet 180 nivelleres og str len markeres p den anden v g B Nu placeres apparatet i n rheden af v g B Det...

Page 43: ...ionen signaliserer gennem en r d kontrollampe p ladeaggregatet Akkumulatorer der er nye eller ikke er blevet brugt i et l ngere tidsrum opn r f rst deres komplette kapacitet efter fem lade og afladecy...

Page 44: ...syning 4 x 1 5 V babybatterier type C LR 14 Driftstemperatur 20 C 50 C Opbevaringstemperatur 20 C 70 C Stativtilslutninger 5 8 M l og v gt 248 x 182 x 184 mm ca 2 1 kg Lavsp ndingsindikering Driftslam...

Page 45: ...classe 2 m x 1mW 600 680 nm IEC 825 1 1993 Nunca olhe para o raio laser nem nunca o volte para os olhos de outrem Aplica se tamb m mesmo estando longe do aparelho Coloque o aparelho sempre de modo a q...

Page 46: ...ela o acendem se e apagam se rapidamente 4 vezes consecutivas Neste caso desligar o aparelho endireit lo e lig lo novamente Modo de rota o Depois de se ligar o laser e de se concluir a nivela o autom...

Page 47: ...fectuar a nivela o marca se a altura na parede A seguir gire o aparelho a 180 nivele e marque o raio na parede distante B Agora coloque o aparelho perto da parede B Dirija o raio laser do aparelho niv...

Page 48: ...a o de carregamento na tomada do aparelho Afun o de carregamento indicada por uma luz vermelha na esta o de carregamento Os acumuladores novos ou que n o tenham sido usados durante muito tempo s desen...

Page 49: ...Temperatura de funcionamento 20 C 50 C Temperatura de armazenagem 20 C 70 C Conex es para o trip 5 8 Dimens es e peso 248 x 182 x 184 mm ca 2 1 kg Indicador de baixa tens o luz de actividade intermit...

Page 50: ...3 Q102405 Rev A Printed in Germany 4 2 3 1 5 7 8 8 6 9 10...

Page 51: ...Manual de funcionamiento Gebruiksaanwijzing Operat rshandbok Brugermanual Guia do Usu rio 2002 Trimble Navigation Limited All rights reserved Reorder PN Q102405 Rev A 10 02 www trimble com www trimble...

Reviews: