


24
Operation and settings
3. Click the left mouse button on the screen to set the
detection area.
- Intrusion: When the perceived object moves into the
event area, the Intrusion Event is activated.
- Object Removal: When the object disappears from the
setting area, the Object Removal Event is activated.
- Object Desertion: When the object is placed in the
setting area, the Object Desertion Event is activated.
- Crossing Line: When the perceived object goes through
the setting lines, the Crossing Line Event is activated.
- Object Counting: When the perceived object goes
through the setting line, the Object Counting Event is
activated.
4. Click the [Save] button to confirm the settings.
Note:
•
You can select a max of 3 algorithms.
•
To finish the area setting, click right mouse button. In case of
octagon, it is finished after clicking the last point.
•
While set an area, if you click the right mouse button over a
point, the point is canceled.
•
In case of [Intrusion], [Object Removal], [Object Desertion]
algorithms can set the detect area and [Crossing Line],
[Object Counting] algorithms can set the direction of
detection.
•
When detection occurs, the text is displayed at the right of
detection configuration. (“Detected” or “Not Detected”)
•
When the area setting and activating of [Object Removal]
and [Object Desertion] are finished, detection will start in
10 seconds to set the initial background.
•
[Object Removal] and [Object Desertion] are activated
when the detected object is being in same condition
for 10 seconds.
•
[Object Removal] and [Object Desertion] need up to
5 minutes to recognize the object as the background.
•
Depending on your installation environment, detection error
can occur or performance degradation of image analysis.
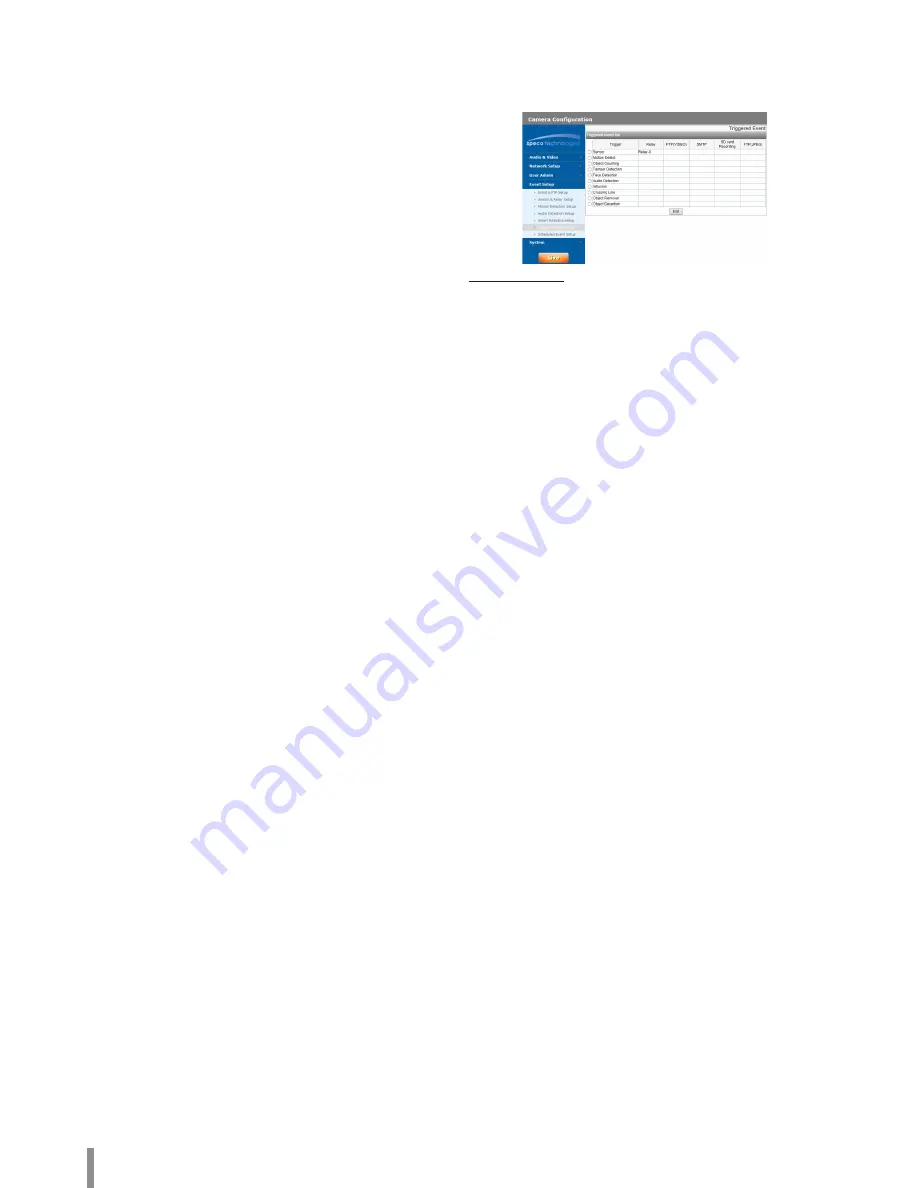
Triggered Event
When an event (Anaytics/ Motion detect/ Sensor Event/Audio
detect) occurs, this unit records the live images and routes as
configured.
Event schedule list
> To edit the Event Schedule
1. Select the Trigger event and click the [Edit] button. Event
schedule window is displayed.
2. Set the options.
•
Trigger: Display the selected trigger event and the
current state of trigger. Current state of trigger is
Displayed to On or Off.
•
Time: Sets the weekday, Start, Finish, Pre alarm, Post
alarm and Ignore interval time options.
•
Action: Selects the options. This occurs when the
event runs.
- FTP(Video) server/SMTP server: Uploading of
images to an FTP server, or e-mail notification.
- Control relay: The relay is activated or
deactivated.
- SD Card recording: Record on the SD card when
the event runs.
- FTP server(JPEG): Sends the JPEG Image to
the FTP server. Image file and suffix setting is
available. You can select Date/Time or Sequence
of Suffix.
•
Stream: Selects the stream of the connected camera.
3. Click the [Save] button to confirm the settings.
Note:
•
You should register the SMTP and FTP server on the
Event server setting to set this function.
•
Recording of event(Analytics/ Motion detect/ Sensor
Event/Audio detect) runs every 5 minutes split file.
•
Used stream is profile1(1st) in case of FTP(JPEG)
transmission.
•
When the [External] mode in [Day/Night] menu is used,
the [Sensor] is deactivated.
Summary of Contents for O2B16
Page 30: ......


