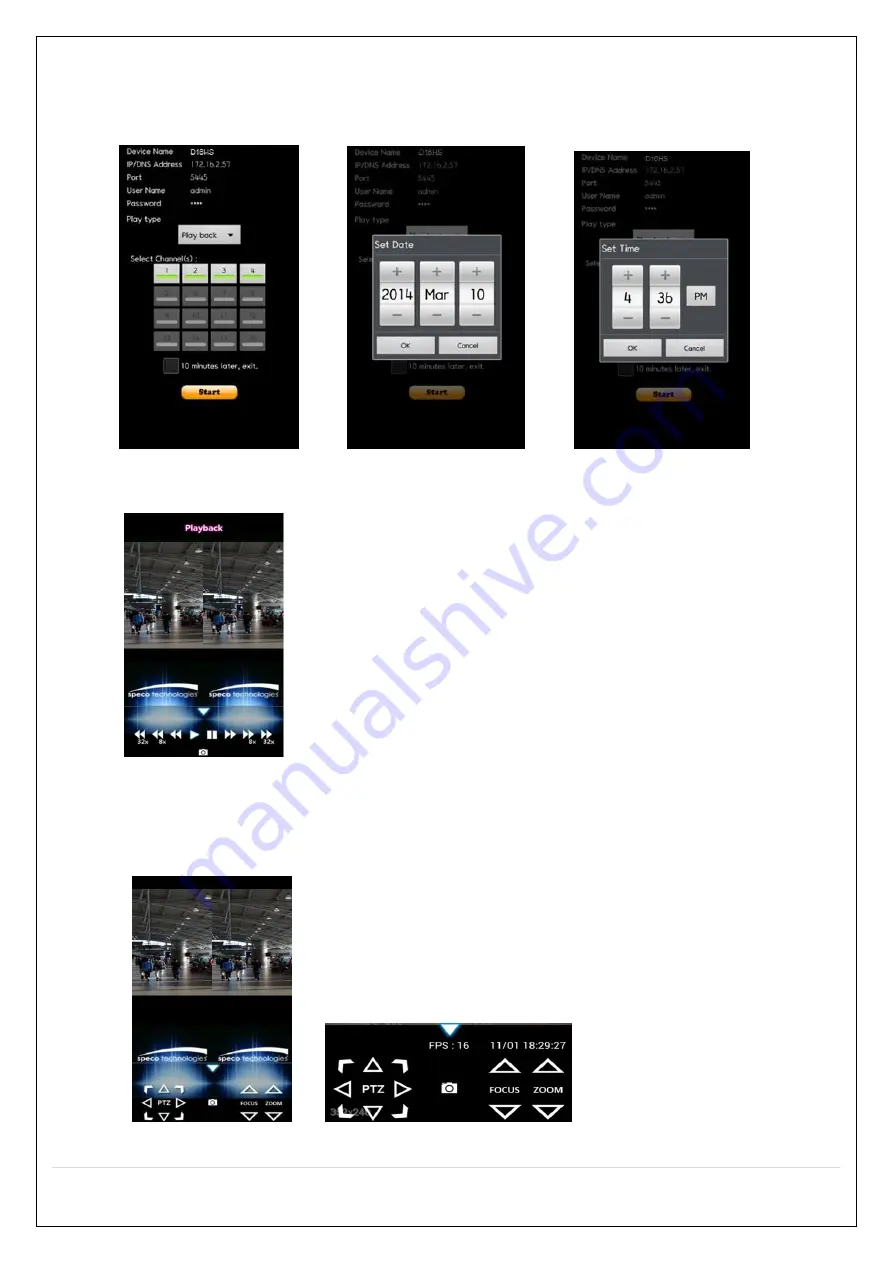
Speco D16HS User Manual Download Page 102

102 

9-2-2. Playback 

1.


Select the registered device and select  PLAYBACK and select  up to  4  channels to  search.  Then  click  START 

button. As soon as setting the date and time to search, the app will start the playback.   


2.


The app will display the selected channel(s). Double tap the channel screen to switch 1 channel display to 4 

channels split display.   


9-2-3.PTZ  Control 

To control the PTZ function of the camera, tap the channel screen, then the channel name will be highlighted 

in Yellow. Using the PTZ menu icons on the screen, control PTZF. 


Summary of Contents for D16HS

Page 1: ...er s Guide Ver 1 0 Models D8HS D16HS 8 16 Channel IP Analog 960H Hybrid DVR About This User s Guide Before operating the unit please read this user s guide thoroughly and retain it for future referenc...

Page 2: ...or explosion Replace only with the same or equivalent type battery recommended by the manufacture Discard used batteries according to manufacturer s instructions This symbol indicates the presence of...

Page 3: ...he air vents Do not restrict airflow of the unit doing so can damage the unit Only qualified and experienced personnel should perform installation and servicing Turn off the power of the HS when conne...

Page 4: ...components are included as specified below DVR Unit Desktop D8HS D16HS Remote Control Battery 1 5V AAA x2 Quick Setup Guide Quick User Guide USB Mouse Software Manual CD Rack mount x 2 Screw x 6 Adapt...

Page 5: ...ssion H 264 H 264 IP Resolution Frame Rate 1920x1080 240 200fps 480 400fps Local Resolution Frame Rate 960H 240 200fps 480 400fps D1 240 200fps 480 400fps CIF 240 200fps 480 400fps Recording Quality G...

Page 6: ...Yes Internal Beep Yes Yes Multi Language Yes Yes e mail Notification Yes Yes Network Access Mobile viewer Speco Player Live Search PTZ 2 Way Audio Speco Player Live Search PTZ 2 Way Audio PC Web Viewe...

Page 7: ...enu 27 4 1 3 SCAN Menu 29 4 2 Setup SYSTEM 29 4 3 Setup RECORD Mode 34 4 4 Setup DEVICE Mode 36 4 4 1 Digital Deterrent 37 4 4 2 Keyboard Controller PTZ Setup 39 4 4 3 Spot Out 40 4 4 4 Motion Zone Se...

Page 8: ...ack of Backup Video 65 6 5 1 AVI Format 65 6 5 2 NSF Format 66 7 Network Access Using the Multi Sites Network Viewer 67 7 1 Overview 67 7 2 PC Requirements 67 7 3 Installation of the Program 68 7 4 Li...

Page 9: ...al Playback and Remote Playback 91 7 8 6 AVI Backup during Playback 93 8 Network Access Using the Web Browser Viewer 96 9 Network Access Using the Smart Phone Viewer 98 9 1 App Viewer for iPhone 98 9...

Page 10: ...recording priority motion detection alarms and scheduling Simple and Easy Graphic User Interface Simple Schedule Recording HDMI Output VGA Output LOOP Out Password to secure installation authorizatio...

Page 11: ...ocess 2 1 Initial Boot up and Basic Time Setup 1 During the first boot up the following logo will be displayed 2 After the logo select the language and set date and time as specified below EZ Setup Pa...

Page 12: ...To enable Daylight Saving feature NTP synchronization take the following steps 1 Enter the SETUP mode The default Username is ADMIN and Password is 1111 2 Go to SETUP SYSTEM DATE TIME SETUP 3 Select O...

Page 13: ...me AL Alabama GMT 6 GMT 5 AK Alaska GMT 9 GMT 8 AK Alaska Aleutian Islands GMT 10 NA AZ Arizona GMT 7 NA AZ Arizona Navajo GMT 7 GMT 6 AR Arkansas GMT 6 GMT 5 CA California GMT 8 GMT 7 CO Colorado GMT...

Page 14: ...GMT 5 MN Minnesota GMT 6 GMT 5 MS Mississippi GMT 6 GMT 5 MO Missouri GMT 6 GMT 5 MT Montana GMT 7 GMT 6 NE Nebraska GMT 6 GMT 5 NE Nebraska W GMT 7 GMT 6 NV Nevada GMT 8 GMT 7 NH New Hampshire GMT 5...

Page 15: ...tah GMT 7 GMT 6 VT Vermont GMT 5 GMT 4 VA Virginia GMT 5 GMT 4 WA Washington GMT 8 GMT 7 WV West Virginia GMT 5 GMT 4 WI Wisconsin GMT 6 GMT 5 WY Wyoming GMT 7 GMT 6 NOTE If you want the unit to autom...

Page 16: ...ra for Date Time and Camera Setup Click NEXT to proceed Configure individual cameras in the EZ Camera Setup Select the Channel to configure Select the Camera Protocol and then click on the scan button...

Page 17: ...onfiguration STATIC and then click TEST Button It will automatically setup the network for the system Setup DDNS setting DDNS Dynamic Domain Name System allows a DNS name to be constantly synchronized...

Page 18: ...O if the HS is not using an internet connection Select Auto Configuration DHCP or Manual Configuration STATIC and then click TEST button when ready Input the Network Settings if Manual Configuration S...

Page 19: ...NEXT to proceed Description of EZ Record Setup is displayed Click NEXT to proceed Set up the Date Time settings and click NEXT to get to the record setup Select Recording mode setup for Continuous Mo...

Page 20: ...pages to launch from the IP Camera Setup menu when accessed from the WAN Ports 59011 to 59254 on the router must be port forwarded to the HS The local address of the HS can be found in the system inf...

Page 21: ...button MENU Goes into the Setup window COPY Takes a Screenshot on Live View and Goes into Backup during Playback ALARM Activates the external alarm device SEQ Enables the sequence mode on Live ESC Exi...

Page 22: ...TA External SATA port for extension storage AUDIO IN Audio inputs connections for channels 5 8 or 5 16 through external cable USB USB terminal for video export or firmware upgrade IP CAM Network Secon...

Page 23: ...PLAY PAUSE To play or to pause the recording in playback mode REW To rewind the recording ESC During setup To retun to the preivous menu screen During Playback To exit playback mode System lock To loc...

Page 24: ...se and select setup from the submenu or press the setup button on the remote control Table 4 1 1 Live Screen and Quick Operation Window When the DVR prompts the LOG IN window enter the PASSWORD using...

Page 25: ...t DISPLAY icon and press SEL button to enter the setup menu item Figure 4 1 1 IP Camera mode setup screen Table 4 1 1 Menu items in IP CAMERA mode setup Item Description CHANNEL To manually connect ea...

Page 26: ...ick the empty box and then Log In box will be pop up Enter ID and PASSWORD of IP Camera PROTOCOL Select the protocol for the IP Camera SCAN Searches the network for IP Cameras using the specified prot...

Page 27: ...d IP cameras using ONVIF protocol require ID Password and Profile to be correctly entered for proper operation SPECO protocols only require ID and Password to be correctly entered for proper operation...

Page 28: ...28 NETWORK View and change Network settings SYSTEM System information and change your password factory reset and the camera is rebooting...

Page 29: ...era on the list and then click the register button After the registration is completed the basic information is to be displayed 4 2 Setup SYSTEM In the SETUP menu select the SYSTEM tab Then the SYSTEM...

Page 30: ...DAYLIGHT SAVING using the mouse or the remote control and select the appropriate daylight saving time zone The available options are OFF Daylight saving is turned off USA Applies the USA daylight savi...

Page 31: ...izes time only once NTP will not synchronize unless the Connection Mode is changed sends E MAIL Notification when the NTP server time is faster than the system time with bellow message NTP server time...

Page 32: ...t TEST E mail settings sent a test mail to the registered account UNIT NAME Name the DVR e g Factory Library Store Location etc This is to used to identify the name of each DVR under the same network...

Page 33: ...ion VIDEO LOSS Enable Email Beep and Alarm output Notification when the camera signal is lost HDD TEMPERATURE Enable Email Beep and Alarm output Notification when the HDD temperature HDD BAD SECTORS E...

Page 34: ...m Description SITE Select a channel for applying the following settings using the mouse or the remote control To change the values of all channels take the following steps Select the button to change...

Page 35: ...hannel 10 60 seconds AUDIO Enable disable audio recording for the specified channel SCHEDULE To setup a recording schedule select SCHEDULE in the RECORD menu Navigate through the menu items or change...

Page 36: ...r infinite DIGITAL DETERRENT Setup schedule and audio recordings for Digital Deterrent CONTROLLER PTZ Set the PTZ baud rate protocol and ID SPOT OUT Display the channels triggered by an event Refer to...

Page 37: ...dard function ON Non Standard OFF Default 4 4 1 Digital Deterrent Trigger audio message via motion detection or sensor Figure 4 4 1 Digital Deterrent setup screen Table 4 4 1 Item for Digital Deterren...

Page 38: ...38 SCHEDULE Schedule the sound file considering the expected situation...

Page 39: ...e 4 4 2 2 PTZ Control Setup Screen Note Connect PTZ cameras that support RS 485 directly to the RS 485 port If the camera is controlled through an RS 232C interface use an RS 232C to RS 485 to RS 232C...

Page 40: ...SPOT EVENT DWELL TIME Set the dwell time for the display of the event activated channel 3 10sec SEQUENCE Enable disable sequential display of spot channel in full screen If select ON the selected cha...

Page 41: ...ON SENSITIVITY FULL ZONE The motion sensor is active on the whole screen PARTIAL ZONE The motion sensor is active in the set detection frame Select the motion detection position using the mouse or the...

Page 42: ...mouse or the remote control To return to the previous setup menu screen press the ESC button Figure 4 5 DISPLAY Setup Screen Table 4 5 Menu Items in DISPLAY Setup Screen Item Description OSD Enable di...

Page 43: ...using the mouse The name can be made up to 36 characters COVERT Enable disable display of the specified video channel in live display COLOR TUNING Brightness Change the brightness value 0 100 Contras...

Page 44: ...e Enable disable using domain name address through DDNS server NETWORK PORT Enter the port number Default 5445 NETWORK AUDIO PORT Display the network audio port NETWORK PORT 1 WEB PORT Enter the port...

Page 45: ...ss will be http D16HS ddns specoddns net Select NETWORK DDNS The menu displays as below Figure 4 6 3 NETWORK Setup Screen DDNS Table 4 6 2 DDNS Item Description ENABLE DDNS Turn DDNS on off HOST NAME...

Page 46: ...IO PORT The default port number is NETWORK PORT number 1 o For web viewer downloading and remote firmware upgrading Open the port number on NETWORK WEB PORT menu The default port number is 80 4 6 4 Ne...

Page 47: ...nly the Admin will have access to the menu PASSWORD CHECK Select the Checkbox to enable the functions or leave the Checkbox blank to disable the functions SETUP Enable Disable of access to Setup PB En...

Page 48: ...and select OK Then the message PASSWORD CHANGED is displayed The factory default password is 1111 It is highly recommended to assign a new password to protect the system AUTHORITY OF PLAYBACK Set aut...

Page 49: ...will have an option of YES or NO for formatting the Hard Drive After formatting HDD the DVR will reboot Caution It is recommended to archive any data that you may need in the future before formatting...

Page 50: ...oad the configuration of the DVR to another DVR using the USB Flash drive Plug in the USB flash drive on the front panel and press the button to start the loading process LOAD DEFAULT Press the button...

Page 51: ...S_speco_ _201 bin For D8HS Models Folder name d8hs File name main_D8HS_speco_ _201 bin 3 Plug in the USB flash drive on the rear panel 4 Navigate to CONFIG menu of SETUP 5 Select SOFTWARE UPGRADE 6 Fo...

Page 52: ...Viewing Screen Icon Description Indicates the DVR is locked Note to unlock right click on the live view screen and click on Unlock Indicates audio is muted on all channels Indicates that alarm is set...

Page 53: ...alarm recording in progress Sensor recording in progress Right click the mouse and the quick operation window will be displayed as below Figure 5 1 2 Quick Operation Window Table 5 1 2 Menu Items in...

Page 54: ...n to mute audio on all channels CAMERA PTZ Pop up the PTZ user interface ENABLE MAIN MONITOR SEQUENCE Sequence button Click this button to use a sequence function DISABLE ALARM OUT Click this button t...

Page 55: ...o return to the previous menu Press the PTZ button to close the OSD menu AUTOSCAN Press the right key to start auto scan Press the left key to stop auto scan PRESET Select PRESET then press the left k...

Page 56: ...the mouse and drag to make rectangular shape 5 3 SEARCH Screen To enter the search screen menu select SEARCH menu on the screen using the mouse or press SEARCH icon on live screen Figure 5 3 Search S...

Page 57: ...inute Thumbnail Screen Figure 5 3 1 5 Play Mode Screen 1 When the EZSearch menu is selected the user can see a calendar which displays recorded dates with highlights Select a specific date on a calend...

Page 58: ...above red box Press the PLAY button after selecting the specific time Press the PREV to return to the SEARCH window 5 3 3 Event Search The Event Search window is used to find stored video Figure 5 3 3...

Page 59: ...ific instance by setting the date and time in the GO TO SPECIFIC TIME menu Use the mouse or the remote control to change the date and time value and press the PLAY button after setting If there is no...

Page 60: ...the log data will be displayed Press the SAVE button to save the data and then the data is saved as a text file format 5 4 Play Mode During playback of a recorded event the mode changes from SEARCH t...

Page 61: ...x 16x at 9 split screen 2x 4x 8x at 16 split screen Single Channel forward playback speed 1x 2x 4x 8x 16x 32x 64x Slow Mode play Forward playback speed x1 4 x1 2 Press to backup the video EZCopy butto...

Page 62: ...ved onto the USB flash drive or a hard drive while playing back the recorded video In playback mode press the BACKUP button to launch the backup function 1 When you press BACKUP button on the selected...

Page 63: ...mage to complete the backup Select lose to return to the previous screen 6 3 EZCopy Video Backup onto USB Flash Drive during playback Using EZCopy feature Video can be easily archived onto the USB fla...

Page 64: ...and press EZCOPY button Then EZCOPY STOP time will display 4 EZCOPY window will display The DVR will ask whether to archive a Still Image a NSF or AVI 5 After backup format is selected also select med...

Page 65: ...e control to scroll through the archive list 4 Select a list of stored events in the archive list 5 Once the desired event has been selected press the DISPLAY button to view the still image or the fir...

Page 66: ...Timestamp On AVI The subtitle is embedded to the video clip file The subtitle is embedded to the AVI file 6 5 2 NSF Format NSF format NSF format video can be played back using the HDplayer that the DV...

Page 67: ...7 2 PC Requirements Minimum PC Requirements Recommended PC Requirements Before installing the program check the PC specifications The DVR remote software may not perform correctly if the PC does not...

Page 68: ...d double click SpecoTech Multi Client XXXX exe 2 Select a destination folder and click Next 3 Select the program folder and click Next 4 The installation status screen is displayed 5 After the install...

Page 69: ...Click this icon to run a playback window to search and play videos that are recorded in the remote DVR SITE MANAGEMENT THUMBNAIL REFRESH Click this icon to refresh and renew thumbnail image of the con...

Page 70: ...ff alarm outputs RECORD ON Enable or disable recording of live video to local disk which has set in setup menu AUDIO Use the volume control bar to set the audio level MIC Use the microphone volume con...

Page 71: ...is icon to run a playback window to search and play videos that are recorded in the remote DVR THUMBNAIL REFRESH Click this icon to refresh and renew thumbnail image of the connected sites SITE ADDITI...

Page 72: ...on main display screen To select the numbers of display channel channels Single quad 9 channels and 16 channels of highlighted site To select the channel to playback The calendar shows dates with reco...

Page 73: ...functions you need to enter the password You can also set the save path for capturing and backup Save Path Specify the location to save captured still image for Capture and Backup data Miscellaneous...

Page 74: ...74 7 6 2 Event Event log can be archived and searched Event Log Specify the location to save event logs and select event to archive Event Search Event log can be searched from the selected time...

Page 75: ...annels When you set the recording condition to event you can set event for motion or alarm with duration Record Local Storage Setup You can select the local disk to record and the amount of disk space...

Page 76: ...76 7 6 4 Display You can select the OSD On Screen Display to be displayed 7 6 5 Language English French and Spanish is selectable...

Page 77: ...d right click on the mouse to open the submenu Then the following window is displayed as below Select the REMOTE SETUP Then the setup window is displayed The specified menu screen is displayed on the...

Page 78: ...ct the Channel to setup an IP Camera o Protocol Select the Brand of the IP Camera o IP Enter the IP Address of the desired Camera o Port Enter the Camera stream Port Number default 554 o Web Port Ente...

Page 79: ...pplied to the system And the system will reboot When the user make the time back to the past it does not show TIME MISMATCH message unlike the local system The data on the duplicated period time will...

Page 80: ...the system SYSTEM EVENT NOTIFICATION Allows the user to set EVENT NOFICIATION ON or OFF o HEALTH CHECK Allows the user to set MAIL STATUS periodically DAILY or WEELY or MONTHLY o HDD TEMPERATURE o HDD...

Page 81: ...HEDULE MOTION SENSOR o PRE RECORD Sets whether to perform or not pre recording o POSE EVENT RECORD Sets the duration of the event recording o AUDIO Sets whether to perform or not audio recording o SEC...

Page 82: ...the PTZ baud rate protocol and ID SPOT OUT o SPOT ON EVENT Enable disable channel change if an event occurs on a channel o SEQUENCE Enable disable sequential display of spot channel in full screen o S...

Page 83: ...as well as channel number on the screen OSD CONTRAST Adjust the character contrast on the screen MAIN MONITOR SEQUENCE Setting for automatically switching the displayed video SEQUENCE DWELL TIME Sets...

Page 84: ...submit the settings o ezDDNS Enable ezDDNS to register the host name automatically NETWORK PORT When connecting multiple DVRs to the network set a unique port number NETWORK AUDIO PORT Display the ne...

Page 85: ...n accessed USER NAME SETUP Select which Username to change o NEW USER NAME Input the new username PASSWORD SETUP Select Username to change Password A CHANGE Select whether to KEEP or CHANGE the curren...

Page 86: ...overwriting when the hard disk becomes full DISK INFO Hard drive information RECORD LIMIT Sets whether to limit or not the recording data storage period 7 7 9 Remote Upgrade Shows the current Firmware...

Page 87: ...ss Public IP address of a router that DVR is connected or Domain name o Port Number Default Port Number is 5445 o ID Input ID of DVR Default ID is admin o Password Input network password of DVR Defaul...

Page 88: ...es 1 Select the site sites to modify from the directory window 2 Click NET FINDER button And then the following window will be displayed as below 3 Click MODIFY button And then the modified informatio...

Page 89: ...onnected 7 8 2 2 Disconnect 1 Select site sites to disconnect from the directory window 2 Click DISCONNECT button and then selected site sites disconnected 7 8 3 Still image Capture During Live 1 Doub...

Page 90: ...l PC During Live 1 Click SETUP button And then a setup window will be displayed as below 2 Select Record and set the values 3 Select Disk and set the values 4 Click RECORD ON button And the color of b...

Page 91: ...K And then Playback Window will be displayed over the Live Window 2 Select site sites to connect from the directory window 3 Click CONNECT button And then Green bar displays on Search calendar and tim...

Page 92: ...e the mouse scroll to digitally zoom in and out from a single channel display 7 8 5 2 Playback of Recorded Video on Remote DVR 1 Click REMOTE PLAYBACK And then Playback Window will be displayed over t...

Page 93: ...here there is video data and press the PLAY button 5 Video data that is recorded on the remote DVR is play backed 7 8 6 AVI Backup during Playback You can back up the recorded videos in AVI format dur...

Page 94: ...t the ending point of the backup Then the selected starting point and the ending point on the timeline scale bar will be marked in green 5 Click BACKUP And then the BACKUP window will be displayed as...

Page 95: ...95 7 AVI video data is recorded as set in AVI Backup window AVI format video can be played back by using Window Media Player or other media player that is compatible with AVI format video...

Page 96: ...Internet Explorer 1 Check the IP address of the DVR from SETUP SYSTEM DESCRIPTION IP ADDRESS or 2 Input the IP address or Domain name address that you pre registered 3 Click this bar Then the dialog b...

Page 97: ...ut IP address Public IP address of a router that DVR is connected or Domain name Port Number Default Port Number is 5445 ID Input ID of DVR Default ID is admin Password Input network password of DVR D...

Page 98: ...k Port number default 5445 ID default admin and Password default 1111 Then click Save button Note Network Port and Web Port must be forwarded before adding a new site 3 Select a registered device and...

Page 99: ...he channel location To swap the channel drag a channel to another channel 7 Digital Zoom In Out Double tap on the desired channel to view in 1channel mode Then use the iPhone zoom feature using two fi...

Page 100: ...on Then select Date Time and click PLAY button 2 The app will display the selected channel s Double tap the channel screen to switch 1 channel display to 4 8 10 16 channels split display depending on...

Page 101: ...button of the phone to add a remote device 2 Select the registered device and select LIVE VIEW and select up to 4 channels to monitor Then click START button 3 The app will display the selected chann...

Page 102: ...ime to search the app will start the playback 2 The app will display the selected channel s Double tap the channel screen to switch 1 channel display to 4 channels split display 9 2 3 PTZ Control To c...

Page 103: ...APPENDIX Network Connection LAN 1 Install the network client software from the supplied CD 2 Check the IP address from SETUP SYSTEM DESCRIPTION or SETUP NETWORK of DVR 3 Run the network client softwa...

Page 104: ...Name Input a name that properly describes a site IP Address Input IP address Port Number Default Port Number is 5445 ID Input ID of DVR Default ID is admin Password Input network password of DVR Defa...

Page 105: ...amic IP address A current dynamic IP address is being associated with a static domain name 1 Go to SETUP NETWORK DDNS and set the DDNS SERVER to ON 2 Go to SETUP NETWORK DDNS HOST NAME Manually enter...

Page 106: ...SETUP menu DDNS NOTIFIY window will pop up 6 DDNS registration status can be checked from SYSTEM INFORMATION or SETUP SYSTEM DESCRIPTION DDNS STATUS 7 Check the NETWORK PORT Default 5445 WEB PORT Defa...

Page 107: ...n Then press button after checking the left check box APPENDIX E SATA CONNECTION Please read the following instructions before using the E SATA port Failure to do so may cause serious damage to the re...

Reviews: