5
No
Part
Description/Function
B1
HDMI port
HDMI OUT
Connect a TV or display.
B2
Power indicator
Lights up when the HDMI receiver is powered on.
B3
Transmitter connection port
Connect the HDMI transmitter.
B4
Data signal indicator
When connected to the HDMI transmitter:
Solid on: Indicates an HDMI signal with HDCP
Blinking: Indicates an HDMI signal without HDCP
B5
Port
SERVICE
No function
B6
Infrared controller connector
IR IN
Connect the IR receiver cable for IR control.
B7
Power supply socket
Connect the power adaptor if it is not connected to the
HDMI transmitter.
6.3 IR Cables
C1
C2
C3
C4
C5
C6
Blaster
Receiver
No
Description
No
Description
C1
IR Blaster signal
C4
IR Signal
C2
Power
C5
Power
C3
NC
C6
Grounding
7 Setting up
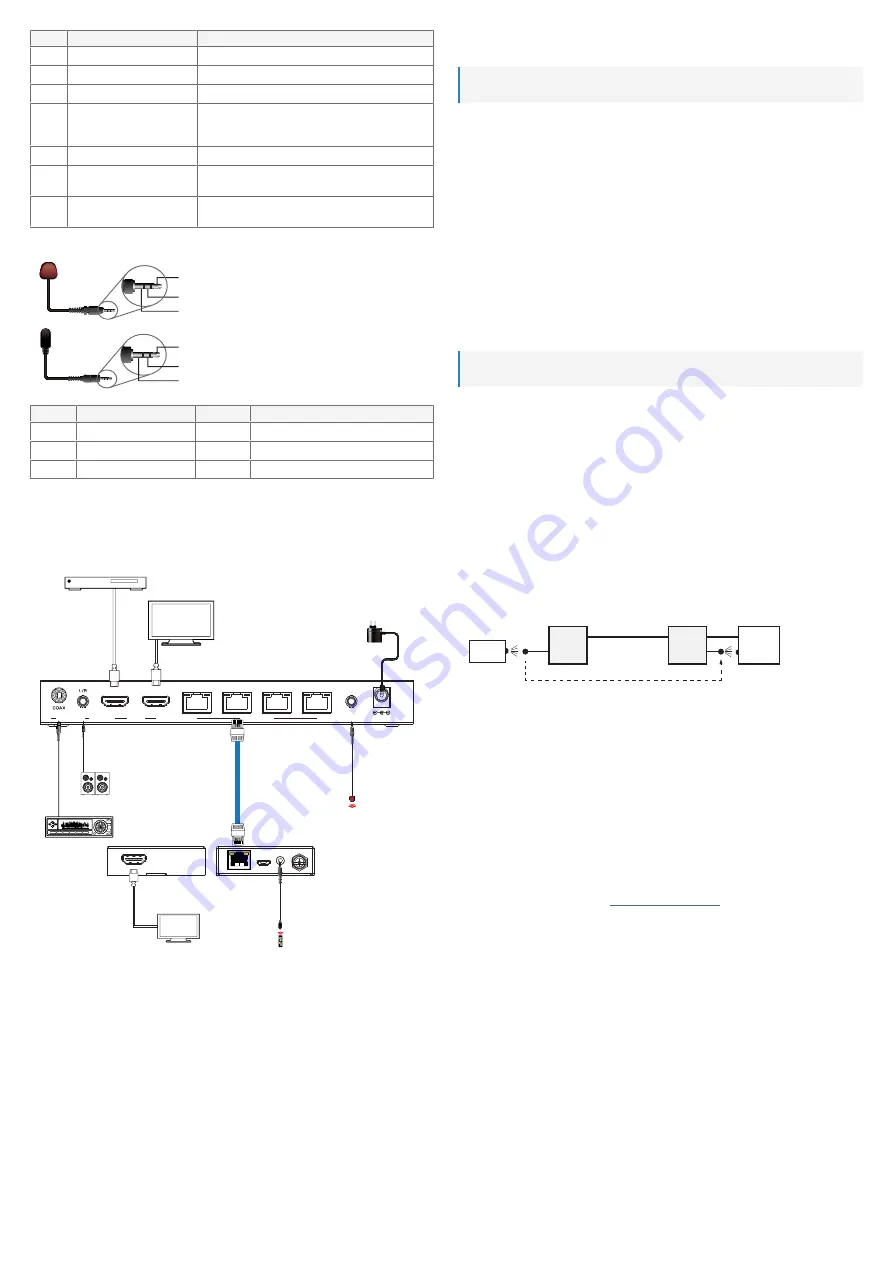
7.1 Setup diagram
IN
AUDIO OUT
HDMI
OUT
DC 12V
CAT OUTPUT
LOOP OUT
1
2
3
4
IR
CAT IN
LAN
LA
N
CAT 6/6a/7
Transmitter
Receiver
Media box/
DVD/Blu-ray player
UHDTV
UHDTV
IR Receiver
IR Blaster
2.0 Speakers
Amplifier
7.2 Setting up the HDMI transmitter
Before you can stream video, set up the HDMI transmitter.
Important:
The setup location must ensure proper heat dissipation.
P
RECONDITIONS
:
a
All playback devices (media box, sound system) you intend to connect to the HDMI transmitter are
switched off.
1. On the HDMI transmitter, move the switch
ON/OFF
to
OFF
.
2. Connect a HDMI video source (example: media box) to the port
HDMI IN
.
3. Connect a sound system to the ports
AUDIO OUT L/R
and
AUDIO OUT COAX.
If needed, consult
the sound system documentation for details on audio connections.
Important:
the
L/R
jack is a 3.5 mm TRS jack. Only connect compatible jack plugs.
4. (Optional) To playback video near the transmitter, connect an HDMI display or TV to the HDMI port
LOOP OUT
.
5. Place the HDMI transmitter on a stable surface.
NOTICE! Do not place on surfaces sensitive to
heat or scratching.
--OR—
Use the mounting brackets to mount the HDMI transmitter permanently.
7.3 Setting up the HDMI receivers
Before you can stream video, set up the HDMI receivers.
Important:
The setup location must ensure proper heat dissipation.
For every HDMI receiver you connect:
1. On the HDMI receiver, connect a twisted pair cable (CAT6/6a/7) to the port
CAT IN
.
2. Connect the other end of the cable to a free port
CAT OUTPUT 1-4
on the HDMI transmitter.
3. On the HDMI receiver, connect an HDMI display or TV to the port
HDMI OUT
.
4. Place the HDMI receiver on a stable surface.
NOTICE! Do not place on surfaces sensitive to heat
or scratching.
--OR—
Use the mounting brackets to mount the HDMI receiver permanently.
7.4 Setting up IR control
Infrared control (IR control) is useful when the HDMI transmitter and the HDMI receiver are physically sep-
arated by walls or other objects IR light is unable to penetrate.
For example, you set up the media box in the living room and want to watch a movie on the TV in the bed-
room. The IR setup allows you to use an IR remote control in the bedroom to control the media box in the
living room.
7.4.1 IR Setup diagram
T
R
M
R
C
RC: Remote control
R: Receiver
T: Transmitter
M: Media box
7.4.2 Connecting IR transmitter and receiver
To enable infrared control (IR), connect the IR sensors to the HDMI transmitter and the HDMI receiver.
1. Connect the IR receiver to the port
IR IN
on the HDMI receiver.
2. Connect the IR blaster to the port
IR OUT
on the HDMI transmitter.
3. Fix the IR blaster head (sensor) in front of the IR receiver on the media box. Keep a distance of about
3 cm between the IR blaster head and the IR receiver on the media box.
7.5 Setting the EDID mode
Set the EDID mode to align the HDMI transmitter video and audio settings with the HDMI source (ex-
ample: media box).
1. Switch the HDMI transmitter off.
2. Download the EDID reference from
www.conrad.com/downloads
.
3. On the HDMI transmitter, use the switches
EDID
to set the required EDID mode as shown in the EDID
reference.
7.6 Connecting the power supply
To power the HDMI transmitter/receiver set, connect the power supply either to the HDMI transmitter or
the HDMI receiver.
1. Connect the plug of the power adaptor cable to the power supply socket on the HDMI transmitter or
the HDMI receiver.
2. Tighten the nut to secure the plug.


