background image

6.MAIN MENU

VRCPAA-106M is a 2-DIN car audio with

following functions:

Apple CarPlay,  Google Android Auto,

Radio,  Bluetooth, USB, SD.

The Mode icon in gray means the corre-

sponding function is not ready or proper

device have not been connected.

Touch the corresponding Mode icon to 

enter playing mode.


Turn off TFT display. 
TFT enter black mode touch any 
zone return to TFT on. 
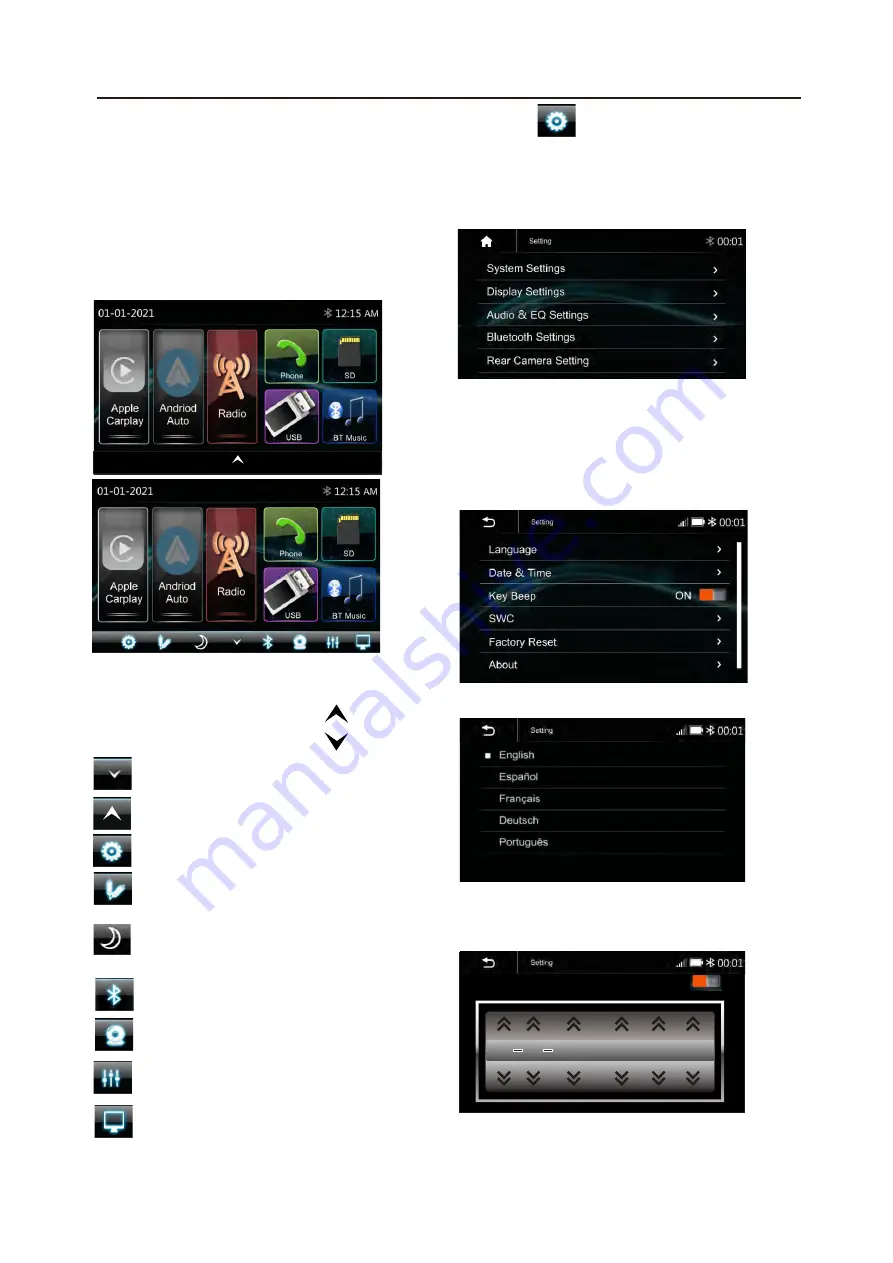
7.Settings

Touch the            icon to enter the Setup menu.  
The Setup menu is included System Settings, 

Display Settings, Audio & EQ Settings, Bluetooth

Settings and Rear Camera Settings  

System Settings

The System Settings allow the user to set up 

the Language, Date & Time, Key Beep, 

SWC, Factory Reset and About  

Audio Settings

Below shown is the Audio Setting Menu. 

EQ Settings
Balance/Fader:

Touch the “+” or “-” of Balance /Fader to tune

for the driver and passenger preference.

The value of Balance (Left15-Right 15) and 

Fader ( Front 15- Rear 15).

Touch Reset to set both Balance and Fader 

to 0. 

9

Hidden soft button bar

A hidden pop up soft button bar is located 
at the bottom. Touch the icon        to shown


the soft button bar. Touch the        to hidden.


Pop up the soft button bar. 

Hidden the pop up soft button bar. 

Setup, to enter the Settings Menu. 

AUX IN, to enter the AUX and A/V IN

 interface 

Dimming, to change Daylight or 

Night (If lighting detect is OFF in 

Display Setting) 

Bluetooth pairing.
Front Camera, to enter the front 

camera .
EQ seting, to enter the Equalizer 

setting mode.

Language

Date & Time:


To setting Time display format (12H or 24H), 

  setting the date and time 

Time Format

Settings

2:05 AM

12H

1

1 2022

1 : 06 AM

Beep Tone: On/Off


To set the touch button beep tune On or Off 

Summary of Contents for VRCPAA-106M

Page 1: ...2 DIN 10 6 Monitor Touch screen MP3 MP4 USB SD AM FM Radio Support Apple CarPlay Support Android Auto Support Bluetooth VRCPAA 106M AV Center 2 DIN Head Unit TM TM...

Page 2: ...Wiring Connection 4 Front panel Description 5 Remote Control 6 Main Menu 7 Settings 8 Apple CarPlay Android auto 9 Radio 10 USB 11 BT Audio 12 BT Phone 13 Specification 14 AV IN 15 Camera FCC Notes 3...

Page 3: ...n of the unit 3 Remote 1 1 2 3 4 5 6 7 8 9 0 EJECT EQ DISC BT USB CP AA SXM Radio 4 Trim Ring 1 5 User Manual 1 6 Warranty Card 1 8 Harness cable 1 7 ISO Cable 2 3 1 Appearance 2 Accessories Installat...

Page 4: ...ing onto the car receiver 8 Reconnect the battery and run through all of the options on this car receiver to ensure that everything is working correctly 9 Particulars will vary widely depending upon t...

Page 5: ...the reversing line to taillight on the car After connecting when you start up the reverse gear the unit will receive the picture from car rear view camera 2A Parking brake lead Brown wire Brake light...

Page 6: ...ellow Orange Blue Black Red Purple Purple Black Grey Grey Black White White Black Green Green Black Blue White Brown Pink Pink Black Black Green Grey Battery B ILL B Antenna Ground ACC B Rear right sp...

Page 7: ...tion 8 button 9 Disc USB SD Music Press repeatedly to shift track previous or next for playback Press and hold to active various fast rewind or fast forward speeds for playback Bluetooth Music Press r...

Page 8: ...Press it to switch to RADIO mode Radio 7 Press it to switch to DVD mode DISC 8 Press it to switch to Bluetooth mode BT 9 Press it to switch to USB mode USB 10 VOL Press it to eject the disc 14 EJECT...

Page 9: ...em Settings allow the user to set up the Language Date Time Key Beep SWC Factory Reset and About 9 Hidden soft button bar A hidden pop up soft button bar is located at the bottom Touch the icon to sho...

Page 10: ...ck SWC Default Switch to be on status Click Custom SWC to SWC study mode Touch Save to confirm the setting Touch Reset to erase and reset the setting Reset Factory Data Cancel OK MCU SOC Hardware Upda...

Page 11: ...ference Touch Reset to set all Band to 0 Or user can touch or at the bottom to select the following preset EQ off Soft Rock Pop Electric Jazz EQ Custom Bluetooth Settings Touch the Bluetooth Settings...

Page 12: ...he source unit The iPhone will be shown the CarPlay The source unit will enter the CarPlay interface the APP that support the CarPlay feature will be displayed on the source unit as shown below Touch...

Page 13: ...uetooth automatically and the Bluetooth smartphon currently conected is disconnected 2 Unlock your Android device 3 To enter Android Auto mode touch Android Auto icon in the head unit screen You can p...

Page 14: ...device Press to go to the next folder Press to select Repeat All Repeat 1 Repeat folder Repeat Off Press to select Audio setting or set the prefer EQ of each band in custom mode File List browsing Sup...

Page 15: ...udio Video or Picture files Press to go to the previous folder Play or pause button Short press to skip next track Long press to fast forward Press to switch Random is On or Off Short press to skip ne...

Page 16: ...elow screen 2 Using the keypad touch 0 9 enter the phone number you wish to dial If you input an incorrect number touch the icon on the keypad to delete the incorrect number 3 Once the correct number...

Page 17: ...the phone book of the connected mobile phone To make a call from the phonebook simply touch the contact name Contacts BT Setup Auto Answer On OFF incoming call auto answer MIC Gain Low Middle High 17...

Page 18: ...Dimensions 255mm W x250mm D x175 1mm H TFT Display TFT Screen size 10 6inch Resolution 1024x600 pixels FM Radio Frequency Range USA 87 5 107 9MHz Frequency Range Europe 87 5 108MHz Usable Sensitivity...

Page 19: ...the Head unit The Reverse wire in High level 12V is reverse low level ground or NC is normal AV IN Camera Touch the to pop up the function bars and touch to view the playing Rear camera Rear Camera S...

Page 20: ...nd used in accordance with the instructions may cause harmful interference to radio communications However there is no guarantee that interference will not occur in a particular installation If this e...

Reviews: