Sound Storm DD405 User Manual Download Page 17

E - 1

5

START THE USB DEVICE MODE

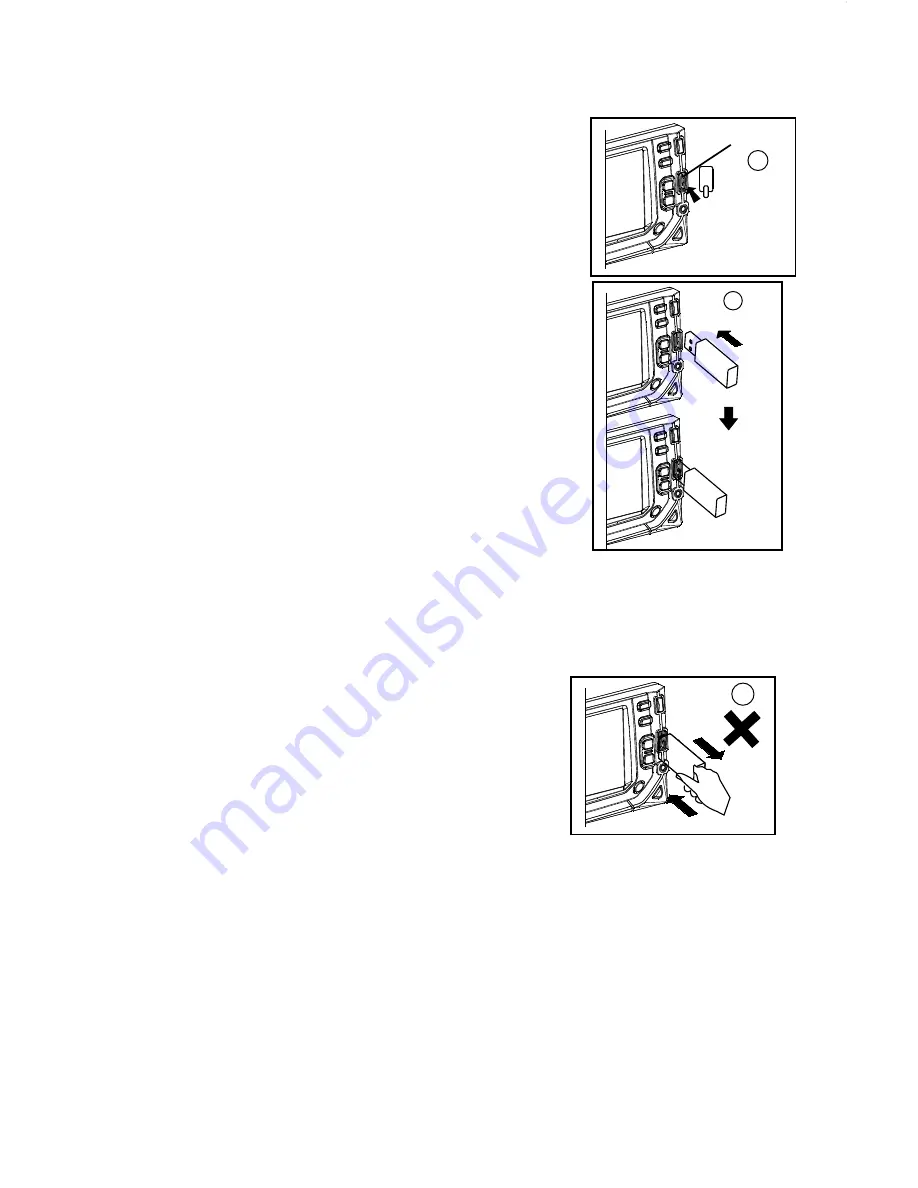
1.The USB mini socket is accessible as indicated in 
picture 1.(P.1) 

2.Plug in the USB drive / device completely  as indicated  
in picture 2(P.2) and display will show “USB” to indicate 
that the USB drive / device is being plugged in correctly 
& the download has begun.

3.Does not matter what mode the unit is in, once a USB 
drive / device is being plugged into the unit, unit will 
automatically switch to USB mode.

4.All the USB files playback function is same as normal disc 
playback.

1.Always unplugg the USB gently from the unit, 
excessive force used will cause permanent & serious 
damage to the unit & the USB drive / device.

TO STOP USB PLAYBACK

1.If the USB drive / device is unplugged, the unit will automatically switch to radio mode.
Or user can use mode button to switch to other modes.
2.The user can use the mode button to choose USB mode (only if USB drive / device is 
inserted in the unit ) or any other modes, when they are in any mode.

CAUTION

COMPATIBILITY

Due to the fast changing technology world, this unit may 
or may not be compatible to all the USB drive / device 
available with all the future technology, especially those 
USB drive / device which require to install a driver. 
Always choose a compatible USB drive / device which is 
compatible with this unit.

Warning: 

Excessive weight or size USB drive/device may 

cause permanent & serious damage to the unit and may 
cause access to the buttons on the front panel impossible. 
User must use an extension cable (provide by USB device 
manufacturer) to connect with USB socket to prevent any 
damage cause.

P.1

USB SPECIFICATION
* SUPPORT MAX IG USB FLASH MEMORY
* SUPPORT MAX 999 SONGS
* USB 1.1 DEVICE SUPPORT
* USB 2.0 DEVICE SUPPORT
  (TRANSFER SPEED SAME AS VER 1.1)
* FILE MANAGER: FAT12/FAT16/FAT32

P.2

USB SOCKET

P.3

1

0

. MMC/SD CARD & USB DEVICE OPERATIONS

Summary of Contents for DD405

Page 1: ......

Page 2: ...4 5 In Dash Double DIN DVD MP3 CD Receiver with USB SD Memory Card Ports and Front Panel AV Input...

Page 3: ...o direct sunlight or heat sources such as hot air ducts or leave them in a car parked in direct sunlight where there can be a considerable rise in temperature inside the car P 3 Do not use CDs with ol...

Page 4: ...o dust dirt or excessive vibration Be sure to remove the front panel before installing the unit DIN FRONT REAR MOUNT 30 DIN FRONT MOUNT Method A Installation the unit 1 Dashboard 2 Screw 1 Dashboard 2...

Page 5: ...ingernails pens screwdrivers etc These 2 screws are used to prevent damage to the CD mechanism during transportation Please make sure to remove the 2 screws before installing the unit into the vehicle...

Page 6: ...Notes INCORRECT WIRING OR OPERATION WILL VOID THE WARRANTY OF THIS UNIT Fuse Replacement To replace the fuse pull out the blown fuse from the socket Insert a new one with same rating CAR UNIT BACK SI...

Page 7: ...ION SELECT BUTTON BAND LOUDNESS APL NTSC BUTTON AMS PLAY PAUSE BUTTON LOC BUTTON SCAN BUTTON FM MONO STEREO BUTTON ENCODER VOLUME KNOB DISPLAY BUTTON MODE BUTTON INFRARED REMOTE SENSOR DSP LEFT RIGHT...

Page 8: ...E 6...

Page 9: ...b to adjust desired volume level PRESET EQUALIZER BUTTON DSP Press this PEQ button then use V UP V DN to toggle the following EQ settings At DSP off mode preset equalizer will be controlled by Bass Tr...

Page 10: ...djust hour and minute CALIBRATION Touch center with a pen point and touch it again to enter into the calibration menu and display Users can operate touch rectiflcation if the touch character deviates...

Page 11: ...BASS TRE BAL FAD BND BAND SWITCH FM1 FM2 FM3 AM1 AM2 TFT OFF FREQUENCY BACKWARD FREQUENCY FORWARD LOUD LOUDNESS ON OFF EQ ROCK POP CLASS EQ OFF MONO LOC SCAN LOCAL DX TFT DISPLAY ON OFF Radio TOUCH TO...

Page 12: ...blinking and stay on the display for a few seconds AUTO MEMORY STORE PRESET SCAN BUTTON AMS PRESET SCAN press AMS button for less than 1 second to scan all preset stations in the memories of the curr...

Page 13: ...ays the file type of the playing and the switching S N NAME FUNCTION DESCRIPTION Information Menu DISPLAY DISC INFO RMATION BACK TO MAIN MENU MOVE CURSOR DIRECTION CONFIRM SELECTED INFORMATION PAUSE P...

Page 14: ...e PLAY button is pressed normal playback will continue STOP BUTTON NUMERIC BUTTONS When playback CD Music file use for track number or File number direct access and Use when function need numeric Sele...

Page 15: ...any ID3 TAG information user can view these ID3 TAG information such as Track title Artist title Album title etc These ID3 TAG information will be displayed on the lower left hand corner of the TFT mo...

Page 16: ...y Region and File Region is shown as the picture above While it appears a transparent rectangle in File Switch Region You can press the Numeric buttons to select the file you want to play For example...

Page 17: ...2 The user can use the mode button to choose USB mode only if USB drive device is inserted in the unit or any other modes when they are in any mode CAUTION COMPATIBILITY Due to the fast changing tech...

Page 18: ...ATION SUPPORT MAX 4G SD MMC CARD SUPPORT MAX 999 SONGS Back side Front side P 7 P 6 P 4 1 Press panel release button to release the front panel P 4 2 The SD MMC card slot is located on top of the fron...

Page 19: ...VIOUS MUSIC FORWARD ENTER INTO SETUP MENU OF AUDIO AND VIDEO NEXT MUSIC BACKWARD STOP BUTTON OSD NUM DISPLAY THE AMOUNT OF TIME PLAYED 14 ANOTHER FANCTION KEY 15 16 17 18 19 AUDIO TITLE REPEAT CHAPTER...

Page 20: ...RIGHT BUTTON Use to move cursor up down left right OK BUTTON Use this button to confirm the selection Long press the buttons under the play mode the unit will start to forward or rewind you can play d...

Page 21: ...c and other image discs the screen will display the following message SLOW BUTTON SLOW A Press SLOW button once to activate SLOW 1 2 slow motion playback B Press SLOW button twice to activate SLOW 1 3...

Page 22: ...select the corresponding title chapter and then you can program title chapter to your need if you want to complete program setting press PLAY button to play chapters in programmed order See the illus...

Page 23: ...of time played and time remaining to be played on the disc SUBTITLE BUTTON SUBTITLE 1 Press SUBTITLE button to bring up the subtitle information which will be shown on the top right corner of the scre...

Page 24: ...Right arrow button to activate that page For example if you want to setup the video page press Right to highlight the video icon the video page will be displayed on the screen 3 Press the Down arrow...

Page 25: ...o a NTSC TV 2 PAL Choose this settings if your Multi Media player is connected to a PAL TV 3 AUTO Choose this settings if your Multi Media player is connected to a multi system TV The default setting...

Page 26: ...on the left and right side of the screen You must adjust the screen setting depending on the type of the television you have 2 LANGUAGE SETUP The language setup options are illustrated below PASSWORD...

Page 27: ...MENU LANG option and press the Arrow buttons to choose the menu language you prefer Press ok to confirm If the disc you are playing has that language available it will displays menu in that language I...

Page 28: ...able Sensitivity Stereo Separation S N Ratio RADIO SECTION FM System Usable disc Sampling frequency No of quantization bits Frequency Number of channels S N Ration 522 1620 KHz EURO 530 1710 KHz USA 4...

Reviews: