Sound Choice PCK4000 Owner'S Manual Download Page 8

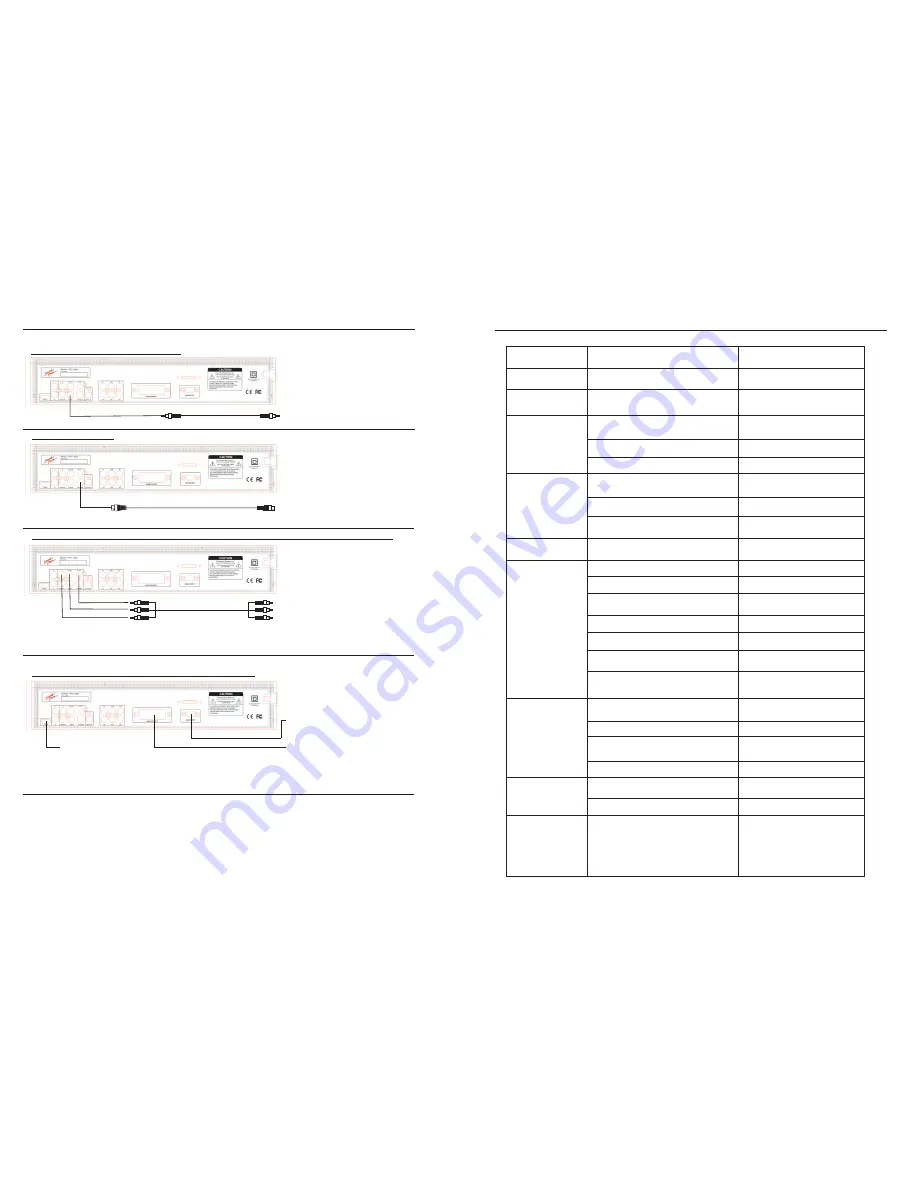
Instructions for connecting the video output

Video Output (Standard / Interlaced)

Video Connections

Caution Note:

Please refer to the instructions for your TV set. Turn off the DVD player, TV set and/or amplifier and disconnect the 
power before you connect the audio/video cables. If there is only one audio input terminal (monaural sound) on your TV
set, you can connect the DVD video player with a Y-shape cable (commercially available) before connecting to the TV 
set.

*Please connect the DVD video player to the TV set directly. If you connect the DVD video player to the VCR, the picture 
will become distorted because all DVD discs are copy-protected.

Video cable

Connect to the VIDEO (Yellow) input of 
the TV set.

S-VIDEO Output

S-VIDEO cable

Connect to the S-VIDEO input of the TV set in which 
there is an S-VIDEO JACK. The S-Video input is
higher resolution picture than the video input.

Progressive Scan - Color Different (Y, Pb/Cb, Pr/Cr) / (R, G, B) Output

 (Y, Pb/Cb, Pr/Cr) cable

Color different video terminals provide (Y, Pb/Cb, Pr/Cr) 
or (R, G, B) in order to match with the (Y, Pb/Cb, Pr/Cr) 
or (R, G, B) of the TV set. By using (Y, Pb/Cb, Pr/Cr) or 
(R, G, B) the video output is clearer than the S-video 
output. (Y, Pb/Cb, Pr/Cr) or (R, G, B) can be switched 
in the options of the general setup menu.

Allows connection to flat screen televisions and 
projectors.  Can be switched in the options of the 
general setup menu.

Note: 

The color different output terminals (Y, Pb/Cb, Pr/Cr)

            are the same as (R, G, B)

6

Trouble-Shooting  Guide

Check the following guide for the possible cause of a problem before contacting service.

Symptom

No power.

The player doesn’t 
 work after turning 
on the power. 

No picture.

No Sound.

The picture is not good.

The DVD video player
 does not start playback.

The remote control does 
not work properly.

Possible Cause

The power plug is disconnected.

No disc.

The TV is not set to receive DVD signal output.

The video cable is not connected securely.

The connected TV set is not turned on.

The equipment connected with the audio cable is 
not set to receive DVD signal output.

The audio receiver is turned off.

The setting of the output sound format is incorrec

t.


The disc is dirty.

No disc is inserted.

The disc is placed upside down.

The disc is not placed within the guide.

The disc is dirty or scratched.

There is a menu pictured on the TV screen.

The parental lock function is set.

The remote control is not pointed at the remote 
sensor on the DVD video player. 

The remote control is too far from the DVD video player.

There is an obstacle between the remote sensor on 
the  player and the remote control.

Correction

Connect the power plug securely into the electrical
 outlet.

Load the disc, USB or  SD Card and check the 
indicator on the display.

Select the appropriate video input mode on the TV so 
the picture from the DVD video player appears on the 
TV screen.

Connect the video cable securely into appropriate jacks.

Turn on the TV power.

Select the proper audio input mode of the TV set.

Turn on the audio receiver`s power.

Eject the disc and clean it.

Insert the disc with the label facing upward.

Place the disc correctly inside the guide on the disc tray.

Carefully clean the disc.

Press SETUP button to close the item picture.

Cancel the parental lock function or change the
 parental level.

Point the remote control at the remote sensor on the
 DVD video player. Do not point the remote at the TV.

Operate the remote control within about 20 feet (7m).

Remove all of  the obstacles.

Replace both of the batteries with new ones.

The batteries in the remote control are exhausted.

27

Insert a disc. 

Change the audio output on the DVD Player.

No sound output in
Karaoke mode.

Stereo output is not connected properly (see pg.7).

Speaker setup is not set properly for Karaoke.

Connect the stereo output of the unit 
to your TV or amplifier.

Speaker setup should be set on stereo.

The microphone does
not work.

Power button on the microphone is switched “off”.

Switch the microphone “on” and check that the
microphone volume is at least more than 50%.  
Check to see that the cable is not damaged. 
Also check that the volume hasn’t been turned 
down on the remote control.
.

HDMI, VGA Output or SCART Connection

Connect the SCART output from the PCK 4000 to 
the SCART input on your TV, Digital Recorder, 
VCR or Receiver.

The word MUTE is on your monitor screen

Turn MUTE off on your remote

or USB Device or SD CARD

Still getting no sound?

Check the volume control on the remote.

Allows connection to flat 
screen televisions and projectors
with HDMI connections..

Summary of Contents for PCK4000

Page 1: ... OWNER S MANUAL Please review this manual before playing the machine This manual refers to models PCK4000 US and PCK4000 AU DVD CD G MP3G Xvid CD USB SD Card DVD R DVD R RW CD DA CD R CD RW MP3 MP3G VCD SVCD JPEG Kodak Picture CD This manual is also available as a PDF file at www soundchoice com ...

Page 2: ...ice 888 389 9648 Australia Sound Choice Distr Aust Pty Ltd Attn Service Dept P O Box 50 KLEMZIG SA 5087 AUSTRALIA Customer Service 61 8 8261 0566 IF THIS UNIT IS OUTSIDE OF THE WARRANTY PERIOD please call the appropriate number below for repair Note The unit must be shipped in the original carton and placed inside another carton with added padding for extra protection during shipment All original ...

Page 3: ...n of liability All implied warranties are limited to the duration of the warranty This is the complete warranty and no other expressed warranty is valid Some states countries provinces do not allow limitations on how long an implied warranty lasts or exclusions or limitations of incidental or consequential damages so the above limitations or exclusions may not apply This warranty gives you the own...

Page 4: ...ncluding amplifiers that produce heat 9 Do not defeat the safety purpose of the polarized or grounding type plug A polarized plug has two blades with one wider than the other A grounding type plug has two blades and a third grounding prong The wide blade or the third prong are provided for your safety When the provided plug does not fit into your outlet consult an electrician for replacement of th...

Page 5: ... player Lens warning Cleaning and adjustment of the lens or other components should only be done by a qualified technician To obtain a clear picture The player is a high technology precision driven device If the optical lens and drive parts are dirty or worn down the picture quality may become poor To obtain a clear picture we recommend regular inspection and maintenance cleaning or parts replacem...

Page 6: ... standard used in the United States is NTSC Throughout the world the most widely used format is PAL 4 Interlaced Video Output Televisions have used interlaced video output since their inception in the 1940 s Interlaced Video Output takes the odd number of lines in a picture and combines them into a frame Then the even numbered lines are combined into a second frame The process begins by displaying...

Page 7: ...AL AUDIO GRAPHICS 5 Playable Discs This DVD player will play the following formats Digital Video Discs DVD Compact Disc Graphics CD G Compact Disc CD Digital Video Disc Recordable DVD R Digital Video Disc Re Writable DVD RW Super Video Compact Disc SVCD Video Compact Disc VCD Compact Disc Recordable CD R Compact Disc Re Writable CD RW MPEG 3 MP3 Compact Disc Digital Audio CD DA MP3G Mp3 with Graph...

Page 8: ...y No disc is inserted The disc is placed upside down The disc is not placed within the guide The disc is dirty or scratched There is a menu pictured on the TV screen The parental lock function is set The remote control is not pointed at the remote sensor on the DVD video player The remote control is too far from the DVD video player There is an obstacle between the remote sensor on the player and ...

Page 9: ... the Stereo Red White inputs of your TV or Stereo 7 Note At any time you may exit the menu by pressing the SETUP button PREFERENCE PAGE CONTINUED PARENTAL KID SAFE G PG PG 13 PGR R Note Password mode must be turned on for the Parental Menu to work To change the parental function the user must turn off the password protection and adjust the parental level setting Once this is completed turn the pas...

Page 10: ...ack may damage speakers To avoid feedback noise do not place your hands near the top of the microphone and do not point the microphone directly at the output speakers If feedback occurs lower the volume control 8 Note At any time you may exit the menu by pressing the SETUP button PREFERENCE PAGE Note In order to access the Preference Page the player must come to a complete stop To completely stop ...

Page 11: ...twice to completely stop the disc 12 Previous PREV Press this button to skip to the previous track title This function may not work with certain discs depending on their structure 13 Next Press this button to skip to the next track title This function may not work with certain discs depending on their structure 14 Single Play Continuous Play momentarily displays on your TV or monitor when pressed ...

Page 12: ...mmediately under running water Remote Control Setup 30 30 Operation of the remote control Instructions for using the remote control Distance within 20ft 6m from the front of the remote control sensor on the player o Angle within 30 in each direction of the front of the remote sensor on the player Do not expose the remote sensor of the DVD video player to a strong light source such as direct sunlig...

Page 13: ...ote control to close the tray or for Turbo Load press desired track number or 1 to start playing a movie 11 AUDIO SETUP PAGE CONTINUED SPDIF SETUP DIGITAL OUTPUT SETUP SPDIF OUTPUT DIGITAL OUTPUT SPDIF OFF Turns off the digital outputs of player SPDIF RAW Activates the optical outputs of the player SPDIF PCM Activates the coaxial outputs of the player Note At any time you may exit the menu by pres...

Page 14: ...EO NORMAL V SURR VIRTUAL SURROUND Note At any time you may exit the menu by pressing the SETUP button Features Setup GENERAL SETUP PAGE CONTINUED LAST MEMORY OFF Permanent factory setting 5 1 CH 21 7 Press buttons to select Move these arrow buttons to the desired menu or picture 8 Press ENTER to confirm the desired menu The next set of submenus will appear The player will automatically play the se...

Page 15: ... 5 Skip to the previous chapter track During playback press the PREV button 13 This section will instruct you on how to navigate the setup features of the DVD player There are many features that are built into this player that can be accessed by the user Please review this section of the manual before attempting to adjust any of the features NOTE While navigating through the menu you must use the ...

Page 16: ...play the demonstration vocal on the right channel only so that you will not hear the lead vocal in stereo Press this button to turn On Off the demonstration lead vocal track during playback The default setting is off you will need to turn this function on for each track selection except for playback in Repeat modes 25 PAUSE While the player is in the playback mode including slow fast forward fast ...

Page 17: ...cs 13 REVERSE FR Press this button to reverse the playback Each time it is pressed the speed will change a level Continually pressing this will return the audio video to the normal playback 14 SLOW Press this button to play in slow speed without sound It can play slowly forward or backward Each time it is pressed the slow motion speed will change Continually pressing this will return the audio vid...

Page 18: ...ress this button the third time to finish the repetition 2 PLAY During the mode of stop pause slow motion fast forward or fast reverse etc press this button to return to the normal playback 3 SUBTITLE 4 PROGRAM Press this button to change the playback order It varies according to the different discs 5 OPEN CLOSE Press this button once to eject the disc tray press it again to close the disc tray Us...

Reviews: