background image

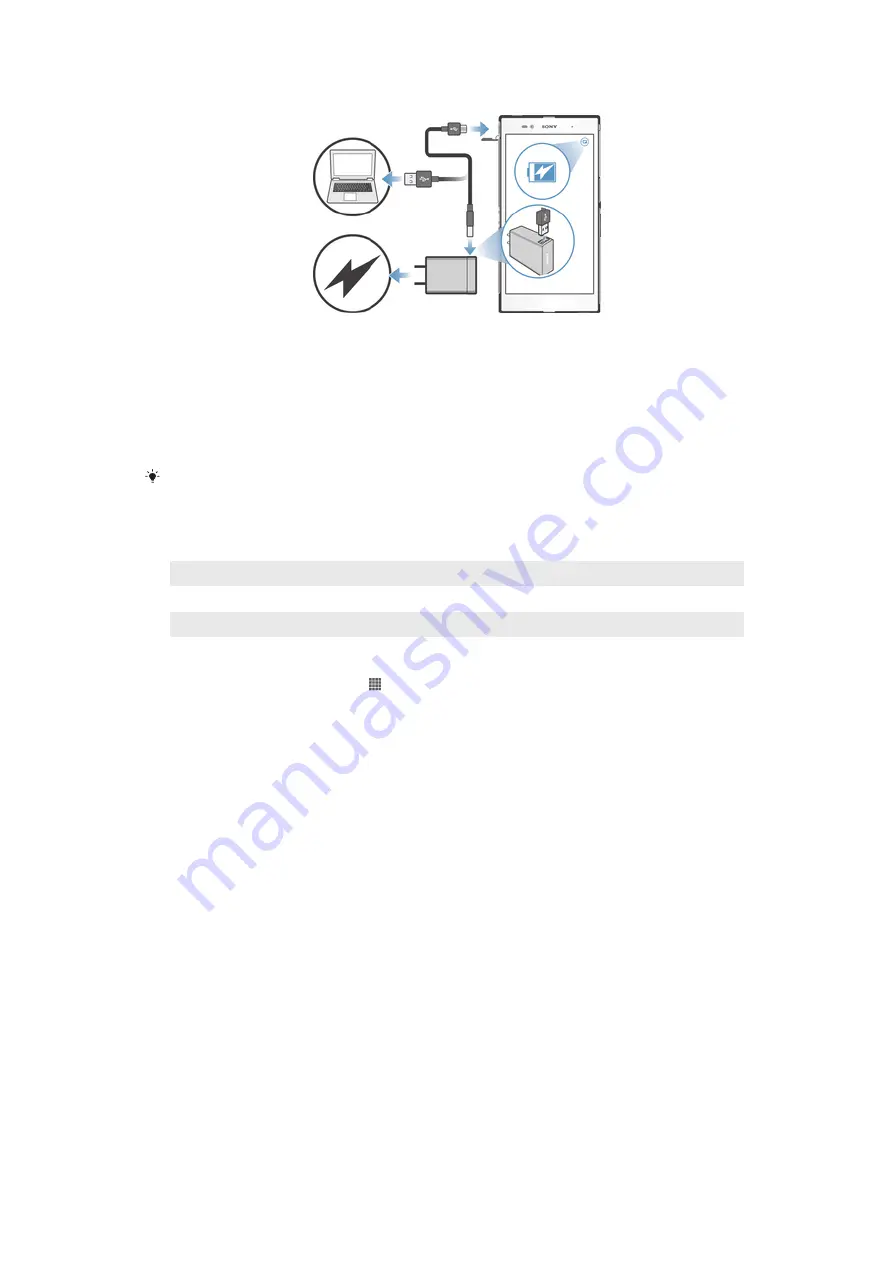
To charge your device

1

Plug the charger into a power outlet.

2

Plug one end of the USB cable into the charger (or into the USB port of a

computer).

3

Plug the other end of the cable into the micro USB port on your device, with

the USB symbol facing up. The notification light lights up when charging starts.

4

When the notification light is green, the device is fully charged. Disconnect the

USB cable from your device by pulling it straight outwards. Make sure not to

bend the connector when removing the cable from the device.

If the battery is completely discharged, it may take a few minutes before the notification light

lights up after you connect the charger cable to a power source.

Battery notification light status

Green

The battery charge level is greater than 90%

Flashing red

The battery level is low

Orange

The battery is charging and the battery charge level is less than 90%

To check the battery level

1

From your 

Home screen

, tap   .

2

Find and tap 

Settings

 > 

About phone

 > 

Status

 > 

Battery level

.

Improving battery performance

The following tips can help you improve battery performance:

Charge your device often. This will not affect the lifetime of the battery.

Downloading data from the Internet is power consuming. When you're not using the

Internet, you can save power by disabling all mobile data connections from the

Notification panel by dragging down the status bar. This setting does not prevent

your device from transmitting data over other wireless networks.

Turn off Bluetooth® and Wi-Fi® connections when you don't need these features.

You can turn them on and off more easily from the Notification panel by dragging

down the status bar.

Use the 

STAMINA mode

 and 

Low battery mode

 features to reduce battery

consumption. You can select the power saving mode that best suits the way you use

your device. You can also customise the settings of each power saving mode.

Set your synchronisation applications (used to synchronise your email, calendar and

contacts) to synchronise manually. You can also synchronise automatically, but

increase the synchronisation intervals.

Check the battery usage menu in your device to see which applications use the most

power. Your battery consumes more power when you use video and music streaming

applications, such as YouTube™. Some applications downloaded from Google

Play™ may also consume more power.

Close and exit applications that you are not using.

Lower the screen display brightness level.

16

This is an Internet version of this publication. © Print only for private use.

Summary of Contents for Xperia Z Ultra C6802

Page 1: ...User guide Xperia Z Ultra C6802 C6833 C6806 ...

Page 2: ...ngs menu 25 Typing text 25 Customising your device 29 Enhancing the sound output 32 Memory 32 Using a headset 33 Internet and messaging settings 33 Controlling data usage 34 Mobile network settings 35 Google Play 37 Getting started with Google Play 37 Downloading from Google Play 37 Clearing your application data 37 Permissions 38 Installing applications not from Google Play 38 Calling 39 Making c...

Page 3: ... Google Talk 52 Email 53 Getting started with Email 53 Using email 54 Socialife 57 Using the Socialife application 57 WALKMAN application 58 About the WALKMAN application 58 Transferring media files to your device 58 Using the WALKMAN application 59 Visualiser 60 Getting more information about a song or artist 60 Using My music to organise your songs 60 Managing playlists 62 WALKMAN application wi...

Page 4: ...buying a video 92 Web browser 94 About the web browser 94 Connectivity 95 Connecting to wireless networks 95 Sharing content with DLNA Certified devices 98 NFC 100 Bluetooth wireless technology 103 Connecting your device to a computer 105 Connecting your device to a TV set 108 Screen mirroring 108 Scanning barcodes with the NeoReader application 109 Smart Connect 110 Synchronising data on your dev...

Page 5: ...vice 122 Finding your device 125 Support application 125 Recycling your device 125 Reference 126 Settings overview 126 Status and notification icons overview 127 Application overview 128 Important information 130 Important information leaflet 130 Limitations to services and features 130 Protecting your device from water and dust 130 Legal information 131 Index 133 5 This is an Internet version of ...

Page 6: ...Xperia Z Ultra User guide 6 This is an Internet version of this publication Print only for private use ...

Page 7: ...pointments and engage in social networking Android devices are constantly evolving When a new software version is available and your device supports this new software you can update your device to get new features and the latest improvements Your Android device is pre loaded with Google services To get the most out of the provided Google services you should have a Google account and sign in to it ...

Page 8: ...ard cover and the device then detach the memory card cover 2 Place the memory card in the memory card slot with the gold coloured contacts facing down then push the memory card all the way into the slot until you hear a locking sound 3 Reattach the memory card cover The memory card may not be included at purchase in all markets To insert the micro SIM card Do not insert the micro SIM card into the...

Page 9: ...lot cover Inserting the micro SIM card into the device without the SIM card holder could damage your micro SIM card or your device and Sony does not warrant and will not be responsible for any damage caused by such action To remove the memory card 1 Turn off the device or unmount the memory card from Settings Storage Unmount SD card 2 Remove the cover of the memory card slot then press against the...

Page 10: ... If your screen goes dark briefly press the power key to activate the screen 3 To unlock the screen swipe up or down on the screen 4 Enter your SIM card PIN when requested then select OK 5 Wait a while for the device to start Your SIM card PIN is initially supplied by your network operator but you can change it later from the Settings menu To correct a mistake made while entering your SIM card PIN...

Page 11: ...hen the screen is active briefly press the power key Setup guide The first time you start your device a setup guide opens to help you configure basic settings sign in to some accounts and personalise your device For example if you have a Sony Entertainment Network account you can sign in to it and start enjoying music videos and games from the Sony Entertainment Network on your device Or you can c...

Page 12: ... to chat with friends using Google Talk and to synchronise the calendar application on your device with your Google Calendar You also need a Google account to download applications and games music movies and books from Google Play Microsoft Exchange ActiveSync account Synchronise your device with your corporate Microsoft Exchange ActiveSync account This way you keep your work email contacts and ca...

Page 13: ...y This lock prevents unwanted actions on the touchscreen when you are not using it You can also set personal locks to protect your subscription and make sure only you can access content on your device The device screen is made from glass Do not touch the screen if the glass is cracked or shattered Avoid trying to repair a damaged screen yourself Glass screens are sensitive to drops and mechanical ...

Page 14: ...ke sure that both fingers are within the photo frame area Scrolling Scroll by moving your finger up or down on the screen On some web pages you can also scroll to the sides Dragging or flicking will not activate anything on the screen To scroll Drag or flick your finger in the direction you want to scroll on the screen To scroll more quickly flick your finger in the direction you want to go on the...

Page 15: ...ear is close to the screen This prevents you from unintentionally activating other functions on your device when you are engaged in a call Battery Your device has an embedded battery Charging the battery Your battery is partly charged when you buy your device It may take a few minutes before the battery icon appears on the screen when you connect the charger cable to a power source such as a USB p...

Page 16: ...e battery Downloading data from the Internet is power consuming When you re not using the Internet you can save power by disabling all mobile data connections from the Notification panel by dragging down the status bar This setting does not prevent your device from transmitting data over other wireless networks Turn off Bluetooth and Wi Fi connections when you don t need these features You can tur...

Page 17: ...r Home screen tap 2 Find and tap Settings Power management 3 Tap next to STAMINA mode To change the settings for STAMINA mode 1 From your Home screen tap 2 Find and tap Settings Power management 3 To open the settings menu tap STAMINA mode 4 Add or remove applications as desired 5 When you re finished tap Done Estimating the standby time of your device Standby time refers to the amount of time the...

Page 18: ...photo from the lock screen 1 To activate the screen briefly press the power key 2 To activate the camera swipe to the left in the upper part of the screen 3 After the camera opens tap To add a new pane and widget when the screen is locked 1 To activate the screen briefly press the power key 2 Swipe to the right then tap to add a new pane 3 Find and tap the widget that you want to add You can only ...

Page 19: ...anes then tap To delete a pane from your Home screen 1 Touch and hold an empty area on your Home screen until the device vibrates 2 Flick left or right to browse to the pane that you want to delete then tap Widgets Widgets are small applications that you can use directly on your Home screen For example the WALKMAN widget allows you to start playing music directly Some widgets are resizable so you ...

Page 20: ...ar at the bottom of the screen To add a shortcut to your Home screen 1 Touch and hold an empty area on your Home screen until the device vibrates 2 Tap Apps Shortcuts 3 Select a shortcut You can add an application shortcut directly from the Application screen by touching and holding the application To move an item on the Home screen Touch and hold the item until it magnifies and the device vibrate...

Page 21: ...gular screen width so you need to flick left and right to view all content To open the Application screen From your Home screen tap To browse the Application screen From the Application screen flick right or left To create a shortcut to an application on the Home screen 1 From your Home screen tap 2 Touch and hold an application icon until the screen vibrates then drag the icon to the top of the s...

Page 22: ...all app that you want to open A small app window appears To close a small app Tap on the small app window To move a small app When the small app is open touch and hold the top left corner of the small app then move it to the desired location To minimise a small app When the small app is open touch and hold the top left corner of the small app then drag it to the right edge or to the bottom edge of...

Page 23: ...u want to uninstall then tap Uninstall Status and notifications The status bar at the top of your screen shows what s going on in your device To the left you get notifications when there is something new or ongoing For example new message and calendar notifications appear here The right side shows the signal strength battery status and other information The Notification panel allows you to adjust ...

Page 24: ...tification panel From the Notification panel tap Clear Setting your device from the Notification panel You can open the settings menu from the Notification panel to adjust device quick settings For example you can turn on Wi Fi To open the device settings menu from the Notification panel 1 Drag the status bar downwards 2 Tap To adjust sound settings from the Notification panel 1 Drag the status ba...

Page 25: ...tion Quick settings 3 Touch and hold beside a quick setting then move it to the desired position Settings menu View and change settings for your device from the Settings menu To access your device settings 1 From your Home screen tap 2 Tap Settings You can also drag the status bar downwards on the Home screen and tap to access your device settings Typing text You can select from a number of keyboa...

Page 26: ...tation When you enter text turn the device sideways For the keyboard to support this feature landscape mode must be supported by the application you are using and your screen orientation settings must be set to automatic To enter text using the on screen keyboard 1 To enter a character visible on the keyboard tap the character 2 To enter a character variant touch and hold a regular keyboard charac...

Page 27: ...when you use the on screen keyboard To enter text using the Gesture input function 1 When you enter text using the on screen keyboard slide your finger from letter to letter to trace the word you want to write 2 Lift up your finger when you ve finished entering a word A word is suggested based on the letters you have traced If necessary select the correct word in the candidate bar 3 To view more o...

Page 28: ...r on the key Tap the word that appears or tap to view more word suggestions and select a word from the list When appears in the Phonepad tap the on screen key for the character you want to enter Keep pressing this key until the desired character is selected Then do the same for the next character you want to enter and so on To enter numbers using the Phonepad When the Phonepad is open tap A Phonep...

Page 29: ...ering text using voice input When you enter text you can use the voice input function instead of typing the words Just speak the words that you want to enter Voice input is an experimental technology from Google and is available for a number of languages and regions To enable voice input 1 When you enter text using the on screen keyboard or the Phonepad tap or 2 Tap then tap Keyboard settings 3 Ma...

Page 30: ...evice to silent mode To set your device to vibrate and ring mode 1 From your Home screen tap 2 Find and tap Settings Sound 3 Mark the Vibrate when ringing checkbox Time and date You can change the time and date on your device To set the date manually 1 From the Home screen tap 2 Find and tap Settings Date time 3 Unmark the Automatic date time checkbox if it is marked 4 Tap Set date 5 Adjust the da...

Page 31: ...screen tap 2 Find and tap Settings Sound 3 Mark the Vibrate on touch checkbox The screen now vibrates when you tap soft keys and certain applications To adjust the idle time before the screen turns off 1 From your Home screen tap 2 Find and tap Settings Display Sleep 3 Select an option To turn off the screen quickly briefly press the power key Language settings You can select a default language fo...

Page 32: ... Sound effects 3 Unmark the ClearAudio checkbox if it is marked 4 Tap Sound enhancements Settings 5 Mark or unmark the relevant checkboxes The manual adjustment of sound output settings has no effect on voice communication applications For example there is no change in the voice call sound quality To minimise volume differences using the Dynamic normaliser 1 Drag the status bar downwards then tap ...

Page 33: ...ase one separately If you are listening to music the music stops when you answer a call and resumes after you end the call Internet and messaging settings To send text and multimedia messages and to access the Internet you must have a mobile data connection and the correct settings There are different ways to get these settings For most mobile networks and operators Internet and messaging settings...

Page 34: ...k profile that you want to create 6 Tap APN and enter the access point name 7 Enter all other information required by your network operator 8 Tap then tap Save Usage info For quality purposes Sony Mobile collects anonymous bug reports and statistics regarding your device None of the information gathered includes personal data To allow the sending of usage info 1 Drag the status bar downwards then ...

Page 35: ...f individual applications 1 From your Home screen tap 2 Find and tap Settings Data usage 3 Find and tap the desired application 4 Mark the Restrict background data checkbox 5 To access more specific settings for the application tap View app settings and make the desired changes Specific settings for an application may not always be accessible The performance of individual applications may be affec...

Page 36: ...rk the Mobile data traffic checkbox Data roaming Some network operators allow mobile data connections via mobile networks when you are outside of your home network roaming Note that data transmission charges may apply Contact your network operator for more information Applications may sometimes use the Internet connection in your home network without any notification for example when sending searc...

Page 37: ...ur data traffic charges when you download content to your device Contact your operator for more information To download a free application 1 In Google Play find an item you wish to download by browsing categories or by using the search function 2 Tap the item to view its details and follow the instructions to complete the installation To download a paid application 1 In Google Play find an item yo...

Page 38: ... Apps 4 Tap the desired application 5 Scroll down to view the relevant details under Permissions Installing applications not from Google Play Installing applications of unknown or unreliable origin can damage your device By default your device is set to block such installations However you can change this setting and allow installations from unknown sources Sony does not warrant or guarantee the p...

Page 39: ...r call log entries 3 View your favourite contacts 4 View all contact groups saved to your device 5 Delete number 6 Dialpad 7 Hide or clear the call log 8 Call button 9 Hide or show the dialer To make a call by dialling 1 From your Home screen tap 2 Find and tap Phone 3 Enter the number of the recipient and tap Call To delete a number tap To make a call using smart dial 1 From your Home screen tap ...

Page 40: ... You can reject a call with a predefined message When you reject a call with such a message the message is automatically sent to the caller and saved on your device Six messages are predefined on your device You can select from these predefined messages which can also be edited if necessary To reject a call with a predefined message Drag Reject with message upward then select a message To reject a...

Page 41: ... Home screen tap 2 Find and tap Phone The call log view appears on the upper part of the screen 3 To call a number directly tap the number To edit a number before calling touch and hold the number then tap Edit number before call You can also call a number by tapping Call back To add a number from the call log to your contacts 1 From your Home screen tap 2 Find and tap Phone The call log view appe...

Page 42: ...d dialing 4 Enter your PIN2 and tap OK To access the list of accepted call recipients 1 From your Home screen tap 2 Find and tap Settings Call settings Fixed dialing numbers Fixed dialing numbers Multiple calls If you have activated call waiting you can handle multiple calls at the same time When it is activated you will be notified by a beep if you receive another call To activate or deactivate c...

Page 43: ... a conference call 1 During an ongoing conference call tap the button showing the number of participants For example tap 3 participants if there are three participants 2 Tap next to the participant you want to release To end a conference call During the call tap Voicemail If your subscription includes a voicemail service callers can leave voice messages for you when you can t answer calls Your voi...

Page 44: ...te a number tap You can make emergency calls when no SIM card is inserted or when outgoing calls are barred To make an emergency call while the SIM card is locked 1 Tap Emergency call 2 Enter the emergency number and tap Call To delete a number tap 44 This is an Internet version of this publication Print only for private use ...

Page 45: ...your Home screen tap then tap 2 Tap then tap Settings Accounts sync 3 If you have already set up a synchronisation account and you want to sync with that account tap the account then tap and tap Sync now Other methods for transferring contacts Depending on the capabilities of your old device you can use a memory card or Bluetooth technology to move contacts directly to your new device It is not re...

Page 46: ...Tap the contact you want to link with another contact 3 Press then tap Link contact 4 Tap the contact whose information you want to join with the first contact then tap OK to confirm The information from the first contact is merged with the second contact and the first contact is no longer displayed in the Contacts list To separate linked contacts 1 From your Home screen tap then tap 2 Tap the lin...

Page 47: ...lect an option under Ringtone 4 When you are finished tap Done 5 Tap Done To delete contacts 1 From your Home screen tap then tap 2 Touch and hold the contact that you want to delete 3 To delete all contacts tap the downwards arrow to open the drop down menu then select Mark all 4 Tap then tap OK To edit contact information about yourself 1 From your Home screen tap then tap 2 Tap Myself then tap ...

Page 48: ...media message and starting a chat using the Google Talk application For an application to appear as an option in the quick contact menu you may need to set up the application in your device and be logged in to the application For example you need to start the Gmail application and enter your login details before you can use Gmail from the quick contact menu Favourites and groups You can mark conta...

Page 49: ...thod and follow the on screen instructions Backing up contacts You can use a memory card or a SIM card to back up contacts To export all contacts to a memory card 1 From your Home screen tap then tap 2 Press then tap Export contacts SD card 3 Tap OK To export contacts to a SIM card 1 From your Home screen tap then tap 2 Press then tap Export contacts SIM card 3 Mark the contacts you want to export...

Page 50: ...ing recipients tap Done 5 Tap Write message and enter your message text 6 If you want to add a media file tap and select an option 7 To send the message tap Send If you exit a message before sending it gets saved as a draft The conversation gets tagged with the word Draft To read a received message 1 From your Home screen tap then find and tap 2 Tap the desired conversation 3 If the message is not...

Page 51: ...the file you want to save then select the desired option To star a message 1 From your Home screen tap then find and tap 2 Tap the conversation you want to open 3 In the message you want to star tap 4 To unstar a message tap To view starred messages 1 From your Home screen tap then find and tap 2 Press then tap Starred messages 3 All starred messages appear in a list To search for messages 1 From ...

Page 52: ...n To start Google Talk 1 From your Home screen tap 2 Find and tap Talk To reply to an instant message with Google Talk 1 When someone contacts you on Google Talk appears in the status bar 2 Drag the status bar downwards then tap the message and begin to chat 52 This is an Internet version of this publication Print only for private use ...

Page 53: ...unt on your device 1 From your Home screen tap 2 Find and tap Email 3 Tap at the top of the screen then tap Add account 4 Enter the email address and password then tap Next If the settings for the email account cannot be downloaded automatically complete the setup manually 5 When prompted enter a name for your email account so that it is easily identifiable The same name shows in the emails you se...

Page 54: ...t the check frequency to Automatic Push To read your email messages 1 From your Home screen tap 2 Find and tap Email 3 If you are using several email accounts tap at the top of the screen and select the account you want to check If you want to check all your email accounts at once tap Combined view 4 In the email inbox scroll up or down and tap the email you want to read To use the email preview p...

Page 55: ...ome screen tap 2 Find and tap Email 3 In your email inbox find and tap the message you want to forward then tap 4 Tap Forward 5 Tap To and enter the recipient s email address manually or tap to select a recipient from your contacts 6 Enter your message text then tap To delete an email message 1 From your Home screen tap 2 Find and tap Email 3 In your email inbox find and tap the message you want t...

Page 56: ...check frequency 5 Tap Inbox check frequency and select an option To set an Out of Office auto reply in an Exchange Active Sync account 1 From your Home screen tap then find and tap Email 2 Press then tap Settings 3 Select the EAS Exchange Active Sync account for which you want to set an Out of Office auto reply 4 Tap Out of office 5 Tap beside Out of office so that changes to 6 If needed mark the ...

Page 57: ...Facebook and Twitter activity plus news feeds that you have subscribed to It colour codes and sizes articles for easy reading adding photos and cropping images of your friends faces to illustrate each story The Socialife application is not available in all markets To open the Socialife application 1 From your Home screen tap 2 Find and tap 57 This is an Internet version of this publication Print o...

Page 58: ...available 5 Go to the next song in the current play queue or fast forward 6 Total time length of the song 7 Elapsed time of current song 8 Progress indicator drag the indicator or tap along the line to fast forward or rewind 9 Play Pause button 10 Go to the previous song in the current play queue or rewind Transferring media files to your device Before using the WALKMAN application it s a good ide...

Page 59: ...t a setting then tap OK to confirm To turn on the surround sound feature 1 When the WALKMAN application is open tap 2 Tap Settings Sound effects Sound enhancements Settings Surround sound VPT 3 Select a setting then tap OK to confirm To view the current play queue While a song is playing in the WALKMAN application tap To minimise the WALKMAN application When the WALKMAN application is playing tap ...

Page 60: ... WALKMAN application tap 2 Tap Visualizer Tap to switch to full screen view To change the background theme 1 In the WALKMAN application tap 2 Tap Visualizer 3 Tap Theme and select a theme Getting more information about a song or artist In the WALKMAN application you can get more information about the artist that you are listening to by tapping the infinite button The infinite button also gives you...

Page 61: ...ng title 3 Tap Add as shortcut The shortcut now appears in the My music main view To rearrange shortcuts In My music touch and hold a shortcut until it magnifies and your device vibrates then drag the item to a new location To delete a shortcut In My music touch and hold a shortcut until it magnifies and your device vibrates then drag the item to You can only delete shortcuts that you create yours...

Page 62: ...r A playlist can be for example a playlist you have created yourself or an album To play songs in random order 1 In My music tap and navigate to an album or tap and browse to a playlist 2 Tap the album art then tap to turn on Shuffle mode To turn off shuffle mode When songs are playing in random order tap Managing playlists In My music you can create your own playlists from the music that is saved...

Page 63: ...You need to add this widget to your Home screen before you can use it To add the WALKMAN application widget to your Home screen 1 Tap an empty area on your Home screen then tap Widgets 2 Find and tap WALKMAN Protecting your hearing Listening to the WALKMAN application or other media players at excessive volume or for a prolonged period of time can damage your hearing even when the volume is at a m...

Page 64: ... screen press To view TrackID charts 1 When the TrackID application is open tap Charts The first time you view a chart it is set to your own region 2 To see charts of the most popular searches in other regions tap Regions 3 Select a country or region Using TrackID technology results Track information appears when the TrackID application recognises a track You can select to purchase the track or sh...

Page 65: ...sic Unlimited Music Unlimited is a subscription based service that offers access to millions of songs over a mobile network or Wi Fi connection You can manage and edit your personal music library in the cloud from a variety of devices or sync your playlists and music using a PC that runs the Windows operating system Go to www sonyentertainmentnetwork com for more information Sony Entertainment Net...

Page 66: ...phones to your device 2 From your Home screen tap 3 Find and tap FM radio The available channels appear as you scroll through the frequency band When you start the FM radio available channels appear automatically If a channel has RDS information it appears a few seconds after you start listening to the channel To move between radio channels Flick your finger up or down along the frequency band To ...

Page 67: ...ot affected by a new scan To start a new search for radio channels 1 When the radio is open press 2 Tap Search for channels The radio scans the whole frequency band and all available channels are displayed Sound settings Switching the radio sound between devices You can listen to the radio through a wired headset or through wired headphones Once either device is connected you can switch the sound ...

Page 68: ...radio tap 2 A progress indicator appears while the TrackID application samples the song If successful you are presented with a track result or a list of possible tracks 3 Press to return the FM Radio The TrackID application and the TrackID service are not supported in all countries regions or by all networks and or service providers in all areas 68 This is an Internet version of this publication P...

Page 69: ... camera 6 Switch between the front and the main camera 7 Camera settings and shortcuts 8 Front camera To open the camera From your Home screen tap then find and tap To close the camera Press from the main camera screen Using the still camera There are two ways to take photos with the still camera You can tap the on screen camera button or touch a spot on the screen To take a photo by touching the ...

Page 70: ... to five faces indicated by white frames A yellow frame shows which face has been selected for focus Focus is set to the face closest to the camera You can also tap one of the frames to select which face should be in focus To turn on face detection 1 Activate the camera 2 Tap the icon on the top left of the screen then select Normal 3 To display all settings tap 4 Tap Focus mode Face detection To ...

Page 71: ...Location services 5 After you confirm your settings press to return to the camera screen 6 If appears on the camera screen your location is available and your photo can get geotagged If not check your GPS and or wireless network connection Using still camera settings To adjust the still camera settings 1 Activate the camera 2 To display all settings tap 3 Select the setting that you want to adjust...

Page 72: ...the maximum resolution available when photos are taken using Superior auto mode when HDR is turned on in Normal mode or when Scenes is selected in Backlight correction HDR mode The 8MP resolution is only available when Normal capturing mode is selected and HDR is turned off and when Scenes mode is selected except in Backlight correction HDR mode Self timer With the self timer you can take a photo ...

Page 73: ...e used for all scene types Continuous autofocus is on Touch focus Touch a specific area on the camera screen to set the area of focus Continuous autofocus is off Touch and hold the camera screen until the yellow focus frame turns blue indicating that the focus is set The photo is taken when you release your finger Object tracking When you select an object by touching it in the viewfinder the camer...

Page 74: ... the exposure in a very small part of the image that you want to capture This setting is only available in Normal capturing mode Image stabiliser When taking a photo it can be difficult to hold the device steady The stabiliser helps you by compensating for small movements of the hand Geotagging Tag photos with details of where you took them On When geotagging is turned on the approximate geographi...

Page 75: ...You can choose to save your data either to a removable SD card or to your device s internal storage Internal storage Photos or videos are saved on the device memory SD card Photos or videos are saved on the SD card Using the video camera To record a video by tapping the screen 1 Activate the camera 2 Point the camera towards the subject 3 Tap to start recording 4 Tap to stop recording Shoot your v...

Page 76: ...p Use for shooting videos against soft backgrounds Landscape Use for videos of landscapes The camera focuses on distant objects Night When turned on light sensitivity is increased Use in poorly lit environments Videos of fast moving objects may get blurred Hold your hand steady or use a support Turn off night mode when lighting conditions are good to improve the video quality Beach Use in bright e...

Page 77: ...s launched from sleep mode Off Focus mode The focus setting controls which part of a video should be sharp When continuous autofocus is on the camera keeps adjusting focus so that the area within the white focus frame stays sharp Single autofocus The camera automatically focuses on the selected subject Continuous autofocus is on Face detection The camera automatically detects up to five human face...

Page 78: ...device steady The stabiliser helps you by compensating for small movements of the hand Geotagging Tag videoss with details of where you took them On When geotagging is turned on the approximate geographical location is added to videos when you take them To use geotagging you must enable location features from the Settings menu For geotags to be added to a video the location must be determined befo...

Page 79: ... to a removable SD card or to your device s internal storage Internal storage Photos or videos are saved on the device memory SD card Photos or videos are saved on the SD card 79 This is an Internet version of this publication Print only for private use ...

Page 80: ...on your device My albums view your online albums and your geotagged photos and video clips on a world map To open Album 1 From your Home screen tap 2 Find and tap Album If the screen orientation does not change automatically when you turn your device sideways mark the Auto rotate screen checkbox under Settings Display Mobile BRAVIA Engine Sony s Mobile BRAVIA Engine technology improves the viewing...

Page 81: ...bum When viewing thumbnails of photos and videos in Album spread two fingers apart to zoom in or pinch two fingers together to zoom out To work with batches of photos or videos in Album 1 When viewing thumbnails of photos and videos in Album tap then tap Select items 2 Tap the items you want to work with Selected items are indicated by a blue frame 3 Use the tools in the toolbar at the top of the ...

Page 82: ...ologically ordered grid Videos are indicated by 4 Tap a photo or video to view it 5 Flick left to view the next photo or video Flick right to view the previous photo or video If the screen orientation does not change automatically when you turn your device sideways mark the Auto rotate screen checkbox under Settings Display To view content in list view in the Internal memory tile 1 From your Home ...

Page 83: ...splay Working with photos in Album You can edit photos in Album For example you can crop photos associate them with contacts or use them as wallpaper To zoom a photo When you are viewing a photo double tap the screen to zoom in Double tap again to zoom out When you are viewing a photo spread two fingers apart to zoom in or pinch two fingers together to zoom out To watch a slideshow of your photos ...

Page 84: ...re viewing a photo tap the screen to display the toolbars then tap Edit photo 2 Select an option 3 To save a copy of the edited photo tap Save After you save the edited photo the original unchanged version of the photo remains on your device To improve a photo using advanced settings 1 When you are viewing a photo tap the screen to display the toolbars then tap Edit photo 2 Select an option 3 To s...

Page 85: ... on and new photos get analysed as they are added After running an analysis you can then group all photos of the same person in one folder To turn on the photo analysis feature 1 From your Home screen tap 2 Find and tap Album My albums Faces 3 Tap Activate All photos on your device get analysed and grouped accordingly To turn off the photo analysis feature 1 From your Home screen tap 2 Find and ta...

Page 86: ...hat you want to use to share the selected video then follow the relevant steps to send it You might not be able to copy send or transfer copyright protected items Also some items may not send if the file size is too large To delete a video 1 In Album find the video you want to delete 2 Touch and hold the video to activate selection mode The frame of the video thumbnail turns blue when it is select...

Page 87: ...mber of photos appears in the top right corner for example To view these photos tap the cover photo and then tap one of the thumbnails at the bottom of the screen When viewing a geotagged photo in the photo viewer you can touch the screen to display the toolbars then tap to view the photo on the map To view geotagged photos on a globe in Album 1 From your Home screen tap 2 Find and tap Album My al...

Page 88: ... Album view the photos and videos that you and your friends have uploaded to online services such as Picasa and Facebook You can view comments from your friends and add your own comments as well Overview of online services 1 Active online service 2 Name of online album 3 Number of items in the online album 4 Refresh 5 View menu options To view photos from online services in Album 1 From your Home ...

Page 89: ...ts scroll down the screen 3 To add your own comments enter your comments at the bottom of the screen then tap Post To Like a photo or video on Facebook While viewing a photo or video from one of your Facebook albums tap the screen to display the toolbars then tap to show that you Like the item on Facebook 89 This is an Internet version of this publication Print only for private use ...

Page 90: ...l shortcut items 5 Access all connected DLNA Certified devices 6 Video file tap to play Sony Entertainment Network with Video Unlimited and Music Unlimited is not available in every market Separate subscription required Additional terms and conditions apply Using Movies To play a video in Movies 1 From your Home screen tap then find and tap Movies 2 Find and tap the video that you want to play If ...

Page 91: ...you mark the Get video details checkbox under Settings Data transmission charges may apply If the downloaded information is not correct search again using different keywords To clear information about a video 1 From your Home screen tap then find and tap Movies 2 Tap All in the My Collection tab to browse to the video that you want to edit 3 Touch and hold the video thumbnail then tap Clear info T...

Page 92: ...tion The Video Unlimited menu is dynamic which means that all options are not always available For example the option to delete all items in your wish list is only available when you are viewing the list To open the Video Unlimited menu When the Video Unlimited application is open tap Creating a Video Unlimited account You need to create a Video Unlimited account if you want to buy or rent movies ...

Page 93: ...ard or on the internal storage Downloading of video is ongoing Downloading is paused Confirmation of successful purchase Rental countdown period has started Watching a video from Video Unlimited You can watch your rented or purchased videos on most Sony devices that are connected to your Video Unlimited account 93 This is an Internet version of this publication Print only for private use ...

Page 94: ... http support google com chrome and click the Chrome for Mobile link to get more detailed information about how to use this web browser Google Chrome is not available in all markets To open the web browser 1 From your Home screen tap 2 Find and tap 94 This is an Internet version of this publication Print only for private use ...

Page 95: ...me screen tap 2 Find and tap Settings 3 Make sure that the Wi Fi function is on Tap Wi Fi 4 Available Wi Fi networks are displayed The available networks may be open or secured Open networks are indicated by and secured networks are indicated by next to the Wi Fi network name 5 Tap a Wi Fi network to connect to it If you are trying to connect to a secure network you are asked to enter a password i...

Page 96: ...eckbox To view detailed information about a connected Wi Fi network 1 From the Home screen tap 2 Find and tap Settings Wi Fi 3 Tap the Wi Fi network that you are currently connected to Detailed network information is displayed Wi Fi sleep policy By adding a Wi Fi sleep policy you can specify when to switch from Wi Fi to mobile data If you are not connected to a Wi Fi network your device uses a mob...

Page 97: ...sconnect the USB cable You cannot share your device s data connection and SD card over a USB cable at the same time You may need to prepare your computer to establish a network connection via USB cable Go to www android com tether to get the most current information To use your device as a portable Wi Fi hotspot 1 From the Home screen tap 2 Find and tap Settings More Tethering portable hotspot 3 T...

Page 98: ...ent with DLNA Certified devices You can view or play media content saved to your device on other devices such as for example a TV or a computer Such devices must be DLNA Certified by the Digital Living Network Alliance and all devices must be connected to the same Wi Fi network in order for content to be shared You can also view or play content from other DLNA Certified devices on your device Afte...

Page 99: ...ss permission are listed as pending devices To set up file sharing with other DLNA Certified devices 1 Connect your device to a Wi Fi network 2 From your Home screen tap then find and tap 3 Tap My music to open the music library 4 Press then tap Media server 5 To turn on the Share content function drag the slider appears in the status bar Your device can now work as a media server 6 Connect your c...

Page 100: ... device on a DMR device 1 Make sure that you have correctly set up the DMR device and that it is connected to the same Wi Fi network as your device 2 From your Home screen tap 3 Find and tap Album 4 Browse to and open the file that you want to view 5 Tap the screen to display the toolbars then tap and select a DMR device to share your content with The selected files start playing in chronological ...

Page 101: ...ring data with another device using NFC refer to the User guide of the other device for more information To share a contact with another device using NFC 1 Make sure that both devices have the NFC function turned on and that both screens are active 2 To view contacts go to your Home screen tap then tap 3 Tap the contact that you want to share 4 Hold your device and the receiving device back to bac...

Page 102: ...l to start the transfer 6 When the transfer is done the photo or video is displayed on the screen of the receiving device At the same time the item is saved on the receiving device You can also use NFC to share a video from the Movies application To share a web address with another device using NFC 1 Make sure that both devices have the NFC function turned on and that both screens are active 2 Fro...

Page 103: ...this kind of connection refer to the User guide of the compatible device for more information You may need to have Wi Fi or Bluetooth activated on both devices for the connection to work Bluetooth wireless technology Use the Bluetooth function to send files to other Bluetooth compatible devices or to connect to handsfree accessories Turn on the Bluetooth function in your device and create wireless...

Page 104: ...tooth device 1 Make sure that the device you want to pair your device with has the Bluetooth function activated and is visible to other Bluetooth devices 2 Drag the status bar downwards then tap 3 Find and tap Bluetooth All available Bluetooth devices appear in a list 4 Tap the Bluetooth device that you want to pair with your device 5 Enter a passcode if required or confirm the same passcode on bo...

Page 105: ...fer drag the status bar downwards 7 To open a received item drag the status bar downwards and tap the relevant notification To view files you have received using Bluetooth 1 Drag the status bar downwards then tap 2 Find and tap Bluetooth 3 Press and select Show received files Connecting your device to a computer Connect your device to a computer and start transferring pictures music and other type...

Page 106: ... Settings Storage Transfer data to SD card 3 Mark the file types you want to transfer to the SD card 4 Tap Transfer The direct transfer method means that a USB cable connection to a computer is not necessary Transferring files using Media transfer mode via Wi Fi You can transfer files between your device and other MTP compatible devices such as a computer using a Wi Fi connection Before connecting...

Page 107: ...unched from the device when you connect it to a computer via USB cable You need an internet connected computer running one of the following operating systems to use the PC Companion application Microsoft Windows 7 Microsoft Windows 8 Microsoft Windows Vista Microsoft Windows XP Service Pack 3 or higher To install PC Companion on a PC 1 Make sure the Install software checkbox under Settings Xperia ...

Page 108: ...devices You may have to purchase an MHL cable separately To view content from your device on a TV which supports MHL input 1 Connect your device to the TV using an MHL cable appears in your device s status bar after a connection is established 2 The TV launcher application starts automatically Follow the instructions to view your media files on the TV To view content from your device on a TV which...

Page 109: ...s mobile web content such as a web page with more product information or a map of nearby outlets NeoReader supports most standard barcode types To start the NeoReader application 1 From the Home screen tap 2 Find and tap NeoReader To scan a barcode 1 When the NeoReader application is open hold your device over the barcode until the complete barcode is visible in the viewfinder 2 Your device automa...

Page 110: ...for the first time tap OK to close the introduction screen 2 Tap 3 Give the event a name then tap Create 4 Under WHEN add either an accessory or a time interval or both 5 Under DO THIS add what you want to happen when connecting accessory or at the specified time in your device 6 Under AT THE END add what you want to happen when you disconnect the accessory or when the time interval comes to an en...

Page 111: ... you that want to synchronise To synchronise manually with your Google account 1 From the Home screen tap 2 Tap Settings Google 3 Tap the Google account that you want to synchronise 4 Press then tap Sync now To synchronise an application with a Google account 1 From your Home screen tap 2 Tap Settings Google 3 Tap the Google account that you want to synchronise with A list appears of applications ...

Page 112: ...o set a synchronisation interval for a corporate account 1 From your Home screen tap 2 Tap Email then tap 3 Tap Settings and select a corporate account 4 Tap Check frequency and select an interval option To remove a corporate account 1 From your Home screen tap 2 Tap Settings Corporate then select the corporate account 3 Tap then tap Remove account 4 Tap Remove account again to confirm Synchronisi...

Page 113: ...acebook account is not deleted and you can still access it from a computer 1 From your Home screen tap 2 Tap Settings Xperia with Facebook 3 Select the account that you want to remove 4 Press then tap Remove account 5 Tap Remove account again to confirm 113 This is an Internet version of this publication Print only for private use ...

Page 114: ...eceiver that uses satellite signals to calculate your location When you use features that require the GPS receiver to find your location make sure you have a clear view of the sky To enable GPS 1 From your Home screen tap 2 Tap Settings Location services 3 Mark the GPS satellites checkbox Getting the best performance The first time you use the GPS it can take 5 to 10 minutes for your location to b...

Page 115: ...oogle Latitude to view your friends locations on maps and share your location and other information with them Using Google Maps to get directions Use the Google Maps application to get directions when you travel by foot public transportation or car You can add a shortcut to a destination on your Home screen to get quick directions from wherever you are When you view a map you make an Internet conn...

Page 116: ...reminder for the event To add a new reminder for the event tap 5 If desired tap More and select another option under Repetition 6 Tap Done When the appointment time approaches your device plays a short sound to remind you Also appears in the status bar To view a calendar event 1 From your Home screen tap then tap Calendar 2 Tap the event you want to view To change the calendar settings 1 From your...

Page 117: ...and tap Alarm clock 3 Tap next to the alarm you want to activate To delete an alarm 1 From your Home screen tap 2 Find and tap Alarm clock 3 Touch and hold the alarm you want to delete 4 Tap Delete alarm then tap Yes To set the ringtone for an alarm 1 From your Home screen tap 2 Find and tap Alarm clock 3 Tap the alarm you want to edit 4 Tap Advanced alarm settings and unmark the Style settings ch...

Page 118: ...o set alarms to sound when the device is in silent mode 1 From your Home screen tap 2 Find and tap Alarm clock then tap to select an alarm 3 Tap Advanced alarm settings then mark the Alarm in silent mode checkbox 4 Tap Done To snooze an alarm when it sounds Tap Snooze s min To turn off an alarm when it sounds Slide to the right 118 This is an Internet version of this publication Print only for pri...

Page 119: ...2 Find and tap Update Center 3 Select the desired application or system update and tap or tap to download all application updates Application updates launch automatically after download With system updates install the update manually after download Your device will then restart automatically after the installation is finished You may incur data connection charges when downloading updates over mobi...

Page 120: ... popup window appears Follow the on screen instructions to carry out the relevant software updates Sony Bridge for Mac application is downloadable from Bridge for mac Backup and restore application Use the Backup and restore application to make backups of content to a memory card or a USB storage device Such backups can be used to restore your content and some settings in cases where your data get...

Page 121: ...er that any changes you make to your data and settings after you create a backup will get deleted during a restore procedure Managing backup records You can delete or rename records of the backups that you make using the Backup restore function To rename a backup record 1 From your Home screen tap 2 Find and tap Back up restore 3 Press then tap Manage backup records 4 Select the backup record that...

Page 122: ...er of the memory card and micro SIM card slots 2 Insert a fingernail or a sharp object such as a pen into the hole in the label tray then drag the tray outwards to view the IMEI number You can also open the phone dialer on your device and enter 06 to view the IMEI number To view your IMEI number in the device 1 From your Home screen tap 2 Find and tap Settings About phone Status 3 Scroll to IMEI t...

Page 123: ...vice For example you can use the Face Unlock feature which uses a picture of your face to unlock the screen You can also set a screen unlock pattern a number based PIN lock or a text based password It is very important that you remember your screen unlock pattern PIN or password If you forget this information it may not be possible to restore important data such as contacts and messages Refer to S...

Page 124: ...nlock pattern 1 From your Home screen tap 2 Find and tap Settings Security Screen lock 3 Draw your screen unlock pattern 4 Tap Pattern 5 Follow the instructions in your device To disable the screen unlock pattern 1 From your Home screen tap Settings Security Screen lock 2 Draw the screen unlock pattern 3 Tap Slide To create a screen unlock PIN 1 From your Home screen tap Settings Security Screen l...

Page 125: ...m and sign in using your Google account If the service is not activated you can activate it manually via the Settings menu The my Xperia service may not available in all countries regions To activate the my Xperia service manually 1 Drag the status bar downwards then tap 2 Tap Xperia MyXperia Activate 3 Mark the checkbox then tap Accept Support application To access the Support application 1 From ...

Page 126: ...rnet calls Sound Configure how your device rings vibrates or alerts you when you receive communications You can also use these settings to set the volume level for music video games or other media with audio and to make related adjustments Display Enable the screen to switch orientation when you rotate your device You can also set the brightness font size and use Screen mirroring to show the scree...

Page 127: ...atus and notification icons overview Status icons The following status icons may appear on your screen Signal strength No signal Roaming GPRS is available EDGE is available LTE is available NFC is activated 3G is available Sending and downloading GPRS data Sending and downloading EDGE data Sending and downloading 3G data Network is available Sending and downloading data Battery status The battery ...

Page 128: ...ing on Software updates available Downloading data Uploading data More undisplayed notifications Application overview Use the Alarm and clock application to set various kinds of alarms Use your web browser to navigate and view web pages manage bookmarks and manage text and images Use the Calculator application to perform basic calculations Use the Calendar application to keep track of your events ...

Page 129: ...n by turn instructions View news stories and weather forecasts Make phone calls by dialling the number manually or by using the smart dial function Search for places for example restaurants and cafés Use the Video Unlimited application to rent and purchase videos Use the subscription based Music Unlimited application to access millions of songs over a mobile data connection or Wi Fi connection Opt...

Page 130: ...your device the covers for the micro USB port and the micro SIM and memory card slots must be firmly closed Avoid exposing your device to environments with excessive dust or moisture Normal wear and tear along with damage to your device can reduce its ability to resist dust or moisture Do not use your device in the following conditions Swimming pool Diving You should only use the device in water d...

Page 131: ... water up to 1 5 metres deep You can therefore use the device in dusty environments when your fingers are wet and in extreme weather conditions for example when it s snowing or raining or when humidity levels are high See the table below for more details Resistance to solid objects and dust Resistance to water IP0X No special protection IPX0 No special protection IP1X Protected against solid objec...

Page 132: ...of such technology outside of this product is prohibited without a licence from Microsoft Content owners use Windows Media digital rights management technology WMDRM to protect their intellectual property including copyrights This device uses WMDRM software to access WMDRM protected content If the WMDRM software fails to protect the content content owners may ask Microsoft to revoke the software s...

Page 133: ...detection 70 geotagging 71 icons 76 overview 69 recording videos 75 screen 69 self portraits 70 settings 71 76 smile detection 71 Smile Shutter 71 taking photos 69 70 71 video 75 viewing photos 70 viewing videos 75 zoom 70 caps lock 25 charging 15 chat 52 conference calls 43 connectivity 95 contacts backing up 49 copying 49 favourite 48 groups 48 importing from SIM card 46 joining contact informat...

Page 134: ...xchange synchronisation 111 Mobile BRAVIA Engine 80 Movies 90 clearing video information 91 settings 91 Multimedia Messaging Service MMS settings 33 music 33 58 63 adjusting volume 59 changing songs 59 deleting 65 downloading music information 61 hearing protection 63 My playlists 63 pausing a song 59 playing 59 purchasing 64 recommending 65 searching using TrackID 64 sending 60 sharing 64 shortcu...

Page 135: ... messaging 33 MMS 33 quick settings 23 still camera 71 video camera 76 setup guide 11 sharing music 64 photos 85 shuffle music 62 silent mode 29 SIM card 122 exporting contacts to 49 importing contacts from 46 slideshow 83 Smart Connect 110 smile detection 71 Smile Shutter 71 SOS See emergency numbers 43 STAMINA mode changing settings 17 standby time estimating 17 status 127 bar 23 still camera 69...

Page 136: ...g to from a computer 58 viewing 75 80 81 viewing movies 90 photos 70 videos recorded using the camera 75 voice input 29 voice recognition 29 voicemail 43 volume adjusting for videos 86 key 29 W WALKMAN application adding songs to playlists 62 creating playlists 62 deleting songs 59 minimising 59 overview 58 playing songs in random order 62 playlists 62 using 59 using the equaliser 59 WALKMAN appli...

Reviews: