background image

1

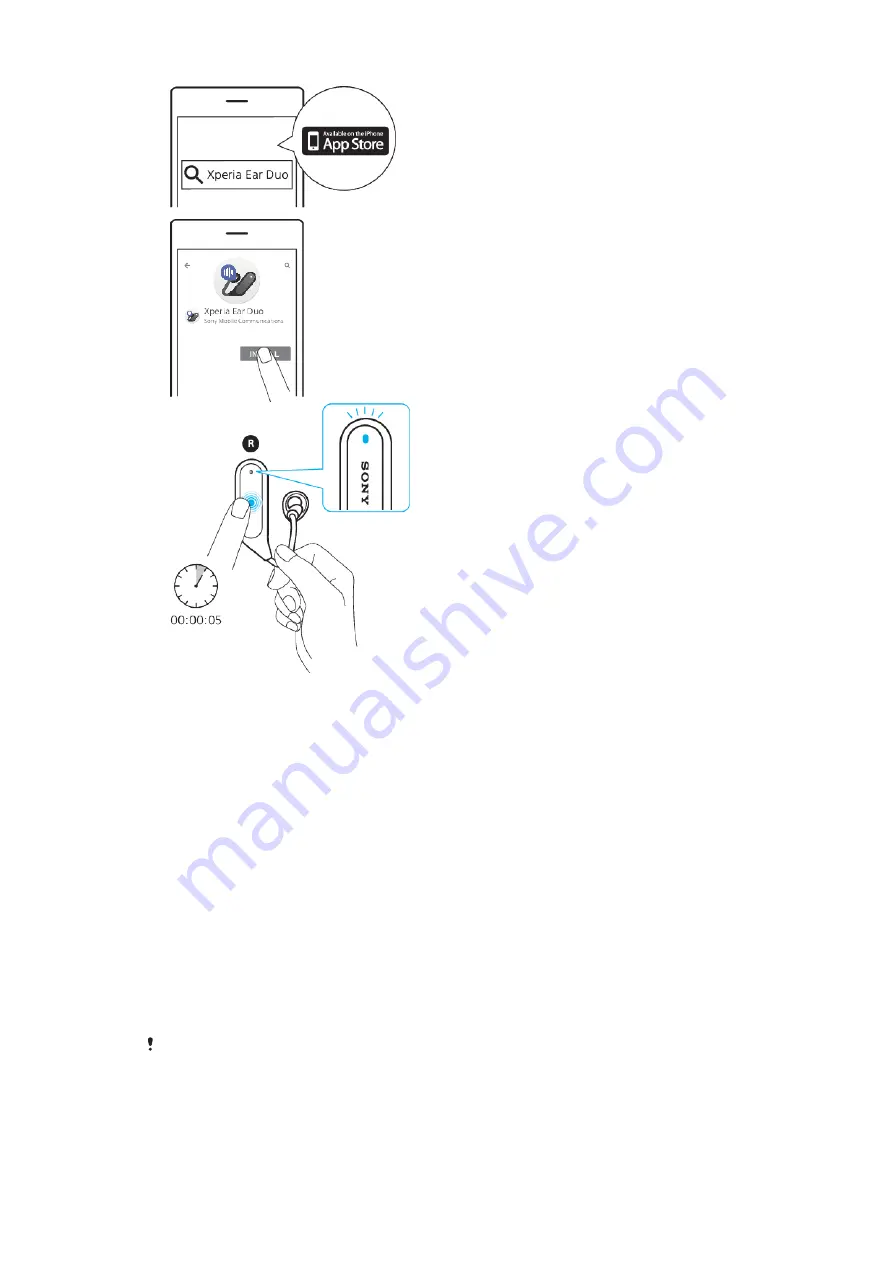
iOS device: Make sure you have the latest version of the Xperia Ear Duo

app.

2

Turn on Bluetooth.

3

Xperia Ear Duo: Touch and hold the touchpad of the main unit (R) for 5

seconds. The LED indicator flashes quickly in blue.

4

Bring the main unit (R) and iOS device close to each other.

5

iOS device: Scan for Bluetooth devices and select XEA20 from the list.

6

Xperia Ear Duo: When pairing is complete, the LED indicator on the main unit

flashes once in white.

7

Launch the Xperia Ear Duo app and follow the on-screen instructions.

To pair with devices other than Android or iOS

1

Touch and hold the touchpad of the main unit (R) for 5 seconds. The LED

indicator flashes quickly in blue.

2

Follow the instructions provided by the device to which you're pairing.

3

When pairing is complete, the LED indicator on the main unit flashes once in

white.

Wearing instructions

Check relevant laws and regulations on the use of mobile phones, transmitting devices and

earphones before using this device while operating a vehicle or riding a bicycle. Always give

your full attention to operating your vehicle or bicycle and the surroundings.

To wear the main units for the first time, follow these steps.

10

This is an internet version of this publication. © Print only for private use.

Summary of Contents for Xperia Ear Duo XEA20

Page 1: ...User guide Xperia Ear Duo XEA20 ...

Page 2: ...t connected to a power source 7 Getting started 8 Charging 8 Turning on or off 9 Pairing with an Android or iOS device 9 Wearing instructions 10 Using your Xperia Ear Duo 13 Using the touchpad 13 Using head gestures 14 Calling 15 Listening to music 16 Adjusting the volume 16 Using voice control 16 Anytime Talk 16 Settings 18 Changing the key behaviour 18 Setting the sound 18 Setting the Assistant ...

Page 3: ...connected to the world You can enjoy music make calls listen to your schedule forecasts and more all while being able to hear your surroundings Set up the Xperia Ear Duo with the Xperia Ear Duo host app on an Android or iOS device 3 This is an internet version of this publication Print only for private use ...

Page 4: ...Microphone 3 LED indicator 4 Proximity sensor 5 Ring supporter 6 Touchpad 7 Charging case connector 8 Right left marker for ring supporter 9 Right left marker for main units Do not insert foreign objects such as pins and clips into the sound hole Charging case 4 This is an internet version of this publication Print only for private use ...

Page 5: ...e C port 15 Charging case battery level LED To attach the lid to the charging case Make sure not to apply too much force when opening the lid of the charging case so the lid does not become detached If necessary reattach the lid as described 5 This is an internet version of this publication Print only for private use ...

Page 6: ...ction part B of the charging case with connection part C of the lid as shown in the illustration 3 Push the connection parts together to attach 4 Press lightly on the connection part while closing the lid so no gap is formed 6 This is an internet version of this publication Print only for private use ...

Page 7: ...atus of the main units through the window to the Xperia Ear Duo battery level LED Charging case battery level LED during charging When the charging case is connected to a power source the LED indicator near the USB port shows the case s battery level Red 15 or less Orange 15 80 Green 80 or more No light Charging complete or no battery left Charging case battery level LED when not connected to a po...

Page 8: ...port of the charging case 3 Connect the other end of the USB Type C cable to the charger Make sure to place the main units in the charging case with the logo facing up Placing them in the case at an angle may damage the charging case connector Placing them in the case upside down may damage the touchpad Use a USB Type C cable provided to charge your device For the recommended charger see http www ...

Page 9: ...ps Pairing with an Android or iOS device For your Xperia Ear Duo to work properly you must install the latest version of the Xperia Ear Duo app on an Android or iOS device and then pair it The Xperia Ear Duo app is available on Google Play or the App Store Make sure not to cover the proximity sensor with your finger as this can prevent the main unit from entering pairing mode To pair with an Andro...

Page 10: ...ir with devices other than Android or iOS 1 Touch and hold the touchpad of the main unit R for 5 seconds The LED indicator flashes quickly in blue 2 Follow the instructions provided by the device to which you re pairing 3 When pairing is complete the LED indicator on the main unit flashes once in white Wearing instructions Check relevant laws and regulations on the use of mobile phones transmittin...

Page 11: ...r ear as shown in the illustration Adjust the ring supporter so it fits comfortably in your ear 4 Insert the main unit L in the left ear in the same procedure Make sure no hair is caught between the proximity sensor window and your ear If the proximity sensor is covered it cannot function properly To change the ring supporter 11 This is an internet version of this publication Print only for privat...

Page 12: ...ar the ring supporter When removing do not forcibly pull or twist the ring supporter as this can damage or tear it When attaching check the right left markers on the ring supporters and main units to be sure they are matched correctly Caring for your Xperia Ear Duo and your skin To help avoid skin irritation clean your Xperia Ear Duo regularly Remove and rub the ring supporter with a dry cloth If ...

Page 13: ...ring use Tapping Tap the touchpad with your finger If the main unit doesn t respond when you double tap or triple tap try tapping at a different speed Touching and holding Touch and hold the touchpad with your finger Sliding Slide your finger firmly up or down on the touchpad then release it 13 This is an internet version of this publication Print only for private use ...

Page 14: ...ckboxes to enable or disable each function To answer or decline a call Nod your head to answer a call Shake your head to decline a call To skip to the previous or the next music track Turn your head to the left then back to skip to the previous music track Turn your head to the right then back to skip to the next music track To respond to the Assistant Nod your head to give positive feedback Shake...

Page 15: ...ad out switch to enable this function For iOS devices you can enable this function in the phone s settings menu To end a call When wearing your Xperia Ear Duo touch and hold the touchpad of either main unit to end a call To reject an incoming call When wearing your Xperia Ear Duo touch and hold the touchpad of either main unit to reject a call You can also use head gestures to reject a call To mut...

Page 16: ...rrounding environment Using voice control To use voice control Touch and hold the touchpad of the main unit R to activate voice command Anytime Talk This application is the beta version Anytime Talk is a service that requires a stable internet connection Depending on the network status you may not be able to chat using Anytime Talk 4G network is recommended Anytime Talk is an app that lets you use...

Page 17: ...ine sound and tap FINISH to complete the setup To add a guest to a chat group 1 When using the host app find and tap Anytime Talk 2 Tap Add guests Only the host can add or remove guests from the group To remove a guest from a chat group 1 When using the host app find and tap Anytime Talk 2 Tap Delete chat group member s 3 Select the guest you want to remove Only the host can add or remove guests f...

Page 18: ...umes more battery AAC Setting the Assistant You can specify what information you would like the Assistant to read out to you and when The Assistant only supports a limited number of languages Some features may not be available depending on the region For iOS devices only voice notifications are supported Setting up Daily Assist You can personalise the information the Assistant provides you with Th...

Page 19: ...d message of voice data is displayed follow the on screen instructions to download the data 5 Tap OK Resetting the Xperia Ear Duo Restart your Xperia Ear Duo if it behaves unexpectedly If restarting does not solve the issue you can perform a factory data reset Make sure the main unit has enough battery by placing it in the charging case Wait for the LED indicator to turn orange or green Then remov...

Page 20: ...he LED indicator flashes four times in green This indicates that the factory data reset is complete 4 When the main unit turns on automatically the LED indicator flashes twice in white and it makes a start up sound It then flashes quickly in blue to indicate that the main unit is ready to be paired Resetting your Xperia Ear Duo deletes all information about paired devices and reverts various setti...

Page 21: ...is User guide may not be available for all regions All rights reserved 2018 Sony Mobile Communications Inc 4 12 3 Higashi Shinagawa Shinagawa ku Tokyo 140 0002 Japan Sony Belgium bijkantoor van Sony Europe Limited Da Vincilaan 7 D1 1935 Zaventem Belgium Sony is the trademark or registered trademark of Sony Corporation All product and company names mentioned herein are the trademarks or registered ...

Page 22: ...että radiolaitetyyppi RD 0222 on direktiivin 2014 53 EU mukainen EU vaatimustenmukaisuusvakuutuksen täysimittainen teksti on saatavilla seuraavassa internetosoitteessa http www compliance sony de Le soussigné Sony Mobile déclare que l équipement radioélectrique du type RD 0222 est conforme a la directive 2014 53 UE Le texte complet de la déclaration UE de conformité est disponible a l adresse inte...

Page 23: ... försäkran om överensstämmelse finns pa följande webbadress http www compliance sony de Bu belgeyle Sony Mobile Communications Inc RD 0222 tipi telsiz cihazının 2014 53 EU sayılı Direktife uygun olduğunu beyan etmektedir AB Uygunluk beyanının tum metnine şu internet adresinden ulaşılabilir http www compliance sony de FCC Statement This device complies with Part 15 of the FCC rules Operation is sub...

Page 24: ...interference including interference that may cause undesired operation of the device Avis d industrie Canada Le présent appareil est conforme aux CNR d Industrie Canada applicables aux appareils radio exempts de licence L exploitation est autorisée aux deux conditions suivantes 1 l appareil ne doit pas produire de brouillage 2 l utilisateur de l appareil doit accepter tout brouillage radioélectriq...

Reviews: