background image

78

Adjusting Your Setup (MENU)

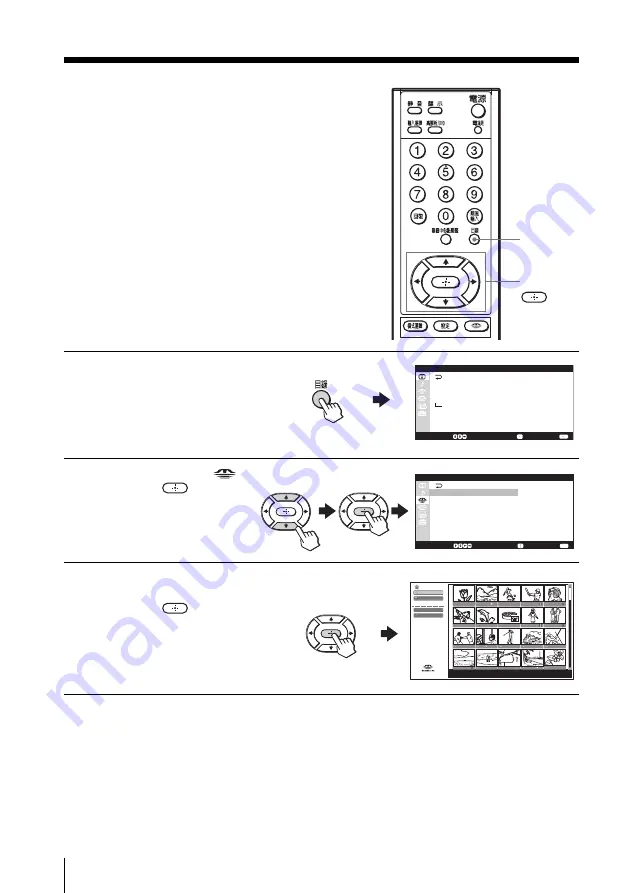
Entering the
“Memory Stick”
menu

The “Memory Stick” menu allows you
to view still pictures and movies stored
in a “Memory Stick”.

Insert a “Memory Stick” into the
“Memory Stick” slot. For details on using
a “Memory Stick”, see pages 41 to 67.

1

Press MENU.

2

Press 

M

/

m

 to select 

,

then press 

.

3

Make sure that “Memory
Stick Menu” is selected,
then press 

.

For details on the options
under the “Memory Stick
Menu”, see pages 45 to 67.

DRC-MF

MEMORY STICK

M o v e :

S e l e c t :

E n d  :

D R C - M F :
D R C  P 

a l e t  t e :

P i c t u r e   M o d e  :

P i c t u r e A d j u s  t m e n t

3 D - N R :

D R C 1 0 5 0
C u s t o m 1
P e r s o n a  l

O f  f

P i  c t u r e

M o v e :

S e l e c t :

E n d  :

M e m o r y  S t i c k M e n u

M e m o r y S t  i  c k

Memory Stick Home

Slide Show

Option

Dig. Cam. Mode

Select Folder

Filter : Still 

Size :

No    : 

Date : 

File   : 

MENU

M

/

m

/

<

/

,

/

Summary of Contents for WEGAKE-MX37

Page 1: ...Operating Instructions Before operating the unit please read this manual thoroughly and retain it for future reference 2004 Sony Corporation 2 059 888 E4 1 Plasma TV KE MX42 KE MX37 N1 ...

Page 2: ...sed to seawater it may cause fire or damage the Plasma TV Cord arrangement Arrange the power cords or connecting cords in a safe place to avoid tripping on them For Safety AC power cord Unplug the AC power cord when moving the Plasma TV Do not move the Plasma TV with the AC power cord plugged in It may damage the AC power cord and result in fire or electric shock If the Plasma TV has been dropped ...

Page 3: ...s Overloading This Plasma TV is designed to operate on a 110V AC supply Take care not to connect too many appliances to the same AC power socket as this could result in fire or electric shock AC power outlet Do not use a poor fitting AC power socket Insert the plug fully into the AC power outlet If it is loose it may cause arcing and result in fire Contact your electrician to have the AC power soc...

Page 4: ...TV Additional Safety Information Electric shock Do not touch the Plasma TV with a wet hand Doing so may cause electric shock or damage the Plasma TV Protruding location Do not install the Plasma TV in protruding locations If you install the unit in the following locations injury may result Do not install the Plasma TV in a location where the Plasma TV protrudes such as pillars Do not install the P...

Page 5: ... vertical length away from the Plasma TV View the Plasma TV in a moderate light room as viewing the Plasma TV in poor light taxes your eyes And watching the screen continu ously long times taxes your eyes too On installing the Plasma TV Use the specified wall mount bracket or stands Leave enough space for ventilation between the exhaust fan in the rear of unit and the wall Do not install the Plasm...

Page 6: ...of any kind Do not place the remote control in a location near heat source or in a place subject to direct sunlight or in a damp room On handling and cleaning the screen surface of the Plasma TV The screen of this Plasma TV has an anti reflection screen coating To avoid screen degradation follow the points mentioned below Do not push on or scratch with hard objects or throw anything at the screen ...

Page 7: ...re Reality and Clarity levels 28 Using wide screen mode 30 Listening with surround sound 34 Enjoying stereo or bilingual programs 35 Operating optional components 36 Using the TV s center speaker 39 Using the picture off feature 40 Using the Memory Stick viewer 41 Adjusting Your Setup MENU Introducing the menu system 68 Changing the Picture setting 72 Changing the Sound setting 75 Entering the Mem...

Page 8: ...r cord to wall outlet until you have completed making all connection Preventing the TV from falling down After connections with antennas and other equipment are completed be sure to attach the anchor attachments to the rear of the TV and pass sturdy cord or chain and attach it to a wall or pillar 1 Remove one of the upper two screws at the rear of the TV then attach the anchor attachment to the sc...

Page 9: ...t and attach the cord or chain to a wall or pillar Tip Anchor attachments are supplied with SU PT2M Tabletop Stand or SU PF2 Floating Stand Bundling the connecting cables You can bundle the connecting cables using the cable tie with Velcro at the rear or the TV Tip Cable tie is supplied with SU PT2M Tabletop Stand continued Cable tie not supplied Rear of TV ...

Page 10: ...ble has a male plug fitted while the other end is fitted with a female socket Connect the male plug to the 8 VHF UHF antenna terminal of the TV CAUTION Do not connect the power cord until all other connections are complete otherwise a minimal current leakage through the antenna and or other terminals to the ground could occur 8 VHF UHF 8 VHF UHF Signal flow or Antenna cable supplied Antenna cable ...

Page 11: ...VHF UHF antenna Rear of TV To t VIDEO IN video input 1 or 2 VIDEO yellow AUDIO L MONO white AUDIO R red Notes If you connect a monaural VCR connect the yellow plug to VIDEO the yellow jack and the black plug to AUDIO L MONO the white jack If you connect a VCR to the 8 VHF UHF antenna terminal preset the signal output from the VCR to the program number 0 on the TV When you connect a VCR to the S vi...

Page 12: ... diagram inside the battery compartment 3 Close the battery compartment Notes Do not use old batteries or different types of batteries together Remove the batteries to avoid damage from possible battery leakage whenever you anticipate that the remote control will not be used for an extended period Handle the remote control with care Avoid dropping it getting it wet placing it in direct sunlight ne...

Page 13: ... now appears 3 Press M m to select Yes then press to preset the channels automatically The screen will indicate automatic presetting is in progress After channel presetting is complete Display this menu next time appears Se l ec t End Language Eng l i sh I n i t i a l Se t up Move MENU PROG CH VOL INPUT Move Se l ec t End F i r s t p l ease cab l e an t enna c onnec t I n i t i a l Se t up Yes No ...

Page 14: ...you turn on the TV by pressing 1 To allow this menu to appear again select Yes then press Tips You can immediately go to the end of the Initial Setup menu by pressing MENU If your TV has preset an unwanted channel or cannot preset a particular channel then preset your TV manually see page 86 Getting Started continued ...

Page 15: ... can also connect video equipment to the t VIDEO IN video input 1 2 or 3 jacks at the rear of your TV When you connect video equipment to the S video input display the Setup menu and select Auto for S Input see page 85 If the signals are input to both S VIDEO S video input and VIDEO video input the S video signal is automatically selected To view the video signal input to VIDEO video input select ...

Page 16: ... VIDEO IN VIDEO COMPONENT IN VIDEO IN 1 3 1 2 2 AUDIO R L MONO MONO AUDIO R L MONO VIDEO AUDIO VAR FIX R L VIDEO S VIDEO IN OUT VIDEO OUT WOOFER OUT VAR AUDIO IN COMPONENTVIDEO IN CENTER SP IN CONTROL S HD G B R VD SYNC Y PB CB PR CR Y PB CB PR CR 3 C 120W MAX 8Ω VIDEO yellow AUDIO VAR FIX L MONO white AUDIO VAR FIX R red Rear of TV To video and audio inputs or Audio system To audio inputs VCR Sig...

Page 17: ...r has the component video output jacks Connect the component video cable and audio cable to the COMPONENT VIDEO IN component video input 1 or 2 jacks You do not need to connect the video cable The audio in jacks for the COMPONENT VIDEO IN component video input 1 jacks are the o AUDIO IN jacks at the left of the t VIDEO IN video input 3 jack These jacks are also used for the audio in jacks for the ...

Page 18: ...ll be heard but no picture will be output from T VIDEO OUT monitor output This does not indicate a malfunction When receiving a progressive signal through COMPONENT VIDEO IN component video input 1 or 2 DRC MF DRC Palette and Game Mode are not selectable Since the high quality pictures on a DVD disc contain a lot of information picture noise may appear In this case display the Picture menu and sel...

Page 19: ...L MONO white AUDIO R red To audio outputs Audio cable not supplied Signal flow To COMPONENT VIDEO IN Component video input 2 Rear of TV To component video output Note The TV is equipped with the G B R HD VD inputs If your DTV receiver is equipped with the Y PB PR output connectors connect it to the Y PB PR connectors of COMPONENT VIDEO IN component video input 1 or COMPONENT VIDEO IN component vid...

Page 20: ...onnecting optional components continued Tip The TV accepts the following signal formats Total scanning line Effective scanning line fV Hz 1125i 1080i 50 60 750p 720p 50 60 625p 576p 50 625i 576i 50 525p 480p 60 525i 480i 60 ...

Page 21: ...peaker terminals of the amplifier to the CENTER SP IN center speaker input terminals on the TV Note To use the TV s speakers as the center speaker display the Sound menu and select On for Speaker Out see page 76 and press CENTER SP to switch to the center speaker mode see page 39 Dolby is a trademark of Dolby Laboratories DVD player To AUDIO L MONO white AUDIO R red To audio outputs Signal flow To...

Page 22: ...end signals to the TV Use CONTROL S OUT to send signals to connected equipment VIDEO IN VIDEO COMPONENT IN VIDEO IN 1 3 1 2 2 AUDIO R L MONO MONO AUDIO R L MONO VIDEO AUDIO VAR FIX R L VIDEO S VIDEO IN OUT VIDEO OUT WOOFER OUT VAR AUDIO IN COMPONENTVIDEO IN CENTER SP IN CONTROL S HD G B R VD SYNC Y PB CB PR CR Y PB CB PR CR 3 C 120W MAX 8Ω Signal flow VIDEO IN VIDEO COMPONENT IN VIDEO IN 1 3 1 2 2...

Page 23: ...e TV Most operations can be done using the remote or 1 STANDBY indicator HD DVD Number buttons JUMP CH Right side of TV 1 1 Press 1 to turn on the TV When the TV is in standby mode the 1 STANDBY indicator on the TV is lit red press POWER on the remote 2 To select a TV channel press CH or press the number buttons and then ENTER continued INPUT SELECT MUTING DISPLAY POWER TV ENTER WAKE UP SLEEP VOL ...

Page 24: ...urn off completely Adjust the volume Mute the sound Watch the video input VCR camcorder etc Watch the component input DVD DTV receiver Jump back to the previous channel Display the on screen information Some picture sound settings and either the channel number or video mode are displayed The on screen display for the picture sound settings disappears after about 5 seconds POWER The 1 STANDBY indic...

Page 25: ...off Note If no buttons or controls are pressed for more than two hours after the TV is turned on using the Wake Up timer the TV automatically goes into standby mode Setting the Sleep timer Press SLEEP until the desired period of time appears You can select the period of time from among 15 30 45 60 75 and 90 minutes The Sleep timer starts immediately after you have set it To cancel the Sleep timer ...

Page 26: ...e Adjustment menu under the Picture menu see page 74 Selecting the sound mode Press repeatedly until the desired sound mode is selected Select To Dynamic listen to dynamic and clear sound that emphasizes both the low and high tones Drama listen to sound that emphasizes voice and high tones Soft receive soft sound Personal receive the last adjusted sound setting from the Sound Adjustment menu under...

Page 27: ...of any small areas or scanning lines e g letters or the edge of objects on the screen Tip When the broadcast signal is weak you may see some dots or noise on the TV screen To reduce this interference display the Picture menu and select Personal for Picture Mode see page 73 then adjust Sharpness under Picture Adjustment to reduce the sharpness see page 74 Note The DRC MF mode is not selectable when...

Page 28: ...to video 1 to 4 inputs and the component input signal separately and each for the Dynamic and Standard Hi Fine Personal picture modes separately max 18 settings 1 Press DRC MF PALETTE repeatedly to select Custom 1 Custom 2 or Custom 3 to which you want to create the setting 2 Press M m to adjust the position of the marker As you move higher along the Reality axis the picture becomes more detailed ...

Page 29: ...T on the remote The dotted lined circle indicator in the Custom1 mode for the Standard Hi Fine Personal picture mode This indicates the factory setting This position is optimum for a normal TV broadcast in good tuning condition Cus t om1 80 80 Clarity Reality Adjust Finish Reset Note The DRC MF PALETTE is not selectable when the Game Mode is turned On The mode is not available for HD high definiti...

Page 30: ... the picture to fill the 16 9 screen Tip You can select the wide screen mode manually using the button see page 32 Notes The AUTO WIDE feature may not work correctly depending on the quality of signal In this case select the wide screen mode manually using the button see page 32 The examples in the table on page 31 show the settings preset at the factory Auto Wide is set to On and 4 3 Default is s...

Page 31: ...age 80 Black bands may appear on the top and bottom of the screen Note If a HD 4 3 picture with the side panel is received select Wide Zoom or Zoom mode manually by pressing the button To return the AUTO WIDE mode change the input by pressing the INPUT SELECT CH or POWER button s Wide Zoom Zoom Full Full enlarge the 4 3 picture with the upper and lower parts condensed to fit the 16 9 screen enlarg...

Page 32: ... pressing the button on the remote or using the menu the AUTO WIDE feature does not work temporarily The AUTO WIDE feature functions again when you change a TV channel with CH you change the video input with INPUT SELECT the TV is turned off and on again You can adjust the vertical position of the picture when wide screen mode is set to Wide Zoom or Zoom see page 33 Wide Zoom Enlarge to fill the s...

Page 33: ...rtical position of the picture in the screen for Zoom mode This feature is available only for Wide Zoom and Zoom modes 1 Press V CENTER 2 Press M m to move the picture up or down 3 Press Notes The adjusted V Center value remains stored even after the TV is turned off You can also adjust the position of the picture in Wide Zoom and Zoom modes using the menu see page 80 V Center 00 Wide Zoom V Cente...

Page 34: ... to the surround sound that spreads out to the rear of a room Simulated listen to monaural sound with a stereo like effect Off turn off the surround sound TruSurround SRS and the symbol are trademarks of SRS Labs Inc TruSurround technology is incorporated under license from SRS Labs Inc Note You cannot change the surround sound when the TV is in the center speaker mode see page 39 TV Surround Off ...

Page 35: ...tereo program the indication changes as follows Broadcasting On screen display Selected sound MTS stereo Select To Stereo listen to a stereo sound SAP listen to a bilingual broadcast Mono receive a monaural sound Notes If no SAP signal is present when SAP is selected the sound is heard as in stereo mode If the stereo signal is very weak the stereo broadcast sound may become noisy To reduce the noi...

Page 36: ...he desired equipment see the chart below To control While holding First press the Next press the down number button number button DVD VIDEO POWER 0 0 VTR1 Beta VIDEO POWER 0 1 VTR2 8 mm VIDEO POWER 0 2 VTR3 VHS VIDEO POWER 0 3 MDP VIDEO POWER 0 4 CD VIDEO POWER 0 6 MD VIDEO POWER 0 7 Note If the equipment does not have a certain function the corresponding button on the remote will not operate DRC ...

Page 37: ... tape m pause X Press again to resume normal playback search the picture forward M or backward m Operating a DVD player using the remote To Press turn on off VIDEO POWER play N stop x pause X Press again to resume normal playback step through different tracks of an audio disc to step forward or to step backward or during playback Release to resume normal playback continued ...

Page 38: ...layback search the picture forward or backward Operating a CD or MD player using the remote To Press turn on off VIDEO POWER play N stop x pause X Press again to resume normal playback step through different tracks to step forward or to step backward or during playback Release to resume normal playback Operating optional components continued ...

Page 39: ...NTER SP again Tip The center speaker mode is automatically cancelled when you select the video input or the Memory Stick viewer or turn the TV off and on again Notes If Off is selected for Speaker Out in the Sound menu see page 76 and nothing is connected to the center speaker input terminals on the rear of the TV no sound is heard from the TV s speakers No sound is heard from the TV s speakers if...

Page 40: ...usic from radio programs of digital broadcasts or DVD s with the TV screen turned off To switch to the picture off mode Press PIC OFF The PICTURE OFF indicator lights up in blue and the screen turns off To return to normal viewing Press any button except for VOL POWER MUTING MTS VIDEO POWER and CENTER SP ...

Page 41: ...page 43 Memory Stick Memory Stick PRO Memory Stick Duo and are registered trademarks of Sony Corporation Notes The data loading speed may differ depending on the Memory Stick When you view a still image stored on Memory Stick media the sound is not output from the TV s speakers Do not attempt to adjust the volume A Memory Stick formatted by a computer may not be used with this TV When using the Me...

Page 42: ... compression format JPEG stands for Joint Photographic Experts Group which is the organization that implemented this format DCF stands for Design Rules for Camera File Systems which are specifications established by the Japan Electronics and Information Technology Industries Association JEITA MPEG1 stands for Motion Picture Experts Group which is the organization that implemented this format and i...

Page 43: ...nly within the designated label area To avoid permanent damage to still image data do not use or store Memory Stick media in a location subject to High temperature such as near a heater or inside a hot car High humidity Direct sunlight Corrosive substances Magnetic fields Excessive dust Static electricity or electric noise Electric surges Store and carry Memory Stick media in its original case to ...

Page 44: ...t may become damaged Insert only Memory Stick media into the Memory Stick slot Attempting to insert other objects into the slot may damage the TV To remove a Memory Stick 1 Check that the Memory Stick indicator is off When the light is on this indicates that the TV is reading data from the Memory Stick 2 Push the Memory Stick gently into the slot and then release it The Memory Stick media is eject...

Page 45: ...mbnails of still images and movie files You can view up to 20 still images and movies on the Memory Stick index 1 Insert a Memory Stick into the Memory Stick slot of the TV For details on inserting a Memory Stick see page 44 Number buttons CH TV DRC MF MEMORY STICK continued ...

Page 46: ...e Digi Cam Mode displays all JPEG and MPEG1 files recorded with the DCF compliant digital cameras When you set the Digi Cam Mode to Off only the selected files or all the files with the extension jpg and mpg can be displayed The Memory Stick viewer of this TV sets Digi Cam Mode to On at the factory To set Digi Cam Mode to Off see page 64 Digi Cam Mode Viewable images On Still images in DCF complia...

Page 47: ... the Options menu see pages 66 and 67 When Digi Cam Mode is set to On the maximum 2 000 pieces of still images and or movies can be displayed When you want to display more than 2 000 pictures set Digi Cam Mode to Off When you do not operate for more than 5 minutes the Memory Stick viewer is canceled automatically to reduce image retention To view still images and movies that have been arranged and...

Page 48: ...RY STICK to display the Memory Stick Home 3 Press M m to select Slide Show then press The Slide Show menu appears 4 Press M m to select Start then press Still images and movies are displayed according to the setting A movie is played automatically At the end of the movie the next image appears Tip You can start the Slide Show even when a still image or movie is selected Note The still images and m...

Page 49: ...mages or movies change from among 5 sec 10 sec 30 sec 1 min and 5 min The factory setting is 5 sec The interval can be changed when Advance in the Slide Show menu is set to Auto 1 Press MEMORY STICK to display the Memory Stick Home 2 Press M m to select Slide Show then press The Slide Show menu appears 3 Press M m to select Interval then press 4 Press M m to select the interval you want to set the...

Page 50: ...o You cannot specify the interval when Advance is set to Manual When Advance is set to Auto a movie file is played to the end regardless of the specified interval When playback is finished the next image file is displayed The Interval setting does not show the exact time because the time required for displaying an image depends on its file size ...

Page 51: ...ull Screen then press The selected still image is displayed on the full screen To go to the previous or next still image press DRC MF MEMORY STICK Memory Stick Home Slide Show Options Select Folder Filter Still Size 1024x768 No 123 1234 Date 2003 MAY 31 1 00PM File 100MSDCF SJP0001 JPG Digi Cam Mode Startup Full Screen Slide Show Protect Rotate Delete Close Still image index menu Size 1024x768 No ...

Page 52: ... a still image is displayed on the full screen You can turn off the display of file information by setting Information in the image setup menu to Off Notes The full screen display may be rough depending on the still image quality Small size images may not be enlarged on the full screen Displaying a large file will take a longer time Image setup menu Size 1024x768 No 1 1234 Date 2003 MAY 31 1 00PM ...

Page 53: ...Press M m to select the still image you want to rotate then press The still image index menu appears 4 Press M m to select Rotate then press 5 Press M m to select the rotating direction clockwise or counterclockwise then press Each time you press the still image is rotated 90 degrees 6 Press m to select Close then press The rotated image is stored DRC MF MEMORY STICK Still image index menu MEMORY ...

Page 54: ... Press M m to select the rotating direction then press Each time you press the still image is rotated 90 degrees in the selected direction 4 Press m to select Close then press Notes You cannot rotate movie files You cannot rotate a still image that has been protected see page 59 Confirm the protect icon in the file information and unlock the protect before rotating You cannot rotate a still image ...

Page 55: ...ICK to display the Memory Stick Home 3 Press M m to select the movie you want to play then press The movie index menu appears DRC MF MEMORY STICK Memory Stick Home Slide Show Options Select Folder Filter Still Size 320x240 No 124 1234 Date 2003 MAY 31 1 00PM File 100MSDCF BASEBALL MPG Digi Cam Mode Startup Movie Player Slide Show Protect Rotate Delete Close Movie index menu MEMORY STICK M m contin...

Page 56: ...ss during movie stop mode to display the next file on the Memory Stick During playback the control changes to M Fast forward and the movie is forwarded rapidly Full Screen display the movie full screen Menu display the movie setup menu to access additional options Notes If you select or during the movie stop mode it may take a longer time to load the previous or next file During loading the file R...

Page 57: ... setup menu appears 2 Press M m to select Audio Select then press 3 Press M m to select the sound to be heard then press Audio Select menu and selectable sounds Item Stereo program Bilingual program L R left and right sounds main and sub sounds L left sound main sound R right sound sub sound Note The Audio Select menu is disabled when the movie does not contain sound continued Full Screen Menu Ret...

Page 58: ...ess The movie is displayed on the full screen and playback starts automatically To return to the Movie Player During movie playback press M m or press Notes Small size movies may not be enlarged on the full screen The full screen display may be rough depending on the movie quality Enlarging a file may take a time and a short file may not be played m and M are disabled when a movie is displayed on ...

Page 59: ... select the still image or movie you want to protect then press The still image or movie index menu appears 4 Press M m to select Protect then press 5 Press M m to select On then press The Protect icon is displayed To unlock the protect select Off then press DRC MF MEMORY STICK Memory Stick Home Slide Show Options Select Folder Filter Still Size 1024x768 No 123 1234 Date 2003 MAY 31 1 00PM File 10...

Page 60: ...ppears 2 Press M m to select Protect then press 3 Press M m to select On then press To protect a movie on the Movie Player 1 After displaying the Movie Player see page 55 press M m to select Menu then press The movie setup menu appears 2 Press M m to select Protect then press 3 Press M m to select On then press Tip The property of the protected image is shown as Read only on a computer ...

Page 61: ... Stick Home 3 Press M m to select the still image or movie you want to delete then press The still image or movie index menu appears 4 Press M m to select Delete then press 5 Press M to select Selected then press A confirmation message appears 6 Press to select Yes then press To cancel deleting select No then press DRC MF MEMORY STICK Memory Stick Home Slide Show Options Select Folder Filter Still...

Page 62: ... position you cannot delete the still images and movies in that Memory Stick To erase a full screen image 1 After displaying a still image on the full screen see page 51 press The image setup menu appears 2 Press M m to select Delete then press 3 Press M to select Selected then press A confirmation message appears 4 Press to select Yes then press To erase a movie on the Movie Player 1 After displa...

Page 63: ...the Memory Stick 1 Insert a Memory Stick into the Memory Stick slot of the TV For details on inserting a Memory Stick see page 44 2 Press MEMORY STICK to display the Memory Stick Home 3 Press M m to select Options then press The Options menu appears 4 Press M m to select Memory Stick The current status of the Memory Stick appears DRC MF MEMORY STICK MEMORY STICK M m continued ...

Page 64: ...nsert a Memory Stick into the Memory Stick slot of the TV For details on inserting a Memory Stick see page 44 2 Press MEMORY STICK to display the Memory Stick Home 3 Press M m to select Select Folder then press The Select Folder menu appears 4 Press M m to select Digi Cam Mode then press 5 Press M m to select Off then press DRC MF MEMORY STICK Current folder Folder list First image or movie file i...

Page 65: ...lect the folder list 7 Press M m to select the folder which includes the file you want to view then press 8 Press M m to select Close then press or press The still images and movies included in the selected folder are displayed on Memory Stick Home continued ...

Page 66: ...mory Stick see page 44 2 Press MEMORY STICK to display the Memory Stick Home 3 Press M m to select Options then press The Options menu appears 4 Press M m to select File then press 5 Press M m to select Sort then press 6 Press M m to select the desired item then press Sort menu Item To Name Order mA Z sort in alphabetical order A to Z by filename Name Order mZ A sort in reverse alphabetical order ...

Page 67: ...k see page 44 2 Press MEMORY STICK to display the Memory Stick Home 3 Press M m to select Options then press The Options menu appears 4 Press M m to select File then press 5 Press M m to select Filter then press 6 Press M m to select the desired item then press Filter menu Item Images to be displayed Show Stills Still images only Show Movies Movies only Off Still images and movies Tip If Show Stil...

Page 68: ...C MF DRC Palette Picture Mode Picture Adjustment appears when Picture Mode is set to Personal 3D NR Sound Mode Sound Adjustment appears when Sound Mode is set to Personal Balance Level 3 Level 4 Function Selects the DRC MF mode DRC1050 t Progressive Selects one of the three custom DRC palettes Custom 1 t Custom 2 t Custom 3 Selects the picture mode Dynamic t Standard t Hi Fine t Personal Adjusts t...

Page 69: ...tion of the picture in Wide Zoom or Zoom mode Adjusts the vertical size of the picture in Wide Zoom or Zoom mode Activates or deactivates ECO MODE feature Reduces image retention Orbit moves the picture position to reduce image retention All White displays a white screen to reduce image retention Activates or deactivates GAME MODE feature Allows you to illuminate the SONY logo on the front panel o...

Page 70: ...tings Level 3 Level 4 Function Assigns labels to the audio video equipment connected to the TV Selects the input to which the audio video equipment is connected Video 1 t Video 2 t Video 3 t Video 4 t HD DVD 1 t HD DVD 2 Selects one of the prefixed labels or assign your own label in Edit position When you select Video 1 the displayed label changes as follows Video 1 t VCR t SAT t Game t Edit Selec...

Page 71: ... 3D NR DRC1050 Cus t om1 Per sona l Of f P i c t u r e DRC MF MEMORY STICK How to use the menu Press MENU to display the menu To Adjust the setting value Move to the next previous menu level Cancel the menu Other menu operations Tip If you want to exit from Menu level 2 to Menu level 1 press M m until the return icon 3 is highlighted then press Note If more than 60 seconds elapse between entries t...

Page 72: ... press Move Se l ec t End DRC MF DRC Pa l e t t e P i c t u r e Mode Pi c t u r e Ad j us tmen t 3D NR Cus t om1 Pe r sona l Of f P i c t u r e DRC1050 P rog r es s i ve Move Se l ec t End DRC MF DRC Pa l e t t e P i c t u r e Mode Pi c t u r e Ad j us tmen t 3D NR DRC1050 Cus t om1 Pe r sona l Of f P i c t u r e Move Se l ec t End DRC MF DRC Pa l e t t e P i c t u r e Mode P i c t u r e Ad j us t...

Page 73: ...ess Col o r Hue 00 Sha r pness Col o r Temper a t u r e Neut r a l Rese t 80 50 50 50 Pi c t u r e Ad j us tmen t 3D NR improve the picture quality of TV or video if a signal received is weak Press M m to select On then press To cancel select Off then press When the Personal mode is selected the last adjusted picture setting in the Picture Adjustment menu is received see page 74 Tips For details o...

Page 74: ...djust the value or select the desired option according to the following table then press You can adjust Hue for the NTSC color system only 5 Repeat steps 3 and 4 to adjust other items The adjusted settings will be received when you select Personal Move Se l ec t End Pi c t u r e Br i gh t ness Col o r Hue 00 Sha r pness Col o r Temper a t u r e Neut r a l Rese t 80 50 50 50 Pi c t u r e Ad j us tm...

Page 75: ...ally You can also listen to the sound with surround effect 1 Press MENU 2 Press M m to select then press 3 Press M m to select the desired option see the table below then press Select To Sound Mode select the suitable sound mode Press M m to select Dynamic Drama Soft or Personal then press Sound Adjustment adjust the sound quality when Sound Mode is set to Personal When the Personal mode is select...

Page 76: ... m to select Off to turn off the TV speaker then press You can listen to the TV s sound only through your external audio system speakers When you select Off you cannot change the surround sound the Intelligent Volume mode or the BBE mode Audio Out select when Speaker Out option is set to Off if you want to use the TV s remote control to control the audio output from your audio system Press M m to ...

Page 77: ... or select the desired option according to the following table then press For Press Treble m to decrease the treble M to increase the treble Bass m to decrease the bass M to increase the bass BBE M m to select High Low or Off BBE can produce clear sound Reset Select Reset and press to reset the sound to the factory preset settings 5 Repeat steps 3 and 4 to adjust other items The adjusted settings ...

Page 78: ...M m to select then press 3 Make sure that Memory Stick Menu is selected then press For details on the options under the Memory Stick Menu see pages 45 to 67 DRC MF MEMORY STICK Move Se l ec t End DRC MF DRC Pa l e t t e P i c t u r e Mode P i c t u r e Ad j us tmen t 3D NR DRC1050 Cus t om1 Per sona l Of f P i c t u r e Move Se l ec t End Memory St i ck Menu Memor y St i ck Memory Stick Home Slide...

Page 79: ... Cen t er 00 V Si ze Wi de Scr een Wi de Zoom Normal Fu l l Zoom DRC MF MEMORY STICK Move Se l ec t End DRC MF DRC Pa l e t t e P i c t u r e Mode P i c t u r e Ad j us tmen t 3D NR DRC1050 Cus t om1 Per sona l Of f P i c t u r e MENU M m Move Se l ec t End Wi de Mode On Wide Zoom 00 Au to Wi de 4 3 De f au l t V Cen t er 00 V Si ze Wi de Scr een Wi de Zoom Move Se l ec t End Wi de Mode On Wide Zo...

Page 80: ...isplay any picture in currently selected wide screen mode 4 3 Default display a 4 3 picture in Wide Zoom factory setting or in Normal mode Press M m to select Wide Zoom or Normal then press V Center adjust the vertical position of the picture within the screen in Wide Zoom or Zoom mode Press M m to move the picture then press V Size adjust the vertical size of the picture within the screen in Wide...

Page 81: ...wer consumption of your TV to save energy Press M m to select On then press To cancel select Off then press Screen Saver reduce image retention See Changing the Screen Saver options on page 83 DRC MF MEMORY STICK MENU M m Move Se l ec t End DRC MF DRC Pa l e t t e P i c t u r e Mode P i c t u r e Ad j us tmen t 3D NR DRC1050 Cus t om1 Per sona l Of f P i c t u r e Move Se l ec t End Eco Mode Sc r ...

Page 82: ...te the SONY logo while the power is turned on then press To cancel select Off then press Notes If Eco Mode is on the ECO MODE icon will appear at the bottom right corner of the screen when you turn on the TV or when you press DISPLAY on the remote Game Mode is available only when receiving signals through the t VIDEO IN video input S VIDEO S video input or COMPONENT VIDEO IN component video input ...

Page 83: ... to reduce image retention Press M m to select On then press This dose not prevent image retention completely if the same picture is displayed for an extended period of time To cancel select Off then press All White display a white screen to reduce image retention To cancel press any button of the remote control except for VOL MUTING MTS VIDEO POWER and CENTER SP This mode is cancelled automatical...

Page 84: ...ired option see the table below then press Select To Language change the menu language Press M m to select English or Chinese then press DRC MF MEMORY STICK Move Se l ec t End Se t up Language Eng l i sh Channe l Se t up V i deo Labe l Co l o r Sy s t em S I npu t Speake r Phase Au t o Au t o Normal Move Se l ec t End DRC MF DRC Pa l e t t e P i c t u r e Mode P i c t u r e Ad j us tmen t 3D NR DR...

Page 85: ...d audio video equipment on page 90 Color System select the color system Normally set this to Auto You can select the color system for each video input The color system for TV channels is fixed S Input select the S video input mode Press M m to select Auto to receive the S video signal automatically when the signals are input through both the S VIDEO S video input and VIDEO video input jacks of the...

Page 86: ...dcast channels 2 If you select Cable Off you will receive VHF or UHF broadcast channels only Presetting channels manually Channel Skip Add 1 After selecting Channel Skip Add under Channel Setup make sure Channel is selected then press 2 Press M m until the channel number you want to add or skip appears then press Changing the Setup setting continued Channe l Se t up Cab l e Au t o Pr og r am On Of...

Page 87: ...to preset a channel or Skip to skip a channel then press 5 To preset other channels select Channel Skip Add then repeat steps 2 to 4 To return to the normal screen Press MENU Move Se l ec t End Channe l Sk i p Add Channe l Sk i p Add Sk i p Add 013 Move Se l ec t End Channe l Sk i p Add Channe l Sk i p Add Add 013 continued ...

Page 88: ... the label characters A to Z 0 to 9 etc then press to confirm the highlighted character To insert a blank leave _ and press To change the confirmed character press to highlight it then press M m to select the correct character 5 Repeat step 4 to add up to 5 characters to the label 6 To assign labels to other channels select Channel then repeat steps 1 to 5 To return to the normal screen Press MENU...

Page 89: ...rs on the screen when On is selected If a locked channel is selected the lock symbol appears on the screen 5 To lock other channels select Channel then repeat steps 2 to 4 To return to the normal screen Press MENU Note If you preset a locked channel manually see page 86 that channel will be unlocked automatically Move Se l ec t End Channe l B l ock Channe l Bl ock 013 Of f Move Se l ec t End Chann...

Page 90: ...want to assign a label then press 3 Press M m to select Label then press 4 Press M m to select one of the prefixed labels then press To assign your favorite label see page 91 5 To assign labels to other equipment select Video Input then repeat steps 2 to 4 To return to the normal screen Press MENU Move Se l ec t End Vi deo Labe l Vi deo I npu t Labe l V i deo 1 V i deo 1 V i deo 2 V i deo 4 V i de...

Page 91: ...gh the label characters A to Z 0 to 9 etc then press to confirm the highlighted character Move Se l ec t End Vi deo Labe l Vi deo I npu t Labe l V i deo 1 V i deo 1 VCR Game SAT Edi t V____ To insert a blank leave _ and press To change the confirmed character press to highlight it then press M m to select the correct character 3 Repeat step 2 to add up to 5 characters to the label ...

Page 92: ...ctions Press POWER on the remote Press 1 on the TV to turn off the TV for about five seconds then turn it on again Snowy picture Noisy sound Distorted picture Noisy sound Good picture Noisy sound No picture No sound Additional Information Troubleshooting If you have any problem while viewing your TV please check the following troubleshooting guide If the problem persists contact your Sony dealer P...

Page 93: ...ect the booster if it is in use Display the Picture menu and select Personal of Picture Mode then adjust the Color level under Picture Adjustment Adjust the antenna direction Contact a Sony dealer for advice Possible cause Symptom Solutions Page 40 24 24 76 39 35 76 74 No picture Good picture No sound Dotted lines or stripes Double images or ghosts No color The picture off feature is activated The...

Page 94: ...arby broadcast station This caused by feature of the Plasma Display Panel and dose not indicate a malfunction of the TV During a transition between two programs the TV detects the optimum wide screen mode During this period an irregular wide screen mode may appear The wide screen mode is switched automatically according to the received signal with an ID 1 signal The AUTO WIDE feature stops working...

Page 95: ...ed No photo or movie files are contained in the Memory Stick The photo or movie image is processed by a computer The Memory Stick is inserted inappropriately The Memory Stick is irregular The Memory Stick may be broken The name of the selected file is not correct The Memory Stick is not formatted correctly When Digi Cam Mode is set to On 2 000 files or less can be displayed The inserted Memory Sti...

Page 96: ...es available for playback are contained in the selected folder of the Memory Stick when Digi Cam Mode is set to Off The file name has been processed by a computer The erasure prevention switch of the Memory Stick is in the LOCK position Show Movies is selected from Filter of the Options menu and no movie files are contained in the selected folder Show Stills is selected from Filter of the Options ...

Page 97: ...oser together Changes in room temperature sometimes make the TV cabinet expand or contract causing a noise This does not indicate a malfunction This is the same static discharge that is felt when touching metal door handles or car doors especially when the air is dry for example in winter This does not indicate a malfunction Video head interference Communication problems may occur if the infrared ...

Page 98: ...e causes 1 Check that the 1 STANDBY standby indicator flashes red a number of times between 3 second intervals 2 Count the number of times the 1 STANDBY standby indicator flashes 3 Press 1 main power to turn off your TV 4 Inform your nearest Sony service center about the number of times the 1 SATNDBY standby indicator flashed Be sure to note the model name and serial number located on the rear of ...

Page 99: ...eature is activated 2 TIMER When lit in red indicates 25 the wake up timer is set When the timer is set this indicator will remain lit even if the TV set is turned off 3 1 STANDBY Lights up in red when TV is in 23 standby mode The indicator dose not light up when the main power is turned off 4 POWER ON Lights up in green when the TV set is turned on 5 Infrared receiver IR Receives IR signals from ...

Page 100: ...4 5 6 Page Function Button Indicator 1 1 Turn off completely or turn on 24 the TV 2 PROG CH Select a TV channel 23 3 2 VOL Adjust volume 24 4 t INPUT Select TV or video input 24 5 Memory Stick Flashes when the data is being 44 indicator read from a Memory Stick 6 Memory Stick slot Insert a Memory Stick into 44 this slot ...

Page 101: ... MONO R S VIDEO VIDEO AUDIO 1 2 3 Page Function Connector 1 i Headphone jack 2 S VIDEO Connect to S video output of 15 VIDEO IN 4 t video equipment 3 VIDEO Connect to video audio 15 AUDIO L MONO outputs of video equipment AUDIO R VIDEO IN 4 t Open the slide cover continued ...

Page 102: ... Audio in jacks for t VIDEO 17 IN 3 and COMPONENT VIDEO 1 5 t VIDEO IN 3 Connect to video audio 17 outputs of video equipment 6 COMPONENT Connect to component video 17 VIDEO IN 1 outputs on a DVD player 8 VHF UHF VIDEO IN VIDEO COMPONENT IN VIDEO IN 1 3 1 2 2 AUDIO R L MONO MONO AUDIO R L MONO VIDEO AUDIO VAR FIX R L VIDEO S VIDEO IN OUT VIDEO OUT WOOFER OUT VAR AUDIO IN COMPONENTVIDEO IN CENTER S...

Page 103: ...nect to speaker terminals 21 on an amplifier 8 SYNC HD VD Connect to HD VD outputs on 19 a digital TV receiver 9 COMPONENT Connect to component video 17 VIDEO IN 2 player Connect to a digital TV receiver 19 equipped with the G B R HD VD outputs 0 CONTROL S IN OUT Allow the TV to receive IN 22 and send OUT remote control signals to other Sony infrared controlled audio or video equipment that has th...

Page 104: ...M m Select adjust and confirm 71 selected items in the menu 8 DRC MF Customize the picture Reality 28 PALETTE and Clarity levels 9 DRC MF MODE Select DRC MF mode 27 q N Operate optional components 37 X x qa Select sound mode 26 qs Select picture mode 26 qd VOL Adjust volume 24 qf CENTER SP Select TV s center speaker 39 mode qg RESET Reset items in the menu to the 70 factory preset values TV DRC MF...

Page 105: ...picture w MEMORY STICK Display Memory Stick 46 Home when a Memory Stick is inserted into the Memory Stick slot wa VIDEO POWER Power 37 Use with the number 36 buttons to set up the remote ws SLEEP Set the TV to turn off 25 automatically wd WAKE UP Set the TV to turn on 25 automatically wf Select wide mode 32 wg Select surround mode 34 wh CH Select a TV channel 23 wj MTS Select stereo bilingual mode...

Page 106: ...75 ohms HD 0 7 Vp p 75 ohms VD 0 7 Vp p 75 ohms Input 1 120 W max 8 ohms Output 1 Phono jack Output 1 Stereo minijack 1024 pixels 1024 pixels KE MX42 42 inches KE MX37 37 inches KE MX42 1229 678 110 KE MX37 1135 617 110 KE MX42 38 kg KE MX37 33 kg Design and specifications are subject to change without notice Specifications Power requirements Power consumption W Television system Color system Ster...

Page 107: ...107 Additional Information Additional Information ...

Page 108: ...108 Additional Information Printed in Japan ...

Reviews: