background image

69

Set
u

p

480p

Outputs 480p resolution.

1080i

Outputs 1080i resolution.

YPbPr/RGB

Specify the color space for converting video 
signals from the HDMI OUT connector.

c

Auto

Select [Auto] unless necessary to specify the 
signal format.

Y/Pb/Pr 4:2:2

Converts the video signal format to Y/Pb/Pr 
4:2:2.

Y/Pb/Pr 4:4:4

Converts the video signal format to Y/Pb/Pr 
4:4:4.

RGB 16-235

Converts the video signal format to RGB 16-235.

RGB 0-255

Converts the video signal format to RGB 0-255.

Resolution

Specify the resolution to output over HDMI OUT 
connector.

c

Auto

Select [Auto] unless necessary to specify the 
output resolution.

480p

Outputs 480p resolution.

1080i

Outputs 1080i resolution.

z

Hint

• HD (High Definition) videos recorded in 720p 

resolution are output in 720p resolution, even if 
[1080i] is set.

Sound

Specify the audio signal from the HDMI OUT 
connector.

c

Auto

Select [Auto] unless necessary to specify the 
audio output. This outputs the audio signal 
suitable for the TV.

PCM

Down-mixes the audio signal to Linear PCM 2ch 
and outputs from HDMI OUT.

b

Note

• If your TV does not support Dolby Digital, DTS or 

AAC, connecting it to the DVDirect and selecting 
[Auto] may not get sound. Select [PCM], if you get no 
sound.

You can check the system software version of the 
DVDirect.
Select [System Info] to view the version of 
system software.
Select [Reset System] to clear the history stored 
on the DVDirect and revert the settings to the 
factory default.

z

Hints

• The system software is the built-in software that makes 

the DVDirect work.

• Selecting [Reset System] clears the recording history 

necessary for copying only new video/photo and resets 
the customized settings.

The DVDirect automatically plays a demo when 
it is not operated for a set period of time.

OFF

Disables the demo.

c

ON

Enables the demo.

HDMI Settings

System Info

Demo

Summary of Contents for VRDMC10 - DVDirect Stand Alone DVD Recorder/Player

Page 1: ... Introducing DVDirect 20 Preparations for Recording 29 Copying From a Camera 38 Copying From Video Devices 51 Viewing a Created Disc 57 Setup 66 Troubleshooting References 71 Additional Information 80 Multi Function DVD Recorder Operating Instructions VRD MC10 ...

Page 2: ...ide the enclosure This symbol is intended to alert the user to the presence of uninsulated dangerous voltage within the product s enclosure that may be of sufficient magnitude to constitute a risk of electric shock to persons This symbol is intended to alert the user to the presence of important operating and maintenance servicing instructions in the literature accompanying the appliance This grap...

Page 3: ... there is no guarantee that interference will not occur in a particular installation If this equipment does cause harmful interference to radio or television reception which can be determined by turning the equipment off and on the user is encouraged to try to correct the interference by one or more of the following measures Reorient or relocate the receiving antenna Increase the separation betwee...

Page 4: ...use cover be sure to attach the fuse cover after you change the fuse Never use the plug without the fuse cover If you should lose the fuse cover please contact your nearest Sony service station Disposal of Old Electrical Electronic Equipment Applicable in the European Union and other European countries with separate collection systems This symbol on the product or on its packaging indicates that t...

Page 5: ...cable television transmission may require authorization from the cable television transmitter and or program owner After image lag If you display a still image on a plasma or projection TV screen except those of LCD screen types for an extended period of time ghosting after image lag may occur Static non moving images permanently on the TV screen if left on for an extended time Our product warrant...

Page 6: ...V i LINK cable 33 Audio video cable AV cable 34 Memory Card 37 Copying All Contents 38 Copying All Contents from an 8cm disc 40 Copying Only New Video Photo 41 Copying Playlist 43 Copying Visual Index Lists 45 Copying Manually 47 One Touch Disc Burn 49 Copying All Contents from a DV tape 51 Copying All Contents Photo 52 Copying Manually 53 Copying Visual Index Lists Photo 55 Connecting to a TV 57 ...

Page 7: ...Demo 69 TV Type 70 Language 70 Troubleshooting 71 Supported Discs and Memory Cards 73 Recording Time and Video Lengths 76 About Created Discs 78 Precautions 80 Specifications 81 Index 83 Troubleshooting References Additional Information ...
Page 8: ...e disc depending on the copy mode selected When you record photos taken with your digital still camera from its memory card onto a disc see page 18 I want to record HD High Definition video as is HD High Definition Disc AVCHD format Compatible players AVCHD format compatible device Sony Blu ray Disc player recorder Playstation3 DVDirect Not playable on DVD players recorders I want to enjoy playbac...

Page 9: ...c Down converted to SD Standard Definition during recording Down converted to SD Standard Definition during recording Type of copy mode Other High Definition Digital video camera Sony Standard Definition Other Standard Definition Digital video camera Other video device Sony High Definition Digital video camera Sony Standard Definition Digital video camera Other High Definition Other Standard Defin...

Page 10: ...ode Record HD High Definition video as is Photos are recorded as a JPEG file HDD Built in memory 8cm Disc Memory Card DV tape Use a USB cable supplied with camera or sold separately Use a USB cable supplied with camera or sold separately Use a USB cable supplied with camera or sold separately Insert a Memory Card into the slot 1 Recording is not available 1 You can record a video by connecting a c...

Page 11: ...scene shooting date 2 You cannot record photos Copying Playlist is possible only with cameras that can create a playlist 3 Built in memory of HYBRID Plus Handycam cannot be recorded by One Touch Disc Burn 4 Recording possible only when connected to a camera via USB cable Only some models support One Touch Disc Burn b Note You cannot record HD High Definition video taken in REC mode at a bit rate e...

Page 12: ...lot Recording is not available You can record by down converting to SD Standard Definition See Type of copy mode C page 14 for details Not all camera operations are supported What is the recording media Connection and setup You cannot record by connecting a camera via a USB cable For details refer to your camera s operating instructions Recording is not available You can record by down converting ...

Page 13: ...date page 38 page 45 b Notes You cannot record HD High Definition video taken in REC mode at a bit rate exceeding 18Mbps such as in HD FX mode for example High Definition Handycam in AVCHD format In this case you can record by down converting to SD Standard Definition quality See Type of copy mode C page 14 You cannot record by connecting an other camera via a USB cable ...

Page 14: ...ording media Connection and setup b page 34 Use an AV cable supplied with camera or sold separately b page 34 Use an AV cable supplied with camera or sold separately b page 34 Use an AV cable supplied with camera or sold separately b page 34 Use an AV cable supplied with camera or sold separately b page 34 Use an AV cable supplied with camera or sold separately b page 33 Use a DV i LINK cable supp...

Page 15: ...rding while operating camera Selecting copy mode Select the copy mode and create a disc page 47 page 47 page 47 page 53 Copying All Contents The entire contents of camera Copying Manually Recording while operating camera page 51 page 53 ...

Page 16: ... a camera via a USB cable b page 33 Use a DV i LINK cable sold separately b page 31 Use a USB cable supplied with camera or sold separately b page 31 Use a USB cable supplied with camera or sold separately b page 37 Insert a Memory Card into the slot 1 b page 31 Use a USB cable supplied with camera or sold separately b page 34 Use an AV cable supplied with camera or sold separately All of the abov...

Page 17: ...Only New Video Photo Only the new contents of camera Copying Playlist Playlist contents on camera Copying Visual Index Lists Select by a scene shooting date Copying All Contents 2 The entire contents of camera Copying Manually 2 Recording while operating the camera Selecting copy mode 2 You cannot record photos 3 Built in memory of HYBRID Plus Handycam cannot be recorded by One Touch Disc Burn 4 R...

Page 18: ...ecord photos Video device with AV OUT Memory Stick Duo Memory Stick SD Card xD Picture Card CompactFlash Insert a Memory card into the slot Video device with DV connector capable of outputting DV signals Recording photos from memory card Photos are recorded as a JPEG file Recorded memory card Connection for your memory card b page 33 Use a DV i LINK cable sold separately b page 34 Use an AV cable ...

Page 19: ... disc Copying All Contents The entire contents of camera Copying Manually Recording while operating the camera Copying All Contents The entire contents of camera Copying Visual Index Lists Select by an index shooting date Selecting copy mode Select the copy mode and create a disc ...

Page 20: ...and device operation m Preparations for Recording page 29 Connect your device to the DVDirect as instructed in the Type of copy mode A E Configure your device if necessary m Copying pages 38 51 Select an available copy mode A E best suited to your needs Follow the instructions on the page referred to in this manual m Viewing a Created Disc page 57 When recording is complete connect the DVDirect to...

Page 21: ...s to an HD High Definition compatible camcorder About Images In this manual images refer to both photos still images and videos About the DVDirect In this manual DVDirect refers to the VRD MC10 About illustrations The on screen display illustrations used in this manual may not match the graphics displayed on your screen ...

Page 22: ...otos from a memory card or a connected Sony camera directly onto a disc When you use a camera or memory card containing videos and photos you can archive both videos and photos on the same disc You can use the DVDirect to play back and check a created video photo disc Simply view it in the display window of the DVDirect or connect the DVDirect to a TV The DVDirect can also play back photos as a sl...

Page 23: ...eos will be recorded in SD Standard Definition quality because HD High Definition is unavailable when recording HD videos recorded in REC mode at a bit rate exceeding 18Mbps such as in HD FX mode for example High Definition Handycam in AVCHD format HD videos recorded on a DV tape using Sony High Definition Handycam HDV format HD videos recorded with an HD High Definition compatible camera other th...

Page 24: ...lay can be displayed on the TV screen during playback Images other than playback cannot be displayed on the TV screen Type of created disc and compatible devices HD High Definition disc containing High Definition videos SD Standard Definition disc containing Standard Definition videos Install the AVCHD compatible application on your computer beforehand Even in the case of a computer environment th...

Page 25: ...er The number in parentheses indicates the number of items VRD MC10 DVDirect 1 Remote control unit 1 The remote control has a button type lithium battery built in AC adapter 1 AC power cord 1 Audio video cable 1 Operating Instructions this document 1 Warranty card 1 b Note Use an AC power cord appropriate to the region or country of use Package Contents ...

Page 26: ...mpactFlash card slot page 37 L Multi memory card slot page 37 Insert a Memory Stick SD Card or xD Picture Card here M Memory Stick Duo slot page 37 N Memory card access LED Lights amber when accessing a memory card O Z eject button page 30 b Note Memory Stick Duo uses a different slot from other memory cards Make sure to insert a Memory Stick Duo into the Memory Stick Duo slot and other types of m...

Page 27: ...n page 66 E V v B b cursor ENTER button pages 38 53 60 63 F PLAY button pages 60 63 G STOP button pages 38 53 62 65 H RECORD button pages 38 53 Rear panel A HDMI OUT connector page 58 B COMPONENT OUT Y PB PR video out connectors page 58 C AUDIO OUT connectors page 59 D VIDEO OUT connector page 59 E DC IN connector page 29 RETURN OUTPUT ENTER VIDEO HDMI COMPONENT 1 2 3 4 5 7 6 8 R L AUDIO COMPONENT...

Page 28: ... be performed by the remote control To change the battery of the remote control 1 While pressing on the tab inset your fingernail into the slit to pull out the battery case 2 Place a new battery with the side facing up 3 Insert the battery case back into the remote control until it clicks b Note The remote control has a button type lithium battery built in Do not use a battery other than of the sa...

Page 29: ...er cord into a power outlet b Notes Be sure to use the supplied AC power cord and the AC adapter Do not use damaged cables such as cables with deformed connectors 4 Press the 1 power button After the display window lights and the DVDirect logo appears initial screen Top screen appears Preparations for Recording Turning the Power On DVDirect To DC IN connector To power outlet AC power cord AC adapt...

Page 30: ... button The disc tray ejects 2 Place the disc in the disc tray with its playing recording side down and press the Z eject button again b Note Do not touch the recording side of the disc The disc tray closes Inserting a Disc ...

Page 31: ...r camera s operating instructions 2 Connect the camera to the DVDirect 3 Check the USB connection on the camera Sony digital video camera The USB SELECT screen appears Be sure to select the media that stores images to record Button names on the USB SELECT screen Connecting Cables for Recording USB cable Storage Media Button Name Hard disk drive USB CONNECT COMPUTER HDD etc Built in memory USB CONN...

Page 32: ...erent depending on the model See the following web site for details on supported camera models English only http sony storagesupport com b Note If a camera with built in memory and memory card is connected to the DVDirect the DVDirect will choose the memory card as the USB connection However built in memory might be chosen depending on the model of the camera and its setting For details see the in...

Page 33: ...g with DV i LINK cable set the i LINK CONV setting on the Handycam to ON This will down convert videos recorded in HD High Definition to SD Standard Definition quality 3 Connect the camera to the DVDirect b Notes A DV i LINK cable is for DV output from DV digital video camera only You cannot record videos from MICROMV or HDV camcorders HDV format and other digital video devices having an i LINK co...

Page 34: ...OUT setting on Handycam DV D8 must be set to OFF OFF is the default setting 3 Connect the video device to the DVDirect Use an audio video cable supplied AV cable not supplied or S video cable not supplied when connecting a video device such as a VCR or DVR to the DVDirect z Hints The connectors on a video device differ depending on the device Refer to the operating instructions for your device and...

Page 35: ...r R L AUDIO IN VIDEO IN S VIDEO IN S VIDEO OUT connector AUDIO OUT connectors Audio video cable supplied or audio cable not supplied S video cable not supplied AUDIO IN connectors S VIDEO IN connector R L AUDIO IN VIDEO IN S VIDEO IN S VIDEO OUT connector AUDIO OUT connectors Audio video cable supplied or audio cable not supplied S video cable not supplied AUDIO IN connectors S VIDEO IN connector ...

Page 36: ...AV cable and S video cable to connect to the DVDirect R L AUDIO IN VIDEO IN S VIDEO IN A V OUT AUDIO IN connectors A V OUT connector S VIDEO IN connector AV cable with S video not supplied R L AUDIO IN VIDEO IN S VIDEO IN S VIDEO A V AUDIO IN connectors A V OUT connector S VIDEO IN connector AV cable not supplied S video cable not supplied S VIDEO OUT connector ...

Page 37: ... CompactFlash card slot The CompactFlash stays half exposed To remove pull out the CompactFlash b Notes Do not use more than one memory card slot at a time Insert only one memory card into a memory card slot Do not insert another memory card while recording onto a disc Doing so may cause a write error Do not insert a Memory Stick Duo with a Memory Stick Duo adapter into the multi memory card slot ...

Page 38: ...the DVDirect detects signals from a camera connecting to the USB port or memory card inserted into the slot the copy mode select screen appears 2 Press V or v to select All and press b z Hint If you do not need to select the type of images simply select All and press the record button to start recording Go straight to step 5 3 Make sure that the type of images you wish to copy is marked Press V or...

Page 39: ...to a single disc the disc will be ejected automatically when it becomes full Remove the created disc and insert a blank one Recording will resume automatically 6 Remove the created disc If Auto Finalizing is set to ON the disc will be finalized automatically when recording is complete page 67 To stop recording Press the stop button when replacing a disc You cannot stop while recording is in progre...

Page 40: ...tored on the 8cm disc will be recorded except for PhotoMOVIE Both the contents of an 8cm disc containing HD High Definition video and an 8cm disc containing SD Standard Definition video cannot be recorded on a 12cm disc Depending on the combination of images on a disc inserted into the DVDirect and the 8cm disc inserted into the camera images may not be recorded 3 Change the 8cm disc of the camera...

Page 41: ...nto the slot the copy mode select screen appears 2 Press V or v to select New Video Photo and press b z Hint If you do not need to select the type of images simply select New Video Photo and press the record button to start recording Go straight to step 5 3 Make sure that the type of images you wish to copy is marked Press V or v to select an image Pressing the ENTER button toggles the selection b...

Page 42: ... recording is complete page 67 To stop recording Press the stop button when replacing a disc You cannot stop while recording is in progress z Hint The DVDirect stores the recording history of a camera built in memory or a memory card copying only newly recorded video to be recorded to a disc The DVDirect can store a combined total of 10 recording history stored in a camera or memory card Notes on ...

Page 43: ... the type of images simply select Playlist and press the record button to start recording Go straight to step 5 3 Make sure that the type of Playlist images you wish to copy is marked Press V or v to select a Playlist to copy Pressing the ENTER button toggles the selection between marked and unmarked If both HD Video and SD Video types are selected for recording HD High Definition and SD Standard ...

Page 44: ... disc the disc will be ejected automatically when it becomes full Remove the created disc and insert a blank one Recording will resume automatically 6 Remove the created disc If Auto Finalizing is set to ON the disc will be finalized automatically when recording is complete page 67 To stop recording Press the stop button when replacing a disc You cannot stop while recording is in progress When rec...

Page 45: ...finition and SD Standard Definition videos are recorded onto separate discs For details see Notes on copying multiple types of image on page 23 b Note You cannot select image types that cannot be recorded For example a camera or memory card containing no video photo data or standard definition SD video taken by another digital video camera 4 Make sure that the shooting date folders of the images y...

Page 46: ...lights up during recording The following appears in the display window 9 Change to a blank disc when the message Insert a new disc appears If the contents of the camera do not fit onto a single disc the disc will be ejected automatically when it becomes full Remove the created disc and insert a blank one Recording will resume automatically 10 Remove the created disc If Auto Finalizing is set to ON...

Page 47: ...ou cannot record HD High Definition videos onto the formatted disc under this message 1 Press the ENTER button on the Top screen 2 Select the input S VIDEO or VIDEO connected to the camera in Select input The connected camera image appears 3 Operate your camera to start video playback and press the record button of the DVDirect The message Recording appears in the display window and the record but...

Page 48: ... Auto Finalizing or Finalize disc on page 67 8 Press V or v to select OK and press the ENTER button When finalizing has completed the disc tray automatically opens Notes on copying manually from a camera Start recording immediately after inserting a disc The recording process may take a few seconds to start after pressing the record button if the disc was inserted more than 10 minutes prior to sta...

Page 49: ...nd SD Standard Definition videos HD High Definition and SD Standard Definition videos are recorded onto separate discs For details see Notes on copying multiple types of image on page 23 b Notes Depending on the camera the display that appears on the camera s LCD screen or button names on the camera may differ e g DVD BURN In One Touch Disc Burn mode you can record videos from an attached video ca...

Page 50: ...it becomes full Remove the created disc and insert a blank one Recording will resume automatically 6 Remove the created disc If Auto Finalizing is set to ON the disc will be finalized automatically when recording is complete page 67 To stop recording Press the stop button when replacing a disc You cannot stop while recording is in progress Next disc number of required discs ...

Page 51: ...ng at the same time the video device starts playback If the video tape is not at its beginning it will automatically rewind and the DVDirect will start recording During recording the message Recording appears in the display window and the record button lights up The following appears in the display window To pause recording Press the record button during recording To resume recording press the rec...

Page 52: ...s up during recording The following appears in the display window 3 Change to a blank disc when the message Insert a new disc appears If the media contents do not fit onto a single disc the disc will be ejected automatically when it becomes full Remove the created disc and insert a blank one Recording will resume automatically 4 Remove the created disc If Auto Finalizing is set to ON the disc will...

Page 53: ...d select DV in Select input For connection with A V cables Press the ENTER button on the Top screen and select the input S VIDEO or VIDEO connected to the video device in Select input 2 Operate the video device to start playback and press the record button of the DVDirect to start recording During recording the message Recording appears in the display window and the record button lights up The fol...

Page 54: ...can skip step 7 below z Hint To finalize a disc means to make the disc playable on other DVD devices For details about finalizing refer to Auto Finalizing or Finalize disc on page 67 7 Press V or v to select OK and press the ENTER button When finalizing has completed the disc tray automatically opens Notes on copying manually from a video device When connecting the camera to the DVDirect with a DV...

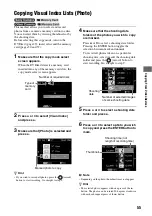
Page 55: ...date folders of the photos you wish to copy are marked Press V or v to select a shooting date folder Pressing the ENTER button toggles the selection between mark and unmark To record all photos taken on a particular shooting date select mark the shooting date folder and press the record button to start recording Go straight to step 9 5 Press V or v to select a shooting date folder and press b 6 Pr...

Page 56: ...e message Insert a new disc appears If the media contents do not fit onto a single disc the disc will be ejected automatically when it becomes full Remove the created disc and insert a blank one Recording will resume automatically 10 Remove the created disc If Auto Finalizing is set to ON the disc will be finalized automatically when recording is complete page 67 To stop recording Press the stop b...

Page 57: ...ring playback Images other than playback cannot be displayed on the TV screen No picture appears on the DVDirect s display window when an external output is selected If you connect the DVDirect to a TV with an HDMI cable or component video cable play an SD Standard Definition disc and then switch from the Top screen to the playback display or vice versa the TV screen image may be distorted This is...

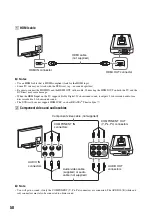
Page 58: ...audio for a disc recorded in 5 1ch surround sound The DVDirect does not support HDMI CEC such as BRAVIA Theatre Sync 2 Component video and audio cables b Note You will get no sound if only the COMPONENT Y PB PR connectors are connected The AUDIO L R white and red connectors must also be connected to obtain sound HDMI HDMI cable not supplied HDMI IN connector HDMI OUT connector R L AUDIO Y PB PR VI...

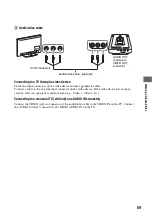
Page 59: ...device If the video device has an input selector select an appropriate external input e g Video 1 Video 2 etc Connecting to a monaural TV with only one AUDIO IN connector Connect the VIDEO yellow connector of the audio video cable to the VIDEO IN on the TV Connect the AUDIO L white connector to the MONO AUDIO IN on the TV R L AUDIO VIDEO Audio video cable supplied AV IN connectors AUDIO OUT connec...

Page 60: ...in 720p resolution even if HDMI settings is set to 1080i Before you begin connect a TV to the DVDirect page 57 1 On your TV select the input from the DVDirect For details refer to the operating instructions for your TV 2 Turn on the DVDirect The Top screen appears 3 Press the OUTPUT button b Note When only the Top screen appears on the DVDirect s display window in step 2 external output can be sel...

Page 61: ... and 78 Note on playback display If you press the DISPLAY button on the remote during playback the following playback information appears When the DISPLAY button is pressed again the information is not shown For details on chapter scene or title number refer to About Created Discs on page 78 z Hint When you connect the DVDirect to High Definition TV and playback HD High Definition disc scene numbe...

Page 62: ... 23 00 20 55 00 15 43 00 08 10 00 10 35 002 003 Operation with remote control Button Operation DISPLAY Display info y M Fast forward during playback Change the search speed in three stages during fast forward Slow motion during pause until the button is released m Fast reverse during playback Change the search speed during fast reverse Display the next title chapter scene Display the beginning of ...

Page 63: ...b Note When only the Top screen appears on the DVDirect s display window in step 2 external output can be selected by pressing the OUTPUT button 4 Press V or v to select Yes and press the ENTER button LED of the selected output lights up on the DVDirect when an external output is selected page 27 5 Press the OUTPUT button repeatedly to change the output of the DVDirect Every time you press the OUT...

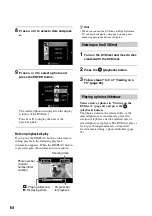
Page 64: ...e and photo number appear in the bottom of display 1 Turn on the DVDirect and insert a disc created with the DVDirect 2 Press the playback button 3 Follow steps 7 to 9 of Viewing on a TV page 63 Select a date or photos in Viewing on the DVDirect page 64 and press the playback button The photos stored in the selected date or the selected photos are continuously played in rotation All photos after t...

Page 65: ...tion screen v V V v Display the next or the previous photo B b Rotate the photo 90 degrees clockwise b B Display the photo list RETURN Display the photo list Button Function DISPLAY Display info PAUSE Continue to display the photo playback play the slideshow again by pressing the PLAY button STOP Stop display return to the Top screen or video photo selection screen RETURN Display the photo lists T...

Page 66: ...is available when you use an audio video cable an AV cable or an S video cable to connect your video device c OFF Recording does not stop automatically 30 minutes 4 hours Recording automatically stops when the preset time has passed after recording starts Select 30 min 60 min 90 min 2h 3h or 4h b Note The Auto Stop Timer setting is canceled when the recording is completed the stop button is presse...

Page 67: ...inition and SD Standard Definition discs will remain unfinalized If recorded onto only one disc or for the last disc you can select whether or not to finalize the disc when prompted after recording is completed The disc will not be finalized in the Manual copy mode even though Auto Finalizing is set to ON Select a background image A D to apply to the Disc Menu screen for the discs created with the...

Page 68: ...tents of a disc time to complete finalizing a disc may vary You can erase videos or photos recorded on a DVD RW or DVD RW disc The erased disc is reusable as a blank disc b Note Be aware that this operation erases all data 1 Insert a disc to erase press V or v to select Erase disc and press the ENTER button 2 Press V or v to select Yes and press the ENTER button 3 Press V or v to select Yes and pr...

Page 69: ...e audio signal from the HDMI OUT connector c Auto Select Auto unless necessary to specify the audio output This outputs the audio signal suitable for the TV PCM Down mixes the audio signal to Linear PCM 2ch and outputs from HDMI OUT b Note If your TV does not support Dolby Digital DTS or AAC connecting it to the DVDirect and selecting Auto may not get sound Select PCM if you get no sound You can c...

Page 70: ...select the aspect ratio of the connected TV c 16 9 Select this when you connect a wide screen TV 4 3 Select this when you connect a 4 3 screen TV Select the language display for the display window TV Type Language ...

Page 71: ...ain A video device is connected to VIDEO IN or S VIDEO IN of the DVDirect but playback displays no video on the DVDirect s display window Make sure that the audio video cable or the S video cable is connected properly to A V OUT or S VIDEO OUT of the video device The DVDirect is not detecting input signals from the connected video device Turn on the video device and configure or operate it to star...

Page 72: ...alized Cannot record The disc has already been finalized You cannot use a finalized disc to record videos and or photos No recordable content found The camera or memory card has no video or photo to record One or more videos in the Playlist created on the camera are missing for copying Playlist only The camera or memory card has no new video or photo to record for copying new images only A correct...

Page 73: ...uality of commercially made recordable discs can vary Sub standard discs may not record normally Some recorded discs cannot be played on playback devices due to the recording quality or physical condition of the disc or the characteristics of the playback device and playback software The disc will not play if it has not been correctly finalized Supported Discs and Memory Cards Discs Disc type Logo...

Page 74: ...ED is on Data may be corrupted if the Memory Stick is removed or the DVDirect is turned off while reading data or the Memory Stick is used in locations subject to static electricity or electrical noise Memory Stick Memory Stick type Read Memory Stick a Memory Stick MagicGate High speed data transfer compatible a 1 Memory Stick Duo a Memory Stick Duo MagicGate High speed data transfer compatible a ...

Page 75: ... read copyright protected data SD Card xD Picture Card CompactFlash 1 SD Memory Card operation is supported up to 2 Gbytes 2 SDHC Memory Card operation is supported up to 32 Gbytes The memory card slot of the DVDirect does not support capacities exceeding 32 Gbytes Even if you insert such a card into the camera s memory card slot and connect the camera to the DVDirect with the USB cable recording ...

Page 76: ...he DV IN VIDEO IN or S VIDEO IN connector on the DVDirect the length of time required for recording is the same as the playback time of the video b Note You cannot record HD High Definition video taken in REC mode at a bit rate exceeding 18Mbps such as in HD FX mode for example High Definition Handycam in AVCHD format For REC mode or bit rate refer to the operating instructions of your camera Reco...

Page 77: ... 8 times longer than the above time b Note You cannot record HD High Definition video taken in REC mode at a bit rate exceeding 18Mbps such as in HD FX mode for example High Definition Handycam in AVCHD format For REC mode or bit rate refer to the operating instructions of your camera Disc space recordable time available for recording videos REC mode setting used to shoot the video DVD R RW R RW F...

Page 78: ...Standard Definition discs USB port or Memory card slot The Disc Menu displays thumbnails of the titles created at points in the video where the shooting date changes For each title chapters breakpoints of a video on the disc are automatically created by scene between the point where you start and stop shooting on the camera If you copy videos recorded in a variety of REC modes HQ SP etc setting on...

Page 79: ...can select the shooting date by the remote When selecting Disc Index in the top right of the Disc Menu each scene is played sequentially for 10 seconds from the beginning If a scene recorded is too long indexes will be automatically created every 5 minutes and played for 10 seconds b Notes Some players may not be able to display the Disc Menu When photos and videos are recorded onto the same disc ...

Page 80: ...cases Clean the disc with a cleaning cloth Wipe the disc from the center out Data may not be recorded properly if there are scratches or dust on the unrecorded area of writable discs Handle discs very carefully Handling memory cards Do not drop bend or submit the memory cards to external shock Do not disassemble or modify the memory cards Avoid touching the terminal of a memory card or touching it...

Page 81: ...er commercial or recorded discs are not supported Output DVDirect s built in LCD display or display devices connected to the VIDEO OUT of the DVDirect for playback only DV IN 1 4 pin i LINK IEEE1394 VIDEO IN 1 Vp p 75 ohms S VIDEO IN 4 pin mini DIN Y 1 Vp p 75 ohms C 0 286 Vp p 75 ohms AUDIO IN 2 Vrms Impedance more than 47 kilohms USB port Type A 2 COMPONENT OUT Y 1 Vp p 75 ohms PB 0 7 Vp p 75 oh...

Page 82: ... 64W AC adapter 1 Type AC NB16A Input AC 100 V 240 V Output DC 16 V 4A Size Approx 198 75 230 mm W H D Weight Approx 1 75 kg Operating temperature 5 ºC to 35 ºC Design and specifications are subject to change without notice Memory Card Slot Multi card slot General 1 Use an AC power cord appropriate for the region or country of use ...

Page 83: ...ble 58 HDMI Settings 69 I Images 21 L Language 70 M Manual 47 53 Memory Card 37 73 Memory Stick 37 74 Memory Stick Duo 37 74 N New Video Photo copying from a Handycam 41 O One Touch Disc Burn 49 P Photo 55 Playlist 43 copying from a Handycam 43 R Rec Quality REC mode 66 Remote control 28 Reset System 69 S SD Standard Definition discs 77 78 SD Card 37 75 Setup Menu 66 S video cable 35 System Info 6...

Page 84: ...P N 7911000014C Sony Corporation Printed in China ...

Reviews: