background image

19

n

N

Setting up the hardware

Network Media Receiver

Connection possibilities

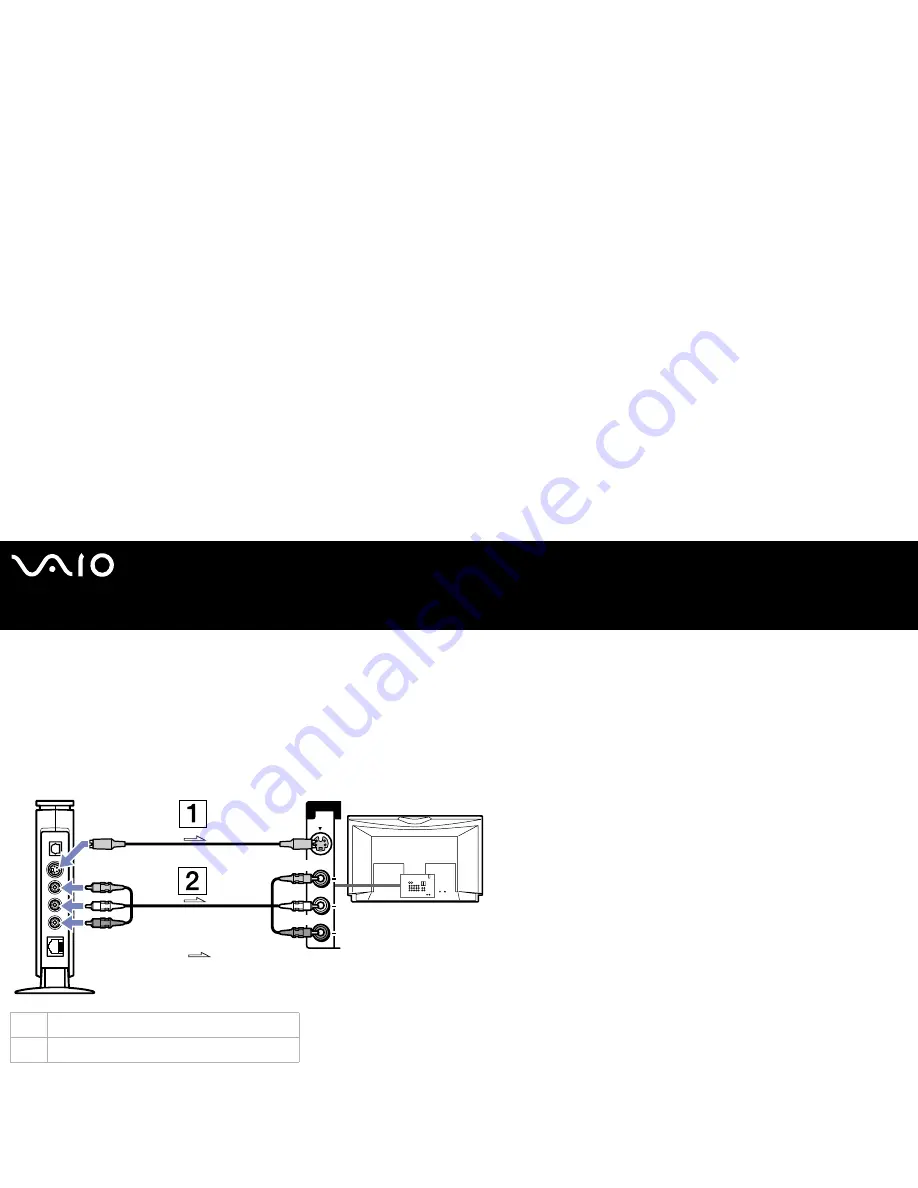
Connecting the Network Media Receiver to a TV

Use the supplied audio/video connection cable to connect the Network Media Receiver and your TV. Connect the cable by matching 
the connector colours to the jack colours on the TV’s audio/video jacks.

Optional equipment and cables may be required to connect the Network Media Receiver, TV, VCR and VAIO computer, depending 
on your connection environment.


The arrows indicate the signal direction.

1

S-video cable (sold separately)

2

Audio/video connection cable (supplied)

S-video

L

R

Video Input

1

Video

Audio

Summary of Contents for Vaio VGC-RA204

Page 1: ...N Network Media Receiver P C N A M R 1 0 A ...

Page 2: ...anties or merchantability or fitness for any particular purpose with regard to this manual the software or such other information In no event shall Sony Corporation be liable for any incidental consequential or special damages whether based on tort contract or otherwise arising out of or in connection with this manual the software or other information contained herein or the use thereof Sony Corpo...

Page 3: ...orised recording of such material may be contrary to the provisions of the copyright laws The law prohibits adding any modification to the recorded materials including but not limited to motion pictures images and audio without authorisation from the copyright holder Some of these materials may be duplication protected to disable unlawful recording Owner s record The model number and serial number...

Page 4: ...sing must be installed near the equipment and must be easily accessible Audio and picture distortion may occur if this equipment is positioned in close proximity to any equipment emitting electromagnetic radiation Stop operating the unit immediately under these circumstances The unit emits smoke or fumes The unit makes loud or unusual noise Water or any foreign object has fallen into the unit The ...

Page 5: ... for inspection and or repair Do not connect inappropriate network or phone lines to the Ethernet port Connect only 100BASE TX 10BASE T cables to the Ethernet port Connecting inappropriate network or phone lines to the Ethernet port may result in an electric current overload that can result in malfunction excessive heat or fire in the port For help on connecting to a network see your network admin...

Page 6: ...urs disconnect the equipment from the VAIO computer and TV for two to three hours The unit should resume normal operation To clean the Network Media Receiver wipe it with a soft dry cloth If the unit requires more cleaning use a soft cloth that is slightly moistened with a mild detergent solution Avoid getting the terminals wet Do not use cleaners that contain thinner benzene or alcohol as these c...

Page 7: ...ime Unplug the AC adapter from the electrical outlet during a lightning storm Lightning may cause electric shock or damage to the equipment When severe lightning is expected unplug the AC adapter from the electrical outlet to avoid fire electric shock or damage to the equipment Do not touch the equipment during a lightning storm About the remote control Use only AA size alkaline batteries in the r...

Page 8: ... Started booklet before using your Network Media Receiver equipment What is the Network Media Receiver The Network Media Receiver enables you to display still images play videos or music files on your TV screen when the Network Media Receiver is connected to a VAIO computer that contains your video and audio content The Network Media Receiver can accommodate multiple VAIO computer connections by u...

Page 9: ...ur recorded programme The TV function is not supported and will not be supported in the future Music Play music files stored on your VAIO computer Play a music track continuously loop feature Photos still images View the photo collections stored on your VAIO computer in slideshow format View your photos as thumbnails in Index view Select your favourite photo for viewing ...

Page 10: ...indicator is white while the power is on The indicator is red during TV recording The indicator blinks red during firmware updates 2 Infrared receiver Enables communication between the Network Media Receiver and the remote control Do not block the area in front of the infrared receiver 3 Power button Standby indicator Turns the Network Media Receiver on and off The indicator is dimmed red when the...

Page 11: ...cal OUT port Supports the digital optical input of an audio device 2 S video jack Connection for an S video cable 3 Video jack Connection for a video cable 4 Audio L jack Connection for an audio cable left 5 Audio R jack Connection for an audio cable right 6 Ethernet port Connection for a 100BASE TX 10BASE T Ethernet cable RJ 45 ...

Page 12: ...remote control can start and stop video recording playback and set viewing preferences MUTE CHANNEL TV POWER POWER 1 2 3 DISPLAY 4 5 6 AUDIO CLEAR REW OPTIONS MAINMENU FUNCTION TV VOLUME NETWORK MEDIA RECEIVER CHANNEL RETURN PAGE UP PAGE DOWN SELECT STOP PLAY PAUSE FWD PREV NEXT REC REC STOP ENTER 7 8 9 0 TV VIDEO PM NM10E ...

Page 13: ...sic or photo servers 9 Direction arrow buttons SELECT button Press a direction arrow button to navigate within the video music or photo servers Press to select operations settings features or other choices while using the video music or photo servers 10 FUNCTION button Press to toggle between the Network Media Receiver features such as video music or photo 11 TV VOLUME switch Use this switch to in...

Page 14: ...0 PAUSE button Press to pause video music or slideshow playback 21 PLAY button Press to begin playback of videos music or slideshows 22 MAIN MENU button Press to return to the main selection screen 23 RETURN button Press to return to the previous screen feature or mode 24 CHANNEL switch Use this switch to change TV channels The Page Up Page Down feature enables you to scroll within folders contain...

Page 15: ...edia Receiver and your VAIO computer Setup poster printed A visual quick reference sheet showing the configuration of the Network Media Receiver equipment as well as the important specifications of the unit Sony guarantee leaflet printed Safety and Regulations guide printed VAIO computer compatibility The Network Media Receiver supports certain Sony VAIO computers Check that your VAIO computer is ...

Page 16: ...icrosoft Windows XP Home Edition or Professional operating system installed Have the VAIO Media software platform and servers preinstalled Be equipped with VAIO Zone software Wireless LAN requirements To use Wireless LAN functions with the Network Media Receiver we recommend the following PCWA DE30 PCWA A320 ...

Page 17: ... see the VAIO Zone guide provided on disc with your VAIO computer and the VAIO Zone Help files which are within the software itself Music file compatibility Only playlists that are managed by the SonicStage software are supported by the Network Media Receiver Other music files or songs purchased from an Internet Electronic Music Distribution EMD service are not compatible for playback using the Ne...

Page 18: ... the remote control proceed as follows 1 Open the battery cover on the back of the remote control 2 Insert two AA batteries supplied by matching the and on the batteries with the diagramme inside the battery compartment Under normal use the AA batteries may last up to six months If your remote control does not operate properly the batteries may need replacing If your remote control is not being us...

Page 19: ...rol proceed as follows 1 Press and hold the SELECT button 2 Enter your TV code number using the channel number buttons 3 Release the SELECT button after you have entered the TV code number After replacing the batteries in your remote control the TV manufacturer s code may require resetting Reset the code each time you replace the batteries TV Manufacturer Code Number TV Manufacturer Code Number Ak...

Page 20: ...nd your TV Connect the cable by matching the connector colours to the jack colours on the TV s audio video jacks Optional equipment and cables may be required to connect the Network Media Receiver TV VCR and VAIO computer depending on your connection environment The arrows indicate the signal direction 1 S video cable sold separately 2 Audio video connection cable supplied S video L R VideoInput 1...

Page 21: ...tion cable to connect the Network Media Receiver and your video recorder Connect the cable by matching the connector colours to the jack colours on the VCR s audio video jacks Optional equipment and cables may be required to connect the Network Media Receiver TV VCR and VAIO computer depending on your connection environment The arrows indicate the signal direction ...

Page 22: ...r and your digital sound system equipment To connect the equipment proceed as follows 1 Insert one end of an optical digital cable sold separately into the optical OUT port on the Network Media Receiver 2 Insert the other end of the optical digital cable into the optical IN port on the sound system equipment Optional equipment and cables may be required to connect the Network Media Receiver and yo...

Page 23: ...IO computer is connected to the Internet using the built in modem page 27 Environment 6 VAIO computer is not connected to the Internet page 28 Environment 7 Connecting multiple VAIO computers page 29 Please take the following notes into account Optional equipment and cables may be required to connect your Network Media Receiver and VAIO computer s All equipment and cables must be compatible with 1...

Page 24: ...ed as follows 1 Connect the Network Media Receiver to your DSL cable modem 1 using the network cable 2 2 Connect the Ethernet jack on each VAIO computer to the jack s on the DSL modem using additional network cables 3 Sold separately MONITOR USB LINE PHONE HEADPHONES MIC LINE IN VHF UHF AUDIO VIDEO OUTPUT AUDIO VIDEO1 INPUT S VIDEO VIDEO S VIDEO VIDEO MONITOR LAN LINE Internet ...

Page 25: ...to a network switch device 1 using the network cable 2 2 Connect the Ethernet jack on each VAIO computer to the jack s on the network switch using additional network cables 3 3 Connect the network switch device to the DSL or cable modem using a network cable 4 Sold separately MONITOR USB LINE PHONE HEADPHONES MIC LINE IN VHF UHF AUDIO VIDEO OUTPUT AUDIO VIDEO1 INPUT S VIDEO VIDEO S VIDEO VIDEO MON...

Page 26: ...switch 1 using the network cable 2 2 Connect the Ethernet jack on each VAIO computer to the jack s on the router device using additional network cables 3 3 Connect the WAN jack on the router device to the LAN jack on the DSL or cable modem using a network cable 4 Sold separately MONITOR USB LINE PHONE HEADPHONES MIC LINE IN VHF UHF AUDIO VIDEO OUTPUT AUDIO VIDEO1 INPUT S VIDEO VIDEO S VIDEO VIDEO ...

Page 27: ...router device with a built in network switch 1 using the network cable 2 2 Connect the Ethernet jack on each VAIO computer to the jack s on the router device using additional network cables 3 3 Connect the WAN jack on the router device to the LAN jack residential complex 4 Sold separately MONITOR USB LINE PHONE HEADPHONES MIC LINE IN VHF UHF AUDIO VIDEO OUTPUT AUDIO VIDEO1 INPUT S VIDEO VIDEO S VI...

Page 28: ...ble 1 into the Ethernet jack on your VAIO computer 2 Insert the other end of this crossover cable into the connection adapter 2 3 Insert one end of the network cable 3 into the connection adapter 4 Insert the other end of this network cable into the Ethernet jack on the Network Media Receiver 4 MONITOR USB LINE PHONE HEADPHONES MIC LINE IN VHF UHF AUDIO VIDEO OUTPUT AUDIO VIDEO1 INPUT S VIDEO VIDE...

Page 29: ... the Ethernet jack on your VAIO computer 2 Insert the other end of this crossover cable into the connection adapter 2 3 Insert one end of the network cable 3 into the connection adapter 4 Insert the other end of this network cable into the Ethernet jack on the Network Media Receiver 4 MONITOR USB LINE PHONE HEADPHONES MIC LINE IN VHF UHF AUDIO VIDEO OUTPUT AUDIO VIDEO1 INPUT S VIDEO VIDEO S VIDEO ...

Page 30: ...router device with a built in network switch or a multiple port network switch device 1 using the network cable 2 2 Connect the Ethernet jack on each VAIO computer to the jack s on the router device using additional network cables 3 When using a router device with a built in network switch a WAN connection is not necessary Sold separately MONITOR USB LINE PHONE HEADPHONES MIC LINE IN VHF UHF AUDIO...

Page 31: ...ddress proceed as follows 1 Click Start on the Windows taskbar and select My Computer The My Computer window appears 2 In the Other Places section click My Network Places The My Network Places window appears 3 Click View Network Connection The View Network Connection window appears 4 Right click Local Area Connection and select Properties from the shortcut menu The Local Area Connection Properties...

Page 32: ...the Internet Protocol TCP IP Properties dialog boxes When you set up the Network Media Receiver the IP address must be specified See Specifying an IP address page 40 When specifying the IP address for the Network Media Receiver use different numbers where the IP address numbers are represented as XXX XXX ...

Page 33: ... on your VAIO Media server computer Use MP3 files stored in the shared folder that you can configure in VAIO Media Console Still image files Use images files stored in the shared folder that you can configure in VAIO Media Video recordings Use VAIO Zone to create video recordings on your VAIO Media Integrated server computer The VAIO Media Integrated Server software automatically makes these recor...

Page 34: ...ck OK 5 Select the option No device registration needed in a secure network environment 6 In the section Start and Stop Servers verify that all available servers are shown as Started 7 If the servers are shown as Stopped click Start 8 Click Close in the VAIO Media Console window The music play lists video cabinets and photo collections are available for network sharing only when the VAIO Media ser...

Page 35: ... set up the other software applications you can start using the Network Media Receiver Starting and stopping the Network Media Receiver page 35 Registering the Network Media Receiver and your VAIO computer page 37 Specifying an IP address page 40 Making your own settings page 42 Restoring the original factory settings page 46 Updating the Network Media Receiver firmware page 48 ...

Page 36: ...utton or switch 2 Turn on your VAIO computer 3 Turn on your TV by pressing the TV POWER button on the remote control see Remote control page 11 for details on button functions 4 Switch the input connection to the Network Media Receiver by pressing the TV VIDEO button on the remote control 5 Turn on the Network Media Receiver by pressing the POWER button on the remote control The POWER REC indicato...

Page 37: ...oximately 20 seconds to light after the AC adapter is plugged into a wall outlet The TV Watch and record TV programs is not available To stop using the Network Media Receiver proceed as follows 1 Turn off the Network Media Receiver by pressing the POWER button on the remote control The POWER REC indicator turns off and the Main Menu screen no longer appears on your TV screen 2 Turn off your TV by ...

Page 38: ...trict access to your VAIO computer accepting access from the Network Media Receiver only To register the Network Media Receiver proceed as follows 1 On the remote control press the MAIN MENU button The Main Menu appears 2 Highlight Settings then press the SELECT button The Settings screen appears 3 Highlight System Settings then press the SELECT button The System Settings screen appears ...

Page 39: ...ight Device Registration then press the SELECT button The Registration screen appears 5 Highlight OK then press the SELECT button The Registration screen appears If the registration of the Network Media Receiver and the VAIO computer are cancelled you need to begin the registration again ...

Page 40: ...red Devices The Registered Devices dialog box appears 7 Click Register The Device Registration dialog box appears 8 Clear the check box Use the confirmation number to register your device 9 Click Start Registration The Receiving Registration Request dialog box appears showing the registration progress 10 When the Registration Confirmation message box appears respond to the prompt Do you want to ad...

Page 41: ...he Network Media Receiver proceed as follows 1 Make sure you are connected to the Internet 2 On the remote control press the MAIN MENU button The Main Menu screen appears 3 Highlight Settings then press the SELECT button The Settings screen appears 4 Highlight System Settings then press the SELECT button The System Settings screen appears ...

Page 42: ... press the SELECT button 8 Use the channel number buttons or the up down arrow buttons to enter numbers for the IP address and the subnet mask then press the SELECT button 9 Highlight OK then press the SELECT button 10 Turn the Network Media Receiver off then restart it to enable the changes to take effect If you are not using a router device select Obtain the IP address automatically not using ro...

Page 43: ...AIO computer as the default server for the Video Music and Photo features available through the Network Media Receiver Repeat these steps for each feature To select a server proceed as follows 1 Start up the Network Media Receiver as described in Starting and stopping the Network Media Receiver page 35 2 Select a feature such as Video Watch video clips 3 Press SELECT The Select a server screen app...

Page 44: ...ault server settings proceed as follows 1 From the Select a server screen press SELECT 2 Choose Delete from list and press SELECT again 3 Press the OPTIONS button on the remote control 4 Select Refresh and then OK Your default server settings are deleted if the AC power is interrupted or if the Network Media Receiver software is updated ...

Page 45: ...d as follows 1 Start up the Network Media Receiver as described in Starting and stopping the Network Media Receiver page 35 2 From the Main Menu highlight Settings and press SELECT The Settings screen appears 3 Highlight System Settings and press SELECT The System Settings screen appears 4 Highlight Startup Menu and press SELECT The Startup Menu screen appears ...

Page 46: ... the Windows taskbar and select Control Panel 2 Click Performance and Maintenance then click System The System Properties dialog box appears 3 Click the Hardware tab then click Device Manager The Device Manager window appears 4 Click next to Network Adapter The drop down tree displays all available network adapters 5 Double click the network adapter that connects the computer to the Network Media ...

Page 47: ...rk Media Receiver Restoring the original factory settings You can reset these features to the original factory default settings Startup menu IP address Recording mode Live mode not available Default server VAIO computer Slideshow intervals Slideshow repeat looping ...

Page 48: ...on The Main Menu appears 2 Highlight Settings then press the SELECT button The Settings screen appears 3 Highlight System Settings then press the SELECT button The System Settings screen appears 4 Highlight Factory Default then press the SELECT button The Default settings screen appears 5 Highlight OK then press the SELECT button All settings are reset to the original factory settings ...

Page 49: ... Network Media Receiver firmware To update firmware proceed as follows 1 On the remote control press the MAIN MENU button The Main Menu appears 2 Highlight Settings then press the SELECT button The Settings screen appears 3 Highlight System Settings then press the SELECT button The System Settings screen appears 4 Highlight Firmware update then press the SELECT button The Firmware Update screen ap...

Page 50: ...EC indicator starts blinking rapidly Do not unplug the AC power cord or the network cable during the download When the update is completed the Network Media Receiver goes into Standby mode Once you have started the firmware update process do not attempt to stop or cancel it All buttons on the remote control are disabled during the update All settings except for the IP address are reset to the defa...

Page 51: ...ver enables you to view video recordings recorded with VAIO Zone on your TV screen You can also use the Network Media Receiver to watch compatible video files The Network Media Receiver displays the video recording names as identified in VAIO Zone software For details on how to use VAIO Zone features refer to the VAIO Zone guide delivered on disc with your VAIO computer and the VAIO Zone Help file...

Page 52: ...edia Receiver To watch video content proceed as follows 1 On the remote control press the MAIN MENU button The Main Menu appears 2 Highlight VIDEO Watch video clips then press the SELECT button The Select a Video Server screen appears ...

Page 53: ...rding to play then press the SELECT button 7 Highlight PLAY then press SELECT The Network Media Receiver starts playing the selected video recording 8 Use the STOP PLAY and PAUSE buttons on the remote just like on your VCR to control the video playback Viewing while rewinding or fast forwarding To view the video recording while rewinding or fast forwarding proceed as follows 1 Using the remote con...

Page 54: ...nding order To sort video recordings proceed as follows 1 Press the OPTIONS button while the Video All Libraries screen is displayed The OPTIONS menu appears 2 Press the arrow buttons to highlight Sort then press the SELECT button A submenu appears 3 Press the up or down arrow buttons to specify the sort order then press the SELECT button The video recordings are sorted as specified ...

Page 55: ...he default TV server To change the video settings proceed as follows 1 Press the OPTIONS button while the Video All Libraries screen is displayed The OPTIONS menu appears 2 Highlight Video Settings then press the SELECT button The Video Settings screen appears 3 Highlight the Yes or No option then press the SELECT button 4 Highlight OK then press the SELECT button The display returns to the Video ...

Page 56: ...he SELECT button Playback starts from the specified frame 3 To hide the film roll press the up or down arrow button Using the time search feature The time search feature enables you to find a specific frame to start playback by specifying a playback time To select the time search feature proceed as follows 1 Press the OPTIONS button during playback or pause A submenu appears 2 Highlight Time searc...

Page 57: ...en highlight the video recording to play then press the SELECT button A submenu appears 2 Highlight Resume then press the SELECT button The media player starts playing the video recording from the frame where playback was previously stopped The Resume function maintains a history of the last 5 playback actions along with frame where each playback was stopped When you play more than 5 video recordi...

Page 58: ...omputer with SonicStage software using your TV s sound system or a digital sound system connected to your TV The playlists managed by the SonicStage software are supported by the Network Media Receiver Other music files may not be compatible with the Network Media Receiver The Network Media Receiver displays the playlist names and playlist folder names as identified in SonicStage software For deta...

Page 59: ... music proceed as follows 1 On the remote control press the MAIN MENU button The Main Menu appears 2 Highlight MUSIC Listen to music then press the SELECT button 3 Highlight a server that contains the required playlists or music tracks and press the SELECT button ...

Page 60: ...that contains the required playlist then press the SELECT button 6 Highlight the required playlist then press the PLAY button The playlist opens and the Network Media Receiver starts playing from the first track in the playlist If the playlist cover art is available on the SonicStage software it is displayed on your TV screen Otherwise the default playlist cover art is displayed on your TV screen ...

Page 61: ...vious music track begins to play 3 Press the NEXT button once The next track begins to play To rewind or fast forward the music track proceed as follows 1 Using the remote control press the REW or the FWD button 2 Press the PLAY or PAUSE button to resume playback of the music track To pause playback proceed as follows 1 Press the PAUSE button on the remote control 2 Press the PLAY button to resume...

Page 62: ... the playback of a single music track or an entire playlist To loop a music track proceed as follows 1 Press the OPTIONS button during the playback of the music track or playlist The OPTIONS menu appears 2 Highlight Repeat then press the SELECT button A submenu appears 3 Highlight ON then press the SELECT button ...

Page 63: ...e song that is being played has the title displayed all the other songs have only their number but no title displayed The playback mode Track plays the current music track only Sorting folders or playlists The Music All Libraries screen enables you to sort folders or playlists by name in ascending or descending order To sort folders or playlists proceed as follows 1 Press the OPTIONS button while ...

Page 64: ...of a computer display Only the photos managed with PictureGear Studio software or the photo files stored in a designated folder are supported by the Network Media Receiver The pictures stored in the Contents folder can also be shared and viewed by the Network Media Receiver To start viewing your photos proceed as follows 1 Press the MAIN MENU button on the remote control The Main Menu appears 2 Hi...

Page 65: ...hat contains the required photo collection or photos then press the SELECT button The folder opens and a list of available still images is displayed 6 Highlight the collection or still image to view then press the PLAY button The Network Media Receiver starts playing the selected collection or photos as a slideshow on your TV Only still image files are compatible for viewing with the Network Media...

Page 66: ...Index View enables you to view still image files photos stored on your photo server in thumbnail view To use the index view proceed as follows 1 From the Photo All Libraries screen highlight the collection or still image to view and press the OPTIONS button A submenu appears ...

Page 67: ...66 n N Viewing photos Network Media Receiver 2 Highlight Show Index then press the SELECT button The photos are displayed in thumbnail view on your TV screen ...

Page 68: ... the photos in a slideshow or set the photos to display in a loop repeat To change the slideshow settings proceed as follows 1 Press the OPTIONS button while the Photo All Libraries screen is displayed The OPTIONS menu appears 2 Highlight Photo settings then press the SELECT button The Photo Settings screen appears ...

Page 69: ...ight or left arrow buttons to highlight a time value then press the SELECT button 4 In the Slide Show Repeat section use the right or left arrow buttons to highlight ON or OFF then press the SELECT button 5 Highlight OK then press the SELECT button The Photos All Libraries screen is displayed ...

Page 70: ...while a slideshow is playing A submenu appears 2 Highlight Background music on then press SELECT 3 Highlight a server that contains the required background music playlist and press the SELECT button 4 Highlight Connect and press the SELECT button The Background Music All Libraries screen appears 5 Select a playlist for the background music then press SELECT ...

Page 71: ...button on the remote control To view the previous picture press the PREV button once To view the next picture press the NEXT button To stop a slideshow press the STOP button To pause the slideshow press the PAUSE button To resume the slideshow press the PLAY button To display the previous screen or menu press the BACK button ...

Page 72: ...Media Receiver Troubleshooting This section describes how to troubleshoot common problems About power connections page 72 About the remote control page 75 About visual and audio reception page 75 About connecting to a server page 77 ...

Page 73: ...ng a power cord extension power strip or surge suppressor make sure that it is turned on and securely connected to the wall power outlet Make sure fresh batteries are properly installed in the remote control Unplug the AC adapter from the power outlet and plug it in again Doing so resets the Network Media Receiver to the original factory default settings The Network Media Receiver takes approximat...

Page 74: ...iver for more than five seconds or disconnect the AC adapter from the Network Media Receiver 2 Wait 20 seconds for the Standby indicator to light in red then turn the Network Media Receiver unit on Resetting the Network Media Receiver or reconnecting the AC adapter resets the unit s settings to the original factory default settings 3 To completely disconnect power to the Network Media Receiver unp...

Page 75: ...onfigured to obtain the IP address automatically Verify that the correct server name appears in the Select a server screen the Select a server screen lists all current and previous servers connected to the Network Media Receiver When connecting to the Network Media Receiver for the first time the Network Media Receiver does not automatically bring a VAIO computer out of Standby mode Subsequent con...

Page 76: ...cturer code again About visual and audio reception There is nothing displayed on the TV screen If your VAIO computer has become unstable and stops responding turn it off and restart the computer Check the following The TV set is turned on and the power indicator light is on The Network Media Receiver is turned on and the power indicator light is on The Network Media Receiver and the TV are connect...

Page 77: ...dio reception is interrupted or distorted The network may not have enough bandwidth Check the following if applicable to your network environment The network cables support 100BASE TX 10BASE T The network switch or the router device supports 100BASE TX 10BASE T ...

Page 78: ... Select a server screen the Select a server screen lists all current and previous servers connected to the Network Media Receiver If the server still does not appear in the Select a server screen turn off the Network Media Receiver and disconnect then reconnect the AC adapter Turn on the Network Media Receiver again and check that the server appears in the Select a server screen To use the automat...

Page 79: ...y take longer than a few moments Verify that the VAIO Media Integrated Server is running on the VAIO computer and that the status is shown as Started To use the Video feature the VAIO computer must be running and have a user logged on If the server still does not appear in the Select a server screen turn off the Network Media Receiver and disconnect then reconnect the AC adapter Turn on the Networ...

Page 80: ... configure your computer to enable the Network Media Receiver to automatically resume from Standby or Hibernate modes Make sure the computer is turned on Make sure the network cable connections are secure If using a network switch device or a router device with a built in network switch make sure the equipment is turned on Make sure the network status is up The Select a server screen always appear...

Page 81: ...1 Mbps 352 x 288 pixels 25 fps Compatible file formats Video Music Photo MPEG2 MPEG1 ATRAC3 ATRAC3plus WAVE MP3 BMP TIF GIF JPEG PNG Connectors video output audio output S video composite video out Audio left audio right optical digital audio out Ethernet network 100BASE TX 10BASE T x 1 RJ 45 Power requirements AC 100V 240V 50Hz 60Hz Operating temperature 0 C to 40 C Power use during operation dur...

Reviews: