background image

11

Connections


Pr
epa

ra

tio
n

• Printer operation is not guaranteed for USB hub 

connections.

Installing the Printer Driver

For computers running on Windows 2000/
Windows XP/Windows Vista

After connecting the printer to your computer, turn on the 
printer. For details on installation, refer to the installation 
guide and Readme file included on the supplied CD-ROM.

For computers running on Windows 7

Before connecting the printer, install the supplied printer 
driver on your computer. For details on installation, refer to 
the installation guide and Readme file included on the 
supplied CD-ROM.

Note

Do not allow the connected computer to enter the Standby 
(Suspend) or Sleep modes while the printer is turned on, 
because this may cause the printer to stop operating 
properly.

Summary of Contents for UPD25MD

Page 1: ...Digital Color Printer Instructions for Use Before operating the unit please read this manual thoroughly and retain it for future reference UP D25MD 4 152 259 15 1 2009 Sony Corporation ...

Page 2: ...s used to connect peripherals must be shielded in order to comply with the limits for a digital device pursuant to Subpart B of part 15 of FCC Rules For the customers in Canada This unit has been certified according to Standard CAN CSA C22 2 No 60601 1 For the customers in the U S A and Canada When you use this product connected to 240 V single phase be sure to connect this product to a center tap...

Page 3: ...djacent to or stacked with other equipment it should be observed to verify normal operation in the configuration in which it will be used Guidance and manufacturer s declaration electromagnetic emissions The UP D25MD is intended for use in the electromagnetic environment specified below The customer or the user of the UP D25MD should assure that it is used in such an environment Emission test Comp...

Page 4: ...mode 2 kV common mode 1 kV differential mode 2 kV common mode Mains power quality should be that of a typical commercial or hospital environment Voltage dips short interruptions and voltage variations on power supply input lines IEC 61000 4 11 5 UT 95 dip in UT for 0 5 cycle 40 UT 60 dip in UT for 5 cycles 70 UT 30 dip in UT for 25 cycles 5 UT 95 dip in UT for 5 sec 5 UT 95 dip in UT for 0 5 cycle...

Page 5: ...transmitters as determined by an electromagnetic site survey a should be less than the compliance level in each frequency range b Interference may occur in the vicinity of equipment marked with following symbol NOTE 1 At 80 MHz and 800 MHz the higher frequency range applies NOTE 2 These guidelines may not apply in all situations Electromagnetic propagation is affected by absorption and reflection ...

Page 6: ...ase refer to the addresses provided in the separate service or guarantee documents Recommended separation distances between portable and mobile RF communications equipment and the UP D25MD The UP D25MD is intended for use in an electromagnetic environment in which radiated RF disturbances are controlled The customer or the user of the UP D25MD can help prevent electromagnetic interference by maint...

Page 7: ...ent Settings 18 Printing a List of Printer Settings 19 Printing 19 Miscellaneous Precautions 21 Safety 21 Cleaning 21 Cleaning the thermal head 22 Automatic paper feed roller cleaning 22 Manual paper feed roller cleaning 22 Ink Ribbon and Paper 23 About the Color Printing Pack UPC 21S UPC 21L and the Laminate Color Printing Pack UPC 24SA UPC 24LA 23 Specifications 24 Troubleshooting 25 Explanation...

Page 8: ...d menus C ALARM indicator Lights when an error such as a paper jam occurs D MENU button Press this button to display the menu or to return to the main screen from the menu E Directional buttons M m Use these buttons to select menu items and change settings F x STOP button Press this button to stop a continuous printing operation Printing stops once the current item is finished printing G EXEC butt...

Page 9: ...lear paper manually when an internal paper jam occurs D Media switch lever Switch the position of this lever according to the type of ink ribbon being used Rear A USB cable stopper page 10 Secures the USB cable to prevent it from being disconnected B USB connector Connects to a computer equipped with a Hi Speed USB USB 2 0 compliant interface Note Use the supplied USB cable when connecting C AC IN...

Page 10: ...efer to the manuals for the computer or other peripheral devices USB Port Connection Securing the USB cable After you connect the USB cable to the printer it is recommended that you use the cable stopper to secure the USB cable to prevent it from being accidentally disconnected Notes Follow the connection procedures described in the computer manual Make sure that the USB cable is connected securel...

Page 11: ...r to the installation guide and Readme file included on the supplied CD ROM For computers running on Windows 7 Before connecting the printer install the supplied printer driver on your computer For details on installation refer to the installation guide and Readme file included on the supplied CD ROM Note Do not allow the connected computer to enter the Standby Suspend or Sleep modes while the pri...

Page 12: ...AIT appears on the LCD display 1 Open the ribbon door panel 2 Switch the position of the media switch lever according to the type of ink ribbon being used When using the printer for the first time or when changing the type of ink ribbon to use perform the following to switch the position of the media switch lever 1 Remove the cover 2 Switch the position of the media switch lever 3 Replace the cove...

Page 13: ...he ribbon tray Doing so may result in improper loading of the ink ribbon 5 Slide the ribbon tray straight into the printer until completely inserted 6 Close the ribbon door panel Removing the Ribbon Tray To remove the ribbon tray when replacing the ink ribbon for example pull the tray straight out If the ink ribbon tears during use Cellophane tape etc can be used to repair a torn ink ribbon so tha...

Page 14: ...ause the printer to shift position and fall 1 Press the Z mark on the paper feed tray to eject the tray 2 Open the lid of the paper feed tray and load the paper and protective sheet together with the print side facing up When using printing packs UPC 21L or UPC 24LA 1 Open the paper feed tray 2 If the paper feed tray partition is raised lower it 3 Neatly stack and load the paper in the paper feed ...

Page 15: ...g it The reverse side of the protective sheet without printing can be used as a cleaning sheet to clean the thermal head For details about cleaning see Cleaning the thermal head on page 22 4 Insert the paper feed tray into the printer until it clicks into place Notes If the paper feed tray cannot be completely inserted in the printer check the tray insertion area and remove any paper found there D...

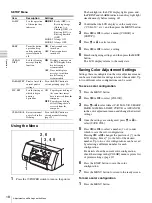
Page 16: ...M m Press the MENU button while the menu is displayed to return the LCD display to the ready state The menu is structured as follows Selected configuration number Media size and remaining pages LA 24LA SA 24SA L 21L S 21S Setup menu Color adjustment menu Ready state Button operations for menus Press or to switch between menus and press M or m to switch between setting items in menus If you press M...

Page 17: ...e Adjustment range 0 7 14 DARK Adjusts the level of dark areas Can be adjusted in 32 gradations 0 is the standard value Adjustment range 32 0 32 GAMMA Adjusts the level of intermediate colors Can be adjusted in 32 gradations 0 is the standard value Adjustment range 32 0 32 LIGHT Adjusts the level of light areas Can be adjusted in 32 gradations 0 is the standard value Adjustment range 32 0 32 CURVE...

Page 18: ...f the desired number Up to two color configurations can be saved by selecting a different number for each configuration For details about the current color configuration check the settings in the COLOR menu or print a list of printer settings page 19 6 Press the EXEC button to save the color configuration 7 Press the MENU button to return to the ready screen To load a color configuration 1 Press t...

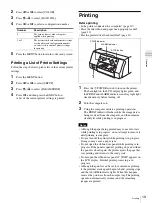
Page 19: ...uter and then remains steadily lit while printing is in progress Notes Although the paper being printed may come into view while printing is in progress do not attempt to remove it until printing is complete Do not turn off the printer while printing is in progress Doing so may cause a paper jam Do not open the ribbon door panel while printing is in progress If the panel is opened printing stops a...

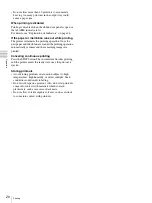
Page 20: ...re loaded the printing operation automatically resumes and the remaining images are printed Canceling continuous printing Press the STOP button The current item finishes printing and the printer enters the ready state once the printout is ejected Storing printouts Avoid storing printouts in a location subject to high temperatures high humidity or direct sunlight Such conditions could result in fad...

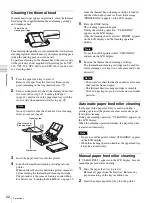
Page 21: ...on and paper feed tray 2 Lock the internal thermal head 1 Press the POWER switch to turn on the printer 2 Simultaneously press and the MENU button The printer operation sound continues for approximately 2 seconds and the message WAIT appears on the LCD display 3 When the printer operation sound stops and the message TRANS MODE appears in the display press the POWER switch to turn off the printer T...

Page 22: ...appears on the LCD display 5 Press the EXEC button The cleaning operation begins During the cleaning operation CLEANING appears on the LCD display After the cleaning sheet is ejected FINISH appears on the LCD display and the cleaning operation finishes Note Do not turn off the printer while CLEANING appears on the LCD display 6 Remove the thermal head cleaning cartridge The thermal head cleaning c...

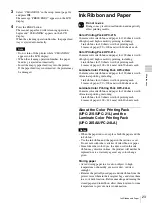
Page 23: ...ch 4 reams of paper 100 144 mm with 50 sheets each Laminate Color Printing Pack UPC 24SA Contains color ink ribbons and paper for 180 sheets worth of laminate printing including 3 ink ribbons for 60 sheets worth of printing each 3 reams of paper 90 100 mm with 60 sheets each Laminate Color Printing Pack UPC 24LA Contains color ink ribbons and paper for 160 sheets worth of laminate printing includi...

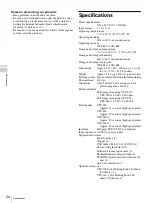
Page 24: ...98 398 mm w d h 8 3 8 3 7 8 15 5 8 inches Weight Approx 5 5 kg 12 lb 3 oz printer only Printing system Dye transfer sublimation thermal printing Thermal head 423 dpi Gradations 8 bit 256 level processing each for yellow magenta and cyan Picture elements Full image print using UPC 21S UPC 24SA 1 600 1 200 dots Full image print using UPC 21L UPC 24LA 2 100 1 600 dots Printing time UPC 21S Approx 19 ...

Page 25: ...R Symptom Possible causes and remedies The printer does not print even though images are being sent from the computer The POWER switch is OFF tTurn the POWER switch ON The printer and computer are not connected properly tCheck the printer and computer connections page 10 The printer does not print The printer is in a state that does not allow printing for some reason In such cases the ALARM indica...

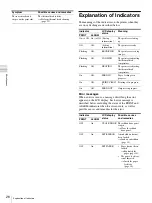
Page 26: ...LARM Ont Off On t Off Startup information The printer is starting up Off Off Setting information The printer is ready Flashing Off RECEIVING The printer is receiving images Flashing Off COOLING The printer is adjusting the thermal head temperature Flashing Off HEATING The printer is adjusting the thermal head temperature On Off FEED IN Paper feeding is in progress On Off PRINT Y M C L Printing is ...

Page 27: ...le causes and remedies PRINT ALARM Off On TR TEMP 20 21 The internal temperature of the printer is abnormal tTurn the printer off and then on again If the error message persists consult your Sony dealer Off On TR HEAD 01 to 0F The thermal head is malfunctioning tTurn the printer off and then on again If the error message persists consult your Sony dealer Off On TR FAN 90 to 9F A malfunction occurr...

Page 28: ...ared open the ribbon door panel and turn the dial upward This ejects the paper jammed deep inside If the paper jam cannot be cleared even by turning the dial refer to If a paper jam cannot be cleared on page 28 3 Load the paper properly Notes Do not reuse the paper removed in step 2 Only use paper from the printing packs recommended for this printer 4 Insert the paper feed tray into the printer If...

Page 29: ...wo screws securing the base plate 5 Lift up the base plate and remove it from the printer 6 Carefully clear the jammed paper 7 Reattach the base plate V Note The printer cannot print with the base plate removed If a paper jam still cannot be cleared Consult your Sony dealer Do not attempt to remove the paper by force ...

Page 30: ...Sony Corporation ...

Reviews: