background image

6

Supplied Accessories


P

rep
ar

at

ion

Supplied Accessories

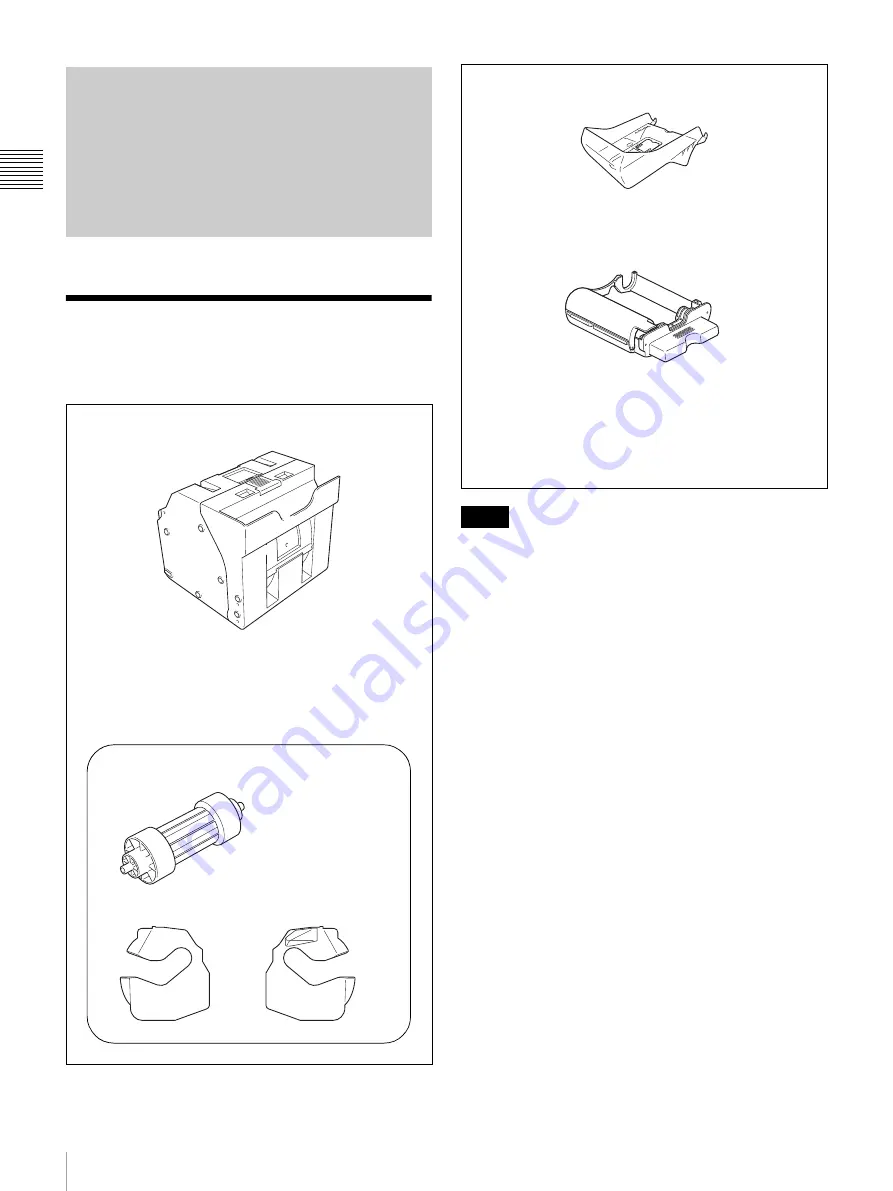
Make certain you have received the following accessories:

• When taking the unit out of the carton box, be careful not 

to hurt your back.

• The packaging materials are needed when transporting 

the unit, so we suggest you keep them.

• Before transporting the unit, remove the ink ribbon and 

paper roll from the unit.

• Before transporting the unit, also remove any paper 

remnants from the paper holder. The paper remnants 
may slip into the inner parts of the unit and result in 
damage if not removed.

Preparation

These accessories are stored in the paper holder.

Paper Core (1)

Adaptor (left,1)

Adaptor (right,1)

Paper Holder

The paper holder is stored in the printer. Be sure to remove 
the paper holder from the inside of the printer before turning 
the power on.

Notes

Paper Tray (1)

Ink Ribbon Holder (1)

Cleaning Cartridge (1)
USB Cable (1)
CD-ROM (1)
Software License Agreement (1)
Before Using This Printer (1)
Warranty Card (1)

Summary of Contents for UP-CX2

Page 1: ...Digital Photo Printer Operating Instructions Before operating the unit please read this manual thoroughly and retain it for future reference UP CX2 4 198 698 11 1 2010 Sony Corporation ...

Page 2: ...cations not expressly approved in this manual could void your authority to operate this equipment All interface cables used to connect peripherals must be shielded in order to comply with the limits for a digital device pursuant to Subpart B of Part 15 of FCC Rules If you have any questions about this product you may call Sony Customer Information Service Center 1 800 222 7669 or http www sony com...

Page 3: ...aper roll and ink ribbon 8 Before Loading the Paper Roll and Ink Ribbon 9 Loading the Paper Roll and Ink Ribbon 9 Attaching the Paper Tray 13 Replacing the Paper Roll and Ink Ribbon 14 Removing the Paper Roll and Ink Ribbon 14 Loading the Paper Roll and Ink Ribbon 15 If the Ink Ribbon Breaks during Use 15 Removing Scraps from the Paper Holder 16 Printing from the Computer 17 Miscellaneous Precauti...

Page 4: ...printer is turned on Flashing 0 5 sec interval Receiving print data Flashing 1 sec interval Printing is in progress c CLEANING indicator Lit Cleaning is in progress Flashing Cleaning cartridge is inserted and the printer is awaiting operation d ALARM indicator page 24 Lit red The printer is malfunctioning Consult a Sony service representative Lit orange A paper jam has occurred or the ribbon cartr...

Page 5: ... resume printing after the problem has been resolved i Eject slot The printed photo emerges from this slot j Paper tray page 13 Printed photos are collected in this tray k Paper eject stopper page 13 Raise this stopper when printout size is small l Front door page 9 Open this door to change the paper roll Front door open A Paper holder page 9 The paper roll is inserted here The white areas between...

Page 6: ...orting the unit also remove any paper remnants from the paper holder The paper remnants may slip into the inner parts of the unit and result in damage if not removed Preparation These accessories are stored in the paper holder Paper Core 1 Adaptor left 1 Adaptor right 1 Paper Holder The paper holder is stored in the printer Be sure to remove the paper holder from the inside of the printer before t...

Page 7: ...For detailed instructions on how to install the printer driver refer to the Readme file and the install manual contained on the CD ROM disc supplied Connections Follow the connection procedures described in the computer manual Make sure that the interface cable is connected securely at both ends The printer driver software provided with the printer is not suitable for using the printer connected t...

Page 8: ...heets that can be printed depends on the print pack type The table below lists the image count for one ink ribbon and paper roll set Do not replace the ink ribbon and paper roll before they are used up Otherwise the above number of sheets may not be achieved Place the paper roll vertically If you place the paper roll horizontally the paper roll may roll around and fall This may cause an injury Hol...

Page 9: ...ead and rollers regularly whenever you load a new paper roll and ink ribbon For detailed information on cleaning see Cleaning the inside of the printer on page 20 Loading the Paper Roll and Ink Ribbon When using the printer for the first time you must first load a paper roll and ink ribbon Always use a designated print pack Always replace the paper roll and ink ribbon together as a set Attaching a...

Page 10: ...5 series Remove the adaptors from the paper holder Store the adaptors in a safe place so as not to lose them Loading the paper roll 1 Insert the paper core into the paper roll If the edges of the paper roll are uneven make sure to even them out before installing the paper roll Otherwise a malfunction may occur If the paper is wound loosely around the core make sure to wind it tightly before instal...

Page 11: ... center of the paper roll Make sure to fully remove all labels from the paper roll If labels remain inside the printer operation problems may occur After inserting the paper roll do not touch the printing surface the inner surface of the rolled paper Fingerprints sweat creases etc can lead to reduced print quality Insert the paper roll firmly and completely into the paper holder 7 Close the paper ...

Page 12: ...icular touching the thermal head when it is hot immediately after printing may result in burns 3 Open the ink ribbon holder cover 4 Detach the white spool of the ink ribbon from the black spool 5 Gently unravel the ribbon without loosening it and place it in the ribbon tray Place the white spool in the front holder and the black spool in the rear holder as shown Be sure to press down on the side o...

Page 13: ...e door Attaching the Paper Tray Attach the supplied paper tray About 50 sheets of printouts can be left on this paper tray However the number of printouts which can be accumulated on the paper tray changes according to the environment condition where the printer is used or the printed image Remove the printed sheets accumulated on the paper tray as soon as possible Raise the paper eject stopper wh...

Page 14: ...aper may result in malfunction Removing the paper roll 1 Lift the paper tray so that it is level and pull the paper tray outward to remove it 2 Open the front door 3 Press the paper holder release button and pull the paper holder out 4 Remove any paper remnants from the paper holder If the paper holder becomes full the paper remnants that are cut off may not eject from the printer These remnants m...

Page 15: ... Remove the ink ribbon After removing the ink ribbon attach the black spool to the white spool Do not reuse ink ribbons that have reached their prescribed print capacities and have been removed The ribbon tray is reusable Do not throw it away Loading the Paper Roll and Ink Ribbon For details on loading the paper roll and ink ribbon see Loading the paper roll on page 10 When you are finished loadin...

Page 16: ...ut s worth of ribbon may be lost Removing Scraps from the Paper Holder If the ALARM indicator lights the accumulation of scraps that are produced in the paper holder during printing may be excessive In such cases remove the scraps as follows Always remove scraps from the paper holder whenever you replace the paper roll even if the ALARM indicator does not light Excessive accumulation of scraps may...

Page 17: ...m that compatible ink ribbon and printing paper are installed page 8 Do not look into the paper output slot during printing The sharp edge of the printout may poke your eye or face This may cause loss of sight Also do not insert a foreign object in the paper output slot The cutter may be damaged or broken and a piece of the cutter can cut you Printing 1 Turn on the printer and computer The PRINT i...

Page 18: ...e type of paper roll and ink ribbon used The PRINT indicator remains lit after printing is complete Do not disconnect the USB cable while data transmission or printing is in progress Wait at least 5 seconds after disconnecting the USB cable before reconnecting it The number of prints that can be stored in the paper tray varies greatly depending on the usage environment and the images printed Be su...

Page 19: ... Install the unit on a level surface Do not install the unit on a slant or on its side Doing so could damage the unit Do not jar or drop the unit Do not install the unit in any location that is subject to instability excessive dust extremely high or low temperatures vibration high humidity direct sunlight Do not block the ventilation holes on the unit Doing so could result in damage On transportin...

Page 20: ...talled 2 Remove the paper tray 3 Open the side door and remove the ink ribbon holder 4 Load the cleaning cartridge into the printer and close the side door The CLEANING indicator begins flashing 5 Press the CLEANING button on the front panel of the printer The CLEANING indicator remains lit and about 30 cm of paper is ejected from the printer The CLEANING indicator begins flashing again after the ...

Page 21: ...rinter roller becomes dirty use a soft cloth moistened with cleaning alcohol to gently wipe the roller while turning it When cleaning the printer roller always turn off the printer and disconnect the power cord Cleaning the cabinet If the cabinet is extremely dirty soak a clean cloth in water or a solution of water and a neutral detergent wring out the cloth and then wipe the surface of the cabine...

Page 22: ...0 V AC 50 60 Hz Input current 3 0 to 1 3 A max while printing Operating temperature range 5 to 35 C Operating humidity range 20 to 80 no condensation External dimensions Approx 275 262 380 mm WHD 10 7 8 10 3 8 14 15 16 in excluding the maximum projecting parts Mass Approx 10 5 kg 23 lb 2 oz printer only Printing system Dye sublimation thermal transfer Resolution 300 dpi Gradations 8 bits 256 level...

Page 23: ...r right 1 Ink Ribbon Holder 1 Cleaning Cartridge 1 USB Cable 1 790 081 71 Sony 1 CD ROM 1 Software License Agreement 1 Before Using This Printer 1 Warranty Card 1 Optional accessories Self Laminating Color Printing Pack 2UPC C53 series 2UPC C54 series 2UPC C55 series 2UPC C58 series Design and specifications are subject to change without notice Notes Always verify that the unit is operating proper...

Page 24: ...per rolls and ink ribbons that came together in the same printing pack page 8 The printing pack that is loaded does not match the size setting configured on the computer tChange the size setting on the computer or replace the printing pack Symptom Cause Remedy Cannot load paper roll Are you trying to load 2UPC C53 C55 while adaptors are mounted in the paper holder tRemove the adaptors and then loa...

Page 25: ...Sony Corporation ...

Reviews: