background image

4

D:\WINNT-E\Profiles\Y3_Yano-w\Desktop\Print for 
PDF\4084273111CPDE110UC\4084273111CPDE110UC\US\01US03BAS-UC.fm

masterpage:Left

CPD-E110

4-084-273

11

 (1)

Adjustments

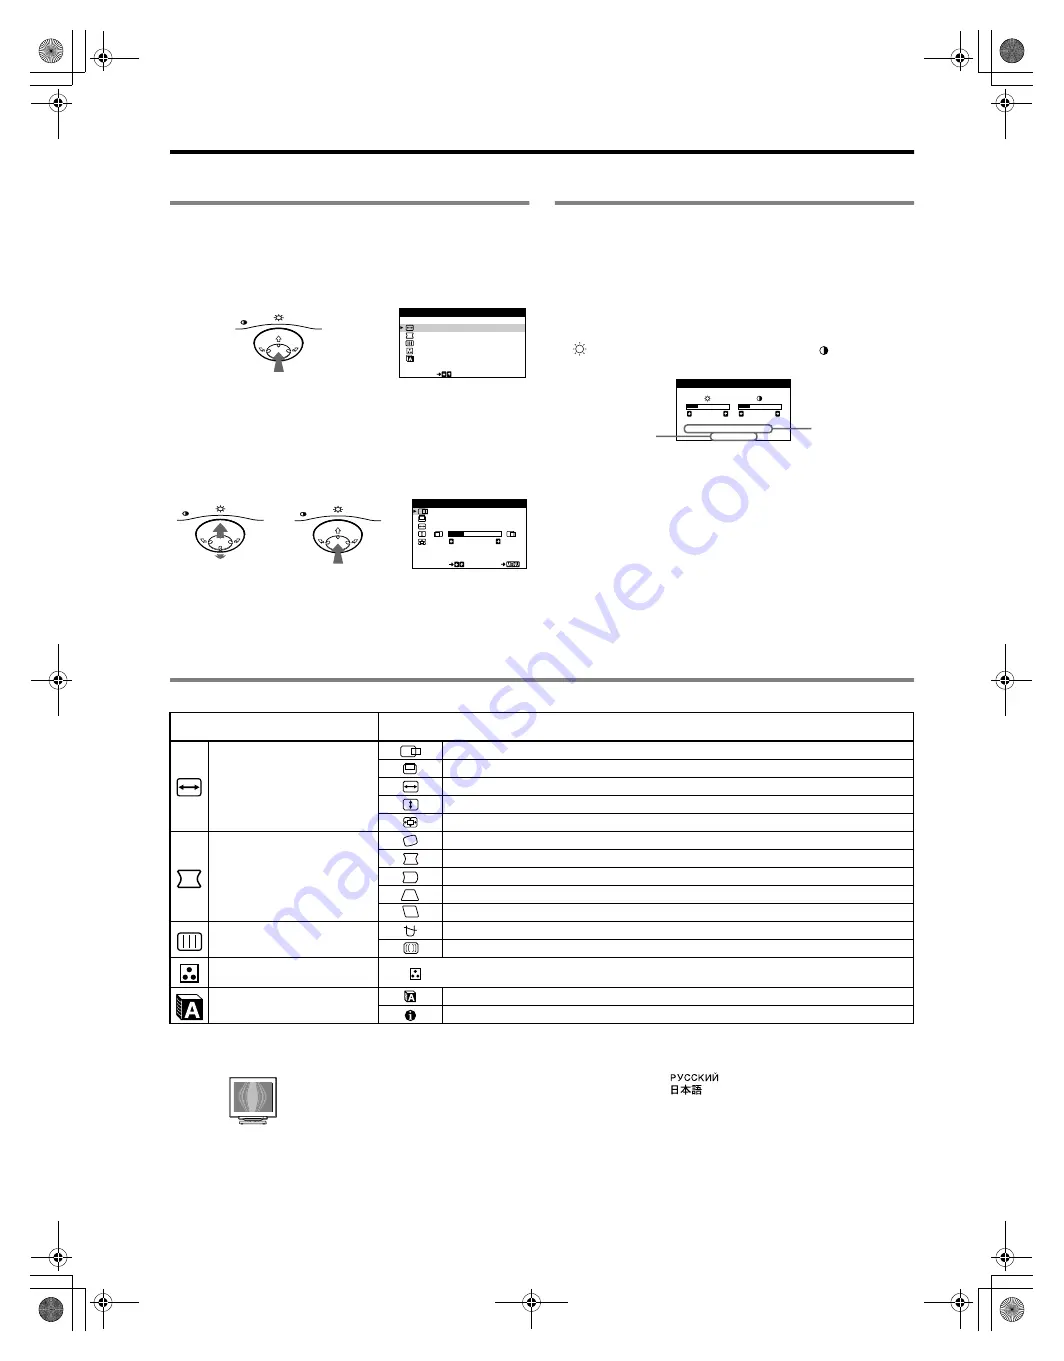
Navigating the menu

1

Press the center of the control button to display the 
main menu.

2

Move the control button 

m

/

M

 to highlight the main 

menu you want to adjust and press the control button.

3

Select the sub menu you want to adjust and press the 
control button.

4

Adjust with the control button.

Adjusting the brightness and contrast

Brightness and contrast adjustments are made using a separate 
BRIGHTNESS/CONTRAST menu. These adjustments are 
effective for all input signals.

1

Move the control button in any direction to display the 
BRIGHTNESS/CONTRAST menu.

2

Move the control button 

m

/

M

 to adjust the brightness 

(

),  and 

<

/

,

 to adjust the contrast (

).

On-Screen menu adjustments

MENU

EX I T

S I Z E / CENT ER
GEOME TRY
SCREEN
COLOR

SE L ECT

L ANGUAGE / I NFORMA T

N

O

I

MENU

,

Main menu

MENU

MENU

H - C E N T ER

2 6

SE L ECT

EX I T

S I ZE / CENTER

,

,

Sub menu

2 6

2 6

H : 6 8 . 7 k H z

V : 8 5 H z

1 0 2 4 X 7 6 8

BR I GHTNESS / CONTRAST

The resolution of 
the current input 
signal (only if the 
signal matches 
one of this 
monitor’s factory 
preset modes)

The horizontal and 
vertical 
frequencies of the 
current input 
signal

Main menu icons and adjustment 

items

Sub menu icons and adjustment items

Adjusting the size or centering of 
the picture

*

1

Horizontal position

Vertical position

Horizontal size

Vertical size

Zoom

Adjusting the shape of the picture

Rotating the picture

*

2

Expanding or contracting the picture sides

*

1

Shifting the picture sides to the left or right

*

1

Adjusting the picture width at the top of the screen

*

1

Shifting the picture to the left or right at the top of the screen

*

1

Adjusting the picture quality

DEGAUSS: demagnetizes the monitor.

CANCEL MOIRE: adjusts the degree of moire

*

3

 cancellation until the moire is at a minimum.

*

1

Adjusting the color of the picture See “

: To adjust the color of the picture”.

Additional settings

Selecting the on-screen menu language

*

4

Confirming the monitor’s information

*1

This adjustment is effective for the current input signal.

*2

This adjustment is effective for all input signals.

*3

Example of Moire

*4

Language Menu

•  ENGLISH

•  NEDERLANDS: Dutch

•  FRANÇAIS: French •  SVENSKA: Swedish
•  DEUTSCH: German •  

: Russian

•  ESPAÑOL: Spanish •  

: Japanese

•  ITALIANO: Italian

01US01COV-UC.book  Page 4  Thursday, April 12, 2001  12:00 PM

Summary of Contents for Trinitron CPD-E110

Page 1: ...uter Display puter Display uter Display ter Display er Display r Display Display Display isplay splay play lay ay y â masterpage Right CPD E110 4 084 273 11 1 Operating Instructions Mode d emploi Manual de instrucciones D WINNT E Profiles Y3_Yano w Desktop Print for PDF 4084273111CPDE110UC 4084273111CPDE110UC US 01US01COV UC fm US FR ES CS CPD E110 01US01COV UC book Page 1 Thursday April 12 2001 1...

Page 2: ... VLF and extremely low frequency ELF INFORMATION Ce produit est conforme aux normes du Swedish National Council for Metrology de décembre 1990 MPR II en ce qui concerne les fréquences très basses VLF et extremement basses ELF INFORMACIÓN Este producto cumple las normas del Consejo Nacional Sueco para Metrología MPR emitidas en diciembre de 1990 MPR II para frecuencias muy bajas VLF y frecuencias e...

Page 3: ... computer 1 Connect the power cord to the monitor and press the 1 power switch to turn on the monitor 2 Turn on the computer No need for specific drivers This monitor complies with the DDC Plug Play standard and automatically detects all the monitor s information No specific driver needs to be installed to the computer The first time you turn on your PC after connecting the monitor the setup Wizar...

Page 4: ...nt input signal only if the signal matches one of this monitor s factory preset modes The horizontal and vertical frequencies of the current input signal Main menu icons and adjustment items Sub menu icons and adjustment items Adjusting the size or centering of the picture 1 Horizontal position Vertical position Horizontal size Vertical size Zoom Adjusting the shape of the picture Rotating the pic...

Page 5: ...scrambled Isolate and eliminate any potential sources of electric or magnetic fields such as other monitors laser printers electric fans fluorescent lighting or televisions Move the monitor away from power lines or place a magnetic shield near the monitor Try plugging the monitor into a different AC outlet preferably on a different circuit Try turning the monitor 90 to the left or right Check your...

Page 6: ... more detailed picture Self diagnosis function This monitor is equipped with a self diagnosis function If there is a problem with your monitor or computer the screen will go blank and the 1 power indicator will either light up green or flash orange If the 1 power indicator is lit in orange the computer is in power saving mode Try pressing any key on the keyboard or moving the mouse x If the 1 powe...

Page 7: ...e a different power cord be sure that it is compatible with your local power supply For the customers in the U S A If you do not use the appropriate cord this monitor will not conform to mandatory FCC standards Example of plug types Before disconnecting the power cord wait at least 30 seconds after turning off the power to allow the static electricity on the screen s surface to discharge After the...

Page 8: ...WINNT E Profiles Y3_Yano w Desktop Print for PDF 4084273111CPDE110UC 4084273111CPDE110UC US 01US03BAS UC fm masterpage Left CPD E110 4 084 27311 1 01US01COV UC book Page 8 Thursday April 12 2001 12 00 PM ...

Page 9: ...is appuyez sur l interrupteur 1 alimentation afin de mettre le moniteur sous tension 2 Mettez l ordinateur sous tension Vous n avez pas besoin de pilotes spécifiques Ce moniteur est conforme à la norme Plug Play DDC et détecte automatiquement l ensemble des informations relatives au moniteur Il n est pas nécessaire d installer un pilote ou un gestionnaire supplémentaire sur l ordinateur Lorsque vo...

Page 10: ... LUMI NOS I T CONTRASTE É Résolution du signal d entrée courant uniquement si le signal correspond à l un des modes préréglés en usine de ce moniteur Fréquences horizontale et verticales du signal d entrée courant Icônes du menu principal et options de réglage Icônes du sous menu et options de réglage Réglage de la taille ou du centrage de l image 1 Position horizontale Position verticale Taille h...

Page 11: ...tiques tels que d autres moniteurs des imprimantes laser des éclairages fluorescents ou des téléviseurs Éloignez le moniteur des lignes à haute tension ou placez un blindage magnétique à proximité du moniteur Branchez le moniteur sur une autre prise secteur de préférence raccordée à un autre circuit Faites pivoter le moniteur de 90 vers la gauche ou la droite Vérifiez le réglage adéquat pour le mo...

Page 12: ...ion d auto diagnostic Ce moniteur est équipé d une fonction d auto diagnostic En cas de problème avec votre moniteur ou votre ordinateur l écran devient blanc et l indicateur 1 alimentation s allume en vert ou clignote en orange Si l indicateur 1 alimentation est allumé en orange l ordinateur est en mode d économie d énergie Essayez d appuyer sur une touche ou de déplacer la souris x Si l indicate...

Page 13: ... votre réseau d alimentation électrique Pour les clients aux Etats Unis Si vous n utilisez pas le cordon d alimentation approprié ce moniteur ne sera pas conforme aux normes FCC en vigueur Exemple de types de prises Avant de débrancher le cordon d alimentation attendez au moins 30 secondes avant de couper l alimentation afin de permettre le déchargement de l électricité statique de la surface de l...

Page 14: ... WINNT E Profiles Y3_Yano w Desktop Print for PDF 4084273111CPDE110UC 4084273111CPDE110UC FR 02FR01BAS UC fm masterpage Left CPD E110 4 084 273 11 1 02FR01BAS UC fm Page 8 Thursday April 12 2001 12 12 PM ...

Page 15: ... interruptor 1 alimentación para encender dicho monitor 2 Encienda el ordenador No es necesario instalar controladores espcíficos Este monitor cumple con el estándar Plug Play DDC y detecta automáticamente toda la información de dicho monitor No es preciso instalar ningún controlador específico en el ordenador La primera vez que encienda el PC después de conectar el monitor es posible que aparezca...

Page 16: ...o si la señal coincide con uno de los modos predefinidos en fábrica de este monitor Frecuencias horizontal y vertical de la señal de entrada actual Iconos del menú principal y elementos de ajuste Iconos del submenú y elementos de ajuste Ajuste del tamaño o centrado de la imagen 1 Posición horizontal Posición vertical Tamaño horizontal Tamaño vertical Zoom Ajuste de la forma de la imagen Giro de la...

Page 17: ...fuentes potenciales de campos eléctricos o magnéticos como otros monitores impresoras láser ventiladores eléctricos luces fluorescentes o televisores Aleje el monitor de líneas eléctricas o instale una protección magnética cerca del monitor Enchufe el monitor en una toma de CA diferente preferiblemente de un circuito diferente Gire el monitor 90 a la izquierda o la derecha Consulte el manual de la...

Page 18: ...algún problema con el monitor o el ordenador la pantalla aparecerá en blanco y el indicador 1 alimentación se iluminará en verde o parpadeará en naranja Si el indicador 1 alimentación se ilumina en naranja significa que el ordenador está en el modo de ahorro de energía Pulse cualquier tecla del teclado o mueva el ratón x Si el indicador 1 alimentación se ilumina en verde 1 Desconecte el cable de s...

Page 19: ...ntación Utilice el cable de alimentación suministrado Si utiliza un cable de alimentación diferente asegúrese de que es compatible con el suministro eléctrico local Para los usuarios en EE UU Si no utiliza el cable apropiado este monitor no cumplirá con las normas obligatorias de la FCC Ejemplo de tipos de enchufe Antes de desconectar el cable de alimentación espere al menos 30 segundos tras desac...

Page 20: ... WINNT E Profiles Y3_Yano w Desktop Print for PDF 4084273111CPDE110UC 4084273111CPDE110UC ES 03ES01BAS UC fm masterpage Left CPD E110 4 084 273 11 1 03ES01BAS UC fm Page 8 Thursday April 12 2001 12 15 PM ...

Page 21: ...器内的针 请查看 HD15 连接器的排列 以防止弄弯视频信号电缆连接器内的 针 设定 3 调整 4 故障排除 5 规格 7 使用前须知事项 7 Appendix i Preset mode timing table i 设定 目录 1 2 3 4 5 8 7 6 11 12 13 14 15 10 9 HD15 输入连接器 至所连接计算机 的 HD15 监视器视频信号 电缆 Trinitron 是 Sony 公司的注册商标 Macintosh 是苹果计算机公司在美国和其他国家的注册商标 Windows 和 MS DOS 是微软公司在美国和其他国家的注册商标 IBM PC AT 和 VGA 是美国 IBM 公司的注册商标 VESA 和 DDC 是影像电子标准协会的商标 ENERGY STAR 是美国注册标志 本说明书中提及的所有其他产品名称都可能是其有关公司的商标或 注册商标 又 在本说明书...

Page 22: ...的画面宽度 1 向左或右移动屏幕顶部的画面 1 DEGAUSS 给监视器消磁 CANCEL MOIRE 调整摩尔 3 消除度 直至摩尔效应为最低为止 1 参见 调整画面彩色 选择屏幕菜单语言 4 确认监视器信息 调整画面形状 调整画面质量 屏幕菜单调整 主菜单 4 语言菜单 ENGLISH 英文 FRANÇAIS 法文 DEUTSCH 德文 ESPAÑOL 西班牙文 ITALIANO 意大利文 EX I T S I ZE CENTER GEOMETRY SCREEN COLOR SELECT LANGUAGE I NFORMAT N O I MENU MENU MENU H CENT ER 2 6 SELECT EX I T S I ZE CENTER MENU 子菜单 调整尺寸或画面定心 1 调整画面彩色 附加设定 1 本调整对当前输入信号有效 2 本调整对所有输入信号有效 3 摩尔示例...

Page 23: ...打开 计算机处於节电模式 试按一下计算机键盘上的任意一个键 或移动鼠标 检查显示卡是否完全固定於适当的总线槽内 如果 1 电源 指示灯呈绿色或闪烁橙色 请利用自检功能 画面闪烁 跳动 振荡或失真 隔离 排除任何潜在的电场或磁场源 例如 其他监视器 激 光打印机 电扇 荧光灯或电视 将监视器移离电源电线或在监视器旁设置磁屏蔽 试将监视器接插到其他 AC 电源插座 最好是不同电源线路 的 试将监视器向左或向右旋转 90 查阅您的显示卡说明书以便适当地设定监视器 确认图形模式和输入信号频率是否被此监视器支持 请参见 Preset mode timing table 第 i 页 即使频率是在 适当范围里 但有些图形卡的同步脉冲也可能太窄而不足於 让监视器正确地达到同步 调整计算机的刷新率 帧频 以便获得最佳的画面 画面模糊 调整亮度和对比度 给监视器去磁 调整摩尔消除度 直到摩尔现象最小 画面出现...

Page 24: ...知授权的 Sony 产品代销店 务必请出示您的监视器的 型号名称和系列号 也请出示计算机和图形卡的厂牌和型号 阻尼线 若屏幕上出现一根细线 阻尼线 此线不是故障 它是本监视器 Trinitron 显象管的正常 现象 该线是用于稳定孔径格栅的阻尼线的阴影 孔径格栅是 Trinitron 显像管基本的要素 它可使更多的光线射达屏幕上 产生更明亮 更细致的图像 屏幕信息 1 如果出现 NO SIGNAL 显示 此显示表示无信号通过视频信号电缆输入 参照下列纠正 方法 试着按计算机上的任何键或移动鼠标 确保计算机的图像卡 完全插入正确的集线槽内 检查监视器是否正确连接到计算机 1 如果出现 OUT OF SCAN RANGE 显示 表示监视器的规格不支持该输入信号 参照下列纠正方法 如果您正在用本监视器更换旧监视器 请重新连接旧监视 器 然後 调整计算机的显示卡 使行频在 30 70kHz 帧频 ...

Page 25: ... Trinitron 对角线测值 15 英寸 可视画面尺寸 大约 285 214 mm 宽 高 观看画面 14 英寸 分辩率 最大 水平 1280 点 垂直 1024 线 推荐 水平 800 点 垂直 600 线 输入信号等级 视频信号 模拟 RGB 0 700 Vp p 正 75 Ω 同步信号 H V 单独或复合同步 TTL 2 kΩ 无极性 标准画面面积 大约 270 202 mm 偏转频率 水平 30 70 kHz 垂直 48 120 Hz AC 电源输入电压 电流 100 240 V 50 60 Hz 1 3 0 5 A 电力消耗 大约 85 W 工作温度 10 至 35 尺寸 大约 356 378 388 mm 宽 高 深 质量 大约 15 kg 即插即用 DDC2B DDC2Bi 随机附件 电源线 保修卡 清洁屏幕表面须知 本使用说明书 预设和用户模式 当监视器接收了输入信号时...

Page 26: ......

Page 27: ...ines Horizontal Frequency Vertical Frequency Graphics Mode 1 640 480 31 5 kHz 60 Hz VGA G 2 640 480 43 3 kHz 85 Hz VESA 3 720 400 31 5 kHz 70 Hz VGA Text 4 800 600 46 9 kHz 75 Hz VESA 5 800 600 53 7 kHz 85 Hz VESA 6 832 624 49 7 kHz 75 Hz Macintosh 16 Color 7 1024 768 60 0 kHz 75 Hz EUVGA 8 1024 768 68 7 kHz 85 Hz VESA 9 1280 1024 64 0 kHz 60 Hz VESA 01US01COV UC book Page i Thursday April 12 2001...

Page 28: ..._Yano w Desktop Print for PDF 4084273111CPDE110UC 4084273111CPDE110UC US 01US04APP UC fm masterpage Left CPD E110 4 084 273 11 1 Sony Corporation Printed in Thailand 01US01COV UC book Page ii Thursday April 12 2001 12 00 PM ...

Reviews: