background image

Setting up your SmartBand

Preparing to use your SmartBand

For your SmartBand to work, it must be connected to your Android™ device and the

latest versions of the following applications must be installed on the Android™

device: Smart Connect™, SmartBand application and Lifelog.
If you set up your SmartBand using NFC, you are guided during setup to Google

Play™, from where you can install the necessary applications to use with your

SmartBand.
If you set up your SmartBand using Bluetooth®, you have to go through some extra

steps to install the necessary applications from Google Play™ and connect to your

Android™ device.

The Smart Connect application is pre-installed on all Android™ devices from Sony Mobile at

purchase. Make sure that you update it to the latest version.

After the SmartBand application is installed, it is not located on the Application screen. You

can access it under 

Devices

 in the Smart Connect application after your SmartBand is

connected to the Android™ device.

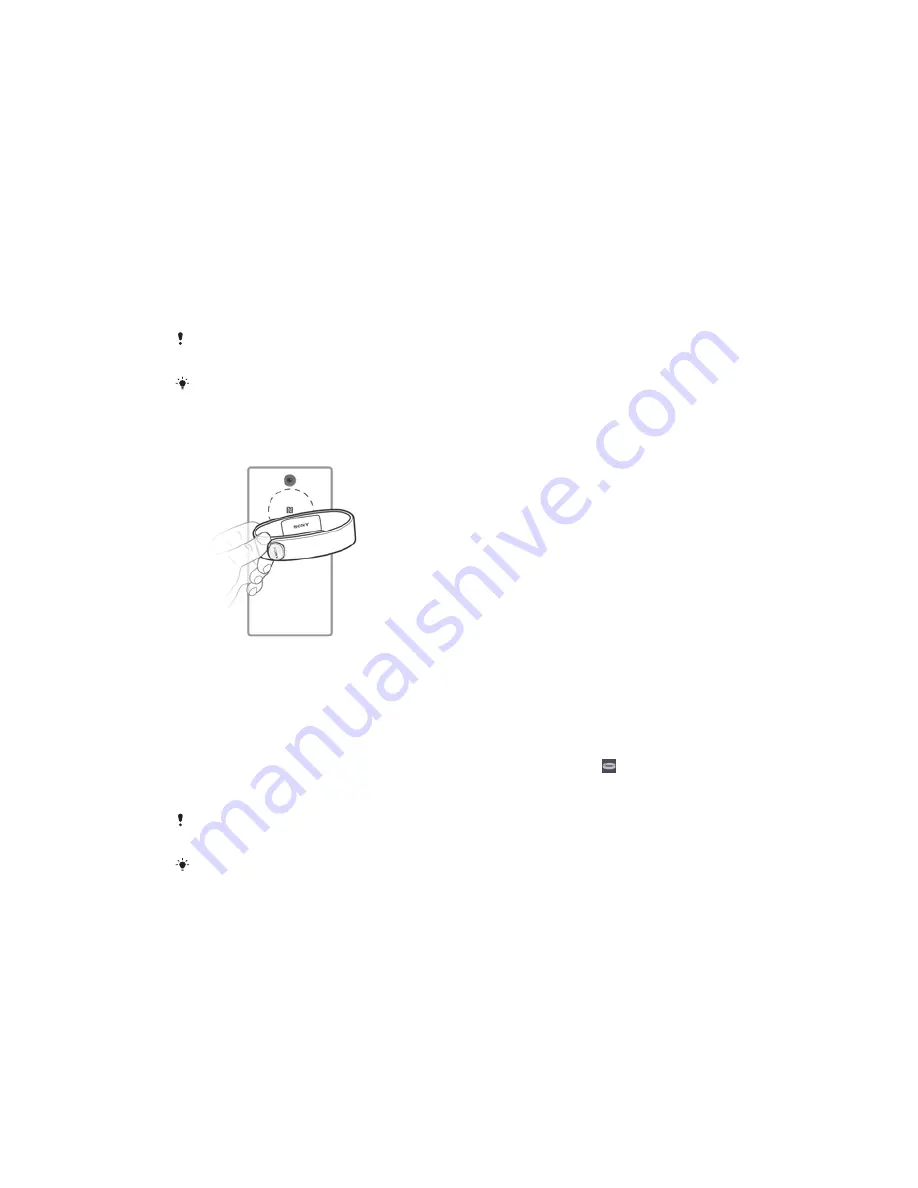
To set up your SmartBand using NFC

1

Make sure that your SmartBand is charged for at least 30 minutes.

2

Android™ device:

 Make sure you have installed or updated the Smart Connect

application to the latest version from Google Play™.

3

Android™ device:

 Make sure that the NFC function is turned on and that the

screen is active and unlocked.

4

Place the Android™ device over your SmartBand so that the NFC area of each

device touches the other, then follow the instructions on the Android™ device

to install the SmartBand application and the Lifelog application.   appears

briefly in the status bar and permanently in the Notification panel when a

connection with the SmartBand is active.

If you touch the NFC areas of each device to each other after all applications are installed and

your SmartBand is on and connected, the Lifelog application starts automatically.

You can drag down the status bar to open the Notification panel and get quick access to the

SmartBand application and the Lifelog application.

6

This is an Internet version of this publication. © Print only for private use.

Summary of Contents for SmartBand SWR10

Page 1: ...User guide SmartBand SWR10 ...

Page 2: ... Using the SmartBand application 9 Auto night mode 9 Notifications 10 SmartBand alarm 10 Out of range alert notifications 11 Incoming call notifications 11 Controlling applications from your SmartBand 12 Logging your activities using the Lifelog application 13 Using the Lifelog application 13 Setting goals 15 Logging your sleep with your SmartBand 15 Creating life bookmarks 15 Important informatio...

Page 3: ...data about your walking running and sleeping and life bookmarks Your SmartBand can store this data for up to two weeks To use the SmartBand with your Android device make sure that the software version of your Android device is Android 4 4 or later and that your Android device supports the Bluetooth 4 0 low energy standard Also remember that you need an active Internet connection to synchronise dat...

Page 4: ...r SmartBand is on and the battery level is less than 5 your SmartBand emits two short vibrations and a popup window in the SmartBand application notifies you that your SmartBand is running out of battery Assembly To assemble your SmartBand 1 Select the wristband that best suits you 2 Insert the core into the wristband in such a way that the power key is inserted underneath the power key cover Turn...

Page 5: ...off your SmartBand Press and hold down the power key until all notification lights are on simultaneously and then turn off one by one 5 This is an Internet version of this publication Print only for private use ...

Page 6: ... your SmartBand is connected to the Android device To set up your SmartBand using NFC 1 Make sure that your SmartBand is charged for at least 30 minutes 2 Android device Make sure you have installed or updated the Smart Connect application to the latest version from Google Play 3 Android device Make sure that the NFC function is turned on and that the screen is active and unlocked 4 Place the Andr...

Page 7: ...on attempts Briefly press the power key To reconnect your SmartBand using NFC 1 Android device Make sure that the NFC function is turned on and that the screen is active and unlocked 2 Place the Android device over your SmartBand so that the NFC detection area of each device touches the other appears briefly in the status bar and permanently in the Notification panel when a connection with the Sma...

Page 8: ...nexpectedly or if you want to connect it to a new device To reset your SmartBand 1 Turn off your SmartBand 2 Press and hold down the power key until notification light A starts flashing 8 This is an Internet version of this publication Print only for private use ...

Page 9: ...om Google Play 8 Read tips about your SmartBand Auto night mode You can set your SmartBand to switch automatically from day mode to night mode at a selected time and for a selected period Auto night mode only becomes active if no movement is detected by your SmartBand at the pre set activation time If you are still moving around then it waits until you stop moving Likewise in the morning day mode ...

Page 10: ...our Android device tap then find and tap Smart Connect 2 Tap Devices SmartBand SmartBand 3 Tap Notifications 4 In the list that appears mark or unmark the desired options SmartBand alarm Your SmartBand has two different alarm functions One is the regular alarm function which only works when your SmartBand is connected to an Xperia device The other is the smart wake up function which wakes you up w...

Page 11: ...ap Done To delete a smart wake up alarm 1 From the Home screen of your Android device tap then find and tap Smart Connect 2 Tap Devices SmartBand SmartBand 3 Tap Smart wake up then touch and hold the alarm that you want to delete 4 Tap then tap Yes To turn on a smart wake up alarm 1 From the Home screen of your Android device tap then find and tap Smart Connect 2 Tap Devices SmartBand SmartBand 3 ...

Page 12: ...oid device tap then find and tap Smart Connect 2 Tap Devices SmartBand SmartBand 3 Tap Applications then tap the item under SELECT APPLICATION 4 Select an option then tap Done To control media playback on your Android device from your SmartBand 1 Make sure that your SmartBand is connected to your Android device 2 Select Media player as the application that can be controlled through your SmartBand ...

Page 13: ...ser 1 Show all logged activities and life bookmarks 2 View detailed information about a life bookmark 3 View information about application usage 4 View all logged activities since the start of the day 5 Add a life bookmark 6 View menu options 7 Physical activities log 8 View all logged activities for the selected day 9 Switch between dashboard and map view 10 Activities dashboard To set up an acco...

Page 14: ... tap Lifelog 2 Tap Settings Profile 3 Find and tap Running stride length 4 Unmark the Automatic checkbox if it is marked then scroll up or down to adjust the setting and tap Set Activity box overview 1 View all logged life bookmarks 2 View your sleep hours and check the quality of your sleep based on the information collected 3 View the amount of active calories that you have burned while exercisi...

Page 15: ...to take or the amount of calories you want to burn To set a goal 1 In the Lifelog application tap the activity that you want to set a goal for 2 Tap DAY then find and tap 3 Scroll up or down to adjust the value for your goal then tap SET Logging your sleep with your SmartBand Your SmartBand can log the hours you sleep as well as the status for light sleep deep sleep and your awake time during slee...

Page 16: ...ap OK To create a life bookmark using your SmartBand 1 Make sure that your SmartBand is turned on and in day mode 2 Press the power key twice to log the place and time 3 Connect your SmartBand to your Android device If necessary add notes to the bookmark using the Lifelog application 16 This is an Internet version of this publication Print only for private use ...

Page 17: ...ty and compatibility among Bluetooth devices varies Device generally supports products utilizing Bluetooth spec 1 2 or higher and Headset or Handsfree profile Sony is the trademark or registered trademark of Sony Corporation Bluetooth is the trademark of the Bluetooth SIG Inc and is used under license All other marks are the property of their respective owners All rights reserved All product and c...

Page 18: ...eception which can be determined by turning the equipment off and on the user is encouraged to try to correct the interference by one or more of the following measures Reorient or relocate the receiving antenna Increase the separation between the equipment and receiver Connect the equipment into an outlet on a circuit different from that to which the receiver is connected Consult the dealer or an ...

Reviews: