background image

32

Presetting channels

filename[01GB04GET-NP0.fm] model name1[SLV-SE850G(ENG)] model name2[]

 [3-062-332-11 (1)]

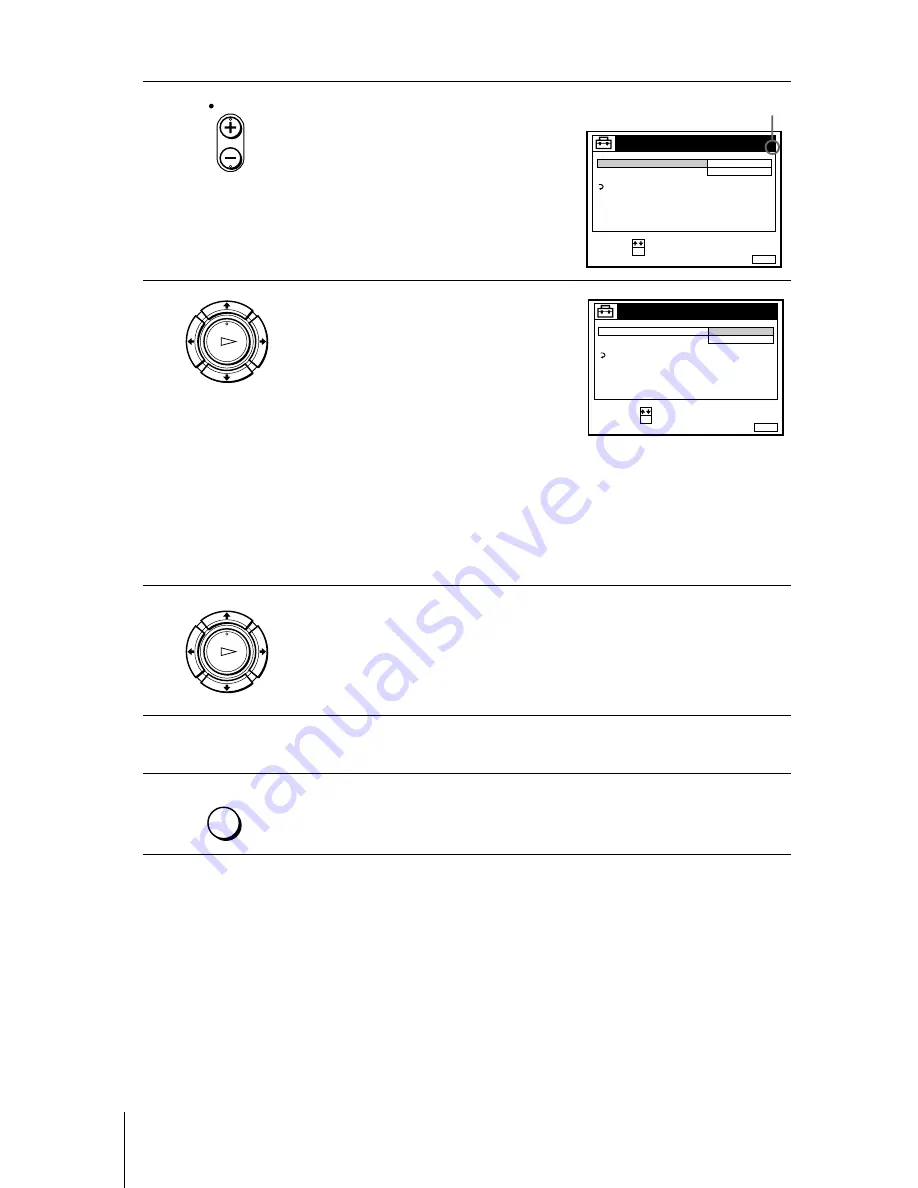
4

Press PROG +/– to select the programme 
position.

5

Press OK to highlight the channel 
number row, then press  

M

/

m

 to start 

tuning.

The VCR starts searching for a channel 
and displays the first one it finds on the 
TV screen. Press  

M

/

m

 repeatedly until 

the channel you want is displayed.

The channels are scanned in the 
following order:

• UHF B21 - B69
If you know the number of the channel you want, press the programme 
number buttons. For example, for channel 05, first press “0” and then 
press “5.”

6

Press OK.

7

To allocate another channel to another programme position, repeat steps 4 
and 5.

8

Press MENU to exit the menu.

  PROG

SET

:

SELECT :

OK

MENU

EXIT

:

TUNER

C 1 2

PROG.

4

CHANNEL SET
AFT
FINE TUNING

ON

RETURN

Selected programme
position

OK

PLAY

MENU

EXIT

:

TUNER

C

TUV

2 7

PROG.

CHANNEL SET
AFT
FINE TUNING

ON

RETURN

4

CONFIRM :

SELECT

:

OK

OK

PLAY

MENU

Summary of Contents for SLV-SE850G

Page 1: ...3 062 332 12 1 Video Cassette Recorder Operating Instructions 2000 Sony Corporation SLV SE850G PAL NTSC 4 43 Chlorine free paper ...

Page 2: ...the plug never by the cord Installing Allow adequate air circulation to prevent internal heat buildup Do not place the unit on surfaces rugs blankets etc or near materials curtains draperies that may block the ventilation slots Do not install the unit near heat sources such as radiators or air ducts or in a place subject to direct sunlight excessive dust mechanical vibration or shock Do not instal...

Page 3: ...ns 43 Playing a tape 46 Recording TV programmes 50 Recording TV programmes using the VIDEO Plus system 55 Setting the timer manually Additional Operations 58 Playing searching at various speeds 60 Setting the recording duration time 61 Synchronized Recording 63 Checking changing cancelling timer settings 65 Recording stereo and bilingual programmes 67 Searching using the Smart Search function 70 S...

Page 4: ...4 Unpacking Getting Started Step 1 Unpacking Check that you have received the following items with the VCR Remote commander R6 size AA batteries Aerial cable Set Top Box controller ...

Page 5: ...sitive end clicks into position Using the remote commander You can use this remote commander to operate this VCR and a Sony TV Buttons on the remote commander marked with a dot can be used to operate your Sony TV If the TV does not have the symbol near the remote sensor this remote commander will not operate the TV 1 2 3 g Remote sensor TV VIDEO To operate Set TV VIDEO to the VCR VIDEO and point a...

Page 6: ...put source aerial in or line in t TV VIDEO Select the TV s programme position Programme number buttons PROG Adjust the TV s volume 2 Switch to TV Teletext off a TV Switch to Teletext Teletext 1 2 3 4 5 6 7 8 9 0 Programme number buttons WIDE PROG c C 1 AUDIO MONITOR t TV VIDEO 2 FASTEXT buttons a DISPLAY ...

Page 7: ... manufacturer s code number These buttons may not work with all TVs Tip When you set your TV s code number correctly while the TV is turned on the TV turns off automatically Select the sound AUDIO MONITOR Use FASTEXT FASTEXT buttons Call up the on screen display DISPLAY Change the Teletext page c C Switch to from wide mode of a Sony wide TV For other manufactures wide TVs see Controlling other TVs...

Page 8: ...TV uses a different remote control system from the one programmed to work with the VCR you cannot control your TV with the remote commander If you enter a new code number the code number previously entered will be erased If you remove the batteries of the remote commander for more than a few minutes the code number may be reset to 01 Sony In this case reset the appropriate code number Manufacturer...

Page 9: ...our TV with an aerial cable only see page 12 Connection to your TV and Set Top Box see page 13 Connection to your TV with a Scart EURO AV connector 1 Disconnect the aerial cable from your TV and connect it to AERIAL IN on the rear panel of the VCR 2 Connect AERIAL OUT of the VCR and the aerial input of your TV using the supplied aerial cable Mains lead iLINE 1 TV AERIAL IN Scart EURO AV to mains A...

Page 10: ... completely connected for example a Sony cable reference VMC 2121HG Please refer to your TV s instruction manual as well for this connection 3 Connect LINE 1 TV on the VCR and the Scart EURO AV connector on the TV with the optional EURO AV cable This connection improves picture and sound quality Whenever you want to watch the VCR picture press t TV VIDEO to display the VIDEO indicator in the displ...

Page 11: ...r details see Starting playback automatically with one button One Touch Play on page 45 One Touch Menu You can turn on the VCR and TV set the TV to the video channel and display the VCR s on screen display automatically by pressing MENU on the remote commander One Touch Timer You can turn on the VCR and TV set the TV to the video channel and display the timer recording menu the TIMER METHOD menu t...

Page 12: ...panel of the VCR 2 Connect AERIAL OUT of the VCR and the aerial input of your TV using the supplied aerial cable 3 Connect the mains lead to the mains You can now tune your TV to the VCR see page 15 Mains lead AERIAL IN to mains Aerial cable supplied AERIAL OUT Signal flow AERIAL IN AERIAL ANTENNE IN ENTREE OUT SORTIE AERIAL ANTENNE IN ENTREE OUT SORTIE ...

Page 13: ... turn on the STB this VCR automatically sends the signal from the STB to the TV without turning itself on Note You cannot watch programmes from your STB on the TV while recording unless you record a programme from your STB 1 Connect the STB to the LINE 3IN connector as shown above 2 Set POWER SAVE to OFF in the OTHER OPTIONS menu 3 Turn off the VCR To watch a programme from the STB turn on the STB...

Page 14: ...VCR is not required Additional connections To a stereo system You can improve sound quality by connecting a stereo system to the AUDIO OUT R L jacks as shown on the right AERIAL IN Aerial cable not supplied Scart cable not supplied Aerial cable supplied AERIAL OUT STB iLINE 1 TV Signal flow Scart EURO AV AERIAL IN STB controller Side view supplied STB Control AUDIO OUT R L LINE IN Audio cable not ...

Page 15: ...CHANNEL on the VCR The factory preset RF Radio Frequency channel appears in the display window 3 Turn on your TV and select an unused programme position for the VCR picture for ex programme position 0 This programme position will be referred to as the video channel for watching your VCR on the TV after tuning is completed g RF CHANNEL PROGRAM 1 AUTO SET UP RF CHANNEL TV STEREO AUTO SET UP S M H LP...

Page 16: ...F channel until a clear picture appears 4 Tune in the programme position you have selected for ex programme position 0 until the picture shown on the right appears clearly on the TV screen background must be green Refer to your TV manual for tuning instructions If the picture does not appear clearly see To obtain a clear picture from the VCR below 5 Press RF CHANNEL You have now tuned your TV to t...

Page 17: ...rop down panel 2 Press briefly RF CHANNEL on the VCR The factory preset RF Radio Frequency channel appears in the display window 3 Press PROGRAM until the OFF indication appears in the display window The RF channel is then switched off The picture shown below appears clearly on the TV screen background must be green 4 Press RF CHANNEL again You can now set your VCR with the Auto Set Up function se...

Page 18: ...u do repeat Auto Set Up from the beginning When you operate the Auto Set Up function some of the settings VIDEO Plus timer etc will be reset In this case you have to set them again g PROGRAM AUTO SET UP Hold down AUTO SET UP on the VCR for more than 3 seconds The VCR automatically turns on and starts searching for all of the receivable channels and presets them in the appropriate order for your lo...

Page 19: ...he Auto Set Up function did not set the clock correctly for your local area try another station for the Auto Clock Set function Setting the clock manually Before you start Turn on the VCR and the TV Set the TV to the video channel MENU M m OK 1 Press MENU then press M m to highlight SETTINGS and press OK 2 Press M m to highlight CLOCK then press OK MENU OK PLAY SET SELECT OK MENU EXIT SETTINGS SET...

Page 20: ...nd press M m to select the digits The day of the week is set automatically 7 Press OK to confirm the setting and start the clock 8 Press MENU to exit the menu OK PLAY CONFIRM SET OK MENU EXIT CLOCK OFF AUTO ADJUST MANUAL ADJUST 1 1 2 0 0 0 SAT 0 0 0 SELECT OK PLAY CONFIRM SET OK MENU EXIT CLOCK OFF AUTO ADJUST MANUAL ADJUST 28 1 2 0 0 0 FRI 0 0 0 SELECT OK PLAY CONFIRM SET OK MENU EXIT CLOCK OFF A...

Page 21: ...ghlight SETTINGS and press OK 2 Press M m to highlight CLOCK then press OK AUTO ADJUST is highlighted 3 Press OK MENU OK PLAY SET SELECT OK MENU EXIT SETTINGS SET TOP BOX TUNER CLOCK RETURN LANGUAGE OK PLAY SET SELECT OK MENU EXIT CLOCK OFF AUTO ADJUST MANUAL ADJUST 1 1 2 0 0 0 SAT 0 0 0 OK PLAY CONFIRM SELECT OK MENU EXIT CLOCK OFF AUTO ADJUST CLOCK PROGRAM MANUAL ADJUST 2 0 0 0 THU 8 0 0 8 9 ON ...

Page 22: ... proceed for more than a few minutes 4 Press M m to highlight ON then press OK 5 Press m to highlight CLOCK PROGRAM then press OK 6 Press M m until the programme position of the station that carries the time signal appears If the VCR does not receive the time signal from any station AUTO ADJUST returns to OFF automatically 7 Press MENU to exit the menu OK PLAY SET SELECT OK MENU EXIT CLOCK ON 1 AA...

Page 23: ... STB controller and place it on top of the STB so that it hangs out over the infrared receptor on the front of the STB see page 13 1 2 3 4 5 6 7 8 9 0 MENU M m OK STB Programme number buttons 1 Press MENU then press M m to highlight SETTINGS and press OK 2 Press M m to highlight SET TOP BOX then press OK OK PLAY MENU SET SELECT OK MENU EXIT SETTINGS SET TOP BOX TUNER CLOCK RETURN LANGUAGE OK PLAY ...

Page 24: ...B using the aerial cable Press M m to select RF and press OK Press M m to highlight PROGRAMME NO and press OK Enter the appropriate number using M m and press OK If you connect the STB using the Scart EURO AV cable Press M m to select LINE 3 and press OK 5 Press M m to highlight TUNER BRAND NO and press OK Enter the appropriate number using the programme number buttons Refer to the table on the ne...

Page 25: ...84 AST 332 361 362 Astra 119 384 529 Astro 184 369 531 559 595 Audio Ton 375 Avalon 407 Axis 377 380 Birmingham Cable Communications 287 British Telecom 014 116 Barcom 228 Best 228 380 Blaupunkt 184 Boca 254 524 840 Brain Wave 343 British Sky Broadcasting 858 013 012 Brunor 420 Bush 078 102 265 BT 526 679 721 Cabletime 172 282 388 459 Cambridge 267 355 526 Camundosat 104 Canal 864 Canal Satellite ...

Page 26: ...720 Galaxis 375 377 844 845 Galaxisat 332 GEC 097 Gold Box 864 Goldstar 346 Gooding 582 Grothusen 346 STB brand Code numbers Grundig 151 184 339 474 582 761 540 G Sat 194 Harting und Helling 344 Hinari 194 Hirschmann 184 344 407 408 409 513 584 592 683 764 Hitachi 466 Houston 679 Humax 059 Huth 231 254 375 528 600 805 HyperVision 630 Ikusi Allsat 379 Imperial 265 496 IRTE 620 ITS 632 ITT 119 183 J...

Page 27: ...Nokia 034 692 119 183 339 408 425 466 584 734 832 Nordmende 283 373 625 Oceanic 597 Orbit 361 362 STB brand Code numbers Orbitec 596 Oxford 355 Pace 078 194 339 347 466 802 806 858 Pal 848 Palcom 308 309 Palladium 582 Panasonic 225 Panda 466 Philips 630 144 211 339 466 474 582 721 761 864 Phoenix 377 Phonotrend 799 Pioneer 155 271 544 864 ProVision 595 Promax 466 Prosat 496 PTT Telecom 224 PVP Ste...

Page 28: ...co 384 Telecom 104 Telefunken 432 Teleka 254 624 683 Telemax 435 Teleservice 292 Televes 596 Tensai 632 Thomson 466 864 Thorens 597 STB brand Code numbers Tonna 679 TPS 831 Triad 332 344 346 361 362 Triasat 425 Tristar 277 Tudi 297 Uniden 205 803 842 Unisat 377 United Cable 014 Unitor 228 343 Universum 184 525 582 Vector 344 364 529 Ventana 211 Videoway 261 VisiCable 492 Vortec 432 VTech 332 473 7...

Page 29: ...te To check if the brand number is entered correctly or not press STB repeatedly to display STB in the display window then enter a three digit number with the programme number buttons If the STB responds you have enterred the correct brand number ...

Page 30: ...f you don t proceed for more than a few minutes MENU M m OK 1 Press MENU then press M m to highlight SETTINGS and press OK 2 Press M m to highlight LANGUAGE then press OK 3 Press M m to highlight the desired language then press OK MENU OK PLAY SET SELECT OK MENU EXIT SETTINGS SET TOP BOX TUNER CLOCK RETURN LANGUAGE OK PLAY SET SELECT OK MENU EXIT LANGUAGE DEUTSCH FRANÇAIS ITALIANO ESPAÑOL PORTUGUÊ...

Page 31: ...M m OK PROG 1 Press MENU then press M m to highlight SETTINGS and press OK 2 Press M m to highlight TUNER then press OK 3 Press M m to highlight CHANNEL SET MENU OK PLAY SET SELECT OK MENU EXIT SETTINGS SET TOP BOX TUNER CLOCK RETURN LANGUAGE OK PLAY SET SELECT OK MENU EXIT TUNER C AAB 1 2 PROG 1 CHANNEL SET AFT FINE TUNING RETURN ON OK PLAY SET SELECT OK MENU EXIT TUNER C AAB 1 2 PROG 1 CHANNEL S...

Page 32: ...ned in the following order UHF B21 B69 If you know the number of the channel you want press the programme number buttons For example for channel 05 first press 0 and then press 5 6 Press OK 7 To allocate another channel to another programme position repeat steps 4 and 5 8 Press MENU to exit the menu PROG SET SELECT OK MENU EXIT TUNER C1 2 PROG 4 CHANNEL SET AFT FINE TUNING ON RETURN Selected progr...

Page 33: ...ighlight RETURN and press OK Note The menu disappears automatically if you don t proceed for more than a few minutes 1 In step 5 above press programme number button 0 twice to display the number 00 beside CHANNEL SET 2 Press OK to confirm the setting then MENU to exit the menu 1 Press PROG or the programme number buttons to select the programme position for which you cannot obtain a clear picture ...

Page 34: ...t LISTS and press OK 2 Press M m to highlight CHANNEL LIST then press OK 3 Press M m to highlight the row on which you want to set or change the station name To display other pages for programme positions 6 to 60 press M m repeatedly MENU OK PLAY RETURN SET SELECT OK MENU EXIT LISTS CHANNEL LIST TIMER LIST OK PLAY MENU EXIT CHANNEL LIST ERASE PROGRAM MOVE PROGRAM PROG SELECT 1 2 3 4 5 AAB CDE FGH ...

Page 35: ... space is highlighted To correct a character press until the character you want to correct is highlighted then reset it You can set up to 5 characters for the station name 6 To change or to set the station name of another station repeat steps 2 to 4 7 Press OK to confirm the setting 8 Press MENU to exit the menu OK PLAY AAB MENU EXIT CHANNEL LIST CONFIRM OK NEXT PROG SELECT A CHARACTER 1 2 3 4 5 C...

Page 36: ... them Before you start Turn on the VCR and the TV Set the TV to the video channel Changing programme positions MENU M m OK 1 Press MENU then press M m to highlight LISTS and press OK 2 Press M m to highlight CHANNEL LIST then press OK MENU OK PLAY RETURN SET SELECT OK MENU EXIT LISTS CHANNEL LIST TIMER LIST OK PLAY MENU EXIT CHANNEL LIST ERASE PROGRAM MOVE PROGRAM PROG SELECT 1 2 3 4 5 AAB CDE FGH...

Page 37: ...l is inserted at the new programme position and the intermediate channels are displaced to fill the gap 5 Press OK to confirm the setting 6 To change the programme position of another station repeat steps 3 to 5 7 Press MENU to exit the menu OK PLAY MENU EXIT CHANNEL LIST CONFIRM SET STATION NAME PROG SELECT 1 2 3 4 5 AAB LMO FGH C C C C 1 0 5 0 2 3 6 9 NAME CH C2 7 OK CDE OK PLAY MENU EXIT CHANNE...

Page 38: ...er when you press the PROG buttons 1 2 3 4 5 6 7 8 9 0 CLEAR MENU M m OK 1 Press MENU then press M m to highlight LISTS and press OK 2 Press M m to highlight CHANNEL LIST then press OK MENU OK PLAY RETURN SET SELECT OK MENU EXIT LISTS CHANNEL LIST TIMER LIST OK PLAY MENU EXIT CHANNEL LIST ERASE PROGRAM MOVE PROGRAM PROG SELECT 1 2 3 4 5 AAB CDE FGH C C C C 1 0 5 0 2 3 6 9 NAME CH C2 7 CLEAR ...

Page 39: ... 3 Press M m to highlight the row which you want to disable 4 Press CLEAR The selected row will be cleared as shown on the right 5 Repeat steps 3 and 4 for any other programme positions you want to disable 6 Press MENU to exit the menu OK PLAY MENU EXIT CHANNEL LIST ERASE PROGRAM MOVE PROGRAM PROG SELECT 1 2 3 4 5 AAB CDE FGH C C C C 1 0 5 0 2 3 6 9 NAME CH C2 7 CLEAR LMO CLEAR MENU EXIT CHANNEL L...

Page 40: ... can check it any time but can never change it Before you start Turn on your TV and set it to the video channel Remove the tape in the VCR if there is one inserted Turn off the VCR g X 1 1 2 3 4 5 6 7 8 9 0 M m OK CLEAR 1 Hold down first X pause hold on 1 on standby simultaneously on the VCR for more than 3 seconds The VCR automatically turns on and the on screen display appears on the TV screen M...

Page 41: ...our personal code 3 Press OK A confirmation screen appears 4 If the displayed personal code is correct press OK to confirm the setting and to return to the normal display If the displayed personal code is wrong press CLEAR to cancel the code and re enter it restarting from step 2 5 Press 1 on standby to turn off the VCR OK PLAY MENU EXIT SECURITY FUNCTION PERSONAL CODE 1 5 7 8 CONFIRM SET SELECT O...

Page 42: ...e number of your VCR you can check the setting 1 Holding down first X pause hold down 1 on standby for more than 3 seconds The VCR automatically turns on and the entered personal code appears on the TV screen 2 Press OK to exit the menu MENU EXIT SECURITY FUNCTION PERSONAL CODE WB 1 5 7 8 ...

Page 43: ...tape 1 Turn on your TV and set it to the video channel 2 Insert a tape The VCR turns on and starts playing automatically if you insert a tape with its safety tab removed 1 2 3 4 5 6 7 8 9 0 Z EJECT DISPLAY CLEAR NTSC PB X PAUSE H PLAY x STOP M FF m REW g continued ...

Page 44: ...ing an NTSC recorded tape The picture becomes black and white The picture shakes No picture appears on the TV screen Black streaks appear horizontally on the TV screen The colour density increases or decreases If you playback a tape in LP or EP mode with the NTSC system the sound is heard in monaural While setting the menu on the TV screen you cannot use M m buttons for tape operation 3 Press H PL...

Page 45: ...CR the VCR and the TV turn on the TV is set to the video channel and playback starts automatically in one sequence when you press H PLAY Note When you use the One Touch Play function leave the TV on or in the standby mode 1 Insert a tape The VCR automatically turns on If you insert a tape with its safety tab removed the TV turns on and switches to the video channel Playback starts automatically 2 ...

Page 46: ...mes Recording TV programmes 1 Turn on your TV and set it to the video channel To record from a decoder or other source turn it on 1 2 3 4 5 6 7 8 9 0 COUNTER REMAIN DISPLAY SP LP t TV VIDEO STB PROG z REC x STOP INPUT SELECT ...

Page 47: ...channel number with the programme number buttons 4 Press SP LP to select the tape speed SP or LP LP Long Play provides recording time twice as long as SP However SP Standard Play produces better picture and audio quality 5 Press z REC to start recording The recording indicator lights up red in the display window INPUT SELECT PROG STB 1 2 3 4 5 6 7 8 9 0 TV STEREO AUTO SET UP S M H LP EP EDIT NICAM...

Page 48: ... the safety tab as illustrated To record on a tape again cover the tab hole with adhesive tape Tips To select a programme position you can use the programme number buttons on the remote commander For two digit numbers press the ten s digit button followed by the programme number buttons The display appears on the TV screen indicating information about the tape but the information won t be recorded...

Page 49: ...or the programme position is different from the data preset in the VCR tuner If there already is a tape with its safety tab in place in the VCR the VCR automatically turns on and starts recording what you are watching on the TV when you press z REC You can turn the TV Direct Rec function ON and OFF in the OTHER OPTIONS menu see page 75 Notes You cannot record what you are watching using this metho...

Page 50: ...mme position of that programme are set automatically You can preset up to eight programmes at a time Before you start Check that the VCR clock is set to the correct time and date Insert a tape with its safety tab in place Make sure the tape is longer than the total recording time Turn on your TV and set it to the video channel Set TIMER OPTIONS to VIDEO Plus or VARIABLE in the OTHER OPTIONS menu s...

Page 51: ... OPTIONS to VIDEO Plus The VIDEO Plus menu appears on the TV screen 2 Press the programme number buttons to enter the PLUSCODE NO If you make a mistake press CLEAR and re enter the correct number TIMER OK PLAY SET SELECT OK MENU EXIT TIMER METHOD STANDARD VIDEO Plus MENU EXIT VIDEO Plus SET 0 9 PLUSCODE NO THU 2 8 9 1 2 3 4 5 6 7 8 9 0 CLEAR MENU EXIT VIDEO Plus SET 0 9 PLUSCODE NO 1 2 4 6 THU 2 8...

Page 52: ...PDC function see Timer recording with VPS PDC signals on page 53 If the information is incorrect press CLEAR to cancel the setting 4 If you want to change the date tape speed and the VPS PDC function setting 1 Press to highlight the item you want to change 2 Press M m to reset it To record the same programme every day or the same day every week see Daily weekly recording on page 53 To use the VPS ...

Page 53: ...broadcast delays early starts or broadcast interruptions when the VPS or PDC indicator in the display window is lit In step 4 above press M m to turn on off the VPS PDC indication after you set the recording date If you do not want to set the VPS PDC function turn off the VPS PDC indication You can also use the VPS PDC function for a source connected to the LINE 1 TV and LINE 3 IN Scart connectors...

Page 54: ...3 To check change or cancel the programme setting press to choose LIST then press OK after step 4 For details see step 3 in Checking changing cancelling timer settings on page 63 Notes When setting the timer with VPS PDC signals enter the start and stop times exactly as indicated in the TV programme guide otherwise the VPS PDC function won t work and the recording won t start If the VPS PDC signal...

Page 55: ... the VCR clock is set to the correct time and date Insert a tape with its safety tab in place Make sure the tape is longer than the total recording time To record from a decoder or other source turn it on Turn on your TV and set it to the video channel Set TIMER OPTIONS to STANDARD or VARIABLE in the OTHER OPTIONS menu see page 75 1 2 3 4 5 6 7 8 9 0 1 M m OK x STOP TIMER STB INPUT SELECT Programm...

Page 56: ...DC function set VPS PDC to ON For details about the VPS PDC function see Timer recording with VPS PDC signals on page 53 To record from a decoder or other source connected to the LINE 1 TV or LINE 3 IN connectors or the LINE 2 INjacks press INPUT SELECT to display L1 L2 or L3 in the PROG position To record from the STB press STB to display STB in the PROG position and enter a three digit number wi...

Page 57: ...r on the picture at the point the tape speed is changed If you want to keep the same tape speed set AUTO LONG PLAY to OFF in the TAPE OPTIONS menu see page 73 Even if you set TIMER OPTIONS to VIDEO Plus in the OTHER OPTIONS menu you can set the timer manually Press MENU to select TIMER then go to step 2 Notes When setting the timer with VPS PDC signals enter the start and stop times exactly as ind...

Page 58: ...iew the picture during fast forward or rewind During fast forward hold M FF down During rewind hold m REW down Play at high speed During playback press M FF down or m REW on the remote commander During playback hold down M FF or m REW When you release the button normal playback resumes Play at twice the normal speed During playback press X2 1 2 3 4 5 6 7 8 9 0 m H M M FF m REW y SLOW X 2 ...

Page 59: ...s at the same time Notes The playback sound is muted during the operations in the above table In the LP mode noise may appear or there may be no colour If the playback mode mark doesn t appear on the TV screen press DISPLAY Play in slow motion During playback press y SLOW Play frame by frame During pause press M FF down or m REW on the remote commander Hold down M FF or m REW to play one frame eac...

Page 60: ...l recording mode To stop recording To stop the VCR while recording press x STOP Note You cannot display the current tape time in the display window when setting the recording duration z REC 1 While recording press z REC The indicator appears in the display window 2 Press z REC repeatedly to set the duration Each press advances the time in increments of 30 minutes The tape counter decreases minute ...

Page 61: ...unction for this feature to work When the connected equipment turns on the VCR also automatically turns on and starts recording a programme from LINE 3 IN How to connect for Synchronized Recording Connect the LINE 3 IN of the VCR to the TV Scart connector of the Set Top Box Then connect the LINE 1 TV connector to the TV i LINE 1 TV Scart cable not supplied Scart cable not supplied Programmable Set...

Page 62: ...and the second programmme starts recording only after the first programme has finished The Auto Clock Set function does not work while the VCR stands by for Synchronized Recording g SYNCHRO REC 1 2 3 4 5 6 7 8 9 0 PROG INPUT SELECT SP LP 1 Set the timer on the STB to the time of the programme you want to record then turn it off 2 Press SP LP to select the tape speed on the VCR 3 Hold down SYNCHRO ...

Page 63: ...er settings Checking changing cancelling timer settings Before you start Turn on your TV and set it to the video channel 1 2 3 4 5 6 7 8 9 0 1 M m OK CLEAR MENU 1 Press 1 to turn on the VCR 2 Press MENU then press M m to highlight LISTS and press OK continued ...

Page 64: ... to recording standby 4 Press M m to select the setting you want to change or cancel then press OK The selected setting appears in the TIMER menu 5 To change the setting press to highlight the item you want to change and press M m to change it To cancel the setting press CLEAR 6 Press MENU If any settings remain turn off the VCR to return to recording standby MENU EXIT TIMER LIST CANCEL SET SELECT...

Page 65: ... Press AUDIO MONITOR to select the sound you want Stereo programme Usually the mixed sound of left and right channels monaural Bilingual programme Usually the main sound monaural Selecting the sound during playback Press AUDIO MONITOR to select the sound you want To listen to On screen display Display window Stereo STEREO STEREO Standard sound No indicator No indicator To listen to On screen displ...

Page 66: ...ou play a tape recorded in monaural the sound is heard in monaural regardless of the AUDIO MONITOR setting If the AUDIO MONITOR button does not function check that AUDIO MIX in the AUDIO OPTIONS menu is set to OFF see page 74 If HIFI AUDIO is set to STANDARD the standard sound will be recorded on both the hi fi and normal audio tracks Pressing AUDIO MONITOR will not change the sound Usually main s...

Page 67: ...mes are listed on the screen regardless of how the programme was recorded The data of last tape inserted into the VCR is automatically stored in memory If you want to recall the latest data screen select LATEST DATA in the SMART SEARCH screen recording Before you start Turn on your TV and set it to the video channel 1 2 3 4 5 6 7 8 9 0 SMART SEARCH M m OK 1 1 After recording press 1 to turn on the...

Page 68: ...lay the data of the last tape used to record a programme even after you have removed the tape If you reinsert the tape and record additional programmes be sure to select LATEST DATA Otherwise all of the data for the tape is deleted 3 Press M m to select the programme you want to start viewing 4 Press OK The VCR starts searching and playback starts automatically from the beginning of the selected p...

Page 69: ...n for the short programme may be deleted Blank Time is measured from the end of the last recorded programme to the end of the tape However if you eject the tape then make a new recording on the same tape the original recorded programme s is displayed as a blank space If no information is stored in the VCR s memory LATEST DATA does not appear in the SMART SEARCH screen If you replace the tape with ...

Page 70: ...ex signal will be added when recording starts from recording pause However an index signal will be marked if you change the programme position during recording pause 1 2 3 INDEX SEARCH 1 Insert an indexed tape into the VCR 2 Press INDEX SEARCH repeatedly to specify how many index signals ahead or behind you want to search To search ahead press INDEX SEARCH To search backwards press INDEX SEARCH Th...

Page 71: ...to its original quality during playback To use the RR function press REALITY REGENERATOR button The REALITY REGENERATOR indicator lights up You can set RR to HIGH or NORMAL in the VIDEO OPTIONS menu see page 73 To turn it off press REALITY REGENERATOR The REALITY REGENERATOR indicator lights off About the Optimum Picture Control OPC function The Optimum Picture Control OPC function automatically i...

Page 72: ... mode If the tape speed automatically switches from SP to LP the OPC function turns off However if the entire programme is recorded in LP mode the OPC function will work There is a delay of about ten seconds before the VCR actually starts recording while the VCR analyses the tape To avoid the delay first set the VCR to recording pause the OPC indicator flashes slowly and press z REC to have the VC...

Page 73: ...s MENU to exit the menu Menu option Set this option to OPC ON to switch on the OPC Optimum Picture Control function and improve picture quality OFF to switch off OPC EDIT ON to minimize picture deterioration when editing OFF to turn off EDIT SHARPNESS LOW to playback a poor quality tape NORMAL to playback an average quality tape HIGH to playback a good quality tape RR NORMAL for normal everyday us...

Page 74: ...DIO MONITOR button For details see page 65 HIFI AUDIO STANDARD to record standard sound on the hi fi audio track NICAM to record NICAM broadcasts on the hi fi audio track For details see page 65 Menu option Set this option to AUTO LONG PLAY ON to automatically record from SP Standard Play to LP Long Play when the tape length is not long enough OFF to normally record in SP Standard Play TAPE LENGTH...

Page 75: ... indicators in the display window to save the VCR power OFF to turn on the indicators in the display window while the VCR is standing by TIMER OPTIONS VARIABLE to display the TIMER METHOD menu for selecting STANDARD or VIDEO Plus when pressing the TIMER button STANDARD to display only the TIMER menu when pressing the TIMER button VIDEO Plus to display only the VIDEO Plus menu when pressing the TIM...

Page 76: ...o the LINE IN connector or jacks of your VCR Refer to the examples A or B and choose the connection that best suits your VCR Example A Example B TV t LINE 3 IN VMC 2121HG Scart cable not supplied Scart EURO AV Signal flow Your VCR Recorder Other VCR Player g TV LINE 2 IN VMC 820 audio video cable not supplied LINE OUT Signal flow Your VCR Recorder Other VCR Player ...

Page 77: ...nect the plugs to jacks of the same colour If the other VCR is a monaural type leave the red plugs unconnected If you connect your VCR to both the LINE IN and LINE OUT jacks of the other VCR select the input correctly to prevent a humming noise If the other VCR does not have a Scart EURO AV connector use the VMC 2106HG cable instead and connect the cable to the line out jacks of the other VCR Tip ...

Page 78: ...edure above the VCR won t start recording with the OPC function To record a tape with the OPC function press z record again during recording pause in step 3 so the VCR analyses the tape Then press X pause after the OPC indicator stops flashing to start recording If you press X pause before the OPC indicator stops flashing the OPC function is cancelled g z X SET SELECT OK MENU EXIT VIDEO OPTIONS OP...

Page 79: ...1 2 3 4 5 6 7 8 9 0 AUDIO DUB CLEAR X PAUSE 1 Insert a source tape into the stereo system or the playback VCR Search for the point to start playback and set it to playback pause 2 Insert a prerecorded tape with its safety tab in place into your recording VCR Search for the end of the section to be replaced and press X PAUSE 3 Press CLEAR to reset the counter to 0H00M00S 4 Rewind the prerecorded ta...

Page 80: ... feature to listen to dubbed audio over the original hi fi audio When AUDIO MIX is set to ON the AUDIO MONITOR button does not function Note that by mixing both hi fi and normal audio some echo may appear Remember to reset AUDIO MIX to OFF after playing the tape Note If you eject the tape AUDIO MIX is automatically set to OFF 6 To start editing press the X pause buttons on your VCR and the stereo ...

Page 81: ...please refer to the corresponding reference S1 symptom1 S2 symptom2 in the right column below CATEGORY REFER TO Picture while watching broadcast tuned by the TV while watching broadcast tuned by the VCR while playing a tape S2 S6 S1 S6 S3 S4 S5 Sound while playing a tape S7 S8 S9 Functional Playback S4 S9 S10 Normal recording S11 S12 Timer recording S13 S14 Synchronized Recording S15 S16 S17 Remot...

Page 82: ...make sure the RF channel is set to OFF see page 17 t Existing broadcasts may interfere with the VCR Reset the RF channel output of your VCR see page 15 t Adjust the tracking with the TRACKING buttons see page 71 t The video heads are dirty see below Clean the video heads using the Sony T 25CLD E 25CLDR or T 25CLW video head cleaning cassette If these cleaning cassettes are not available in your ar...

Page 83: ...en removed To record on this tape cover the tab hole see page 48 S12 Nothing happens when you press z REC t Make sure the tape is not at its end Timer recording S13 The timer does not operate properly t Check that the clock is set t The clock stops if the VCR is disconnected from the mains for more than an hour Reset the clock and the timer t Check that the safety tab has not been removed t Make s...

Page 84: ...control switch is set correctly S19 You cannot control your TV t Set your TV s code number The code number may change when you replace the batteries for the remote commander see page 8 Cleaning S20 The VCR needs to be cleaned t Clean the cabinet panel and controls with a dry soft cloth or a soft cloth slightly moistened with a mild detergent solution Do not use any type of solvent such as alcohol ...

Page 85: ...C EASYLINK CinemaLink Q Link or TV LINK t Make sure you use a 21 pin Scart cable to connect the VCR and your TV t Make sure the Scart cable is connected securely Refer to your TV manual for instructions Set Top Box control S30 The Set Top Box Control function does not work properly t Be sure to point the VCR remote commander only at the VCR s remote sensor and not at the STB sensor t Be sure the S...

Page 86: ... LINE 3 IN 21 pin Video input pin 20 Audio input pins 2 and 6 LINE 2 IN VIDEO IN phono jack 1 Input signal 1 Vp p 75 ohms unbalanced sync negative AUDIO IN phono jack 2 Input level 327 mVrms Input impedance more than 47 kilohms AUDIO OUT phono jack 2 Rated output level 327 mVrms Load impedance 47 kilohms Output impedance less than 10 kilohms General Power requirements 220 240 V AC 50 Hz Power cons...

Page 87: ...O REC indicator 62 D Z eject button 44 E SYNCHRO REC button 62 F H playback button 44 G x stop button 44 H X pause button 44 I z record button 46 78 J AUTO SET UP 18 RF Radio Frequency CHANNEL button 15 K m rewind M fast forward buttons 44 L PROGRAM TRACKING buttons 15 18 71 M REALITY REGENERATOR button 71 N REALITY REGENERATOR RR indicator 71 O Remote sensor 5 P LINE 2 IN VIDEO AUDIO L R jacks 76...

Page 88: ... indicator 71 E SMARTLINK indicator 11 F Tape speed indicators 47 G VIDEO indicator 47 H STB indicator 53 I TV indicator 49 J STEREO indicator 65 K NICAM indicator 65 L Time counter clock line programme position indicator 15 44 47 M Remaining time indicator 48 N Tracking indicator 71 O EDIT indicator 78 P Tape recording indicator 47 EP TV STEREO S M LP SP VIDEO EDIT NICAM VPS PDC H SMARTLINK OPC S...

Page 89: ...TV i LIGNE 1 TV connector 9 C t LINE 3 IN t ENTREE LIGNE 3 connector 13 D STB CONTROL CONTROLEUR STB jack 15 E AERIAL IN ANTENNE ENTREE connector 9 12 F AERIAL OUT ANTENNE SORTIE connector 9 12 G NTSC PB Play Back switch 43 H LINE 2 OUT AUDIO R L VIDEO SORTIE LIGNE 2 AUDIO D G VIDEO 14 continued ...

Page 90: ... y SLOW button F SP Standard Play LP Long Play button 42 G DISPLAY button 44 H ten s digit button 6 44 I 2 volume buttons for TV 6 J z REC record button 42 56 71 K MENU button L M m buttons OK button m REW rewind button 40 54 M FF fast forward button 40 54 H PLAY button 40 54 x STOP button 40 56 X PAUSE button 40 56 FASTEXT buttons for TV 1 2 3 4 5 6 7 8 9 0 ...

Page 91: ...n for TV 6 P AUDIO DUB button 79 a TV power on TV mode select button for TV 6 Q INDEX SEARCH buttons 63 R CLEAR button 39 46 59 S t TV VIDEO button 6 T Programme number buttons 6 U STB button 27 V PROG programme buttons 6 25 43 c C Teletext page access buttons for TV 7 W TIMER button 46 51 X SMART SEARCH button 70 FASTEXT buttons for TV 1 2 3 4 5 6 7 8 9 0 ...

Page 92: ...CH C2 7 CLEAR LMO MENU EXIT TIMER LIST CANCEL SET SELECT OK CLEAR RETURN DATE TIME PROG VPS PDC THU 2 8 9 2 0 0 0 2 1 0 0 SP TODAY AAB 2 0 0 0 2 1 0 0 AAB SP 0 3 9 2 0 0 0 1 3 0 CDE LP 1 0 VPS PDC 1 1 MON 1 4 0 0 1 5 0 0 LP FRI FGH SUN 6 3 0 7 0 0 LP I J K DATE CANCEL SET SELECT CLEAR MENU EXIT TIMER SP LP LIST TIME PROG TODAY AB 2 0 0 0 2 1 0 0 A SP VPS PDC OFF THU 2 8 9 RETURN SET SELECT OK MENU...

Page 93: ...IONS BUZZER DIMMER POWER SAVE TIMER OPTIONS TV DIRECT REC ON OFF OFF VARIABLE ON RETURN SET SELECT OK MENU EXIT TUNER C AAB 1 2 PROG 1 CHANNEL SET AFT FINE TUNING RETURN ON CONFIRM SELECT OK MENU EXIT CLOCK AUTO ADJUST CLOCK PROGRAM MANUAL ADJUST 2 0 0 0 THU 8 0 0 8 9 1 AAB 2 1 SET SELECT OK MENU EXIT LANGUAGE DEUTSCH FRANÇAIS ITALIANO ESPAÑOL PORTUGUÊS NEDERLANDS EΛΛHNIKA ENGLISH DANSK NORSK SVEN...

Page 94: ...ersonal code 40 Picture adjustment See Adjus ting Playback 43 at various speeds 44 58 selecting the sound 65 slow motion 58 Power save 75 Presetting channels 31 R Recording 46 bilingual programmes 65 saving 48 using the VIDEO Plus system 50 what you are watching on the TV 49 while watching another program me 48 Remote commander 5 RF channel 15 17 RR Reality Regenerator 71 S Safety tab 48 Searching...

Reviews: