background image

Additional Operations

58

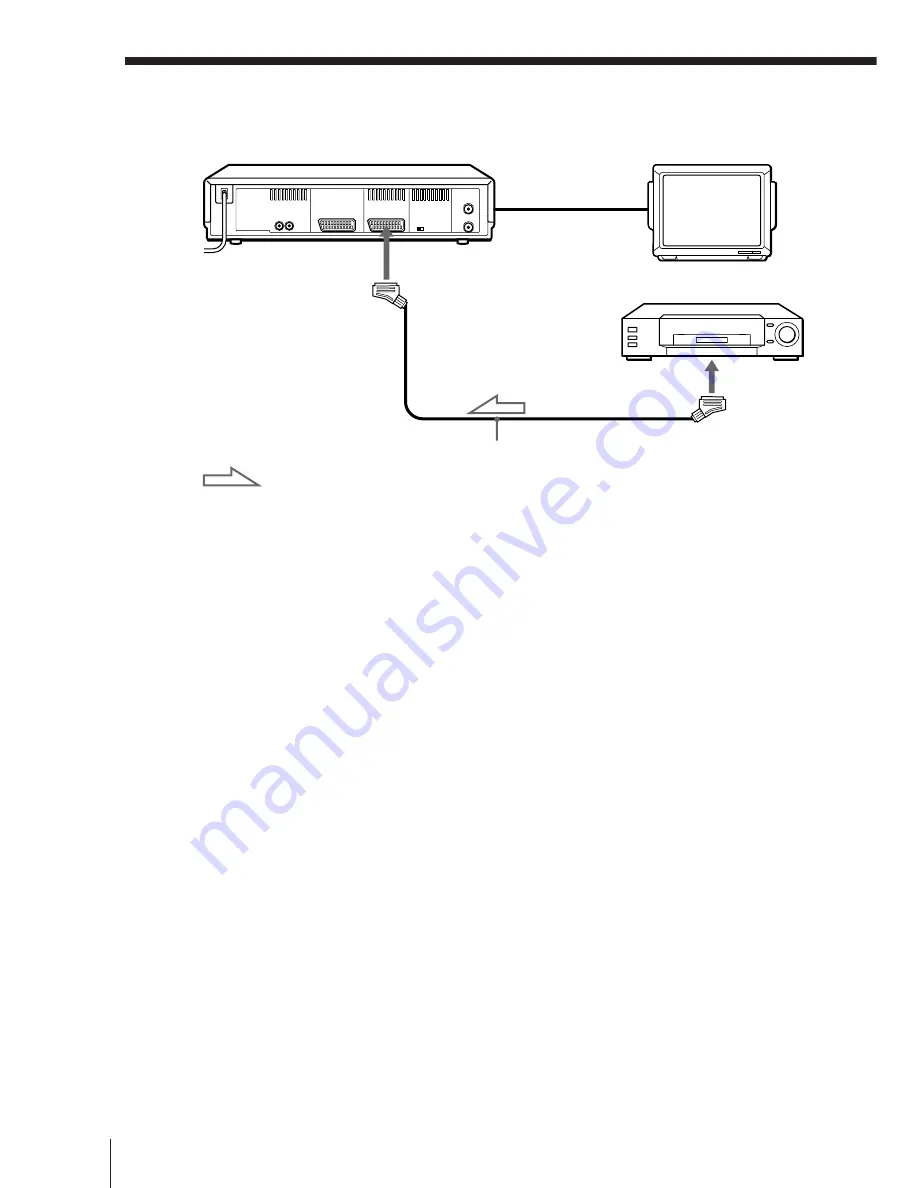
Editing with another VCR (continued)

This VCR (Recorder)

DECODER/

 LINE-3 IN

: Signal flow

VMC-2121 EURO-AV cable
(not supplied)

TV

Other VCR (Player)

EURO-AV
(Scart)

Tip

• You can also use the LINE-1 (TV) connector instead.

Notes

• When you connect LINE-3 IN to other VCR, set DECODER/LINE3 in the OPTIONS

menu to L3.

• If the other VCR doesn’t have a EURO-AV (Scart) connector, use the VMC-2106

cable instead and connect the cable to the line out jacks of the other VCR.

Summary of Contents for SLV-E780EG

Page 1: ...Video Cassette Recorder 1998 by Sony Corporation SLV E780EN EG Operating Instructions 3 861 927 11 1 PAL NTSC 4 43 ...

Page 2: ... radiators or air ducts or in a place subject to direct sunlight excessive dust mechanical vibration or shock Do not install the unit in an inclined position It is designed to be operated in a horizontal position only Keep the unit and cassettes away from equipment with strong magnets such as microwave ovens or large loudspeakers Do not place heavy objects on the unit If the unit is brought direct...

Page 3: ...ng a language Presetting channels Setting up ShowView 27 Setting the Canal Plus decoder Basic Operations 31 Playing a tape 34 Recording TV programmes 38 Recording TV programmes using ShowView 42 Setting the timer manually Additional Operations 45 Playing searching at various speeds 47 Recording TV programmes using the quick timer 48 Checking changing cancelling timer settings 50 Recording stereo a...

Page 4: ... The instructions in this manual are for the 2 models SLV E780EN and E780EG Check your model number by looking at the rear panel of your VCR The SLV E780EN is the model used for illustration purposes Any difference in operation is clearly indicated in the text for example SLV E780EG only Remote commander R6 size AA batteries Aerial cable ...

Page 5: ...rst then push in and down until the positive end clicks into position Using the remote commander You can use this remote commander to operate this VCR and a Sony TV Buttons on the remote commander marked with a dot can be used to operate your Sony TV To operate the VCR a Sony TV Set TV VIDEO to VIDEO and point at the remote sensor on the VCR TV and point at the remote sensor on the TV continued Re...

Page 6: ...ttons TV control buttons To Turn the TV into standby or active mode Select an input source of the TV either from aerial in or from line in Select the programme position of the TV Adjust the volume of the TV Switch to TV Teletext off Switch to Teletext Press ON STANDBY TV VIDEO Programme number buttons PROG VOL TV V Teletext PROG Joystick OK 1 2 3 4 5 6 7 8 9 0 ...

Page 7: ...mmander to TV 2 Hold down ON STANDBY and enter your TV s code number s using the programme number buttons Then release ON STANDBY Now you can use the following TV control buttons to control your TV ON STANDBY TV VIDEO programme number buttons ten s digit PROG VOL TV V Teletext FASTEXT buttons WIDE MENU and the joystick OK These buttons may not work with all TVs Tip When you set your TV s code numb...

Page 8: ... number previously entered will be erased When you replace the batteries of the remote commander the code number automatically resets to 01 Sony Reset the appropriate code number Code numbers of controllable TVs If more than one code number is listed try entering them one at a time until you find the one that works with your TV To make wide mode settings see the footnotes below this table for the ...

Page 9: ...L OUT to mains 1 Disconnect the aerial cable from your TV and connect it to AERIAL IN on the rear panel of the VCR 2 Connect AERIAL OUT of the VCR and the aerial input of your TV using the supplied aerial cable 3 Connect the mains lead to the mains Mains lead AERIAL ANTENNE OUT SORTIE IN ENTREE AERIAL ANTENNE OUT SORTIE IN ENTREE ...

Page 10: ...rove sound quality by connecting a stereo system to the AUDIO OUT R L jacks as shown on the right Note When you connect the VCR and your TV only with an aerial cable you have to set RF MODULATOR in the OPTIONS menu to ON initial setting If the TV is connected to the LINE 1 TV connector setting RF MODULATOR in the OPTIONS menu to OFF is recommended In the OFF position only the signal from the aeria...

Page 11: ...rn on the VCR 2 Press RF CHANNEL on the VCR The factory preset RF channel appears in the display window The VCR signal is output through this channel to the TV 3 Turn on your TV and select a programme position for the VCR picture This programme position will now be referred to as the video channel 4 Press RF CHANNEL The TV system appears in the display window continued RF CHANNEL RF CHANNEL ON STA...

Page 12: ...l To check to see if the TV tuning is correct Set the TV to the video channel and press PROGRAM on the VCR If the TV screen changes to a different programme each time you press PROGRAM the TV tuning is correct To obtain a clear picture from the VCR If the picture does not appear clearly in step 6 above go to step 7 to finish this procedure once Then start again from step 2 After pressing RF CHANNE...

Page 13: ...the VCR for more than three seconds The VCR automatically turns on and the country abbreviation for ATP Auto Tuner Preset appears in the display window 2 Press PROGRAM to select the abbreviation of your country For some countries there is a selection of languages to choose from The abbreviations of the countries and languages are as follows If your country does not appear select ELSE continued AUT...

Page 14: ... After the search is complete the current time appears in the display window for any stations that transmit a time signal To cancel the Auto Set Up function Press AUTO SET UP Tip If you want to change the language for the on screen display from the one preset in the Auto Set Up function see page 19 Note Do not cancel the Auto Set Up function during the ATP operations If you do repeat the steps abo...

Page 15: ...start Turn on the VCR and the TV Set the TV to the video channel Setting the clock manually 1 Press MENU then push the joystick to to select SETTINGS and press the joystick OK 2 Push the joystick to to select CLOCK then press the joystick OK 3 Push the joystick to to move the cursor to the clock row then push the joystick to The day starts flashing Joystick OK MENU OK PLAY MENU OK PLAY OK PLAY SET...

Page 16: ...ck The cursor appears at the beginning of the line 8 Press the joystick OK Tip To change the digits during setting push the joystick to to return to the item to be changed and select the digits pushing the joystick to Note The menu disappears automatically if you don t proceed for more than a few minutes OK PLAY OK PLAY OK PLAY OK PLAY OK PLAY CLOCK 2 9 TU 8 AUTO ADJUST SELECT SET END 1 1 9 OFF OK...

Page 17: ... to to select CLOCK then press the joystick OK The cursor appears at AUTO ADJUST Changing the station for the Auto Clock Set function Joystick OK MENU 1 2 3 4 5 6 7 8 9 0 OK PLAY MENU OK PLAY continued SETTINGS OPTIONS TUNER SHOWVIEW CLOCK LANGUAGE SELECT SET OK CLOCK 2 9 FR 8 1 AUTO ADJUST SELECT SET END 1 1 9 ON OK 7 1 5 30 CLOCK PROG 1 ...

Page 18: ... proceed for more than a few minutes 3 Push the joystick to to select ON 4 Push the joystick to to move the cursor to CLOCK PROG then push the joystick to repeatedly until the programme position of a station that carries the time signal appears If the VCR does not receive the time signal from any station AUTO ADJUST returns to OFF automatically 5 Press the joystick OK Step 6 Setting the clock cont...

Page 19: ...TV to the video channel Joystick OK MENU 1 Press MENU then push the joystick to to select SETTINGS and press the joystick OK 2 Push the joystick to to select LANGUAGE and press the joystick OK 3 Push the joystick to to move the dot r to the desired language then press the joystick OK OK PLAY MENU SETTINGS OPTIONS TUNER SHOWVIEW CLOCK LANGUAGE SELECT SET OK OK PLAY OK PLAY ENGLISH LANGUAGE MAGYAR P...

Page 20: ...GS and press the joystick OK 2 Push the joystick to to select TUNER and press the joystick OK 3 Push the joystick to to move the cursor to NORMAL CATV then select NORM To preset CATV channels select CATV OK PLAY MENU SETTINGS OPTIONS TUNER SHOWVIEW CLOCK LANGUAGE SELECT SET OK OK PLAY OK PLAY TUNER NORMAL CATV CHANNEL SET C NORM PAY TV CANAL OFF 21 SYSTEM B G AFT ON FINE TUNING SELECT SET PROG10 N...

Page 21: ... R5 10 E10 17 R8 11 E11 18 R9 12 E12 19 R10 21 69 E21 E69 20 R11 CATV 1 41 S1 S41 21 69 R21 R69 CATV 42 46 S01 S05 If you know the number of the channel you want press the programme number buttons For example for channel 5 first press 0 and then press 5 Selected programme position Channel Channel number in the CHANNEL SET field D K TV system Channel continued PROG OK PLAY OK PLAY TUNER NORMAL CATV...

Page 22: ...at steps from 5 to 7 9 Press the joystick OK Disabling unwanted programme positions After presetting channels you can disable unused programme positions The disabled positions will be skipped later when you press the PROG buttons 1 In step 6 above press programme number button 0 twice to display the number 00 beside CHANNEL SET 2 Press the joystick OK OK PLAY OK PLAY NORMAL CATV CHANNEL SET C NORM...

Page 23: ...ain a clear picture 2 Press MENU then select SETTINGS and press the joystick OK 3 Select TUNER then press the joystick OK 4 Select FINE TUNING The fine tuning meter appears 5 Push the joystick to to get a clearer picture then press the joystick OK Note that the AFT Auto Fine Tuning setting switches to OFF Note The menu disappears automatically if you don t proceed for more than a few minutes Selec...

Page 24: ...age 25 Before you start Turn on the VCR and the TV Set the TV to the video channel 1 Press MENU then push the joystick to to select SETTINGS and press the joystick OK 2 Push the joystick to to select SHOWVIEW then press the joystick OK The preset channels are displayed on the screen in the GUIDE CH column means that the guide channel has not been preset Programme number buttons Joystick OK MENU 1 ...

Page 25: ...each satellite channel using the TUNER menu Then set the guide channel number for each satellite channel using the SHOWVIEW menu If your satellite tuner is connected via the LINE 1 TV connector you don t have to set programme positions nor guide channel numbers for satellite channels Skip the following procedure 1 Turn on the satellite tuner 2 Press MENU then select SETTINGS and press the joystick...

Page 26: ...me position assigned to the satellite channel following the procedures on page 24 Notes The menu disappears automatically if you don t proceed for more than a few minutes If you use a satellite tuner connected via the LINE 1 IN TV connector you don t have to set up ShowView Just record a satellite programme using ShowView and the VCR automatically records the programme from the LINE 1 IN TV connec...

Page 27: ...RIAL OUT AERIAL IN EURO AV Scart EURO AV Scart Signal flow EURO AV cable not supplied EURO AV cable supplied with decoder DECODER LINE 3 IN Setting Canal Plus channels To watch or record Canal Plus programmes set your VCR to receive the channels using the on screen display Before you start Turn on the VCR the TV and the decoder Set the TV to the video channel PROG MENU Aerial cable supplied Joysti...

Page 28: ...UDIO DECODER LINE3 POWER SAVE RF MODULATOR OFF NICAM DEC OFF ON SELECT SET 1 Press MENU then push the joystick to to select SETTINGS and press the joystick OK 2 Push the joystick to to select OPTIONS then press the joystick OK 3 Push the joystick to to move the cursor to DECODER LINE3 then push the joystick to to select DEC 4 Press the joystick OK 5 Press MENU then push the joystick to to select S...

Page 29: ...he cursor to PAY TV CANAL then push the joystick to to select ON Selected programme position OK PLAY PROG OK PLAY OK PLAY continued NORMAL CATV CHANNEL SET C NORM TUNER PAY TV CANAL OFF 21 SELECT SET PROG10 SYSTEM B G AFT ON FINE TUNING TUNER SELECT SET PROG15 NORMAL CATV CHANNEL SET C NORM PAY TV CANAL OFF 21 SYSTEM B G AFT ON FINE TUNING TUNER NORMAL CATV CHANNEL SET C NORM PAY TV CANAL OFF 02 S...

Page 30: ...Canal Plus programmes using the RFU input of the TV press TV VIDEO so that the VIDEO indicator appears in the display window 11 If the TV sound is distorted or noisy push the joystick to to move the cursor to SYSTEM then select B G or D K so that you get the better sound 12 Press the joystick OK OK PLAY OK PLAY Setting the Canal Plus decoder continued NORMAL CATV CHANNEL SET C NORM PAY TV CANAL ON...

Page 31: ...ECT 1 Turn on your TV and set it to the video channel 2 Insert a tape The VCR turns on and starts playing automatically if you insert a tape with its safety tab removed COUNTER RESET DISPLAY REPLAY Joystick PLAY P PAUSE FF p STOP 03 REW NTSC PB 1 2 3 4 5 6 7 8 9 0 continued ...

Page 32: ...ng playback press REPLAY up to four times The VCR rewinds the tape about 10 seconds on the counter for each press of the button and restarts playback To set the colour system If the playback picture has no colour or streaks appear during playback set the SYSTEM option in the VIDEO OPTIONS menu to conform to the system that the tape was recorded in see page 56 Normally set the option to AUTO To pla...

Page 33: ...re shakes No picture appears on the TV screen Black streaks appear horizontally on the TV screen The colour density increases or decreases If you play back a tape in LP or EP mode with NTSC system the sound is heard in monaural While setting the menu on the TV screen you cannot use the joystick for tape operation To use the time counter At the point on the tape that you want to find later press CO...

Page 34: ...ogrammes r REC PROG SP LP 1 Turn on your TV and set it to the video channel To record from a decoder turn it on 2 Insert a tape with its safety tab in place INPUT SELECT COUNTER REMAIN DISPLAY TV VIDEO Joystick p STOP 1 2 3 4 5 6 7 8 9 0 ...

Page 35: ...SP LP to select the tape speed SP or LP LP Long Play provides recording time twice as long as SP however SP Standard Play produces better picture and audio quality 6 Press r REC to start recording The recording indicator lights up red in the display window Recording indicator To stop recording Push the joystick to p STOP INPUT SELECT PROG SP LP REC VIDEO SP VIDEO SP LP VIDEO LP VIDEO continued ...

Page 36: ...o record on a tape again cover the tab hole with adhesive tape Safety tab To check the remaining time Press DISPLAY With the display on press COUNTER REMAIN to check the remaining time Each time you press COUNTER REMAIN the time counter and the remaining time appear alternately The remaining time with the indicator also appears in the display window To correctly check the remaining time of the tap...

Page 37: ...eave it on Notes The display does not appear during still pause mode or slow motion playback The display will not appear while playing an NTSC recorded tape If a tape has portions recorded in both PAL and NTSC systems the time counter reading will not be correct This discrepancy is due to the difference between the counting cycles of the two video systems You cannot watch a Canal Plus programme wh...

Page 38: ...set automatically You can preset up to eight programmes at a time Before you start Check that the VCR clock is set to the correct time Insert a tape with its safety tab in place Make sure the tape is longer than the total recording time Turn on your TV and set it to the video channel SHOWVIEW CLEAR SET Programme number buttons Joystick p STOP ON STANDBY 1 2 3 4 5 6 7 8 9 0 SHOWVIEW SHOWVIEW NO SHO...

Page 39: ...o change 2 Push the joystick to to reset it To record the same programme every day or the same day every week see Daily weekly recording on page 40 To use the VPS PDC function set VPS PDC to ON For details of the VPS PDC function see Timer recording with VPS PDC signals on page 40 4 Press the joystick OK to complete the setting 5 Press ON STANDBY to turn off the VCR The indicator appears in the di...

Page 40: ...r recording with VPS PDC signals The broadcast systems transmit VPS Video Programme System or PDC Programme Delivery Control signals with their TV programmes These signals ensure that your timer recordings are made regardless of broadcast delay early starts or broadcast interruptions To use the VPS PDC function set VPS PDC to ON You can also use the VPS PDC function for a source connected to the L...

Page 41: ...ANDBY The indicator turns off and the VCR switches on Remember to press ON STANDBY to reset the VCR after using the VCR You can also do the following tasks while the VCR is recording Reset the counter Display tape information on the TV screen Check the timer settings Watch another TV programme Tips To set the tape speed you can also use the SP LP button When you are recording a programme in the SP...

Page 42: ... to record programmes Before you start Check that the VCR clock is set to the correct time Insert a tape with its safety tab in place Make sure the tape is longer than the total recording time To record from a decoder turn it on Turn on your TV and set it to the video channel Joystick OK p STOP ON STANDBY 1 2 3 4 5 6 7 8 9 0 MENU OK PLAY DATE SP TIMER PROG TODAY SP LP ON VPS PDC SELECT SET OK OK W...

Page 43: ...VPS PDC function set VPS PDC to ON For details of the VPS PDC function see Timer recording with VPS PDC signals on page 40 To record from a decoder or other source connected to the LINE 1 TV LINE 3 IN Scart connector or LINE 2 IN VIDEO AUDIO L R jacks press INPUT SELECT to display L1 L3 or L2 in the PROG position 3 Press the joystick OK to complete the setting 4 Press ON STANDBY to turn off the VC...

Page 44: ...e picture at the point the tape speed is changed If you want to keep the same tape speed set AUTO TAPE SPEED to OFF in the TAPE OPTIONS menu page 55 Notes When setting the timer with VPS PDC signals enter the start and stop times exactly as indicated in the TV programme guide otherwise the VPS PDC function won t work If the VPS PDC signal is too weak or the broadcasting station failed to transmit ...

Page 45: ...the joystick to FF During rewind keep pushing the joystick to 03 REW During playback push the joystick to FF or 03 REW During playback keep pushing the joystick to FF or 03 REW When you release the joystick resume normal playback During playback press 2 During playback press SLOW During pause push the joystick to FF or 03 REW Keep pushing the joystick to FF or 03 REW to play one frame each second ...

Page 46: ...p or bottom while pausing The picture shakes while pausing To set tracking to the centre position press both buttons at the same time Notes The playback sound is muted during the operations in the above table In the LP mode noise may appear or there may be no colour If the playback mode mark doesn t appear on the TV screen press DISPLAY Playing searching at various speeds continued ...

Page 47: ... minute by minute to 0 00 then the VCR stops recording and turns off automatically To extend the duration Press QUICK TIMER repeatedly to set to the new duration To stop recording To stop the VCR while recording push the joystick to p STOP Using the quick timer during stop mode You can set the quick timer and start recording during stop mode by pressing QUICK TIMER To set the programme position yo...

Page 48: ...ss the joystick OK then turn off the VCR to return to recording standby Checking changing cancelling timer settings Before you start Turn on your TV and set it to the video channel Joystick OK CLEAR MENU ON STANDBY 1 2 3 4 5 6 7 8 9 0 DATE LIST PROG TIME 1 5 900 2000 WE 2 1 9 LP 2 6 930 000 1 SP 44 500 530 LP 1 000 100 LP SU 2 1 7 212 2000 LP 8 12 17 12 2 2 300 000 SP MO MO SA FR SA VPS PDC VPS PD...

Page 49: ...ant to change and push the joystick to to reset it To cancel the setting press CLEAR 5 Press the joystick OK If any settings remain turn off the VCR to return to recording standby When the timer settings overlap The programme that starts first has priority and the second programme starts recording only after the first programme has finished If the programmes start at the same time the programme li...

Page 50: ...he display window To select bilingual sound while recording Press AUDIO MONITOR to select the sound you want In NICAM system SLV E780EN only This VCR receives and records stereo and bilingual programmes based on the NICAM system the NICAM indicator appears When a stereo or bilingual programme is received the STEREO indicator appears in the display window To record a NICAM programme HIFI AUDIO in t...

Page 51: ...sten to playback sounds in stereo you must use the EURO AV or AUDIO OUT connections When you play a tape recorded in monaural the sound is heard in monaural regardless of the AUDIO MONITOR setting If the AUDIO MONITOR button does not function check that AUDIO MIX in the OPTIONS menu is set to OFF see page 56 If HIFI AUDIO is set to STD the standard sound will be recorded on both the hi fi and norm...

Page 52: ...ape into the VCR 2 Press INDEX SEARCH To search ahead press INDEX SEARCH To search backwards press INDEX SEARCH The VCR starts searching and playback starts automatically from that point To stop searching Push the joystick to p STOP Note No index signal will be added when recording starts from recording pause However an index signal will be marked if you change the programme position during record...

Page 53: ...ves recording and playback quality by adjusting the VCR to the condition of the video heads and tape To maintain better picture quality we recommend that you set OPC to ON in the VIDEO OPTIONS menu with the OPC indicator in the display window lit For details see page 56 OPC playback The OPC function automatically works on all types of tapes including rental tapes and tapes that were not recorded w...

Page 54: ...mode the OPC function will work There is a delay of a few seconds before the VCR actually starts recording while the VCR analyses the tape To avoid the delay first set the VCR to recording pause the OPC indicator flashes slowly and press r REC to have the VCR analyse the tape the OPC indicator flashes rapidly After the OPC indicator stops flashing push the joystick to P PAUSE to start recording im...

Page 55: ...d print Menu option AUTO TAPE SPEED TAPE SELECT Set this option to ON to change the timer recording tape speed automatically to the LP mode when the remaining tape becomes shorter than the recording time OFF to keep the set tape speed 300 to use an E 300 type tape 240 to use an E 240 type tape 195 to use an E 195 or shorter type tape TAPE OPTIONS menu choices SLV E780EN SLV E780EG TAPE OPTIONS AUT...

Page 56: ...tion to ON to listen to the hi fi and normal audio tracks at the same time The AUDIO MONITOR button will not function OFF to listen to the hi fi and normal audio tracks separately Select the sound using the AUDIO MONITOR button For details see page 51 STD to record standard sound on the hi fi audio track NICAM to record NICAM broadcasts on the hi fi audio track For details see page 50 DEC to use t...

Page 57: ...CR Player LINE 2 IN VMC 810 audio video cable not supplied Notes Make sure you connect the plugs to jacks of the same colour If the other VCR is a monaural type leave the red plugs unconnected If you connected this VCR to both the LINE IN and LINE OUT jacks of the other VCR select the input correctly to prevent a humming noise continued ...

Page 58: ...t supplied TV Other VCR Player EURO AV Scart Tip You can also use the LINE 1 TV connector instead Notes When you connect LINE 3 IN to other VCR set DECODER LINE3 in the OPTIONS menu to L3 If the other VCR doesn t have a EURO AV Scart connector use the VMC 2106 cable instead and connect the cable to the line out jacks of the other VCR ...

Page 59: ...eave the red plugs unconnected If you connected this VCR to both the LINE IN and LINE OUT jacks of the other VCR select the input correctly to prevent a humming noise This VCR Recorder TV 21 pin adaptor not supplied VMC 810 audio video cable not supplied Signal flow LINE OUT LINE 1 TV Other VCR Player AUDIO IN VIDEO IN continued ...

Page 60: ... it to recording pause 4 To start editing press the P PAUSE buttons on both VCRs at the same time To stop editing Press the p STOP buttons on both VCRs Tips To edit more precisely press the P PAUSE buttons on the VCRs to release pause To cut out unwanted scenes while editing press P PAUSE on this VCR when an unwanted scene begins When it ends press P PAUSE again to resume recording Assemble Editin...

Page 61: ... type cleaning cassette other than Sony s as it may damage the video heads The video heads may have to be replaced Consult your local Sony service facility for more information Adjust the vertical hold control on the TV or monitor The tape is defective Use a new tape When you play a tape with the same sound recorded on both the hi fi and normal sound tracks make sure AUDIO MIX in the OPTIONS menu ...

Page 62: ...he system in your area The safety tab has been removed To record on this tape cover the tab hole Check that the safety tab has not been removed Make sure the tape is not at its end Select the correct source with the INPUT SELECT button Select a programme position when recording TV programmes select L1 L2 or L3 when recording from other equipment Check that the clock is set Make sure a tape has bee...

Page 63: ... batteries in the remote commander with new ones if they are weak Make sure the TV VIDEO remote control switch is set correctly The recording condition of the tape is very poor and tracking cannot be adjusted The tracking mater does not appear when playing back an NTSC recorded tape Set your TV s code number The code number resets to 01 when you replace the batteries of the remote commander Clean ...

Page 64: ...O IN phone jack 2 Input level 327 mVrms Input impedance more than 47 kilohms DECODER LINE 3 IN 21 pin Video input pin 20 Audio input pins 2 and 6 AUDIO OUT Phono jack 2 Rated output level 327 mVrms Load impedance 47 kilohms Output impedance less than 10 kilohms General Power requirements 220 240 V AC 50 Hz Power consumption 23 W Operating temperature 5 C to 40 C Storage temperature 20 C to 60 C Di...

Page 65: ...n 60 º PROGRAM TRACKING buttons 12 46 53 AUTO SET UP RF Radio Frequency CHANNEL button 11 13 Remote sensor 5 LINE 2 IN VIDEO AUDIO L R jacks 57 1 ON STANDBY switch indicator 11 2 Tape compartment 3 EJECT button 32 4 03 REW rewind button 45 5 PLAY button 45 6 FF fast forward button 45 7 r REC record button 60 8 p STOP button 60 continued ...

Page 66: ... 50 4 Tape speed indicators 35 5 VIDEO indicator 10 36 6 OPC Optimum Picture Control indicator 53 7 VPS Video Programme System PDC Programme Delivery Control indicator 40 8 Tracking indicator 53 9 Time counter clock line programme position indicator 33 35 60 0 Remaining time indicator 36 Tape recording indicator 33 35 STEREO NICAM LP EP VPS VIDEO OPC SP PDC ...

Page 67: ...AERIAL OUT ANTENNE SORTIE connector 9 3 AERIAL IN ANTENNE ENTREE connector 9 4 NTSC PB playback switch 32 5 DECODER LINE 3 IN DECODEUR ENTREE LIGNE 3 connector 27 58 6 LINE 1 TV LIGNE 1 TV connector 10 27 7 AUDIO OUT R L SORTIE AUDIO D G jacks 10 continued ...

Page 68: ...CK TIMER button 47 8 INPUT SELECT button 35 43 TV power on TV mode select button for TV 6 9 SP LP button 35 V Teletext button for TV 6 0 SLOW button 45 r REC record button 35 INDEX SEARCH buttons 52 MENU button 15 19 42 48 55 Joystick 15 19 32 45 P PAUSE p STOP 03 REW rewind FF fast forward PLAY OK FASTEXT buttons for TV 1 2 3 4 5 6 7 8 9 0 Index to parts and controls continued ...

Page 69: ...utton for TV 7 AUDIO MONITOR button 50 ª TV VIDEO button 10 36 º SHOWVIEW button 38 Programme number buttons 6 22 25 37 SET button 39 ten s digit button 37 PROG programme buttons 6 21 35 Teletext page access buttons for TV 7 VOL volume buttons for TV 6 REPLAY button 32 1 2 3 4 5 6 7 8 9 0 ...

Page 70: ...70 Additional Information ...

Page 71: ...71 Additional Information ...

Page 72: ... recording 50 N NICAM broadcasts 50 Normal audio track 51 O OPC Optimum Picture Control 53 P PDC Programme Delivery Control 40 Picture adjustment See Adjusting Playback 31 at various speeds 45 frame by frame 45 slow motion 45 Power save 56 Presetting channels 13 20 Q Quick timer 47 R Recording 34 bilingual programmes 50 saving 36 stereo programmes 50 using ShowView 38 while watching another progra...

Reviews: