109
Set
ting
s an
d Adj
u
st
m
ent
s
Recorder Settings
(Basic)
The “Basic” setup helps you to make clock
and other recorder related settings.
1
Press SYSTEM MENU while the
recorder is in stop mode.
2
Select “Initial Setup,” and press
ENTER.
3
Select “Basic,” and press ENTER.
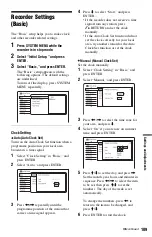
The “Basic” setup appears with the
following options. The default settings
are underlined.
To turn off the display, press SYSTEM
MENU repeatedly.
Clock Setting
Auto (Auto Clock Set)
Turns on the Auto Clock Set function when a
programme position in your local area
broadcasts a time signal.
1
Select “Clock Setting” in “Basic,” and
press ENTER.
2
Select “Auto,” and press ENTER.
3
Press
<
/
,
repeatedly until the
programme position of the station that
carries a time signal appears.
4
Press
m
to select “Start,” and press
ENTER.
• If the recorder does not receive a time
signal from any station, press
O
RETURN and set the clock
manually.
• If the Auto Clock Set function did not
set the clock correctly for your local
area, try another station for the Auto
Clock Set function or set the clock
manually.
Manual (Manual Clock Set)
Set the clock manually.
1
Select “Clock Setting” in “Basic,” and
press ENTER.
2
Select “Manual,” and press ENTER.
3
Press
<
/
,
to select the time zone for
your area, and press
m
.
4
Select “On” if you are now on summer
time, and press ENTER.
5
Press
M
/
m
to set the day, and press
,
.
Set the month, year, hour, and minutes in
sequence. Press
<
/
,
to select the item
to be set, then press
M
/
m
to set the
numbers. The day of the week is set
automatically.
To change the numbers, press
<
to
return to the item to be changed, and
press
M
/
m
.
6
Press ENTER to start the clock.
,
continued

