


1-14
56
4
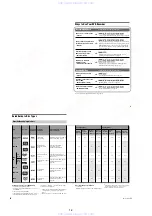
Select “sort by.”
5
Select an option, and press ENTER.
The cursor moves to “done.”
Press ENTER again to exit the Panel Menu.
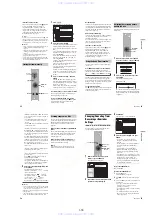
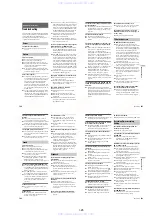
If two or more timer settings overlap
The timer recording set last has priority over the
other settings and is recorded. All other
overlapped settings are suspended, even if the
setting only partially overlaps the setting with
priority.
appears next to programs that are
suspended.
Example: You set the timer in order of A, and then
B.
Note that if you modify setting A (for instance, if
you extend the recording time), then setting A
becomes the last timer recording you set and will
have priority over setting B.
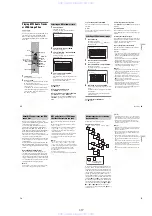
If the end and start time of two timer settings
are the same
The end of program A or the beginning of program
B will be cut.
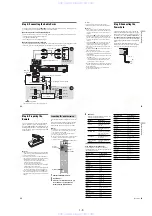
Recording From Connected
Equipment
You can set the recorder to automatically record
programs from connected equipment that has a
timer function (such as a satellite tuner). Connect
the equipment to the LINE IN
1
jacks of the
recorder (page 30).
When the connected equipment turns on, the
recorder starts recording a program from the LINE
IN
1
jacks. If you have connected a set top box, be
sure to set “Set Top Box Control” to “Off”
(page 90).
1
Before recording, select HDD or DVD.
If you select DVD, insert a recordable DVD
(see “Inserting a Disc” on page 31).
2
Set “Synchro Rec” in “Features” setup to
“Record to HDD” or “Record to DVD”
(page 97).
7:00
A
9:00
11:00
B
will be suspended
will be recorded
7:00
A
B
9:00
10:00
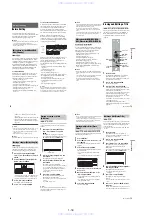
Recording from connected
equipment with a timer
(Synchro Rec)
-RWVR
-RWVR
+
RW
-
R
+
R
-RW
Video
+
R
HDD
REC MODE
x
REC STOP
SYNCHRO
REC
INPUT SELECT
1
2
3
4
6
7
8
9
0
5
DVD
HDD
X
REC PAUSE
57
Ti
me
r
Re
co
rd
in
g
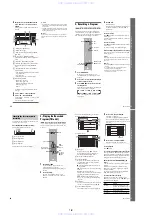
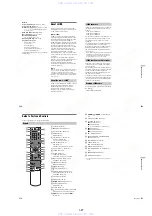
3
Press INPUT SELECT repeatedly to select
“L1.”
4
Press REC MODE repeatedly to select the
recording mode.
For details about the recording mode, see
page 49.
5
Set the timer on the connected equipment
to the time of the program you want to
record, and turn it off.
6
Press SYNCHRO REC.
The SYNCHRO REC indicator lights up on
the front panel. The recorder is ready to start
Synchro-Recording.
The recorder automatically starts recording
when it receives an input signal from the
connected equipment. The recorder stops
recording when the connected equipment
turns off.
To stop recording
Press
x
REC STOP or SYNCHRO REC.
To cancel Synchro Rec
Press SYNCHRO REC.
The SYNCHRO REC indicator on the recorder
turns off.
b
Notes
• The recorder starts recording only after detecting the
video signal from the connected equipment. The
beginning of the program may not be recorded
regardless of whether or not the recorder’s power is on
or off.
• During Synchro-Recording, other operations such as
normal recording cannot be done.
• To use the connected equipment while the recorder is
standing by for Synchro-Recording, cancel Synchro-
Recording by pressing SYNCHRO REC. Be sure to
turn off the connected equipment and press
SYNCHRO REC to reset Synchro-Recording before
the timer recording starts.
• The Synchro Rec function does not work with some
tuners. For details, see the tuner’s operating
instructions.
• To use the Synchro Rec function, you must first set the
recorder’s clock correctly.
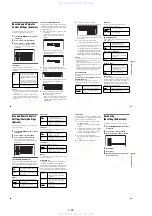
If the timer settings of a Synchro-Recording
and another timer recording overlap
Regardless of whether or not the program is a
Synchro Rec program, the program that starts first
has priority and the second program starts
recording only after the first program has finished.
You can record from a connected VCR or similar
device. To connect a VCR or similar device, see
“Connecting a VCR or Similar Device” on
page 28. Use the DV IN jack on the front panel if
the equipment has a DV output jack (i.LINK jack).
1
Press HDD or DVD.
If you select DVD, insert a recordable DVD
(see “Inserting a Disc” on page 31).
2
Press INPUT SELECT to select an input
source according to the connection you
made.
The front panel display changes as follows:
3
Press REC MODE repeatedly to select the
recording mode.
For details about the recording mode, see
page 49.
4
Press
X
REC PAUSE to set this recorder to
record pause.
5
Insert the source tape into the connected
equipment and set to playback pause.
6
At the same time, press
X
REC PAUSE on
this recorder and the pause or play button
on the connected equipment.
Recording starts.
To stop recording, press
x
REC STOP on this
recorder.
Recording from connected
equipment without a timer
7:00
8:00
9:00
10:00
First program
will be cut off
Second program
DV
L2
L1
L3
Channel number
,
continued
58
If you connect a digital video camera with a DV
IN jack
See “DV/Digital8 Dubbing” on page 84 for an
explanation of how to record from the DV IN jack.
z
Hint
You can adjust the settings for the recording picture
before recording. See “Adjusting the recording picture
quality and size” on page 53.
b
Notes
• When recording a video game image, the screen may
not be clear.
• Any program that contains a Copy-Never copy guard
signal cannot be recorded. The recorder continues to
record, but a blank screen will be recorded.
59
Pl
a
yb
a
ck
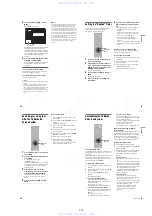
Playback
Playing
1
Press HDD or DVD.
• If you select DVD, insert a disc (see
“Inserting a Disc” on page 31).
• If you insert a DVD VIDEO, VIDEO CD, or
CD, press
H
PLAY. Playback starts.
2
Press TITLE LIST.
For details about the Title List, see “3. Playing
the Recorded Program (Title List)” on
page 34.
Example: DVD-RW (VR mode)
3
Select the title, and press ENTER.
The sub-menu appears.
4
Select “Play,” and press ENTER.
Playback starts from the selected title.
To stop playback
Press
x
STOP.
To select the “list” or “group” view
1
Press TV GUIDE.
TV Guide On Screen appears.
2
Press
M
/
m
to move the cursor to the Service
Bar.
3
Select “RECORDINGS” in the Service Bar
using
<
/
,
, and press MENU.
The cursor moves to the Panel Menu.
4
Select an option using
M
/
m
.
• “view as”: select “list” to view all recorded
programs as a single list, or “group” to list
episodes under a single program title.
• “sort by”: sorts the recorded programs by
“date” or by “title” name.
+
R
DVD
VCD
CD
DATA CD
-RWVR -RW
Video
+
RW
-
R
HDD
DATA DVD
1
2
3
4
6
7
8
9
0
5
NEXT
>
H
PLAY
/
X
PAUSE
/
x
STOP
Z
OPEN/
CLOSE
TITLE LIST
<
/
M
/
m
/
,
,
ENTER
TOOLS
MENU
PROGRESSIVE
SUBTITLE
AUDIO
TOP MENU
ANGLE
.
PREV
INPUT
SELECT
HDD
DVD
CH +/–
REPLAY
/
ADVANCE
SUR
TV GUIDE
Playing titles with the TV Guide On
Screen system
12
11
10
9
2ch
TITLE LIST
ORIGINAL
GB
4.3 / 4.7
World Sports
Mystery
Travel
(0H30M) LSP
GB
0.9
5ch
2ch
3ch
Tennis
(0H30M) SEP
(1H00M) SLP
(1H00M) SEP
Wed
Tue
Wed
Fri
GB
0.3
GB
0.8
GB
0.6
10/26/2005 8:00PM
10/28/2005 1:00PM
10/25/2005 9:00AM
10/19/2005 8:00PM
go to Service Bar
Recording Options
done
cancel
view as
group
sort by
title
Doctors and Lawyers
RECORDINGS
Local News
Today's News
The Urban Garden
Music Show
Chemicals and Chemistry
World Soccer
High Places
Tue
Tue
Fri
Tue
Tue
Wed
Wed
Thu
10/4
10/4
10/7
10/11
10/11
10/12
10/12
10/13
8:00pm
9:00pm
10:00pm
4:00pm
8:00pm
2:00pm
8:00pm
7:00am
All shows recorded are listed here
Press Menu now to choose Recordings view
Move
m
to highlight any show
and press Menu to customize
SCHEDULE
8:05
LISTINGS
RECORDINGS
INFO
,
continued
www. xiaoyu163. com
QQ 376315150
9
9
2
8
9
4
2
9
8
TEL 13942296513
9
9
2
8
9
4
2
9
8
0
5
1
5
1
3
6
7
3
Q
Q
TEL 13942296513 QQ 376315150 892498299
TEL 13942296513 QQ 376315150 892498299


