background image

16

Settings and adjustments (continued)

Setting the display language or
sound track (Language Setup)

“Language Setup” allows you to choose among
various languages for the on-screen display or
sound track.
The default settings are underlined.

Select “Language Setup” in the Setup display.

Notes

• When you select a language that is not recorded on the

DVD, one of the recorded languages is automatically
selected for the “DVD Menu,” “Audio” and “Subtitles”
settings.

• Depending on the DVD, the console may not start

playing the language you have selected in the “DVD
Menu,” “Audio” or “Subtitles.”

x

 OSD

Selects the language for the on-screen display.
• English
• French
• German
• Italian
• Spanish
• Dutch
• Portuguese

x

 DVD Menu

Selects the language for the DVD menu.
• English
• French
• German
• Italian
• Spanish
• Dutch
• Danish
• Swedish
• Finnish
• Norwegian
• Portuguese
• Russian
• Chinese
• Japanese
• Language Options

When you select “Language Options,” the
language list is displayed. Select the
language from the list.

x

 Audio

Selects the language for the sound track.
• English
• French
• German
• Italian
• Spanish
• Dutch
• Danish
• Swedish
• Finnish
• Norwegian
• Portuguese
• Russian
• Chinese
• Japanese
• Language Options

When you select “Language Options,” the
language list is displayed. Select the
language from the list.

x

 Subtitles

Selects the language for the subtitles.
• Audio Follow*
• English
• French
• German
• Italian
• Spanish
• Dutch
• Danish
• Swedish
• Finnish
• Norwegian
• Portuguese
• Russian
• Chinese
• Japanese
• Language Options

When you select “Language Options,” the
language list is displayed. Select the
language from the list.

* When you select “Audio Follow,” the language for the

subtitles changes according to the language you
selected for the sound track.

After changing DVD settings

To save your changes, be sure to eject the DVD
before pressing the 

1

/RESET button or

turning off the unit with the MAIN POWER
switch. Please note that changes will not be
saved if you reset or turn off the console
without first ejecting the DVD.

Setting your TV display mode
(Screen Setup)

“Screen Setup” allows you to set various
options for your TV display.
The default settings are underlined.

Select “Screen Setup” in the Setup display.

x

 TV Type

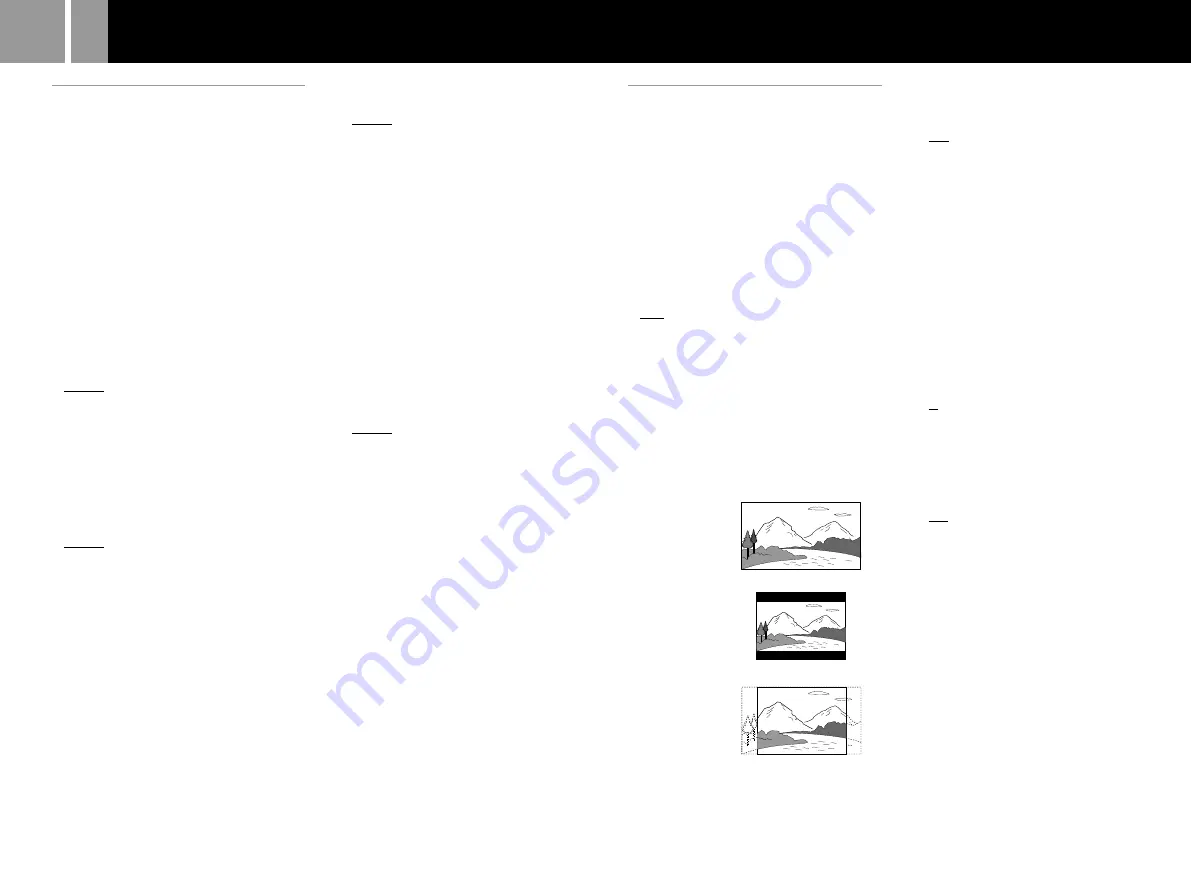
Selects the aspect ratio of the TV to be
connected.
You can change this setting only when the
DVD is stopped.
• 16:9 : select this when you connect a

wide-screen TV, or a TV that displays in
wide mode to the console.

• 4:3 Letter Box : select this when you connect

a standard TV to the console. Displays a
wide picture with margins on the upper and
lower portions of the screen.

• 4:3 PAN SCAN : select this when you

connect a standard TV to the console.
Displays the wide picture on the whole
screen automatically and cuts off the
portions that do not fit.

16:9

4:3 Letter Box

4:3 PAN SCAN

Note

With most DVDs, the picture is automatically output in a
predetermined aspect ratio.

x

 DNR (Digital Noise Reduction)

If the playback picture has noise or interference,
set this item to “DNR1” or “DNR2.”
• Off : normally select this position.
• DNR1 : makes the picture clear by reducing

noise.

• DNR2 : makes the picture even clearer by

reducing noise.

Notes

• When you select “DNR2,” an afterimage may appear.

In this case, select ”Off.”

• Depending on the DVD, the DNR function may

produce limited results.

x

 Outline Sharpening

Makes the outline of the picture sharpened or
softened. The higher the value, the sharper the
outline.
• +2
• +1
• 0 : normally select this position.
• -1
• -2

x

 Display

Displays or turns off the playing status
information on the TV screen.
• On : when you operate the DVD player, the

playing status appears for a few seconds on
the TV screen.

• Off : the playing status is not displayed.

After changing DVD settings

To save your changes, be sure to eject the DVD
before pressing the 

1

/RESET button or

turning off the unit with the MAIN POWER
switch. Please note that changes will not be
saved if you reset or turn off the console
without first ejecting the DVD.

Summary of Contents for PlayStation 2 SCPH-39003

Page 1: ... discs audio CDs and DVD video discs with this system Before operating this console please read this manual carefully and retain it for future reference MEMORY CARD slots product family logo 1 standby RESET button and 1 indicator A open button and A indicator Disc tray Controller ports L2 button R2 button L1 button R1 button Directional buttons a s buttons START button ANALOG mode button SELECT bu...

Page 2: ...sation for the analysis or modification of the PlayStation 2 console nor the analysis and use of its circuit configurations is given There are no user serviceable components inside the PlayStation 2 console Disassembling it will void the guarantee Additionally there is a risk of exposure to laser radiation as well as to electrical shock hazards Notes on safety when using the Analog Controller DUAL...

Page 3: ...pecially shaped discs Do not use irregularly shaped CDs for example heart or star shaped CDs as they may cause the console to malfunction Disc logo Disc colour Contents Disc size PlayStation 2 format DVD ROM PlayStation 2 logo and designation Silver PlayStation 2 format CD ROM PlayStation 2 logo and designation Blue Audio and video 12 cm PlayStation format CD ROM PlayStation logo and designation B...

Page 4: ...ion explains the connecting method for listening to sound through your TV speakers If you wish to connect to audio equipment with digital connectors see Connecting digital audio equipment on page 6 Connecting to a TV with audio video input Connect your PlayStation 2 computer entertainment system to the TV using the supplied AV Cable integrated audio video When connecting the cords be sure to match...

Page 5: ...Euro AV connector using the Euro AV connector plug Connect your PlayStation 2 console to the Euro AV connector SCART on the TV using the Euro AV connector plug and AV Cable integrated audio video making sure you match the colour coded plugs of the AV Cable to the matching jacks of the connector plug After connecting Set your TV to the appropriate video input mode Refer to the instruction manual of...

Page 6: ...G to On in the Audio Setup display Note Refer to the operating and setup instructions for the audio equipment to be connected DTS and DTS Digital Out are trademarks of Digital Theater Systems Inc Manufactured under license from Dolby Laboratories Dolby and the double D symbol are trademarks of Dolby Laboratories Confidential unpublished works 1992 1997 Dolby Laboratories All rights reserved Connec...

Page 7: ...m Configuration menu and output all DVD video software in Y Cb Pb Cr Pr The colour is disturbed when you set this item to RGB and play the DVD x Language Selects the language for the on screen display English French Spanish German Italian Dutch Portuguese Using the browser screen You can do the following operations using the browser screen Checking copying deleting game data on a Memory Card 8MB f...

Page 8: ...sc after screen 1 has appeared screen 2 or 3 will appear and you can start the game You can move to the System Configuration menu or the browser screen from screen 1 For details see Using the Main menu on page 7 When turning on the console with a disc already inserted Depending on the type of disc inserted screen 2 3 or 4 will appear If screen 4 appears it is possible that the inserted disc is not...

Page 9: ...ware Left analog stick right analog stick PlayStation format software Left analog stick right analog stick You can enjoy the vibration function Mode switching and the mode indicator The Analog Controller DUALSHOCK 2 and Analog Controller DUALSHOCK can be switched between digital mode and analog mode by pressing the ANALOG mode button Each time the ANALOG mode button is pressed the mode changes as ...

Page 10: ...ve or load game data in the browser screen For details on game data saving or loading refer to the software manual MEMORY CARD slot 2 MEMORY CARD slot 1 Playing an audio CD Playing an audio CD Press the A open button The disc tray opens Place a disc on the disc tray with the playback side facing down Press the A button The disc tray closes Select the audio CD icon in the browser screen page 7 then...

Page 11: ...int where you stopped the disc in step 1 To play from the beginning of the disc After step 1 select x Stop and press the button The point where you stopped playing is cleared Select N Play and press the button Notes Resume Play may not be available on some DVDs Depending on where you stopped the disc the console may resume playback from a slightly different point The point where you stopped playin...

Page 12: ...ing the DVD 5 Angle Options page 13 With DVDs on which various angles multi angles for a scene are recorded you can select among the various angles available 6 Subtitle Options page 13 With DVDs on which subtitles are recorded you can change the language whenever you want while playing the DVD and turn it on and off whenever you want 7 Go to Title page 14 You can select the number of the title you...

Page 13: ... recorded no subtitles appear Due to the programming on some DVDs you may not be able to turn the subtitles on even if they are recorded on the DVD Depending on the DVD you may not be able to turn the subtitles off The type and number of languages for subtitles vary from disc to disc Due to the programming on some DVDs you may not be able to change the subtitles even if multilingual subtitles are ...

Page 14: ... Use the number buttons to enter a 2 digit chapter number The player starts playback at the selected chapter Searching for a particular point on a disc You can locate a particular point on a disc quickly by monitoring the picture or playing back slowly Note Depending on the DVD you may not be able to do some of the operations described Locating a point quickly Search 1 While a disc is playing sele...

Page 15: ...ng off the unit with the MAIN POWER switch Please note that changes will not be saved if you reset or turn off the console without first ejecting the DVD 1 2 3 4 5 6 Setup display item list The default settings are underlined On Off Screen Setup page 16 DNR Off DNR1 DNR2 4 3 Letter Box 4 3 PAN SCAN 16 9 2 1 1 2 0 TV Type Display Outline Sharpening Dolby Digital Audio Digital Out DIGITAL OUT OPTICA...

Page 16: ...ch Please note that changes will not be saved if you reset or turn off the console without first ejecting the DVD Setting your TV display mode Screen Setup Screen Setup allows you to set various options for your TV display The default settings are underlined Select Screen Setup in the Setup display x TV Type Selects the aspect ratio of the TV to be connected You can change this setting only when t...

Page 17: ...ct the level you want using the directional buttons then press the button The lower the value the stricter the limitation To turn off the Parental Control function and play the DVD after entering your password Set Level to Off in step 7 then press the button To change the password 1 After step 3 select Change Password using the directional buttons then press the button The display for changing the...

Page 18: ...n MPEG decoder If the console is connected to audio equipment without a built in MPEG decoder do not turn this option on Otherwise when you play the MPEG sound track a loud noise or no sound will come out from the speakers possibly hurting your ears or damaging the speakers Off when the console is connected to audio equipment without a built in MPEG decoder x Audio Track Auto Select Mode Gives the...

Page 19: ...e video input on the TV or VCR Make sure the TV volume is set properly or mute is not selected on the TV Make sure the AV Cable integrated audio video is connected securely Make sure the inserted disc can be played with this console see page 3 Make sure the disc is placed with the label side facing up when using a disc with a label Make sure you have connected the console to the audio input connec...

Page 20: ...e language for the track is prohibited on the DVD The subtitle language cannot be changed Multilingual subtitles are not recorded on the DVD Changing the language for the subtitles is prohibited on the DVD The subtitles cannot be turned off Depending on the DVD you may not be able to turn the subtitles off The angles cannot be changed when you play a DVD Multi angles are not recorded on the DVD Ch...

Page 21: ...letely prohibited violent scenes are skipped or replaced with other scenes and so on Title page 13 The longest section of a movie or a music piece on a DVD a movie etc for a picture piece on video software or an album etc for a music piece on audio software Each title is assigned a title number enabling you to locate the title you want GUARANTEE Additional information GUARANTEE Thank you for buyin...

Page 22: ...22 ...

Page 23: ...23 GB ...

Page 24: ...e titles may not play or play differently on the PlayStation 2 computer entertainment system This is primarily due to design variations in PlayStation format software For further information on individual software titles please contact the appropriate PlayStation customer service helpline which can be found on the customer registration card within every PlayStation and PlayStation 2 format softwar...

Reviews: