background image

20 

(EN)

Advanced Operations

Charging batteries

You can charge two NP-520/F530/720/F730 rechargeable battery packs (not
supplied) for the viewer simultaneously.

Charging

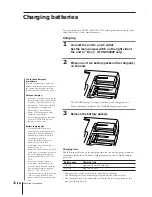
1

Connect the unit to an AC outlet.
Set the main power switch on the right side of
the unit to “I (on).”  (MPS-VS500P only)

2

Place one or two battery packs on the charger(s)
on the unit.

The CHARGE lamp(s) (orange) light(s) up and charging starts.

When charging is complete, the CHARGE lamp(s) go(es) out.

3

Remove the battery pack(s).

Charging time

The following table shows the charging time for two battery packs which are
completely discharged.  When charging is complete, the CHARGE lamp(s)
go(es) out.

Battery pack

Charging time

NP-520

Approx. 2 hours 30 minutes

NP-720

Approx. 5 hours

• Charging time varies according to the battery conditions.
• The charging time for one battery pack is about the same as above.
• The charging time is the same either when the unit is in operation or the

power of the unit is off.

To use the battery pack
immediately

You can use the battery pack even
before it is fully charged.  However,
the shorter the charging time, the
shorter the life of the battery pack.

Notes on charging

• When you use the battery pack for

the first time or after a long period
of disuse, the battery life may be
diminished.  The battery life will
be restored by charging and
discharging it several times.

• Remove the battery pack when

charging is completed.

• The remaining capacity indicator

on the NP-F530/F730 does not
function with this unit.

Battery charging tips

• A rechargeable battery does

not need to be discharged before
recharging. You can recharge a
half-charged battery. However,
a rechargeable battery
discharges little by little even
while it is not in use. We
recommend that you charge it
before every use.

• Keep a few spare battery packs. To

avoid a power shortage, prepare a
few extra rechargeable battery
packs, model NP-520/F530/720/
F730.

• For a longer battery life, we

recommend storing the battery
pack in a cool place and charging
it under temperatures ranging
from 10 - 30°C (50 - 86°F).

• When the battery pack is not to be

used for a long period of time,
remove the battery pack from the
unit.

Summary of Contents for MPS-VS500

Page 1: ...t d utiliser cet appareil lisez attentivement ce manuel et conservez le comme référence ultérieure Bedienungsanleitung Lesen Sie diese Anleitung vor Inbetriebnahme des Geräts bitte genau durch und bewahren Sie sie zum späteren Nachschlagen sorgfältig auf Picture MD Viewer Station 3 856 664 11 1 1996 by Sony Corporation MPS VS500 MPS VS500P LOGO ...

Page 2: ...ure For the Customers in the U S A This equipment has been tested and found to comply with the limits for a Class B digital device pursuant to Part 15 of the FCC Rules These limits are designed to provide reasonable protection against harmful interference in a residential installation This equipment generates uses and can radiate radio frequency energy and if not installed and used in accordance w...

Page 3: ...ther certificates of value is punishable by law Description of signal words WARNING Used for the critical situation which may possibly cause a death or serious injury if the situation is not avoided CAUTION Used for the critical situation which may possibly cause a slight injury or a medium degree of injury if the situation is not avoided This word is also used for the critical situation under whi...

Page 4: ...of recording are possible narration recording which enables you to record sound on each picture recorded on the Picture MD independently and BGM recording with which sound is recorded throughout one album p Disc copying from one viewer to the other is possible By mounting two viewers on the viewer station all of the data on a Picture MD disc can be duplicated from one viewer to the other As the co...

Page 5: ...BGM 12 Playing back sound 14 Listening to the narration of one picture 14 Listening to the BGM or narration during auto play 15 Erasing sound 17 Erasing the narration 17 Erasing the BGM 17 Advanced Operations Copying an MD 18 Charging batteries 20 Connecting optional equipment 21 For Your Information About the Picture MD 22 Precautions 23 Troubleshooting 24 Error messages 25 Specifications 26 Inde...

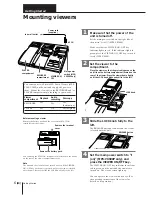
Page 6: ...FF Main power switch MPS VS500P only Power cord supplied AC IN to a wall outlet LOCK knob Place the viewer so that the protruding area on the unit fits on the battery compartment located on the rear of the viewer Press the viewer down lightly until the LOCK knob clicks and shifts to the left RELEASE button 1 Make sure that the power of the unit is turned off Set the main power switch on the right ...

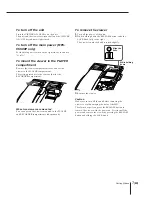
Page 7: ...sing the RELEASE button and sliding the LOCK knob To turn off the unit Press the VIEWER ON OFF key on the unit The unit and the viewers are turned off and the VIEWER ON OFF key indicator lights in red To turn off the main power MPS VS500P only Set the main power switch on the right side of the unit to O off To mount the viewer in the PLAYER compartment Remove the viewer compartment cover and set t...

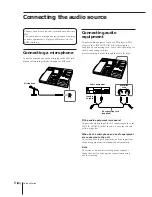
Page 8: ...plied AV connecting cord Leave the yellow plugs of the AV connecting cord free Stereo recording is made through the LINE IN jacks If the audio equipment is monaural Connect the white plug of the AV connecting cord to the LINE IN AUDIO L jack of the unit Leave the red and yellow plugs free When both a microphone and audio equipment are connected to the unit The microphone input has priority and the...

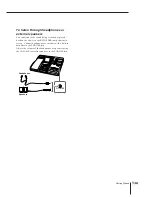
Page 9: ...sound being recorded or played back on the viewer in the RECORDER compartment in stereo Connect headphones or speakers with a built in amplifier to the PHONES jack Adjust the volume of the headphones or speakers using the VOLUME control located next to the PHONES jack PHONES Headphones Speakers ...

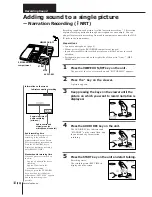
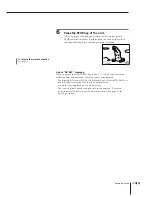
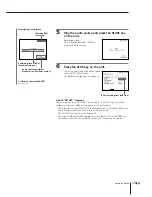
Page 10: ...onnect a microphone page 8 Mount a viewer in the RECORDER compartment page 6 Insert a Picture MD with recorded pictures on which you want to record narration Set the main power switch on the right side of the unit to I on MPS VS500P only 1 Press the VIEWER ON OFF key on the unit The power of the viewer is turned on and PICTURE MD appears 2 Press the key on the viewer A picture appears 3 Keep press...

Page 11: ...O REC key in step 4 NO REC appears in the following cases and narration recording cannot be performed The inserted disc is an MD DATA for playback only Hybrid MD DATA or audio MiniDisc that cannot be recorded with this unit A picture is not displayed on the whole screen The selected picture already contains recorded narration To record narration for this picture erase the current narration See pag...

Page 12: ...s on the viewer to select the number of the album on which you want to record BGM If necessary display the picture using the keys on the viewer then return the display to the AUTO PLAY screen by pressing the AUTO PLAY key 4 Press the AUDIO REC key on the unit The AUDIO REC key indicator and STANDBY on the screen flash and the unit stands by for BGM recording VIEWER ON OFF ZOOM AUTO PLAY START STOP...

Page 13: ...in step 4 NO REC appears in the following cases and BGM recording cannot be performed The inserted disc is an MD DATA for playback only Hybrid MD DATA or audio MiniDisc that cannot be recorded with this unit The AUTO PLAY screen is not displayed The selected album already contains recorded BGM To record BGM for this album erase the current BGM See page 17 for details on erasing Information on the ...

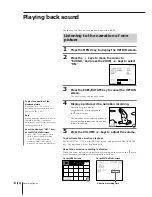
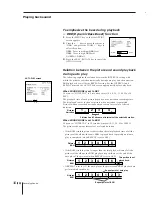
Page 14: ...tivate the narration playback Set SOUND to OFF on the OPTION screen and press the EXEC ROTATE key The narration will not be played back About the narration recording indication When you select a picture with narration recording on the viewer the mark or the narration recording time is displayed as follows On the INDEX screen On the PICTURE INFO screen Narration recording time To play the narration...

Page 15: ...ing auto play 6 Press the EXEC ROTATE key Auto play starts and the selected sound is played back The mark or the mark flashes during playback See page 16 for details on the relation between the picture and sound playback during auto play 7 Press the VOLUME keys to adjust the volume continued About the display of BGM item Only BGM is displayed when there is no BGM recording BGM XX XX BGM recording ...

Page 16: ...narration recording time The display advances to the next picture when narration is completed Pictures without recorded narration advance at an interval of a selected duration When SOUND MODE is set to BGM You can set INTERVAL to 10 seconds or more 10 15 20 25 or 30 SEC The pictures advance at intervals of a selected duration If the BGM recording time is shorter than the total playback time of all...

Page 17: ...he AUDIO ERASE key on the unit The AUDIO ERASE key indicator and STANDBY on the screen flash and the unit stands by for BGM erasing 3 Press the START key on the unit Erasing starts ERASE is displayed during erasing END appears after erasing finishes and the display returns to the AUTO PLAY screen The BGM recording time disappears and only BGM is displayed START AUDIO ERASE About NO ERASE message W...

Page 18: ...it stands by for disc copying PLAYER screen RECORDER screen 3 Press the START key on the unit Disc copying starts PLAYER screen RECORDER screen When copying finishes COMPLETE is displayed on both screens 4 Press any key on the unit to make COMPLETE disappear Advanced Operations START STOP DISC COPY VIEWER ON OFF Note An MD DATA for playback only Hybrid MD DATA or audio MiniDisc cannot be copied If...

Page 19: ... disc copying all the data stored in the MD will be erased To cancel disc copying and check the contents of the MD press the STOP key 3 To start disc copying press the START key again The previous data in the MD will be erased 4 Press any key on the unit to make COMPLETE disappear To cancel copying and replace the MD with another one Press the STOP key while STANDBY NO BLANK DISC or ALL ERASE is d...

Page 20: ...attery pack immediately You can use the battery pack even before it is fully charged However the shorter the charging time the shorter the life of the battery pack Notes on charging When you use the battery pack for the first time or after a long period of disuse the battery life may be diminished The battery life will be restored by charging and discharging it several times Remove the battery pac...

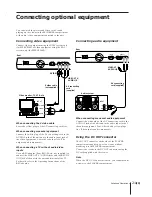
Page 21: ...Connect video equipment using the NTSC system only for MPS VS500 or video equipment using the PAL system only for MPS VS500P When connecting the S video cable Leave the yellow plugs of the AV connecting cord free When connecting monaural equipment Connect the white plug of the AV connecting cord to the AUDIO L jack of the unit and to the audio input jack of the video equipment Leave the red plugs ...

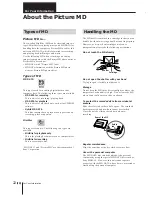
Page 22: ...t discs MiniDisc for recording This is a recordable disc MD DATA and Picture MD are the trademarks of Sony Corporation Shutter Cartridge Handling the MD The MD itself is contained in a cartridge so that you can handle it without worrying about dust and fingerprints However as dirty or bent cartridges may cause misoperation please take the following precautions Do not touch the MD directly Do not o...

Page 23: ...e the unit on surfaces rugs blankets etc or near materials curtains draperies that may block the fan on the rear of the unit Do not install the unit in a location near heat sources such as radiators or air ducts or in a place subject to direct sunlight excessive dust or humidity continuous mechanical vibration or shock If the unit is brought directly from a cold to a warm location moisture may con...

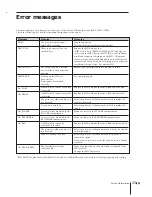
Page 24: ...d to strong noise during operation due to mechanical shock excessive static electricity irregular power supply from lightning etc If so restart the operation as follows 1 Disconnect all the power sources 2 Leave the unit for about 30 seconds 3 Connect the power source m Check if the unit was subjected to continuous vibration If so SYSTEM ERR message appears m Check if the unit was subjected to a t...

Page 25: ...ce the MD with another one which can be recorded Select the picture or album number on which you want to record the sound Select the picture or album number which does not contain the sound If you want to re record erase the sound which is already recorded When copying is done the data already contained in the MD is erased Change the MD if necessary Meaning The viewer is operating or internally pr...

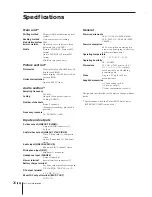
Page 26: ...o jack 1 composite video Audio Phono jack 2 2 channel stereo Audio input LINE IN AUDIO L R Phono jack 2 2 channel stereo Microphone input MIC Minijack 1 monaural Headphone input PHONES Stereo minijack 1 Viewer terminal Special interface connector 2 Battery charge terminal For Sony rechargeable battery pack NP 520 F530 720 F730 etc 2 DC output terminal 6 5 V DC 2 A 1 RF unit DC output terminal RFU ...

Page 27: ... DC OUT jack 21 LINE IN AUDIO L R jacks 8 AC IN connector 6 PLAYER compartment 6 7 RECORDER compartment 6 CHARGE indicators 20 Battery chargers 20 Main power switch 6 MPS VS500P only VIEWER ON OFF key and indicator 6 10 12 18 MIC jack 8 PHONES jack 9 VOLUME knob 9 AUDIO ERASE key and indicator 17 DISC COPY key and indicator 18 STOP key 11 13 AUDIO REC key and indicator 10 12 START key 10 13 RECORD...

Page 28: ... de manière à pouvoir le débrancher rapidement si nécessaire Description des signaux d avertissement AVERTISSEMENT Signal utilisé dans une situation critique susceptible d entraîner la mort ou des blessures graves si elle ne peut pas être évitée ATTENTION Signal utilisé dans une situation critique susceptible de provoquer des blessures légères ou des blessures moyennement graves si elle ne peut pa...

Page 29: ...ar des droits d auteur sans le consentement du détenteur de ces droits La possession de copies ou de répliques de monnaies pièces de monnaies de titres de timbres ou de cartes postales non oblitérés de timbres fiscaux et d autres certificats de valeur est punissable par la loi F ...

Page 30: ...pes d enregistrement sont possibles l enregistrement de commentaires qui vous permet d enregistrer du son indépendamment pour chaque photo enregistrée sur le Picture MD et l enregistrement BGM grâce auquel du son est enregistré tout au long de l album p Possibilité de copier un disque d un lecteur à l autre En installant les deux lecteurs sur le poste de lecteurs toutes les données du disque Pictu...

Page 31: ...eproduction du son 14 Ecoute des commentaires d une photo 14 Ecoute de la musique d arrière plan ou des commentaires pendant la lecture automatique 15 Suppression du son 17 Suppression des commentaires 17 Suppression de la musique en arrière plan 17 Opérations avancées Copie d un MD 18 Recharge des batteries 20 Raccordement d équipement en option 21 Pour votre information A propos du Picture MD 22...

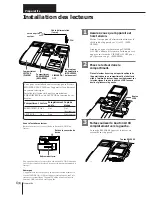
Page 32: ...la batterie Copie de disque Oui destination Oui source Lecture Oui Oui Enregistrement audio Oui Non Câble d alimentation fourni Compartiment LECTEUR PLAYER Compartiment ENREGISTREUR RECORDER VIEWER ON OFF AC IN vers une prise secteur Interrupteur d alimentation MPS VS500P uniquement Touche RELEASE Placez le lecteur de sorte que la partie saillante de l appareil s adapte au compartiment de la batte...

Page 33: ...mpartiment du lecteur et mettez le lecteur dans le compartiment LECTEUR La procédure d installation est la même que celle du compartiment ENREGISTREUR Lorsque deux lecteurs sont installés Vous pouvez faire fonctionner indépendamment les deux lecteurs installés dans les compartiments LECTEUR et ENREGISTREUR Pour retirer le lecteur 1 Mettez l appareil hors tension 2 Tout en maintenant la touche RELE...

Page 34: ...e du câble de connexion AV fourni Ne raccordez pas les fiches jaunes du câble de connexion AV L enregistrement stéréo se fait via les prises LINE IN Si l équipement audio est monaural Raccordez la fiche blanche du câble de connexion AV à la prise LINE IN AUDIO L de l appareil Ne raccordez pas les fiches rouge et jaune Lorsqu un microphone et un équipement audio sont tous deux raccordés à l apparei...

Page 35: ...ré ou reproduit sur le lecteur du compartiment ENREGISTREUR en stéréo Branchez les écouteurs ou les haut parleurs avec amplificateur intégré dans la prise PHONES Ajustez le volume des écouteurs ou des haut parleurs à l aide de la molette de réglage VOLUME située à côté de la prise PHONES PHONES Ecouteurs Haut parleurs ...

Page 36: ...témoin AUDIO REC et le message STANDBY se mettent à clignoter à l écran et l appareil est prêt pour l enregistrement des commentaires 5 Appuyez sur la touche START de l appareil et commencez à parler L enregistrement commence La durée d enregistrement REC TIME s affiche à l écran Enregistrement du son sur une seule photo Enregistrement de commentaires NRT Enregistrement du son VIEWER ON OFF START ...

Page 37: ...les cas suivants et l enregistrement de commentaires ne peut pas s effectuer Le disque inséré est un MD DATA pour lecture uniquement un MD DATA hybride ou un MiniDisc audio qui ne peut pas être enregistré avec cet appareil Une photo ne s affiche pas sur l écran tout entier La photo sélectionnée contient déjà des commentaires enregistrés Pour enregistrer les commentaires sur cette photo supprimez l...

Page 38: ...PLAY apparaît 3 Appuyez sur les touches ZOOM du lecteur pour sélectionner le numéro d album sur lequel vous désirez enregistrer de la musique en arrière plan Au besoin affichez la photo à l aide des touches du lecteur puis revenez à l écran d affichage AUTO PLAY en appuyant sur la touche AUTO PLAY 4 Appuyez sur la touche AUDIO REC de l appareil Le témoin AUDIO REC et le message STANDBY se mettent ...

Page 39: ...le message NO REC apparaît dans les cas suivants et l enregistrement de musique en arrière plan ne peut pas avoir lieu Le disque inséré est un MD DATA pour lecture uniquement un MD DATA hybride ou un MiniDisc audio qui ne peut pas être enregistré avec cet appareil L écran AUTO PLAY n est pas affiché L album sélectionné contient déjà de la musique en arrière plan Pour enregistrer une musique en arr...

Page 40: ...e des commentaires Mettez SOUND sur OFF sur l écran OPTION et appuyez sur la touche EXEC ROTATE Les commentaires ne seront pas lus A propos de l indication d enregistrement de commentaires Lorsque vous sélectionnez une photo avec enregistrement de commentaires sur le lecteur l indication ou la durée d enregistrement des commentaires apparaît comme suit Sur l écran d index Sur l écran PICTURE INFO ...

Page 41: ...angent pendant la lecture automatique 6 Appuyez sur la touche EXEC ROTATE La lecture automatique débute et le son sélectionné est reproduit L indication ou l indication clignote pendant la lecture Reportez vous à la page 16 pour plus de détails sur la relation entre la photo et la reproduction du son pendant la lecture automatique 7 Appuyez sur les touches VOLUME pour régler le volume du son Durée...

Page 42: ...oto dépend de la durée de l enregistrement des commentaires Lorsque les commentaires sont terminés une autre photo s affiche Les photos dépourvues de commentaires se succèdent selon l intervalle spécifié Lorsque SOUND MODE est mis sur BGM Vous pouvez mettre INTERVAL sur 10 secondes ou plus 10 15 20 25 ou 30 secondes Les photos se succèdent selon l intervalle spécifié Si la durée d enregistrement B...

Page 43: ...s l écran AUTO PLAY 2 Appuyez sur la touche AUDIO ERASE de l appareil Le témoin de la touche AUDIO ERASE et le message STANDBY clignotent à l écran et l appareil est prêt pour la suppression BGM 3 Appuyez sur la touche START de l appareil La suppression débute Le message ERASE s affiche pendant la suppression Le message END apparaît une fois que la suppression est terminée et l affichage revient à...

Page 44: ...l autre Préparatifs Mettez l appareil sous tension et installez les lecteurs dans les compartiments LECTEUR et ENREGISTREUR page 6 Insérez le MD source dans le lecteur du compartiment LECTEUR et le MD de destination dans le compartiment ENREGISTREUR Les lecteurs installés dans les compartiments LECTEUR et ENREGISTREUR sont appelés respectivement LECTEUR et ENREGISTREUR pour la suite Mettez l inter...

Page 45: ...nnées conservées sur le MD seront supprimées Pour annuler la copie de disque et vérifier le contenu du MD appuyez sur la touche STOP 3 Pour lancer la copie du disque appuyez de nouveau sur START Les données précédentes du MD seront supprimées 4 Appuyez sur n importe quelle touche de l appareil pour faire disparaître le message COMPLETE Pour annuler la copie et remplacer le MD par un autre Appuyez ...

Page 46: ...rsqu elle n est pas entièrement rechargée Sachez simplement que plus la durée de charge est courte plus la durée de vie de la batterie est courte A propos de la recharge Lorsque vous utilisez la batterie pour la première fois ou après une longue période d inutilisation il est possible que l autonomie de la batterie soit réduite L autonomie de la batterie atteindra son niveau normal lorsqu elle aur...

Page 47: ...ar le lecteur du compartiment ENREGISTREUR à l aide d un équipement audio vidéo raccordé à l appareil Raccordement d un équipement vidéo Connectez l équipement vidéo à l aide du système NTSC uniquement pour le modèle MPS VS500 ou l équipement vidéo à l aide du système PAL uniquement pour le modèleMPS VS500P Lorsque vous raccordez un câble S vidéo Ne raccordez pas les fiches jaunes du câble de conn...

Page 48: ...c pour l enregistrement Il s agit d un disque enregistrable MD DATA et Picture MD sont des marques déposées de Sony Corporation Manipulation du MD Le MD lui même est intégré dans une cartouche vous permettant de le manipuler sans vous soucier des particules de poussière et des traces de doigt Cependant étant donné que la saleté et les cartouches pliées peuvent provoquer un mauvais fonctionnement v...

Page 49: ...s telles que les rideaux draperies car cela pourrait obstruer les ouïes de ventilation Evitez de placer l appareil dans un endroit exposé à des sources de chaleur telles que les radiateurs ou les conduits d air chaud ou dans un endroit exposé à la lumière directe du soleil à une humidité excessive ou à la poussière à des vibrations et chocs mécaniques Si vous transportez l appareil d un endroit fr...

Page 50: ... mécaniques à un excès d électricité statique à un courant électrique irrégulier dû à la foudre etc Si c est le cas recommencez l opération comme suit 1 Déconnectez toutes les sources d alimentation 2 Ne touchez pas à l appareil pendant 30 secondes 3 Rebranchez la source d alimentation m Vérifiez si l appareil a été soumis à des vibrations continues Si c est le cas le message SYSTEM ERR apparaît m...

Page 51: ...PY NO ERASE NO PLAYER NO RECORDER NO REC NO BLANK DISC Remèdes Arrêtez toute opération Attendez que le traitement interne soit terminé Remplacez le MD par un autre Les messages DISC FULL et REMAIN TIME 00 00 peuvent apparaître même si la barre DISC dans l écran OPTION indique une capacité résiduelle suffisante sur le MD Cela signifie que de nombreux fragments non enregistrés du MD sont trop petits...

Page 52: ...io Prises phono 2 2 canaux stéréo Entrée audio LINE IN AUDIO L R Prises phono 2 2 canaux stéréo Entrée microphone MIC Miniprise 1 monaural Entrée écouteur PHONES Miniprise stéréo 1 Borne du lecteur Connecteur d interface spécial 2 Borne de recharge de la batterie Pour batterie rechargeable Sony NP 520 F530 720 F730 etc 2 Borne de sortie DC 6 5 V CC 2 A 1 Unité RF à broche de sortie DC RFU DC OUT 5...

Page 53: ...Compartiment ENREGISTREUR RECORDER 6 Touche et témoin AUDIO ERASE 17 Touche et témoin DISC COPY 18 Touche STOP 11 13 Touche et témoin AUDIO REC 10 12 Touche START 10 13 Prises LINE IN AUDIO L R 8 Connecteur AC IN 6 Bouton LOCK du compartiment ENREGISTREUR et touche RELEASE 6 Bouton LOCK du compartiment LECTEUR et touche RELEASE 6 Connecteur DC OUT 21 Témoins CHARGE 20 Chargeurs de batterie 20 Inte...

Page 54: ... Überlassen Sie Wartungsarbeiten stets nur qualifiziertem Fachpersonal Achtung Dieses Gerät sollte nur an eine leicht zugängliche Steckdose angeschlossen werden so daß der Stecker bei Bedarf schnell abgezogen werden kann Für Kunden in Deutschland Dieses Produkt kann im kommerziellen und in begrenztem Maße auch im Industriellen Bereich eingesetzt werden Dieses Gerät ist nach den Vorschriften der Kl...

Page 55: ... wenn Sie die entsprechenden Sicherheitsvorkehrungen nicht beachten Weist außerdem auf eine Situation hin in der es zu Sachschäden kommen kann Hinweis Das Kopieren oder Duplizieren urheberrechtlich geschützten Materials ist ohne die Erlaubnis des Urheberrechtseigentümers untersagt Der Besitz von Kopien oder Duplikaten von Geldscheinen und anderen gesetzlichen Zahlungsmitteln Wertpapieren nicht ent...

Page 56: ...naufnahmefunktionen stehen Ihnen zur Wahl Sie können einzelne Bilder mit einem Kommentar unterlegen wobei Sie zu jeweils einem Bild auf einer Bild MD den gewünschten Ton aufzeichnen NRT Funktion Oder Sie können ein ganzes Album mit einer zusammenhängenden Hintergrundmusik unterlegen BGM Funktion p Kopieren von einem Bild MD Foto Player auf den anderen Wenn Sie an die Player Station zwei Bild MD Fo...

Page 57: ...14 Wiedergeben des Kommentars zu einem Bild 14 Wiedergeben von Hintergrundmusik oder Kommentaren mit Auto Play 15 Löschen von Tonaufnahmen 17 Löschen eines Kommentars 17 Löschen von Hintergrundmusik 17 Weitere Funktionen Kopieren einer MD 18 Laden der Akkus 20 Anschließen weiterer Geräte 21 Zu Ihrer Information Erläuterungen zur Bild MD 22 Sicherheitsmaßnahmen 23 Störungsbehebung 24 Fehlermeldunge...

Page 58: ...der Player an die Station angeschlossen und mit dem Knopf LOCK gesichert ist Achten Sie daher darauf den Knopf LOCK ganz nach links zu schieben Nehmen Sie die Abdeckung über dem Stationsanschluß ab Anschlußfläche RECORDER für das Aufnahmegerät Anschlußfläche PLAYER für das Wiedergabe Zuspielgerät zur Netzsteckdose Netzschalter nur MPS VS500P AC IN Netzkabel mitgeliefert Knopf LOCK Richten Sie den ...

Page 59: ...chselt von rot zu grün und Station und Player schalten sich ein Der Bildschirm des Players leuchtet auf Nun können Sie den Player über seine Bedienelemente steuern Näheres dazu finden Sie in der Bedienungsanleitung zum Bild MD Foto Player So schalten Sie die Geräte aus Drücken Sie die Taste VIEWER ON OFF an der Station Station und Player schalten sich aus und die Anzeige der Taste VIEWER ON OFF le...

Page 60: ...Verbindungskabel an die Buchsen LINE IN AUDIO L R anschließen Schließen Sie die gelben Stecker des AV Verbindungskabels bitte nicht an Eine Tonaufnahme über die Buchsen LINE IN erfolgt in Stereo Wenn das Audiogerät ein Monogerät ist Verbinden Sie nur den weißen Stecker des AV Verbindungskabels mit der Buchse LINE IN AUDIO L der Station Schließen Sie die roten und gelben Stecker bitte nicht an Wenn...

Page 61: ...ßfläche RECORDER aufgezeichnet oder wiedergegeben wird in Stereo wiedergeben lassen Schließen Sie dazu Kopfhörer oder Lautsprecher mit eingebautem Verstärker an die Buchse PHONES an Die Lautstärke von Kopfhörern oder Lautsprechern können Sie mit dem Regler VOLUME neben der Buchse PHONES einstellen PHONES Kopfhörer Lautsprecher ...

Page 62: ...as Sie an die Buchsen LINE IN anschließen Vorbereitungen Schließen Sie ein Mikrofon an Seite 8 Bringen Sie einen Player an der Anschlußfläche RECORDER an Seite 6 Legen Sie eine Bild MD mit Bildaufnahmen ein zu denen Sie einen Kommentar aufnehmen wollen Stellen Sie beim MPS VS500P den Netzschalter an der rechten Seite des Geräts auf I ein 1 Drücken Sie die Taste VIEWER ON OFF an der Station Der Pla...

Page 63: ...en erscheint in folgenden Fällen die Anzeige NO REC und eine Kommentaraufnahme ist nicht möglich Bei der eingelegten MD handelt es sich um eine bespielt gekaufte MD DATA die Sie nur abspielen können um eine Hybrid MD DATA oder um eine Ton MD die mit dieser Station nicht bespielt werden kann Bei dem angezeigten Bild handelt es sich nicht um ein Einzelbild das den gesamten Bildschirm füllt Das ausge...

Page 64: ... an der Station Der Player schaltet sich ein und PICTURE MD erscheint 2 Drücken Sie die Taste AUTO PLAY am Player Die Anzeige AUTO PLAY erscheint 3 Wählen Sie mit den Tasten ZOOM am Player die Nummer des Albums das Sie mit Hintergrundmusik unterlegen wollen Wenn nötig rufen Sie das gewünschte Bild mit Hilfe der Tasten am Player auf und schalten Sie mit der Taste AUTO PLAY dann wieder zur Anzeige A...

Page 65: ...NO REC und eine Hintergrundmusikaufnahme ist nicht möglich Bei der eingelegten MD handelt es sich um eine bespielt gekaufte MD DATA die Sie nur abspielen können um eine Hybrid MD DATA oder um eine Ton MD die mit dieser Station nicht bespielt werden kann Der Bildschirm AUTO PLAY wird nicht angezeigt Das ausgewählte Album ist bereits mit Hintergrundmusik unterlegt Wenn Sie ein solches Bild mit einer...

Page 66: ... Sie die Option SOUND auf dem Bildschirm OPTION auf OFF und drücken Sie die Taste EXEC ROTATE Nun wird der Kommentar nicht mehr wiedergegeben Hinweis zur Kommentaranzeige Wenn Sie mit dem Bild MD Player ein Bild mit unterlegtem Kommentar auswählen werden das Zeichen Kommentaranzeige und die Dauer des Kommentars folgendermaßen angezeigt Auf dem Bildschirm INDEX Auf dem Bildschirm PICTURE INFO So la...

Page 67: ...gezeigt wird 6 Drücken Sie die Taste EXEC ROTATE Auto Play beginnt und der ausge wählte Ton wird wiedergegeben Während der Wiedergabe blinkt oder Näheres über den Zusammenhang zwischen Bild und Tonwiedergabe im Modus Auto Play finden Sie auf Seite 16 7 Stellen Sie mit VOLUME die Lautstärke ein Fortsetzung Hinweis zur Anzeige BGM BGM allein wird angezeigt wenn das betreffende Bild nicht mit Hinterg...

Page 68: ...ange ein Bild angezeigt wird hängt davon ab wie lange der Kommentar dauert Ist der Kommentar beendet erscheint das nächste Bild Bilder ohne Kommentar werden so lange angezeigt wie unter INTERVAL angegeben Wenn SOUND MODE auf BGM gesetzt ist Sie können INTERVAL auf 10 oder mehr Sekunden einstellen Die Werte 10 15 20 25 oder 30 SEC stehen zur Verfügung Die Bilder werden so lange angezeigt wie unter ...

Page 69: ...Anzeige der Taste AUDIO ERASE und die Anzeige STANDBY auf dem Bildschirm blinken Das Gerät ist zum Löschen der Hintergrundmusik bereit 3 Drücken Sie die Taste START an der Station Der Löschvorgang beginnt Während die Hintergrundmusik gelöscht wird erscheint ERASE Wenn die Hintergrundmusik gelöscht ist erscheint END und der Bildschirm AUDIO PLAY ist wieder zu sehen Die Dauer der Hintergrundmusik wi...

Page 70: ...sind zum Kopieren bereit Bildschirm des Zuspielgeräts Bildschirm des Aufnahmegeräts 3 Drücken Sie die Taste START an der Station Der Kopiervorgang beginnt Bildschirm des Zuspielgeräts Bildschirm des Aufnahmegeräts Ist der Kopiervorgang beendet erscheint auf beiden Bildschirmen COMPLETE 4 Drücken Sie eine beliebige Taste an der Station so daß COMPLETE wieder ausgeblendet wird Weitere Funktionen STA...

Page 71: ... Sie den Kopiervorgang nicht starten und den Inhalt der Ziel MD noch einmal überprüfen drücken Sie die Taste STOP 3 Wollen Sie den Kopiervorgang starten drücken Sie die Taste START nochmals Die Daten die zuvor auf der Ziel MD gespeichert waren werden überschrieben 4 Drücken Sie eine beliebige Taste an der Station so daß COMPLETE wieder ausgeblendet wird So brechen Sie den Kopiervorgang ab und taus...

Page 72: ...eit benutzen Sie können einen Akku auch schon benutzen bevor er voll aufgeladen ist Je kürzer jedoch die Ladedauer um so kürzer ist auch die Betriebsdauer eines Akku Hinweise zum Laden Wenn Sie einen Akku zum ersten Mal überhaupt oder nach einer langen Lagerzeit zum ersten Mal wieder benutzen fällt seine Betriebsdauer kürzer aus Soll er wieder seine normale Betriebsdauer erreichen müssen Sie ihn m...

Page 73: ...T V AUDIO und die Buchse RFU DC OUT an der Station über einen TV Adapter Sony RFU 89 usw nicht mitgeliefert mit dem Antennenanschluß des Fernsehgeräts Näheres dazu finden Sie in der Bedienungsanleitung zum TV Adapter Anschließen von Audiogeräten Wenn Sie ein Mono Audiogerät anschließen Verbinden Sie den weißen Stecker des AV Verbindungskabels mit der Buchse AUDIO L der Station und dem Audioeingang...

Page 74: ... MiniDisc Typ können Sie selbst etwas aufnehmen MD DATA und Picture MD sind Warenzeichen der Sony Corporation Umgang mit der MD Die MD selbst befindet sich in einer Cartridge also einem Kunststoffgehäuse so daß Sie mit ihr arbeiten können ohne daß Staub und Fingerabdrücke auf die MD selbst gelangen Allerdings kann es bei verschmutzten oder verbogenen Cartridges ebenfalls zu Fehlfunktionen kommen B...

Page 75: ...ie es von qualifiziertem Fachpersonal überprüfen bevor Sie es wieder benutzen Wollen Sie das Gerät einige Tage oder länger nicht benutzen ziehen Sie den Netzstecker aus der Steckdose Ziehen Sie dabei immer am Stecker niemals am Kabel Aufstellung Achten Sie auf ausreichende Luftzufuhr damit sich im Gerät kein Wärmestau bildet Stellen Sie das Gerät nicht auf Oberflächen wie Teppichen oder Decken ode...

Page 76: ...örungen ausgesetzt war zum Beispiel mechanischen Erschütterungen starker statischer Aufladung Schwankungen in der Stromversorgung z B wegen eines Blitzschlags usw Wenn ja gehen Sie folgendermaßen vor 1 Trennen Sie es von allen Stromquellen 2 Lassen Sie es etwa 30 Sekunden lang stehen 3 Schließen Sie es wieder an die Stromversorgung an m Überprüfen Sie ob das Gerät ständigen Vibrationen ausgesetzt ...

Page 77: ... Warten Sie mit weiteren Bedienschritten bis das Gerät die Verarbeitung beendet hat Tauschen Sie die MD aus DISC FULL und REMAIN TIME 00 00 können auch dann schon erscheinen wenn der Balken DISC auf dem Bildschirm OPTION noch ausreichend Platz auf der MD anzeigt Das kann darauf hinweisen daß sich auf der MD unbespielte Bereiche befinden die für eine Tonaufnahme zu stark fragmentiert zu klein sind ...

Page 78: ...buchsen 2 2 Kanäle stereo Audioeingang LIINE IN AUDIO L R Cinchbuchsen 2 2 Kanäle stereo Mikrofoneingang MIC Minibuchse 1 monaural Kopfhörereingang PHONES Stereominibuchse 1 Player Anschluß Spezialschnittstellenanschlüsse 2 Akkuladefläche Für Sony Akkus NP 520 F530 720 F730 usw 2 Gleichstromausgang DC OUT 6 5 V Gleichstrom 2 A 1 Gleichstromausgang für TV Adapter RFU DC OUT 5 V Gleichstrom 1 Allgem...

Page 79: ...n LINE IN AUDIO L R 8 Netzanschluß AC IN 6 Anschlußfläche PLAYER 6 7 Anschlußfläche RECORDER 6 Taste und Anzeige AUDIO ERASE 17 Taste und Anzeige DISC COPY 18 Taste STOP 11 13 Taste und Anzeige AUDIO REC 10 12 Taste START 10 13 Knopf LOCK und Taste RELEASE an der Anschlußfläche RECORDER 6 Knopf LOCK und Taste RELEASE an der Anschlußfläche PLAYER 6 Gleichstromausgang DC OUT 21 Ladeanzeigen CHARGE 2...

Page 80: ...Sony Corporation Printed in Japan ...

Reviews: