background image

4

Before You Start the
Hookup

Checking the supplied accessories

This MD deck comes with the following items:
• Audio connecting cords (2)
• Optical cable (1)
• Remote commander (remote) RM-D29M (1)
• R6 (size-AA) batteries (2)

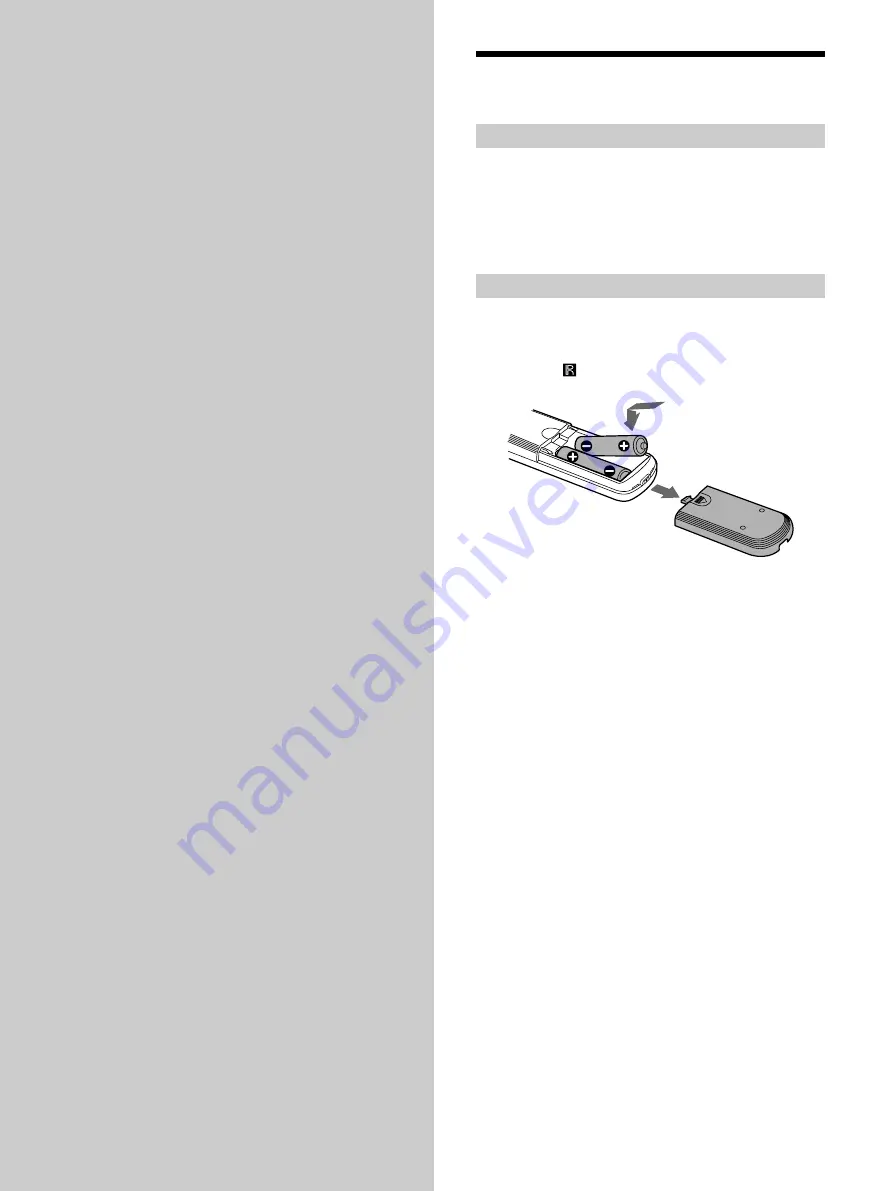
Inserting batteries into the remote

Insert two R6 (size-AA) batteries with the + and –
properly oriented to the markings into the battery
compartment.  When using the remote, point it at the
remote sensor   on the deck.

z

When to replace the batteries

Under normal conditions, the batteries should last for about six
months.  When the remote no longer operates the deck, replace
both batteries with new ones.

Notes

• Do not leave the remote in an extremely hot or humid place.
• Do not drop any foreign object into the remote casing,

particularly when replacing the batteries.

• Do not use a new battery with an old one.
• Do not expose the remote sensor to direct sunlight or lighting

apparatus.  Doing so may cause a malfunction.

• If you don’t use the remote for an extended period of time,

remove the batteries to avoid possible damage from battery
leakage and corrosion.

Getting
Started

This chapter provides information on
the supplied accessories, things you
should keep in mind while hooking
up the system, and how to connect
various audio components to the MD
deck.  Be sure to read this chapter
thoroughly before you actually
connect anything to the deck.

Summary of Contents for MDS-M100 - Md Player

Page 1: ...3 866 678 11 1 MiniDisc Deck Operating Instructions 1999 by Sony Corporation MDS M100 ...

Page 2: ...sion reception which can be determined by turning the equipment off and on the user is encouraged to try to correct the interference by one or more of the following measures Reorient or relocate the receiving antenna Increase the separation between the equipment and receiver Connect the equipment into an outlet on a circuit different from that to which the receiver is connected Consult the dealer ...

Page 3: ...nchro recording With a Sony CD Player CD Synchro recording 19 Playing MDs 21 Playing an MD 21 Playing a Specific Track 22 Locating a Particular Point in a Track 23 Playing Tracks Repeatedly 23 Playing Tracks in Random Order Shuffle Play 24 Creating Your Own Program Program Play 25 Tips for Recording From MDs to Tape 26 Editing Recorded MDs 28 Erasing Tracks 29 Dividing Tracks 31 Combining Tracks 3...

Page 4: ...lace both batteries with new ones Notes Do not leave the remote in an extremely hot or humid place Do not drop any foreign object into the remote casing particularly when replacing the batteries Do not use a new battery with an old one Do not expose the remote sensor to direct sunlight or lighting apparatus Doing so may cause a malfunction If you don t use the remote for an extended period of time...

Page 5: ... in until they click into place Do not bend or tie the optical cable White L White L Red R Red R Things you should keep in mind while hooking up the system Turn off the power to all components before making any connections Do not connect any AC power cord until all the connections are completed Be sure the connections are firm to prevent hum and noise Jacks connectors for connecting audio componen...

Page 6: ...e voltage of the local power supply If not use a screwdriver to change it to the correct position before connecting the AC power cord to a wall outlet 110 120V 220 240V VOLTAGE SELECTOR Connecting the AC power cord Connect the AC power cord of the deck to a wall outlet Note Do not connect the AC power cord to a switched outlet Hooking Up the Audio Components ...

Page 7: ...7 Getting Started ...

Page 8: ...ck turns off and the indicator lights up red 2 SCROLL button 12 Press to scroll the name of a track or MD 3 LEVEL DISPLAY CHAR button 12 16 25 33 Press during recording or recording pause to adjust the recording level Press when the deck is stopped to display disc information or the contents of a program Press during recording to display information on the track being recorded Press during play to...

Page 9: ...lay qa x button 15 21 29 Press to stop play stop recording or cancel the selected operation qs z REC button 15 17 Press to record on the MD monitor the input signal or mark track numbers qd INPUT switch 14 Use to select the input jack or connector of the program source to be recorded qf X button 15 21 Press to pause play or recording Press again to resume play or recording qg AMS control 14 16 21 ...

Page 10: ...ter number buttons 22 34 Press to enter a track number directly or input letters or numbers 6 MUSIC SYNC button 19 Press to start Music Synchro recording 7 CD SYNC STOP button 20 Press to stop CD Synchro recording CD SYNC START button 19 Press to start CD Synchro recording CD SYNC STANDBY button 19 Press to enter standby for CD Synchro recording 8 CD PLAYER X button 20 Press to pause the CD play P...

Page 11: ... to display Edit Menu or Setup Menu YES button 14 25 29 38 Press to carry out the selected operation ws Z button 15 21 Press to eject the MD Using the Display The display window shows information about the MD or track This section describes the information that appears for each deck status LEVEL DISPLAY CHAR H M m 1 A x X z Note The type of information e g total number of tracks recorded time rema...

Page 12: ...maining recordable time on the MD recordable MDs only Press Using the Display Track number and recorded time of the current track default display Disc name Press While the deck is playing Press LEVEL DISPLAY CHAR or DISPLAY repeatedly to change the display Each press of the button changes the display as follows 2 3 m 3 3 s D I A R Y 2 1 m 2 5 s When the track has no name No Name appears followed b...

Page 13: ...The MD deck uses the Serial Copy Management System MDs recorded through the digital input connector can t be copied to other MDs or DAT tapes through the digital output connector For details see Guide to the Serial Copy Management System on page 14 When TRACK flashes in the display The MD deck is recording over existing track s Recording on an MD on page 14 The indication stops flashing when the d...

Page 14: ... analog sound program for example an analog record or a music cassette tape or from a digital satellite broadcast program but you can t make a second copy from the first generation copy A first generation copy means the first recording of a digital audio source through the deck s digital input connector For example if you record from a CD player connected to the DIGITAL IN connector that copy is a...

Page 15: ...cording x Pause recording X Resume recording after pausing H or X Eject the MD EJECT A after stopping recording When you pause recording The track number increases by one For example if you paused recording while recording track 4 the track number will be 5 when you resume recording Bottom side of the MD To prevent accidental erasure of the recorded material To make it impossible to record on an M...

Page 16: ... to select P Hold On then press AMS or YES 4 Press MENU NO To turn Peak Hold off repeat the procedure above selecting P Hold Off in step 3 Recording Tips YES EJECT A z REC AMS INPUT MENU NO LEVEL DISPLAY CHAR H M m 1 A x X z Checking the remaining recordable time on the MD Press LEVEL DISPLAY CHAR or DISPLAY repeatedly While the deck is The following information appears Stopped Total number of tra...

Page 17: ...blank space occurs in the middle of a track Auto Cut is automatically turned on or off in tandem with Smart Space If you turn off the deck or disconnect the AC power cord the deck will store the last setting S Space On or S Space Off and apply it the next time you turn on the deck Marking Track Numbers While Recording Track Marking You can mark track numbers either manually or automatically while ...

Page 18: ...put signal changes regardless of the track marking parameter setting T Mark LSync or T Mark Off z You can mark track numbers even after recording has finished See Dividing Tracks on page 31 Note If you turn off the deck or disconnect the AC power cord the deck will store the last settings T Mark LSync or T Mark Off and the trigger level and apply them the next time you turn on the deck Starting Re...

Page 19: ...e As the same remote operates both the MD deck and the CD player or CD player section of the component system make sure to place the MD deck and the CD player as close together as possible Note On some CD players and Hi Fi component systems you may find it impossible to perform CD Synchro recording using the deck s remote In this case use Music Synchro recording this page to record from CDs to the...

Page 20: ...en selected page 17 When you resume recording after recording pause a new track number is automatically marked regardless of the track marking parameter setting T Mark LSync or T Mark Off z You can change CDs during CD Synchro recording 1 Press x on the CD player s remote 2 Change the CD 3 Press H on the CD player s remote Recording resumes z You can also perform synchro recording with a Sony vide...

Page 21: ...turn AMS or press repeatedly to locate the track you want to start playing from If you want to play from the first track go to step 5 5 Press H The deck starts to play 6 Adjust the volume on the amplifier Operations you may want to do during play To Press or turn Stop play x Pause play X Resume play after pausing H or X Locate a succeeding track AMS clockwise or press repeatedly Locate the beginni...

Page 22: ...f you enter a track number while the deck is paused The deck will still be paused at the beginning of the track Number buttons Automatic Music Sensor z To locate the last track of the MD quickly While the deck is stopped turn AMS counterclockwise or press once z If you locate a track while the deck is stopped or paused The deck will still be stopped or paused at the beginning of the located track ...

Page 23: ...rclockwise or press or press m to go back Playing Tracks Repeatedly You can play an entire MD repeatedly This function can be used with Shuffle Play to repeat all the tracks in random order page 24 or with Program Play to repeat all the tracks in the program page 25 You can also repeat a specific track or portion within a track REPEAT AyB M REPEAT m M z x X H Z 1 X 1 Note If you turn off the deck ...

Page 24: ...sume normal play Press REPEAT repeatedly until Repeat Off appears in the display Repeating a specific portion within a track Repeat A B Play Z You can specify one portion within a track to be played repeatedly Note that the portion that you specify must be within the boundaries of a single track 1 While the deck is playing press AyB at the starting point point A of the portion to be played repeate...

Page 25: ...e 10 For details see page 22 To check the total playing time of the program Press LEVEL DISPLAY CHAR or DISPLAY 4 Repeat step 3 to enter other tracks 5 Press YES Complete appears and the program is completed 6 Press PLAY MODE repeatedly until PROGRAM lights up in the display 7 Press H Program Play starts To stop Program Play Press x To resume normal play Press PLAY MODE repeatedly until PROGRAM tu...

Page 26: ...on containing multiple track numbers for example a medley or symphony blank spaces will be created on the tape in between the various sections If you turn off the deck or disconnect the AC power cord the deck will store the last setting Auto Space or Auto Off and recall it the next time you turn on the deck Erase a track Press m M repeatedly until the number of the unwanted track flashes then pres...

Page 27: ...Turn AMS or press repeatedly until Auto appears then press AMS or YES 3 Turn AMS or press repeatedly to select the setting then press AMS or YES To Select Turn on Auto Pause Auto Pause Turn off Auto Pause Auto Off factory setting 4 Press MENU NO To resume play after pausing Press H Note If you turn off the deck or disconnect the AC power cord the deck will store the last setting Auto Pause or Auto...

Page 28: ...k is stopped playing or paused press to edit tracks While editing press to cancel editing AMS control Turn to select an editing operation or track number then press to enter your selection You can also use the control to specify points in a track for erasure or track division YES button Press this button instead of the AMS control to enter a selection m M buttons Press to specify the unit minute s...

Page 29: ...D 1 2 3 4 AAA CCC DDD 1 2 3 When you erase a track all the tracks after the one erased are automatically renumbered For example if you erase track number 2 the previous track number 3 becomes track number 2 and the previous track number 4 becomes track number 3 and so on 1 While the deck is stopped playing or paused press MENU NO Edit Menu appears in the display 2 Turn AMS or press repeatedly unti...

Page 30: ... the sound turn AMS or press repeatedly to locate the starting point of the portion to be erased point A The time indication m minute s second and f frame 1 86 second of the current point is displayed and several seconds of the track from that point play back repeatedly To find a point quickly Specify a unit minute second or frame by which the MD is advanced when you turn AMS or press repeatedly T...

Page 31: ...it minute second or frame by which the MD is advanced when you turn AMS or press repeatedly To do this press m M in step 4 repeatedly to select m s or f The selected unit flashes in the display 5 Repeat step 4 until you ve located the dividing point 6 Press AMS or YES Complete appears for a few seconds and the track is divided The deck starts to play the newly created track Note that new track has...

Page 32: ...the number of the second track of the two to be combined appears then press AMS or YES Complete appears for a few seconds and the tracks are combined The deck starts to play the combined track To cancel the operation Press MENU NO or x z You can undo the combination For details see Undoing the Last Edit on page 36 Note If Impossible appears in the display the tracks can t be combined because repea...

Page 33: ... name Press while the deck is A track or the MD Stopped playing or paused The track being recorded Recording the track Edit Menu appears in the display 2 Turn AMS until Name appears then press AMS or YES While the deck is recording a flashing cursor appears in the display and you can enter a name for the track being recorded In this case go to step 6 3 Turn AMS until Nm In appears then press AMS o...

Page 34: ...selected uppercase or lowercase letters 1 Press the corresponding letter number button repeatedly until the character to be entered flashes Or press the button once and press repeatedly 2 Press M The flashing character is entered and lights continuously and the cursor shifts to the right If you ve selected numbers Press the corresponding number button The number is entered and the cursor shifts to...

Page 35: ... function to erase the name of a track or disc 1 While the deck is stopped playing recording or paused press MENU NO Edit Menu appears in the display 2 Turn AMS or press repeatedly until Name appears then press AMS or YES 3 Turn AMS or press repeatedly until Nm Erase appears then press AMS or YES 4 Turn AMS or press repeatedly until the number of the track when erasing the track name or Disc when ...

Page 36: ...appears in the display 2 Turn AMS or press repeatedly until Undo appears Undo doesn t appear if no editing has been done 3 Press AMS or YES One of the following messages appears depending on the last edit operation Last edit operation Message Erasing a track Erasing all the tracks on an MD Erase Undo Erasing a portion of a track Dividing a track Divide Undo Combining tracks CombineUndo Moving a tr...

Page 37: ...nal level at the end of recording MENU NO YES FADER m M z x X H Z 1 X Note Fade in Recording and Fade out Recording have no effect during digital recording Fade in Play and Fade in Recording During play pause for Fade in Play or recording pause for Fade in Recording press FADER b flashes in the display and the deck performs Fade in Play or Fade in Recording for five seconds until the counter reach...

Page 38: ... MENU NO twice Setup Menu appears in the display 2 Turn AMS or press repeatedly until Sleep appears in the display then press AMS or YES 3 Turn AMS or press repeatedly to select the setting then press AMS or YES To Select Turn on Sleep Timer Sleep On Turn off Sleep Timer Sleep Off factory setting 4 Press MENU NO To turn off Sleep Timer Repeat the procedure above selecting Sleep Off in step 3 ...

Page 39: ...AC power cord must be changed only at the qualified service shop On condensation in the deck If the deck is brought directly from a cold to a warm location or is placed in a very damp room moisture may condense on the lenses inside the deck Should this occur the deck may not operate properly In this case remove the MD and leave the deck turned on for about an hour until the moisture evaporates On ...

Page 40: ...even after erasing numerous short tracks Tracks under 12 seconds in length are not counted and so erasing them may not lead to an increase in the recording time The total recorded time and the remaining recordable time on the MD may not total the maximum recording time 60 or 74 minutes Recording is done in minimum units of 2 seconds each no matter how short the material The contents recorded may t...

Page 41: ...with another recordable MD with fewer recorded tracks or erase unnecessary tracks There has been a power failure or the AC power cord has been disconnected during recording Data recorded to that point may be lost Repeat the recording procedure The deck does not perform Synchro recording with a CD player or video CD player The remote supplied with the MD deck is not set correctly Reset the remote A...

Page 42: ...isc A new blank or erased MD has been inserted Cannot Copy An attempt was made to make a second copy from a digitally dubbed MD page 14 Cannot Edit An attempt was made to edit the MD during Program or Shuffle Play Or the MD is record protected Disc Full The MD is full page 40 Impossible The deck cannot do the specified operation Initialize flashing The Setup Menu settings have been lost Name Full ...

Page 43: ... status of the deck Menu item Sub item Function Reference page s Tr Erase Erases a track 29 All Erase Erases all the tracks on an MD 30 A B Erase Erases a portion of a track 30 Divide Divides a track 31 Combine Combines tracks 32 Move Moves a track 32 Name Nm In Names a track or an MD 33 Nm Copy Copies a name to a track or an MD 34 Nm Erase Erases a name 35 Nm All Ers Erases all the names on an MD...

Page 44: ...hen an error occurs then issues a three digit code and an error message on the display If the code and message alternate find them in the following table and perform the indicated countermeasure Should the problem persist consult your nearest Sony dealer Three digit code Message Cause Remedy C11 Protected The inserted MD is record protected Take out the MD and close the record protect slot page 15...

Page 45: ...oint 23 tracks 22 M Manual Track Marking 17 MD MiniDisc ejecting 15 21 premastered 12 recordable 12 14 record protect tab 15 Monitoring input signal See Input Monitor Moving 32 Music Synchro recording 19 N Naming copying 34 how to 33 34 renaming 35 O Optical cable 4 5 P Q Pausing after each track See Auto Pause play 21 recording 15 Peak Hold 16 Peak level meters 16 Playing entering the number 22 f...

Page 46: ......

Page 47: ......

Page 48: ...Sony Corporation Printed in Malaysia ...

Reviews: