background image

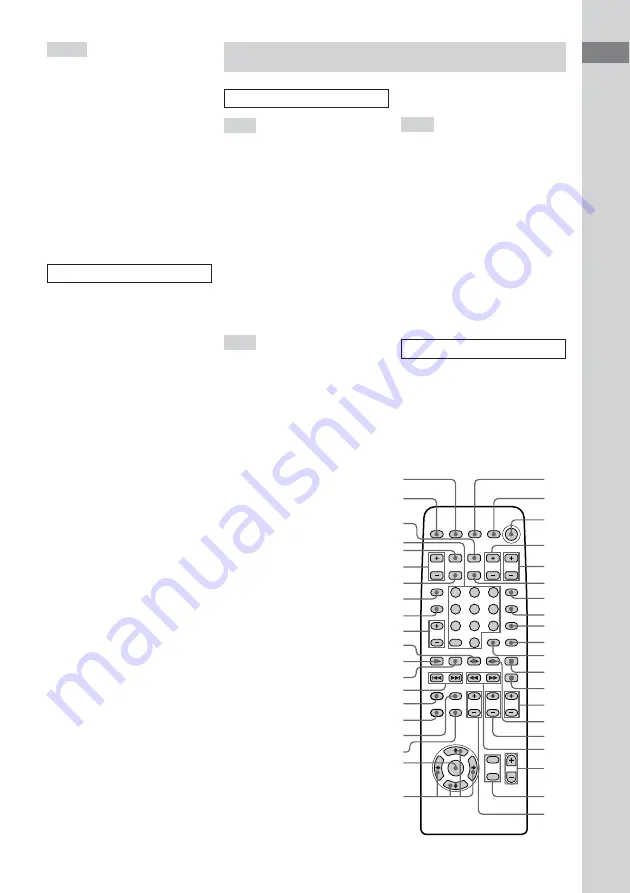
List of Button Locations and Reference Pages

5

GB

Remote control

ALPHABETICAL ORDER

1

eh

ej

r;

el

eg

e;
wl
wk

ea

es

ef

2

3

4

5

6

7

8

9
0

qa

qs

qd

qf
qg
qh
qj

qk

ql

w;

wa

wd
ws

wf

wg

wh

wj

ed

ek

S – X

SELECT 

wd

 (13, 18)

SLEEP 

0

 (28)

SPECTRUM ANALYZER 

4

 (29)

SUPER WOOFER 

ra

 (25)

SUPER WOOFER MODE 

ra

 (25)

TIMER SELECT 

qa

 (25, 29)

TUNER/BAND 

9

 (20, 21)

TUNER ENTER 

wh

 (20, 41)

TUNER MEMORY 

wh

 (20)

TUNING MODE 

8

 (20, 21)

TUNING –/+ 

9

 (20, 21)

VOLUME control 

7

X-GROOVE 

wj

 (25)

BUTTON DESCRIPTIONS

@/1


1

c

/CLOCK SET 

qs

h/H


qj


el

x


qj


el

.m

 /

M>


qj


el

X


qk

z

 REC 

qk

.

AMS

>


wa

HX


ws

x


ws

m

 /

M


ws

R

/

r

/

T

/

t

 (cursor) 

e;

A–E

ALBUM +/– 

eg

 (17)

CD 

N


wl

 (11, 12, 14, 19)

CENTER LEVEL +/– 

w;

 (10)

CLEAR 

6

 (15, 18)

CLOCK/TIMER SELECT 

r;

 (25,

29)

CLOCK/TIMER SET 

1

 (10, 24,

28)

DISC SKIP 

ef

 (12, 14, 15, 17)

DISPLAY 

eh

 (32)

DSP 

wh

 (26)

DVD 5.1CH 

wg

 (37)

EFFECT 

q;

 (26, 27)

ENTER 

ws

 (10, 24, 25, 27–29, 33)

F–R

FILE /– 

qf

 (26)

FU/– 

ea

 (8, 11, 14, 15,

17, 23, 30, 31, 37)

KEY CONTROL 

#

/

2


ql

 (30)

NEXT 

wj

 (13, 19)

Numeric buttons 

ej

 (12, 13, 18, 19)

ON SCREEN 

ek

 (33)

PICTURE EFFECT 

9

 (33)

PLAY MODE 

ed

 (11, 14, 15, 17)

PRESET –/+ 

wj

 (21)

PREV 

wj

 (13, 19)

PRO LOGIC 

wf

 (9, 27)

REAR LEVEL +/– 

qh

 (10)

REPEAT 

es

 (12, 15, 17)

RETURN 

O


qa

 (13)

S–V

SELECT 

wl

 (13, 18)

SLEEP 

el

 (28)

SPECIAL MENU 

8

 (18, 19)

TAPE A 

nN


e;

 (22)

TAPE B 

nN


qg

 (22)

TEST TONE 

wd

 (9)

TUNER/BAND 

wk

 (20, 21)

TUNING –/+ 

qj

 (20, 21)

TV CH +/– 

5

 (8)

TV/VIDEO 

7

 (8)

TV VOL +/– 

4

 (8)

TV 

@/1


2

 (8)

VOL +/– 

qk

BUTTON DESCRIPTIONS

@/1


3

X


qs

x


qd

m

 /

M


qj

R

/

r

/

T

/

t

 (cursor) 

wa

.

/

>


wj

Summary of Contents for LBT-XGV10AV

Page 1: ...Compact Hi Fi Stereo System 2002 Sony Corporation Operating Instructions 4 239 139 12 2 LBT XGV10AV ...

Page 2: ...moving pictures Disc size 12 cm 8 cm 12 cm 8 cm Play time 74 min 20 min 74 min 20 min Notes on VIDEO CDs This system conforms to VIDEO CDs without PBC functions Ver 1 1 and VIDEO CDs with PBC functions Ver 2 0 of VIDEO CD standards You can enjoy two kinds of playback according to the disc type Disc type VIDEO CDs without PBC functions Ver 1 1 discs VIDEO CDs with PBC functions Ver 2 0 discs PBC Pl...

Page 3: ... tape CD Synchro Recording High Speed Dubbing Recording Manually Program Edit 23 Timer recording radio programs 24 Sound Adjustment Adjusting the sound 25 Selecting the audio emphasis effect 26 Selecting the surround effect 26 Making a personal audio emphasis file Personal File 27 Enjoying Dolby Pro Logic Surround sound 27 Timer Falling asleep to music Sleep Timer 28 Waking up to music Daily Timer...

Page 4: ...wd 13 19 PRO LOGIC wg 9 27 PUSH OPEN wk 11 12 15 17 REPEAT eg 12 15 17 RETURN O wd 13 List of Button Locations and Reference Pages How to use this page Use this page to find the location of buttons and other parts of the system that are mentioned in the text Illustration number r PLAY MODE eg 11 14 15 17 R R Name of button part Reference page Main unit wf wg wh wj wl e ea es ed ef eg eh ej ek r ra...

Page 5: ... A E ALBUM eg 17 CD N wl 11 12 14 19 CENTER LEVEL w 10 CLEAR 6 15 18 CLOCK TIMER SELECT r 25 29 CLOCK TIMER SET 1 10 24 28 DISC SKIP ef 12 14 15 17 DISPLAY eh 32 DSP wh 26 DVD 5 1CH wg 37 EFFECT q 26 27 ENTER ws 10 24 25 27 29 33 F R FILE SELECT qf 26 FUNCTION ea 8 11 14 15 17 23 30 31 37 KEY CONTROL 2 ql 30 NEXT wj 13 19 Numeric buttons ej 12 13 18 19 ON SCREEN ek 33 PICTURE EFFECT 9 33 PLAY MODE...

Page 6: ...peakers Connect the speaker cords to the FRONT SPEAKER jacks as below 2 Connecting the center speaker Connect the speaker cords to the SURROUND SPEAKER CENTER jack as below CENTER REAR L R Black Stripe Red Solid 3 Insert only the stripped portion Black Stripe Red Solid 3 AM loop antenna FM antenna Right front speaker Left front speaker Center speaker Left rear speaker Right rear speaker ...

Page 7: ...mage may be distorted You cannot set the color system in the Power Saving Mode The color system of your TV NTSC PAL AUTO Do this While holding down DANCE press 1 While holding down ROCK press 1 While holding down JAZZ press 1 continued CENTER REAR L R Black Stripe Red Solid 3 3 Connecting the rear speakers Connect the speaker cords to the SURROUND SPEAKER REAR jacks as below Note Keep the speaker ...

Page 8: ...You can Turn on or off the TV Select the input source for the TV Adjust the volume of the TV Change the channel of the TV TV 1 TV CH TV VOL TV VIDEO When carrying this system Do the following to protect the CD mechanism 1 Make sure that all discs are removed from the unit 2 Press FUNCTION or FUNCTION on the remote repeatedly until CD appears 3 Hold down EDIT and then press 1 until LOCK appears 4 U...

Page 9: ... center speaker with the front speakers or place it a little behind the front speakers position 3 Place the rear speakers facing each other at about 60 to 90 cm above your listening position Adjusting the speaker volume of each speaker Test Tone To enjoy Dolby Pro Logic Surround sound adjust the volume of each speaker using the test tone that the system provides 1 Press PRO LOGIC when the power is...

Page 10: ...ers for Dolby Pro Logic continued Press CENTER LEVEL on the remote REAR LEVEL on the remote Setting the clock 1 Turn on the system 2 Press c CLOCK SET or CLOCK TIMER SET on the remote 3 Press R r repeatedly to set the hour 4 Press ENTER The minute indication flashes 5 Press R r repeatedly to set the minute 6 Press ENTER The clock starts working If you make a mistake Press T t repeatedly until the ...

Page 11: ...inner circle of the tray continued Disc number in the playing position Track number Playing time 2 Press FUNCTION or FUNCTION on the remote repeatedly until CD appears 3 Press PLAY MODE repeatedly in stop mode until the mode you want appears Select ALL DISCS Normal Play 1 DISC ALBUM Normal Play ALL DISCS SHUFFLE Shuffle Play 1 DISC SHUFFLE ALBUM SHUFFLE Shuffle Play PROGRAM Program Play Depending ...

Page 12: ...scene Lock Search function Select a VIDEO CD in stop mode Switch to VIDEO CD function from another source Play repeatedly Repeat Play Remove the VIDEO CD Do this Press x Press HX or X on the remote 1 Press again to resume play or CD N on the remote Turn AMS clockwise to go forward or counterclockwise to go backward and release it when you reach the desired track Or press to go forward or to go bac...

Page 13: ...tton indicated by the instructions on the menu screen When you press NEXT during menu playback or while playing moving pictures the next scene on the disc appears Also refer to the instructions supplied with the disc PBC appears for the disc with PBC functions and PBC OFF appears when its function is canceled Note Depending on the disc the player may not be able to advance to the next disc during ...

Page 14: ...LE ALBUM SHUFFLE Shuffle Play PROGRAM Program Play 3 Press HX or CD N on the remote To play All CDs in the disc tray continuously The CD you selected in the original order The tracks on all CDs in random order The tracks on the CD you selected in random order The tracks on all CDs in the order you want them to be played see Programming the VIDEO CD CD tracks on page 15 Do this Press x Press HX or ...

Page 15: ...o 5 to select a disc 4 Turn AMS until the track you want appears 5 Press PLAY MODE once The track is programmed First the programmed playing order and STEP appear then the total playing time appears 6 To program additional tracks repeat steps 3 to 5 Skip step 3 to select tracks from the same disc 7 Press HX To Cancel Program Play Clear a track from the end Add a track to the end of the program in ...

Page 16: ... specification levels In Level 1 file names must be in the 8 3 format no more than eight characters in the name no more than three characters in the extension MP3 and in capital letters Folder names can be no longer than eight characters There can be no more than eight nested folder levels Level 2 specifications allow file names and folder names up to 31 characters long To program the MP3 files Af...

Page 17: ...ISC SHUFFLE Shuffle Play ALBUM SHUFFLE Shuffle Play PROGRAM Program Play To play All discs in the disc tray continuously The disc you selected in the original order The folder you selected in the original order The files on all discs in random order The files on the disc you selected in random order The files in the folder you selected in random order The files on all discs in the order you want t...

Page 18: ...s is skipped Maximum folder number 255 The maximum number of MP3 files and folders that can be contained on a single disc is 512 Playback is possible up to 8 levels The MP3 files are played in the order that they were recorded on the disc There may be exceptions to these rules depending on the disc Depending on the encoding writing software recording device or the recording media used at the time ...

Page 19: ... where you stopped the VIDEO CD so you can resume from that point Note that resume play is not available when playing an audio CD and a disc with MP3 files 1 While playing a VIDEO CD press x to stop playback RESUME appears on your TV screen If RESUME does not appear Resume Play is not available 2 Press HX or CD N on the remote The player starts playback from the point you stopped the VIDEO CD in s...

Page 20: ...s in a station TUNED and STEREO for a FM stereo program appear If TUNED does not appear and the scanning does not stop Set the frequency of the desired radio station as described in steps 2 through 6 of Setting presets through manual tuning 4 Press TUNER MEMORY Method Automatic Tuning preset Manual Tuning Preset 5 Press TUNING repeatedly to select the desired preset number 6 Press TUNER ENTER COMP...

Page 21: ...o You can listen to a radio station either by selecting a preset station or by manually tuning in the station Listening to a preset station Preset Tuning Preset radio stations in the tuner s memory first see Presetting radio stations on page 20 1 Press TUNER BAND repeatedly to select FM or AM 2 Press TUNING MODE repeatedly until PRESET appears 3 Press TUNING repeatedly to select the desired preset...

Page 22: ...forward Tape Do this Press x Press X Press again to resume play Press M or m or press M or m on the remote in stop mode Press m or M or press m or M on the remote in stop mode Press A EJECT Z or Z B EJECT in stop mode Tip The deck stops automatically after repeating the sequence five times Searching for the beginning of a track AMS During playback press m or M or press or on the remote repeatedly ...

Page 23: ...tedly until CD appears and then insert the VIDEO CD CD you want to record Press CD SYNC Press z REC Press DIRECTION repeatedly to select g to record on one side Select j or RELAY to record on both sides Press X Recording starts Tips When you record on both sides be sure to start from the front side If you start from the reverse side recording stops at the end of the reverse side For recording from...

Page 24: ...playing time for side A and side B respectively Tape Select Edit Note You cannot use Tape Select Edit for discs containing over 20 tracks or MP3 files Timer recording radio programs To timer record you must preset the radio station see Presetting radio stations on page 20 and set the clock see Setting the clock on page 10 beforehand 1 Tune in the preset radio station see Listening to the radio on ...

Page 25: ...ress SUPER WOOFER Each time you press this button the super woofer level display changes cyclically as follows SUPER WOOFER FLAT t LOW t HIGH Tip SUPER WOOFER button lights up when super woofer mode is activated To select the super woofer mode Press SUPER WOOFER MODE while the super woofer is on Each time you press this button the super woofer mode display changes as follows MODE MOVIE y MODE MUSI...

Page 26: ...lecting the surround effect Press DSP until the desired DSP mode appears in the display Each time you press this button the menu changes as follows DSP OFF Deactivates the DSP mode SURROUND ON Reproduces stereo sources in surround sound HALL Reproduces the acoustics of a concert hall THEATER Reproduces the acoustics of a movie theater E enhanced THEATER Reproduces the acoustics of a large movie th...

Page 27: ...o Call up a personal file Cancel a personal file Frequency level ALL 1DISCS Frequency range Press P FILE EFFECT repeatedly until EFFECT OFF appears Enjoying Dolby Pro Logic Surround sound You can enjoy the Dolby Pro Logic Surround sound of Dolby Surround encoded videos and TV programs Complete the setup and speaker adjustments first see Setting up the speakers for Dolby Pro Logic on page 9 1 Press...

Page 28: ...music at a preset time every day Make sure you have set the clock see Setting the clock on page 10 1 Prepare the music source you want to play VIDEO CD CD Load a VIDEO CD CD To start from a specific track make a program see Programming the VIDEO CD CD tracks on page 15 Tape Load a tape with the side you want to play facing forward Radio Tune in the preset station you want see Presetting radio stat...

Page 29: ...the microphone volume by turning MIC LEVEL After you have finished Turn MIC LEVEL to MIN and disconnect the microphone from MIC1 or MIC2 then press KARAOKE PON MPX repeatedly until m disappears 7 Press R r repeatedly until the music source you want appears The indication changes as follows t TUNER y CD PLAY T t TAPE PLAY T 8 Press ENTER The start time stop time and the music source appear then the...

Page 30: ...o cancel the echoing turn ECHO LEVEL to MIN Press KEY CONTROL 2 to suit your vocal range You can adjust the key higher or lower in 13 halftone steps 2 6 to 6 This function can be used with the CD player only To cancel the key adjustment press KEY CONTROL 2 until KEYCON OFF appears Mixing and recording sounds 1 Do the procedure for Singing along steps 1 through 5 Then load a recordable tape in deck...

Page 31: ...eatedly to select your desired sound source 3 Press GAME MIXING Each time you press this button the level of the game sound changes cyclically as follows MIXING LOW t MIXING MID t MIXING HIGH t MIXING OFF Tips The indicator on the GAME MIXING button lights up when GAME MIXING is activated Once GAME MIXING is activated it will remain active while the power is on even if the function is changed Note...

Page 32: ...hecking the remaining time Press DISPLAY repeatedly during Normal Play Each time you press the button the display changes cyclically as follows CD VIDEO CD without PBC function Ver 1 0 Playing time on the current track t Remaining time on the current track or display while MP3 file is playing t Remaining time on current CD 1 DISC or ALBUM mode or display ALL DISCS mode or while MP3 file is playing...

Page 33: ... in stop mode Depending on condition some items are displayed and others are not Press ON SCREEN on the remote Each time you press this button the on screen display changes cyclically as follows ON SCREEN 1 t ON SCREEN 2 t ON SCREEN OFF No display except for Time Search Disc Digest ON SCREEN 1 2 display 1 2KARAOKE effect status 3Play mode or AUTO PBC AUTO PBC appears for a VIDEO CD with PBC functi...

Page 34: ...t check the operating status while operating the CD player In this case check the information on the front panel display When you record video signals played back from this system onto a video tape etc be sure to select ON SCREEN OFF Otherwise the display information will also be recorded on the video tape You may hear some noise when you change the on screen display When During playback In stop m...

Page 35: ...ect an optional component such as a turntable to these jacks You can then record or listen to analogue audio from that component through this system D SUB WOOFER OUT jack Use an audio cord not supplied to connect an optional sub woofer to this jack You can then output analogue audio to that component from this system A C J D B E F G I H To the input of a sub woofer Optional turntable Optional anal...

Page 36: ...to these jacks You can then record or listen to analogue audio from that component through this system L GAME INPUT VIDEO jack Use video cord not supplied to connect an optional component such as a video game or camcorder etc to this jack You can then output video to the connected TV from that component through this system Notes Be sure to match the color of the plugs and the connectors Using a tu...

Page 37: ... until PHONO appears Start playing the connected component Listening to a video game or camcorder etc 1 Connect the audio cords See Hooking up optional components on page 35 2 Press FUNCTION or FUNCTION on the remote repeatedly until GAME appears or press GAME in the right corner of the front panel Start playing the connected component Listening to a DVD player 1 Connect the audio cords See Hookin...

Page 38: ...failure occurs Redo Setting the clock on page 10 If you have set the timer redo Waking up to music on page 28 and Timer recording radio programs on page 24 The radio presetting timer setting is canceled The power cord is disconnected or a power failure occurs for longer than half a day Redo Presetting radio stations on page 20 Troubleshooting Recording audio from a connected component Making an an...

Page 39: ...he speaker cord will obstruct the speaker connections The protective device on the amplifier has been activated because of a short circuit PROTECT and PUSH POWER flash alternately Turn off the unit eliminate the short circuit problem and turn on the power again There is no audio output during timer recording There is no microphone sound Turn VOLUME or MIC LEVEL to adjust the microphone volume Make...

Page 40: ...les on the disc playback may take more time than usual if the number of folders or files on the disc is very large the folder and file organization structure is very complex The folder title track title and ID3 tag do not appear correctly The disc was not recorded in conformance with ISO 9660 level 1 or level 2 Use a disc that conforms with ISO 9660 level 1 or level 2 The disc ID3 tag is not ver 1...

Page 41: ...ise TUNED or STEREO flashes in the display Adjust the antenna The signal strength is too weak Connect the external antenna A stereo FM program cannot be received in stereo Press STEREO MONO so that STEREO disappears If other troubles not described above occur reset the system as follows 1 Press c CLOCK SET TUNER ENTER and 1 at the same time 2 Unplug the power cord 3 Plug the power cord back in 4 P...

Page 42: ...perating voltage Before operating the unit check that the operating voltage of your unit is identical with the voltage of your local power supply On safety The unit is not disconnected from the AC power source mains as long as it is connected to the wall outlet even if the unit itself has been turned off Unplug the unit from the wall outlet mains if it is not to be used for an extended period of t...

Page 43: ...elded type of speaker system the speakers can be installed near a TV set However color irregularity may still be observed on the TV screen depending on the type of your TV set If color irregularity observed Turn off the TV set once then turn it on after 15 to 30 minutes If color irregularity is observed again Place the speakers farther away from the TV set continued Specifications Amplifier sectio...

Page 44: ... 440 mm Mass Approx 15 5 kg net per speaker Outputs PHONES stereo phone jack accepts headphones of 8 ohms or more MD VIDEO OUT phono jacks voltage 250 mV impedance 1 kilohms WOOFER OUT phono jack voltage 1 V impedance 1 kilohm FRONT SPEAKER accepts impedance of 6 to 16 ohms CENTER SPEAKER accepts impedance of 8 to 16 ohms REAR SPEAKER accepts impedance of 8 to 16 ohms Video section Inputs GAME INP...

Page 45: ... accessories AM loop antenna 1 FM lead antenna 1 Speaker cords 5 Speaker pads 12 Remote commander 1 Batteries 2 Video connecting cable 1 Design and specifications are subject to change without notice Glossary Auto Pause An automatic pause function which is activated according to the signal encoded on the disc while playing a VIDEO CD If the CD player does not resume play for a long time press HX t...

Page 46: ...g pictures VIDEO CDs also contain compact audio information Sounds outside the range of human hearing are compressed while the sounds we can hear are not compressed VIDEO CDs can hold six times the audio information of conventional audio CDs There are two versions for VIDEO CDs Version 1 1 VIDEO CDs without PBC functions You can play only moving pictures and sounds Version 2 0 VIDEO CDs with PBC f...

Page 47: ...Additional Information 47GB ...

Page 48: ...48GB Sony Corporation Printed in Indonesia ...

Reviews: