background image

14

-EN

Operations

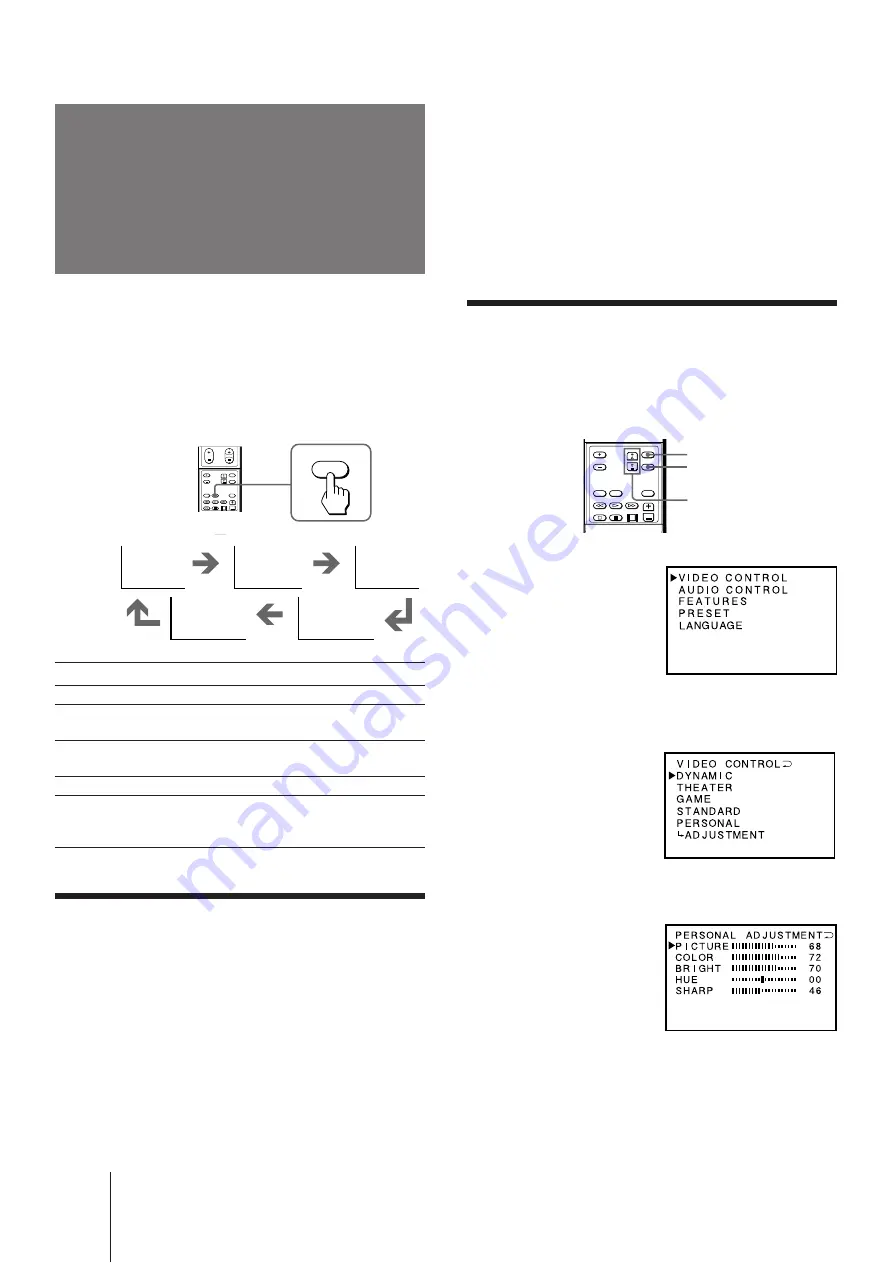
Adjusting the picture setting
(ADJUSTMENT)

You can adjust the picture quality to suit your taste
with the ADJUSTMENT option.  The adjusted settings
are stored in the PERSONAL option.

1

Press MENU.

2

Press 

¢

 + or 

 – to move the cursor (

z

) to

VIDEO CONTROL, and press ENTER.

3

Press 

¢

 + or 

 – to move the cursor (

z

) to

ADJUSTMENT, and press ENTER.

4

Press 

¢

 + or 

 – to move the cursor (

z

) to

the item you want to adjust, and press
ENTER.

MODE

DYNAMIC

THEATER

GAME

PERSONAL

STANDARD

PICTURE

Selecting the
picture mode

You can select the picture mode using the menu as well
as the PICTURE MODE button on the remote
commander.  Select VIDEO CONTROL from the main
menu, then select the desired mode.

Press PICTURE MODE until the mode you want
appears on the screen.

Select

To

DYNAMIC

Display more contrast picture

THEATER

Display darker and finely detailed picture
suitable for movies

GAME

Display softer picture suitable for the video
games

STANDARD Display normal contrast picture
PERSONAL

Display the picture that is adjusted using
ADJUSTMENT in the VIDEO CONTROL
menu

Viewing a video game screen

Press PICTURE MODE until the GAME mode
appears on the screen.

The screen changes to the optimum mode for video
games with soft picture.

If the fixed (non-moving) pattern is on the screen
for long periods of time

Keep the picture functions at low settings (see “Adjusting the
picture setting” on page 14).  If not, the image may be
permanently imprinted on the screen.

Note

To prevent imprints on the screen, the picture shifts
horizontally and vertically about 5 mm every 2 hours.  This is
not a malfunction of the TV.

MENU

ENTER

¢

+ or 

Summary of Contents for KP-E41

Page 1: ...3 858 447 21 1 1997 by Sony Corporation Projection TV Operating Instructions KP E41 KP E53 KP E61 MN ...

Page 2: ...2 EN Getting Started S VIDEO VIDEO AUDIO L R MONO ...

Page 3: ...3 EN Getting Started MENU ENTER ENTER ENTER ENTER MENU ENTER MENU COLOR SYSTEM ...

Page 4: ...4 EN Getting Started ...

Page 5: ...tain the best picture do not expose the screen to direct illumination or directs sunlight It is recommended to use spot lighting directed down from the ceiling or to cover the windows that face the screen with opaque drapery It is desirable to install the projection TV in a room where the floor and walls are not of reflecting material If necessary cover them with dark carpeting or wall paper Do no...

Page 6: ... 2 7m approx 9 ft 61 For the best picture quality install the projection TV within the areas shown below Optimum viewing area Horizontal KP E41 Installing the projection TV Getting Started Optimum viewing area Vertical KP E41 27 5 min 1 5m 5 ft 41 27 5 75 75 75 min 1 5m 5 ft 41 KP E53 E61 KP E53 E61 ...

Page 7: ...t CHINESE 6 Press ENTER 7 Press MENU to return to the normal screen If you prefer Chinese to English you can change the menu language You can use the buttons on both the remote commander and the projection TV 1 Press POWER on the projection TV KP E41 Changing the menu language MENU or ENTER MENU ENTER ENTER MENU KP E53 E61 ...

Page 8: ...n and blue If they do not converge the color is poor and the picture blurs To correct this adjust convergence After 20 30 minutes of turning on the power adjust convergence 1 Press MENU 2 Press or to move the cursor z to FEATURES and press ENTER 3 Press or to move the cursor z to CONVERGENCE and press ENTER The CONVERGENCE adjustment screen appears 4 Press or to move the cursor z to the symbol sho...

Page 9: ...mmander Presetting channels automatically You can preset up to 100 TV channels in numerical sequence from program position 1 1 Press MENU 2 Press or to move the cursor z to PRESET 3 Press ENTER 4 Press or to select AUTO PROGR 5 Press ENTER 6 Press or to select your area channel system For the areas allocated in each channel system see Channel allocation on page 27 7 Press ENTER Presetting starts f...

Page 10: ...ttons on both remote commander and the projection TV to operate the menus Main menu Getting back to the previous menu Press or to move the cursor z to the first line N of each menu except for the main menu and press ENTER Cancelling the menu screen Press MENU Note If more than 60 seconds elapse after you press a button the menu screen disappears automatically ...

Page 11: ...twice for cable TV channels then press the number buttons two digit number for VHF UHF channels three digit number for cable TV channels For example to select the VHF UHF channel 4 press C 0 then 4 2 Press VOL to adjust the volume 1 Select the TV program you want to watch Press the number buttons or PROGR The projection TV turns on automatically and the selected program appears When the STANDBY in...

Page 12: ...d press ENTER 4 Press or until the time in minutes you want appears 5 Press ENTER To cancel the Sleep Timer select OFF or turn the projection TV off DISP 1 C12 ABC Switching off the projection TV To switch off the projection TV temporarily press POWER on the remote commander The STANDBY indicator lights To switch off the projection TV completely press POWER on the TV Watching the video input Press...

Page 13: ... the PIP screen Press FREEZE To restore the normal picture press FREEZE again You can display a Picture in Picture PIP screen small picture within the main picture of a TV program or a video input Displaying PIP Press PIP Selecting a TV program or video input in the PIP screen To select a TV program press PIP PROGR yellow buttons To select a video input press TV VIDEO Swapping pictures between the...

Page 14: ...l the mode you want appears on the screen Select To DYNAMIC Display more contrast picture THEATER Display darker and finely detailed picture suitable for movies GAME Display softer picture suitable for the video games STANDARD Display normal contrast picture PERSONAL Display the picture that is adjusted using ADJUSTMENT in the VIDEO CONTROL menu Viewing a video game screen Press PICTURE MODE until...

Page 15: ...djust other items repeat steps 4 and 5 7 Press MENU to return to the normal screen Note You can adjust HUE for NTSC color system only If the color of the picture is abnormal when receiving programs through the antenna terminal Press COLOR SYSTEM on the projection TV or change the TV system setting from the menu as described below until the color becomes normal 1 Press MENU 2 Press or to move the c...

Page 16: ... and press ENTER 4 Press or to move the cursor z to SURROUND and press ENTER 5 Press or to select ON and press ENTER If the sound is distorted or noisy when receiving programs through the antenna terminal Press COLOR SYSTEM on the projection TV or change the TV system setting as follows until the sound becomes clear 1 Press MENU 2 Press or to move the cursor z to PRESET and press ENTER 3 Press or ...

Page 17: ...dicator lights up as follows KP E41 A B KP E53 E61 A B When receiving a NICAM program Broadcasting NICAM stereo NICAM bilingual NICAM monaural On screen Display NICAM NICAM NICAM Selected sound Indicator lit n Stereo n Regular A and B n A n B n Regular A B n NICAM monaural A RegularN On screen display STEREO When receiving an A2 German stereo program Broadcasting A2 German stereo A2 German bilingu...

Page 18: ...he number buttons to enter the three digit page number of the Teletext number you want If you make a mistake re enter the correct page number To access the next or previous page press PROGR Note When you request another Teletext page while viewing one Teletext page the page scrolling may pause on a different page depending on the Teletext service but the search will continue till the requested pag...

Page 19: ...letext reception press TEXT Displaying subtitles SUBTITLES Your Teletext service informs you if a TV program is subtitled 1 Press MENU 2 Press or to move the cursor z to SUBTITLES and press ENTER Note If the subtitles are not broadcast on page 888 select the subtitle page using the number buttons Displaying a Teletext page at the requested time TIME PAGE You can display a time coded page e g an al...

Page 20: ...e does not allow you to enjoy the sound of PIP screens Listening to the sound of the projection TV with headphones Insert the headphones into the 2 headphones jack located on the front panel of the projection TV The sound from the speaker is shut off To adjust the headphones volume press VOL KP E41 KP E53 E61 Customizing the projection TV Using headphones Select TV MONITOR To Output the TV signal ...

Page 21: ...eset a channel in program position 8 1 Press MENU 2 Press or to move the cursor z to PRESET and press ENTER 3 Press or to select MANUAL PROGR and press ENTER 4 Select the program position to which you want to preset a channel 1 Press or to select PR and press ENTER 2 Press or to select 8 You can also select the program position with PROGR or the number buttons e g for program 24 press 2 and 4 3 Pr...

Page 22: ...eat steps 2 to 5 to caption other channels To erase a caption In step 5 above select _ space Manual fine tuning Normally the automatic fine tuning AFT is operating However if the picture of a channel is distorted you can use the manual fine tuning function for the channel to obtain better picture reception 1 Display the MANUAL PROGR menu Follow steps 1 to 3 in Presetting channels manually on page ...

Page 23: ...ode VTR1 e g Beta format VCR VTR2 e g 8 mm format VCR VTR3 e g VHS format VCR MDP multi disc player After setting the remote command mode you can use the following buttons to operate the video equipment Operation buttons for video equipment 1 2 Improving TV signal If the reception signal is very strong you can attenuate it to obtain better picture reception 1 Display the MANUAL PROGR menu Follow s...

Page 24: ...enna terminal at the rear of the projection TV Connecting optional equipment You can connect optional audio video equipment to this projection TV such as a VCR multi disc player camcorder headphones or stereo system Connections Rear of projection TV Rear of projection TV On a wall or VCR to video and audio outputs to S Video output Video yellow Audio L white Audio R red to antenna socket to S1 Vid...

Page 25: ...equipped with two sets of the VIDEO 3 IN jacks on the front and rear panels Front and rear jacks are not available to be used at the same time When using equipment connected turn off other equipment not in use Connecting an amplifier with Dolby Pro Logic decoder If you use an amplifier with Dolby Pro Logic decoder instead of the projection TV s audio system you can still use the projection TV s ce...

Page 26: ... or ghosts This may be caused by reflections from nearby mountains or buildings A highly directional antenna may improve the picture Good picture Noisy sound Check the TV SYSTEM setting No picture No sound Press POWER Press POWER to turn the projection TV off for 5 to 6 seconds then turn it on again by pressing POWER Check the antenna connection Check the VCR connections Good picture No sound Pres...

Page 27: ...ica United Kingdom CHINA E EURO Benin Bulgaria China Congo Czechoslovakia Djibouti Republic Gabon Guadeloupe Guiana Guinea P P R Hungary Ivory Coast Dem People s Rep of Korea Madagascar Mongolia New Caledonia Niger Poland Reunion Rumania Senegal Tahiti Togo Former U S S R Vietnam Zaire AMERICA CATV AMERICA Bahama Islands Barbados Belize Bermuda Bolivia Burma UHF Canada Chile Colombia Costa Rica Cu...

Page 28: ... C62 C 13 to C 32 C80 to C99 M E ASIA CATV W EURO Receivable channel Channel display E 2 to E 12 C02 to C12 E 21 to E 69 C21 to C69 S 01 to S 03 S42 to S44 S 1 to S 41 S01 to S41 Indonesia 1A C01 2 to 11 C03 to C12 Morocco M 4 to M 7 C70 to C73 M 8 to M 10 C08 to C10 New Zealand 1 C01 2 to 11 C03 to C12 27 to 62 C27 to C62 Channel coverage HK UK Receivable channel Channel display Hong Kong United ...

Reviews: