KP-51HW40/57HW40
(AFFECTS S/N’s 90000001- 90XXXXXX ONLY)
3-5. FOCUS VR ADJUSTMENT
1. Set generator to crosshatch.
2. Cover the both red and blue picture lenses with the lens caps
to show only the green color.
3. Turn the green focus VR on the focus block to adjust to the
optimum focus point with the crosshatch signal.
4. Cover the both green and blue picture lenses with the lens caps
to show only the red color.
5. Turn the red focus VR on the focus block to adjust to the
optimum focus point with the crosshatch signal.
6. Cover the both green and red picture lenses with the lens caps
to show only the blue color.
7. Turn the blue focus VR on the focus block to adjust to the
optimum focus point with the crosshatch signal.
8. After adjusting the items 3-4. Focus Lens Adjustment, 3-6. 2-
Pole Magnet Adjustment and 3-7. 4-Pole Magnet Adjustment,
adjust again to the optimum focus point.
Note: Instead of items 2, 4 and 6, you can cut off the unnecessary
color beams by controlling the service mode 2150P-2 1
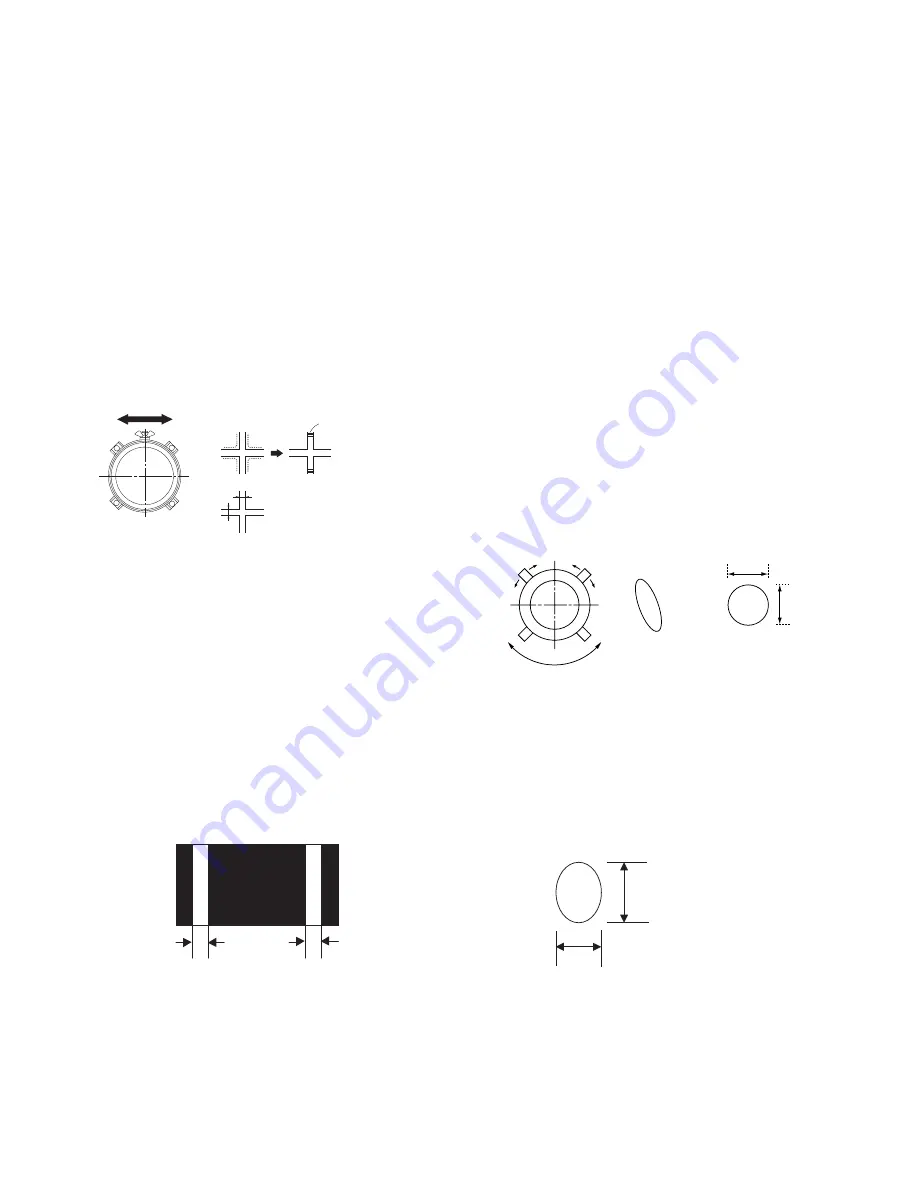
3-6 2-POLE MAGNET AND CENTERING
MAGNET ADJUSTMENT
1. Either select the PJED Test Pattern dot signal or apply an external
dot signal
2. Set the Picture control to Max., Brightness to 50% and the VM to
OFF, in the customer users menu.
3. Cut off the red and blue CRTs by controlling the service mode
2150P-2 1 RGBS.
4. Turn the green focus control counterclockwise so the picture is
slightly defocus (just off of focus). Confi rm that the dot size
increases slightly.
5. Adjust the the 2-pole magnet so that the left and right side fl are
levels (compare the dots that are indicated in the white areas of the
fi gure below) are balanced and are approximately equal.
A
B
A = B [Flare Balance]
6. Readjust the Green focus control to best focus position. (minimum
dot diameter)
7. Apply a Monoscope signal to the set.
8. Adjust the H-CENTERING and V-CENTERING roughly By the
centering magnets.
- 13 -
Fig.3-6
9. Check 2-Pole magnet adjustment. If necessary, repeat steps 1 – 6.
10. Adjust the Red 2-pole magnet and centering magnet in the
same manner.
11. Adjust the Blue 2-pole magnet and centering magnet in the same
manner
3-9 BLUE DEFOCUS ADJUSTMENT
1. Setup: Apply a Dot Hatch Signal and set the mode to Vivid Mode
and verify the color temperature is set to Cool in the users menu.
Cut off the red and green CRT’s by controlling the service mode
2150P-2 1 RGBS.
2. Turn the Blue focus control clockwise, until the dot at the center
becomes oval. (see fi gure below).
3. Confi rm the fl are is minimal while the bright spot is located in the
center. If not, please readjust the 2 and 4 pole magnets.
Blue
D1:D2 = 1:1.2
D1
D2
4. Check for uniformity on a 100% IRE all white fi eld.
3-8. 4-POLE MAGNET ADJUSTMENT
1. Set the picture mode to“Pro” and picture to MAX.
2. Receive the Dot signal.
3. Cover the both red and blue picture lenses with the lens caps
to show only the green color.
4. Turn the green focus VR on the focus block to the right and set
the spot will become smaller.
5. Adjust the 4-Pole Magnet so that the spot becomes round for
green and red.
6. Adjust blue spot to an oval shape X:Y = 1:1.2
Note: Instead of item 2 you can cut off the unnecessary color
beams by controlling the service mode 2150p-2 1 RGBS.
Fig. 3-8
/
x
y
x : y = 1:1.2 (BIue)
x : y = 1:1 (Green, Red)
Use the center dot
3-7. CENTERING MAGNET ADJUSTMENT
Not required - Combined with 2-Pole Magnet adjustment
A
B
Lens
Minimize both A and B.
Center of crosshatch
Scanning line visible.
Fig. 3-6
Fig. 3-5
Summary of Contents for KP 51HW40
Page 46: ... 46 KP 51HW40 57HW40 RM Y909 RM Y909 1 A B C D E F G H I J 2 12 13 11 10 9 8 7 6 5 4 3 14 15 ...
Page 69: ... 69 KP 51HW40 57HW40 RM Y909 RM Y909 CN3001 D3001 S3002 3P WHT S MICRO MTZJ T 77 5 6B ...
Page 79: ... 79 KP 51HW40 57HW40 RM Y909 RM Y909 CB CB Board CRT I F BLUE Component Side Conductor Side ...
Page 80: ... 80 KP 51HW40 57HW40 RM Y909 RM Y909 CG CRT I F GREEN CG Board Component Side Conductor Side ...
Page 81: ... 81 KP 51HW40 57HW40 RM Y909 RM Y909 CR CRT I F RED CR Board Component Side Conductor Side ...
Page 212: ......
Page 213: ......
Page 214: ......


