background image

Usi
ng S

e

tt

in

gs

35

 GB

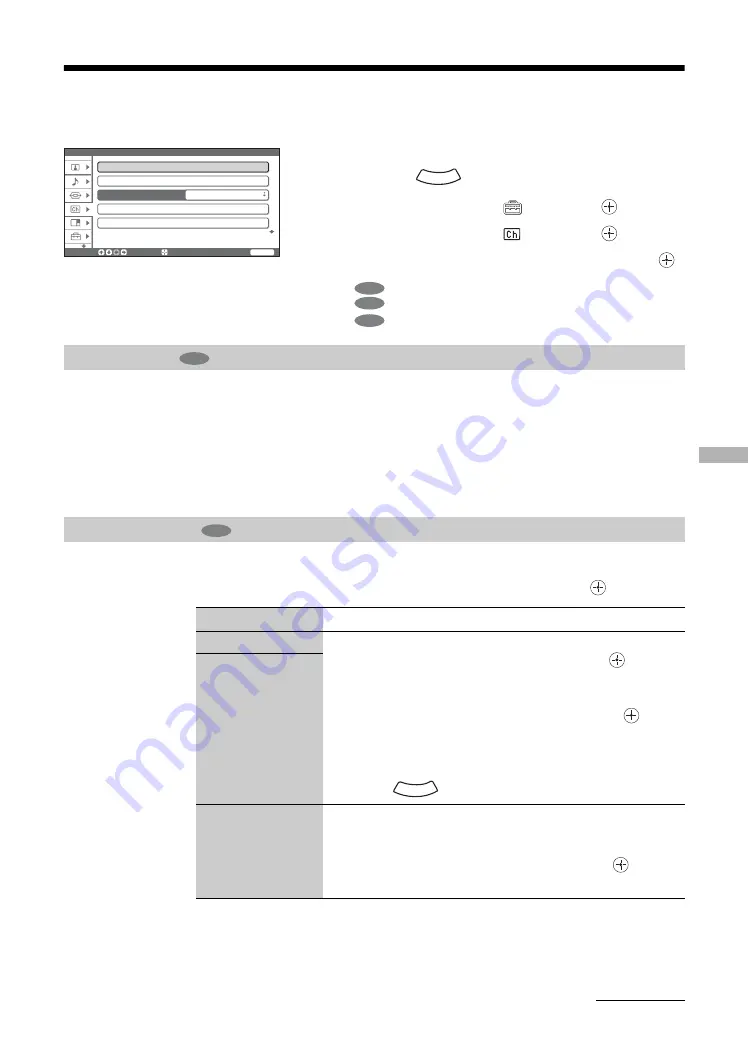
Program menu

Tunes in all the available channels.
Usually you do not need to perform this operation because the channels are already tuned in 
when the TV is first installed (page 16). However, this option allows you to repeat the 
process (e.g., to retune the TV after moving house, or to search for new channels that have 
been launched by broadcasters).

Follow the operation of “6: Auto-programming the TV (page 16).

When all available channels have been tuned in, the TV returns to normal operation.

Allows you to preset, adjust, skip, and tune in channels manually.

Press 

M

/

m

 to select one of the following options, then press 

.

You can select the options listed below on the Program menu.

To select options

1

Press .

2

Press 

M

/

m

 to select 

, then press 

.

3

Press 

M

/

m

 to select 

, then press 

.

4

Press 

M

/

m

 to highlight the option, then press 

.

 indicates the available options for TV.
 indicates the available options for video input.
 indicates the available options for PC input.

Auto Program 

Manual Program 

Option

Description

Program

Presets channels manually.

1

Press 

M

/

m

 to select “Program”, then press 

.

2

Press 

M

/

m

 to select the program number you want to 

manually tune in, then press 

<

.

3

Press 

M

/

m

 to select “TV System”, then press 

.

4

Press 

M

/

m

 to select the best received TV broadcast 

systems, then press 

<

.

Repeat the procedure above to preset other channels manually.

5

Press .

TV System

Fine

Fine-tunes the selected program number manually if you feel that a 
slight tuning adjustment will improve the picture quality. 
(Normally, fine tuning is performed automatically.)

Press 

M

/

m

 to adjust the fine tuning, then press 

.

To restore automatic fine tuning, select “Auto”.

Program

S e l e c t :

E n t e r :

WEGA GATE

E n d :

Auto Program

Manual Program

1 Digit Direct

Off

Program Label

Program Block

WEGA GATE

TV

Video

PC

TV

TV

WEGA GATE

Continued

Summary of Contents for KF-E42A10

Page 1: ...KF E42A10 2005 Sony Corporation LCD Projection TV 2 662 489 12 2 GB Operating Instructions Before operating the TV please read the Safety Information section of this manual Retain this manual for future reference ...

Page 2: ...ruSurround XT SRS and symbol are trademarks of SRS Labs Inc TruSurround XT technology is incorporated under license from SRS Labs Inc This TV incorporates High Definition Multimedia Interface HDMI technology HDMI the HDMI logo and High Definition Multimedia Interface are trademarks or registered trademarks of HDMI Licensing LLC WEGA Grand WEGA WEGA GATE Steady Sound Digital Reality Creation and Ci...

Page 3: ... 29 DRC Palette 30 Advanced Video 30 Sound menu 31 Sound Mode 31 Reset 31 Treble Bass Balance 31 Steady Sound 31 Volume Level 32 Effect 32 BBE 32 Speaker 32 Audio Out 32 Screen menu 33 Wide Mode 33 Auto Wide 33 4 3 Default 33 Display Area 34 Screen Shift 34 Vertical Size 34 Auto Adjustment 34 Phase Pitch 34 Horizontal Center Vertical Center 34 Program menu 35 Auto Program 35 Manual Program 35 1Dig...

Page 4: ...4 GB Replacing the lamp 48 Specifications 50 Troubleshooting 52 Index 56 Additional Information ...

Page 5: ... picture may be blurred or show poor color This is because moisture has condensed on the mirror or lenses inside If this happens let the moisture evaporate before using the LCD projection TV If direct sunlight or other strong illumination shines on the screen part of the screen may appear white due to reflections from behind the screen This is a structural property of the LCD projection TV Do not ...

Page 6: ...he screen edges Caution Do not use the LCD projection TV at altitudes higher than 4000 m as doing so might cause malfunctions Cleaning To remove hard contamination use a cloth moistened with a solution of mild detergent and water Do not use a spray cleaning solution directly to the TV It should only be used to moisten the cleaning cloth Clean the cabinet of the LCD projection TV with a dry soft cl...

Page 7: ... type of lamp This television s lamp contains mercury and should be disposed of properly Consult your local authorities regarding safe disposal If the lamp is broken during use a small amount of mercury may be released In this situation move away from the product and ventilate the area In case of accidental contact or inhalation or if you feel unwell consult a physician promptly Cooling fan This L...

Page 8: ...n operating WEGA GATE 8 RETURN Returns to the previous page when operating WEGA GATE 9 WEGA GATE page 24 Displays WEGA GATE which includes TV List External Inputs and Settings 0 TOOLS page 20 Enables you to access various viewing options and change make adjustments according to the source and screen mode qa Info Text reveal In TV mode page 18 Displays information such as current channel number and...

Page 9: ...page 46 Displays the menu of a DVD wg POWER SAVING This function does not work with this model wh F1 F2 page 46 Selects the function of connected equipment wj PROG page 18 In TV mode page 18 Selects the next or previous channel In Text mode page 19 Selects the next or previous page wk Colored buttons In Text mode page 19 Used for Fastext wl Screen mode page 20 Selects the type of the wide mode e S...

Page 10: ...mer is set 6 indicator Flashes up in red when the lamp for the light source has burned out 7 1 indicator Flashes in green when the light source is preparing to turn on Lights up in green when the TV is switched on Lights up in red when the TV is in standby mode When the lamp door or the lamp itself is not securely attached the red indicator will continue to flash in intervals of three blinks at a ...

Page 11: ...ng on your TV it may take a while 1 minute or less before the picture appears When the projection lamp wears out the screen goes dark Replace the lamp with a new Sony XL 2400 replacement lamp not supplied How to replace the lamp see page 48 Warning The light emitted from the lamp is quite bright when your TV is in use To avoid eye discomfort or injury do not look into the light housing when the po...

Page 12: ...ords be sure to unplug them before moving the TV Notes To ensure the safety of children and the TV keep children away from the TV during installation Climbing on or pushing the TV or its stand may cause it to fall and damage the TV When installing your TV against a wall keep your TV at least 10 cm away from the wall to provide proper ventilation Getting Started Model Viewing distance KF E42A10 min...

Page 13: ...and for your TV you must use the support belt 2 Inserting batteries into the remote Notes Observe the correct polarity when inserting batteries Dispose of batteries in an environmentally friendly way Certain regions may regulate disposal of the battery Please consult your local authority Do not use different types of batteries together or mix old and new batteries Handle the remote with care Do no...

Page 14: ...PB CB R L R S S VIDEO VIDEO IN VIDEO OUT AUDIO R L To 8 VHF UHF antenna VCR Antenna cable not supplied To antenna output To video and audio outputs Audio Video cable not supplied To S video output S video cable not supplied To 1 S video input To t1 3 video input L MONO audio input R audio input l Signal flow B Rear of the TV 1 2 2 ...

Page 15: ...nect the yellow plug to t VIDEO the yellow jack and the black plug to AUDIO L MONO the white jack If you connect a VCR to the 8 VHF UHF antenna jack preset the signal output from the VCR to the program number 0 on the TV If the S video cable is connected to this TV and the VCR the S video signal is automatically selected 2 Connect your VCR Connect the output jack on your VCR to the input jack on t...

Page 16: ...ter selecting the language a message confirming that the TV starts auto program appears on the screen You must tune the TV to receive channels TV broadcasts Do the following to search and store all available channels Press to select Yes M m Please select your language Initial Setup Select Enter End English WEGA GATE Please connect cable antenna before starting auto program Start auto program now S...

Page 17: ...the channel stored on channel number 1 Tip If you press any of the buttons during auto programming auto programming operation is canceled To perform auto programming again activate Initial Reset in the Setup menu page 40 When a message appears for you to confirm the antenna connections No channels are found Check all the antenna connections and press to start auto program again To change the order...

Page 18: ...you press the number buttons after setting 1Digit Direct to On page 36 Additional operations Watching TV WEGA GATE PROG 2 1 2 To Do this Turn off the TV temporarily Standby mode Press TV 1 Turn off the TV completely Press 1 on the front side of the TV Adjust the volume Press 2 increase decrease Mute the sound Press Press again to restore Return to the previous channel watched for more than five se...

Page 19: ...ws Tips NICAM is receivable in following countries regions Hong Kong Singapore New Zealand Malaysia Thailand etc A2 German is receivable in following countries regions Australia Malaysia Thailand etc Notes If the signal is very weak the sound becomes monaural automatically If the stereo sound is noisy when receiving a NICAM program select Mono The sound becomes monaural but the noise is reduced If...

Page 20: ...ct the best mode to suit the broadcast page 33 Full 1 Full 2 Normal and Zoom are available for Wide Mode when PC input is selected You can access the following options quickly by pressing TOOLS Available items differ depending on the screen mode and source Wide Zoom Normal Full Zoom TOOLS operation for TV Item You can Close Close the Tools Menu Freeze Freeze the screen page 19 Twin Picture Display...

Page 21: ... R Video 3 Video 3 Rear Audio 3 Rear L MONO R HD DVD 1 Video 1 Rear Y PB CB PR CR Audio 1 Rear L R HD DVD 2 Video 2 Rear Y PB CB PR CR Audio 2 Rear L R HDMI Video Audio Rear HDMI IN Audio Rear L R PC Video Rear PC RGB Audio Rear PC TOOLS operation for connected equipment Item You can Close Close the Tools Menu Freeze Freeze the screen page 19 Twin Picture Display two screens page 38 Full Screen Ap...

Page 22: ...22 GB For PC input Item You can Close Close the Tools Menu Picture Adjust picture page 28 Sound Adjust sound page 31 Wide Mode Select the screen mode Tools Menu Close Picture Sound Wide Mode ...

Page 23: ...Watching TV 23GB ...

Page 24: ...ontrol button presses When you press you can select from basic TV function watching TV viewing external equipment signals adjusting TV settings Introducing WEGA GATE WEGA GATE WEGA GATE TV List External Inputs Settings Show available TV programs Select Enter End 1 Press WEGA GATE on the remote The WEGA GATE control panel appears 2 Press M m to highlight the item you want 3 Press to select Press WE...

Page 25: ...connected to your TV such as a DVD player PC You can assign a label to your equipment or skip unused inputs conveniently page 39 1 Select External Inputs from the WEGA GATE control panel and press The External Inputs panel appears 2 Press M m to highlight the desired external input and press Using Settings in WEGA GATE The Settings feature lets you adjust set the Picture Sound Screen Program Twin ...

Page 26: ...ss Balance 31 Steady Sound 31 Volume Level 32 Effect 32 BBE 32 Speaker 32 Audio Out 32 Picture Picture Mode Vivid Reset Iris Picture Brightness Select Enter WEGA GATE End 3 Screen Wide Mode 33 Auto Wide 33 4 3 Default 33 Display Area 34 Screen Shift 34 Vertical Size 34 4 Program Auto Program 35 Manual Program 35 Program TV System Fine Skip Sensitivity VHF Low VHF High UHF 1Digit Direct 36 Program ...

Page 27: ...is Picture Brightness 29 Color Temperature 29 2 Sound Sound Mode 31 Reset 31 Treble Bass Balance 31 Effect 32 Speaker 32 Audio Out 32 3 Screen Wide Mode 33 Auto Adjustment 34 Phase Pitch 34 Horizontal Center Vertical Center 34 6 Setup Power Management 39 Video Label 39 Language 39 Image Shift 40 High Altitude 40 Picture Display Mode Video Reset Iris Picture Brightness Select Enter End WEGA GATE Si...

Page 28: ...view text charts or tables Resets the picture settings except the Advanced Video setting to the factory settings Press to select Ok then press You can select the options listed below on the Picture menu To select options 1 Press 2 Press M m to select then press 3 Press M m to select then press 4 Press M m to highlight the option then press Tip The available options differ depending on the Picture ...

Page 29: ...s to set the level then press Reduces the picture noise snowy picture in a weak broadcast signal Press M m to select one of the following then press Auto Automatically reduces the picture noise High Medium Low Modifies the effect of the noise reduction Off Turns off the noise reduction feature Note This option cannot be used in Twin Picture Picture Freeze mode Selects the density adjustment accord...

Page 30: ...ust the following options Reset resets the settings of the options in Advanced Video to the factory settings Black Corrector enhances the contrast performance Advanced Iris controls Iris shutter automatically Gamma adjusts light and dark balance Clear White emphasizes the whiteness of the picture Live Color improves the vividness of colors 1 Press M m to select an option then press 2 Press M m to ...

Page 31: ...select the option 2 Press to set the level then press Keeps a constant volume level even when volume level gaps occur e g advertisements tend to be louder than programs Press M m to select On then press You can select the options listed below on the Sound menu To select options 1 Press 2 Press M m to select then press 3 Press M m to select then press 4 Press M m to highlight the option then press ...

Page 32: ...d with impact Off For normal stereo or mono reception Switches on off the TV s internal speakers Press M m to select On or Off then press On The sound of the TV is output through the TV s speakers Off No sound is output through the TV s speakers Select Off when you want to hear the sound only through the external audio equipment connected to the audio output jacks Sets the method used to adjust th...

Page 33: ... the 16 9 screen keeping the original image as much as possible Normal Returns the 4 3 picture to its original size Full Enlarges the 4 3 picture horizontally only Zoom Displays cinemascopic letter box format broadcasts in the correct proportions Off Continues using the current Wide Mode setting when the channel or input is changed Note You cannot select Normal when input signals are 720p 1080i Yo...

Page 34: ...option quickly by pressing TOOLS Adjusts the display position of the picture automatically Press to select Start then press To cancel this operation select Cancel Phase adjusts the phase to reduce flickering of the screen Pitch adjusts the pitch to make unwanted vertical stripes disappear 1 Press to select the option 2 Press M m to improve the screen appearance then press Horizontal Center adjusts...

Page 35: ...to highlight the option then press indicates the available options for TV indicates the available options for video input indicates the available options for PC input Auto Program Manual Program Option Description Program Presets channels manually 1 Press M m to select Program then press 2 Press M m to select the program number you want to manually tune in then press 3 Press M m to select TV Syste...

Page 36: ...re in step 2 until the name is complete then press Blocks an individual channel from being watched 1 Press M m to select the channel you want to block then press 2 Press M m to select Block then press To watch the channel select Allow Skip Skips unused channels when you press PROG to select channels You can still select a skipped channel using the number buttons Press M m to select On then press T...

Page 37: ...ou to replace the channel assigned to a program position with another channel 1 Press M m to select the channel you want to assign to another program position then press 2 Press M m to select the program position you want to assign the channel to then press Repeat the procedure in steps 1 and 2 to reassign other channels if required Program Sorting TV ...

Page 38: ...e active screen the screen framed in green Press To change the program on the active screen Press PROG To change the program on the inactive screen Press M m To change the input source 1 Select the active screen 2 Press repeatedly To return to Full screen Press To select options 1 Press 2 Press M m to select then press 3 Press M m to select then press indicates the available options for TV indicat...

Page 39: ...name other jacks Tip To make the jack that no equipment is connected not to be displayed select Skip in step 2 Selects the language in which the menus are displayed Press M m to select the language then press All menus will appear in the selected language You can select the options listed below on the Setup menu To select options 1 Press 2 Press M m to select then press 3 Press M m to select then ...

Page 40: ... the TV to that of the source you want to play back Press M m to select the color system then press Usually select Auto so that an appropriate color system for the source is selected automatically Resets all the manual settings to the factory settings Press to select Ok then press Repeat this operation once more Video2 Component Image Shift High Altitude Cinema Drive Color System Initial Reset TV ...

Page 41: ...o select On then press The Timer indicator on the TV front side lights up in amber 3 To set the time press M m to select Time then press 4 Set the hour using M m then press 5 Set the minute using M m then press Tips To cancel the on timer setting select Off in step 2 You can set the on timer in 10 minute increment for up to 12 hours later If the TV is not operated for two hours after it is turned ...

Page 42: ...f the TV To connect Do this Camcorder or video game equipment A Connect to the video jack 2 or component jack 2 and the audio jacks 2 If you connect mono equipment connect it to the L MONO jack 2 page 43 Headphones B Connect to the i jack to listen to sound from the TV on headphones MONO R L P R C R P B C B Y 2 Headphones Camcorder without component video out Camcorder with component video out A B...

Page 43: ...e equipment D E G H 1 2 1Use an HDMI cable HDMI to DVI cable or adaptor not supplied 2When using an HDMI cable it is not necessary to connect the audio cable When using an HDMI to DVI cable or an adaptor it is necessary to connect the audio cable To Y PB CB PR CR 1 2 component video input L audio input R audio input To t1 3 video input L MONO audio input R audio input To 1 S video input t1 3 video...

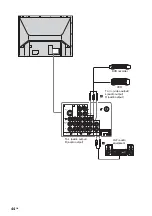
Page 44: ...44 GB L MONO R L PR CR Y 1 3 1 2 PB CB R L R S S DVD recorder VCR Hi Fi audio equipment F I To L audio output R audio output To T video output L audio output R audio output ...

Page 45: ...p If the digital receiver has an HDMI jack connecting via an HDMI cable will provide the best results Note When using an HDMI to DVI cable or an adapter be sure to connect the DVI output connector first then connect to the HDMI jack on the TV DVD player with component output E Connect to the component jack 1 2 and the audio jacks 1 2 For better picture quality component connection is recommended i...

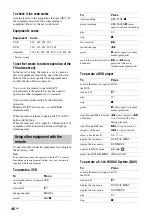
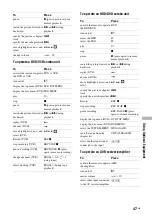
Page 46: ...e the remote supplied with the equipment To operate a VCR To operate a DVD player To operate a 5 1ch DVD AV System DAV Equipment Code VCR 001 002 003 004 DVD 101 151 201 202 203 Amplifier 301 302 303 304 401 402 403 451 Using other equipment with the remote To Press activate the remote to operate the VCR VCR turn on off 1 change channels PROG record REC z stop recording REC STOP x pause recording ...

Page 47: ...cording VCR REC PAUSE X press again to resume recording change channels VCR PROG 0 9 using tuner adjust tracking VCR PROG during tape playback To Press To Press activate the remote to operate the HDD DVD DVD turn on off 1 select the HDD select the DVD F1 F2 play H stop x pause X press again to resume normal playback search the picture froward or backward M or m during playback replay DVD advance D...

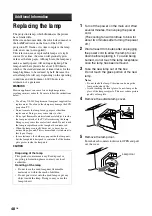
Page 48: ...p receptable once the lamp has been removed When the lamp eventually burns out you may hear a noticeable pop sound This is normal and it is inherent to this type of lamp In rare instances the bulb may pop inside the lamp unit but the lamp unit is designed to contain all of the broken glass pieces inside the lamp unit CAUTION 1 Turn off the power on the main unit Wait several minutes then unplug th...

Page 49: ... new lamp into its place Mount the new lamp securely Failure to do so may cause a fire or the screen to go dark Note If the lamp is not securely reattached the self diagnostic function may be triggered and the 1 indicator flashes three times see page 10 8 Reattach the lamp door Turn the knob back to CLOSE and secure the cover 9 Put the outside lamp cover back in its place Notes Consult your Sony d...

Page 50: ... S1 to S41 Australia only VHF 1 to 11 UHF 21 to 69 CATV S01 to S03 S1 to S41 New Zealand only I UHF B21 to B68 CATV S01 to S03 S1 to S41 D K VHF C1 to C12 R1 to R12 UHF C13 to C57 R21 to R60 CATV S01 to S03 S1 to S41 Z1 to Z39 M VHF A2 to A13 UHF A14 to A79 CATV A8 to A2 A to W 4 W 6 to W 84 Terminals S VIDEO 1 4 pin mini DIN Y 1 0 Vp p 75 ohms unbalanced sync negative C 0 286 Vp p Burst signal 75...

Page 51: ...I IN HDMI Video 480i 480p 576i 576p 720p 1080i Audio Two channel linear PCM 32 44 1 and 48 kHz 16 20 and 24 bits AUDIO 500 mVrms 100 modulation Impedance 47 kilohms Headphones i Stereo minijack Impedance 16 ohms Sound Output KF E50A10 12 W 12 W KF E42A10 12 W 12 W Optional accessories TV stand KF E50A10 SU RG11M KF E42A10 SU RG11S Design and specifications are subject to change without notice ...

Page 52: ...nstalled in front of the TV or beside the TV When installing optional equipment leave some space between the optional equipment and the TV When changing channels turn off any equipment connected to the video input jack on the rear of the TV Broadcast signals are too strong Turn off or disconnect the booster if it is in use Double images or ghosting Check antenna cable connections Check the antenna...

Page 53: ...Program menu to preset the channel again page 35 If the sound of some channels is noisy select the channel then perform Manual Program in the Program menu and select the appropriate TV system TV System page 35 Good picture but no sound The volume level is too low Press 2 to increase the volume level The sound is muted Press or 2 to cancel the muting Set Speaker to On in the Sound menu page 32 The ...

Page 54: ...ches on and off or is distorted The sound switches between stereo and monaural frequently The antenna connection is loose or the antenna cable is damaged Check the cable and connection on the TV VCR and on the wall page 14 Adjust the antenna direction for the minimum interference Contact a Sony dealer for advice Signal transmission is low Try using a booster Otherwise use the fine tuning Fine func...

Page 55: ...s working temporarily when you press and resumes after a while To fix in the manually selected wide screen mode set Auto Wide to Off in the Screen menu page 33 100 appears at the top of the screen after approximately 10 seconds and there is no teletext display The channel carries no Teletext broadcast Teletext display is incomplete snowy picture or double images Your area may not be able to receiv...

Page 56: ...tibility 27 Personal computer 42 Phase 34 Picture 29 Picture Freeze 19 Picture menu 28 Picture Mode 28 Picture mode button 9 Pitch 34 Power 1 indicator 10 Power 1 switch 10 Power Management 39 Previous channel button 8 PROG buttons 9 10 Program Block 36 Program Label 36 Program menu 35 Program Sorting 37 R Remote control sensor 10 inserting batteries 13 overview 8 programming 45 Reset picture adju...

Page 57: ...57GB Additional Information ...

Page 58: ...58 GB ...

Page 59: ...59GB Additional Information ...

Page 60: ...Printed in Thailand ...

Reviews: