background image

Other Information

44

Preparation for Wall Mounting the KDL-40S2010 and KDL-46S2010

This TV can be installed on a wall by using a wall-mount bracket (sold 
separately). Before mounting the TV on a wall, the Table-Top Stand must be 
removed from the TV.

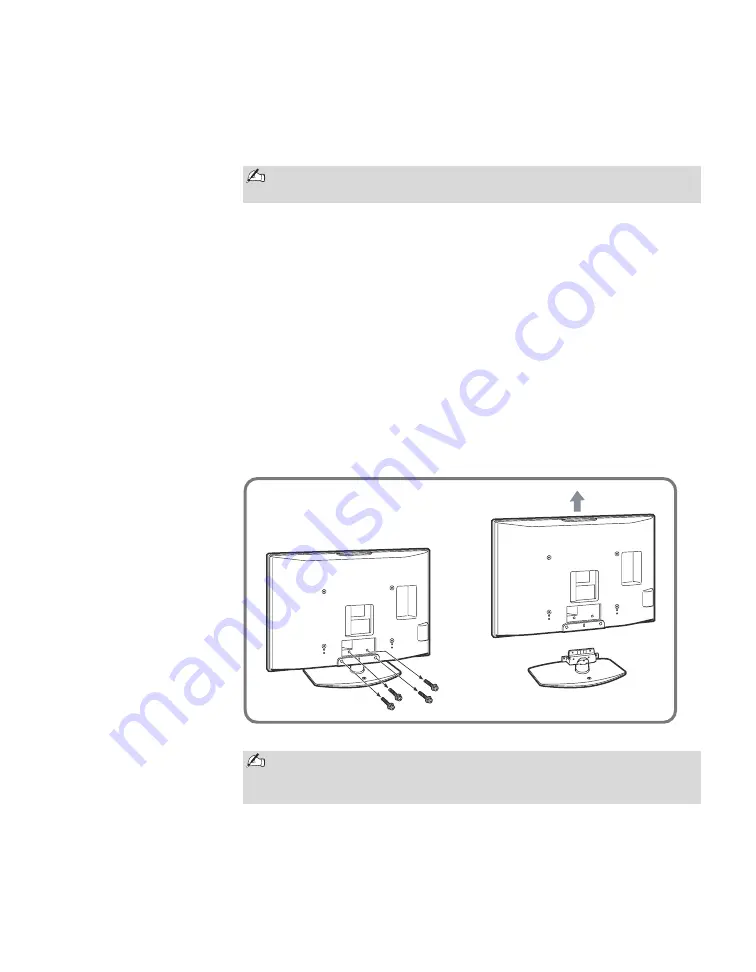
Follow the simple steps below to remove the Table-Top Stand:

1

Disconnect all the cables from the TV.

2

Start removing the screws from the ones on top. (See illustration below) 
Do not remove any other screws from the TV.

3

When screws are removed, lift the TV out. Make sure that you carry out 
this task with two people. Do not attempt to lift the TV by your self.

For bracket installation, refer to the instruction guide provided by the Wall-
Mount Bracket model for your TV. Sufficient expertise is required in 
installing this TV, especially to determine the strength of the wall for 
withstanding the TV’s weight. 

For product protection and safety reasons, 

Sony strongly recommends that you use the Wall-Mount Bracket model 
designed for your TV and the wall-mounting of your TV should be 
performed by Sony dealers or licensed contractors.

Do not remove the Table-Top Stand for any reason other than to wall-
mount the TV.

Be sure to store the removed screws and Table-Top Stand in a safe 
place until you are ready to reattach the Table-Top Stand.  Keep the 
screws away from small children.

Sony Wall-Mount 
Bracket Models 
SU-WL51 and 
SU-PW2

(KDL-40S2010/

KDL-46S2010)

Summary of Contents for KDL-32S2010 - 32" Bravia Lcd Hdtv

Page 1: ... 2006 Sony Corporation 2 889 166 12 2 LCD Digital Color TV Operating Instructions KDL 23S2010 KDL 32S2010 KDL 46S2010 KDL 26S2010 KDL 40S2010 ...

Page 2: ...t or to speak with a support representative United States 1 800 222 SONY 7669 8 00 AM 10 00 PM EST Mon Fri 10 30 AM 7 15 PM EST Sat Sun Canada Please Do Not Return the Product to the Store 1 877 899 SONY 7669 8 00 AM 6 00 PM Eastern 8 00 AM 5 00 PM Western Please contact Sony directly if you Have questions on the use of your television after reading your manual Experience difficulty operating your...

Page 3: ...e 4 Installing s The TV should be installed near an easily accessible power outlet s To prevent internal heat buildup do not block the ventilation openings s Do not install the TV in a hot or humid place or in a place subject to excessive dust or mechanical vibration s Avoid operating the TV at temperatures below 41 F 5 C s If the TV is transported directly from a cold to a warm location or if the...

Page 4: ... sources such as radiators heat registers stoves or other apparatus including amplifiers that produce heat 9 Do not defeat the safety purpose of the polarized or grounding type plug A polarized plug has two blades with one wider than the other A grounding type plug has two blades and a third grounding prong The wide blade or the third prong are provided for your safety If the provided plug does no...

Page 5: ...ure the antenna system is grounded so as to provide some protection against voltage surges and built up static charges Section 810 of the National Electrical Code NEC in the USA and Section 54 of the Canadian Electrical Code in Canada provides information with respect to proper grounding of the mast and supporting structure grounding of the lead in wire to an antenna discharge unit size of groundi...

Page 6: ...nt or near a swimming pool etc It may result in a fire or an electric shock s Do not let this TV get wet Never spill liquid of any kind on the TV If any liquid or solid object does fall through do not operate the TV It may result in electric shock or damage to the TV Have it checked immediately by qualified personnel s To prevent fire keep flammable objects or open flame e g candles away from the ...

Page 7: ... surface the TV may fall or drop and cause injury or damage Placing on a stable surface If you place the TV on an unstable surface the TV may fall and cause injury or damage Fall Do not hang anything on the TV The TV may fall from the stand or wall mount causing damage or serious injury Attachments Do not use attachments not recommended by the manufacturer as they may cause hazards VOLUME ADJUSTME...

Page 8: ...rer that have the same characteristics as the original parts Unauthorized substitutions may result in a fire an electric shock or other hazards Safety check Upon completion of any service or repairs to the TV ask the service technician to perform routine safety checks as specified by the manufacturer to determine that the TV is in safe operating condition and to so certify Should the TV not be rep...

Page 9: ...e TV 17 Setting Up the Channel List Initial Setup 18 Basic Operations Remote Control 19 TV Controls 22 Using the Menus Overview of MENU 23 Using the Picture Settings 26 Using the Sound Settings 28 Using the Screen Settings 29 Using the Setup Settings 31 Using the PC Settings 36 Using the Analog Setup Settings 37 Using the Digital Setup Settings 38 Other Information Troubleshooting 41 Preparation f...

Page 10: ......

Page 11: ...variety of optional equipment connection diagrams It is strongly recommended that you connect the antenna cable input using the supplied 75 ohm coaxial cable to receive optimum picture quality A 300 ohm twin lead cable can be easily affected by radio frequency resulting in signal deterioration When the antenna cable connection is done you must perform an Initial Setup so your TV will create a list...

Page 12: ...your TV Be sure to set Cable setting option to Cable On or Cable Off in Setup settings for the type of input signal you choose see page 34 75 ohm coaxial cable supplied Rear of TV VHF UHF input A B A A B RF Switch Rear of TV VHF UHF input Cable Antenna R AUDIO L VIDEO AUDIO RGB AUDIO MONO L R S VIDEO AUDIO L Y PB R R VIDEO IN PC IN HD DVD IN 1080i 720p 480p 480i 7 6 1 3 4 5 OPTICAL OUT AUDIO OUT V...

Page 13: ...se a VIDEO cable yellow instead of the S VIDEO cable Run the Initial Setup program as described in Setting Up the Channel List on page 18 after completing your connections VHF UHF VIDEO AUDIO MONO L R VIDEO IN S VIDEO 1 Y PB PR L R HD DVD IN 1080i 720p 480p 480i 5 4 AUDIOOUT AUDIO OPTICAL OUT 3 VAR FIX Rear of TV A V cable CATV cable Antenna cable supplied S VIDEO AUDIO L white AUDIO R red S VIDEO...

Page 14: ...ou have mono equipment connect its audio output jack to the TV s L MONO audio input jack 3 Headphones jack Connects to your headphones If your headphones do not match the jack use a suitable plug adapter not supplied While headphones are connected the TV speakers turn off and volume control affects headphone volume only Sound Setting options on page 28 have no effect while using headphones 4 PC IN...

Page 15: ...uipment A third composite video and audio VIDEO 2 input is located on the left side panel of the TV 8 AUDIO OUT VAR FIX Connect to the left and right audio input jacks of your audio or video equipment You can use these outputs to listen to your TV s audio through your stereo system 9 OPTICAL OUT PCM DOLBY DIGITAL Connects to the optical audio input of a digital audio equipment that is PCM Dolby di...

Page 16: ...ure to use the specified Wall Mount Bracket see page 3 when installing the TV on a wall Refer to the Instruction Guide supplied with the Wall Mount Bracket sold separately See page 43 or 44 for Table Top Stand removal Be sure to take measures to prevent the TV from toppling over and causing injury The supplied wood screw may not be used depending on the type of TV stand In this case or when the se...

Page 17: ...sted within the angles shown below Do not bundle the AC power cord with other connecting cables 1 2 3 When adjusting the angle or tilt hold the stand with one hand to avoid slipping or tipping the TV Adjust the angle left and right swivel for all models except for KDL 23S2010 Top view Front 15 15 15 15 Adjust the angle back and forth tilt for KDL 23S2010 only 3 8 Right view Front ...

Page 18: ...ss to turn on the TV The Initial Setup screen appears 2 Press V v to highlight the on screen display language Then press The message First please connect cable antenna Do you want to start Auto Program appears 3 Press B b to highlight OK then press The message Auto Program appears Then the message Continue programming digital channels appears This may require 50 minutes for completion 4 Press B b ...

Page 19: ...e modes Vivid Standard Custom The picture modes can be also accessed in the Picture settings For details see Using the Picture Settings on page 26 5 GUIDE Digital channels only Press to display the Guide when you are watching digital channels if it is available from the station Using the Guide The Guide allows you to select the channels from a channel list The Guide also provides information about...

Page 20: ... the broadcaster provides an alternate audio stream for instance the audio may contain a different language 6 RETURN Press to go back to the previous screen when displaying MENU items and settings 7 MENU Press to display the MENU with TV functions and settings See Overview of MENU on page 23 8 DIGITAL ANALOG Press to switch between analog and digital channels To enjoy the digital features of this ...

Page 21: ...s again to immediately turn off the display qg V v B b Press V v B b to move the on screen cursor Press to select confirm an item qh TOOLS Press to display the Tools Menu that is associated with your current input Analog TV Digital TV or External Inputs See page 26 28 31 36 and 37 qj JUMP Press to jump back and forth between two channels The TV alternates between the current channel and the last c...

Page 22: ... signals from the remote control Senses room light level and adjusts the screen brightness accordingly see page 33 for details Do not put anything near the sensor as its function may be affected 7 PIC OFF TIMER LED Lights up in green when the Picture Off feature is activated Lights up in orange when the timer is set When the timer is set this LED will remain lit even if the TV is turned off For de...

Page 23: ... select an option Press MENU to exit MENU provides one button access for controlling your TV It enables you to perform a variety of tasks intuitively with a control panel on the screen rather than a variety of remote control button presses When you press the MENU button you can easily perform basic TV functions such as switching between external inputs viewing your favorite analog digital stations...

Page 24: ... 1 Highlight Favorites on the MENU control panel and press 2 Make your selection by pressing V v to highlight the desired channel then press To add the current channel to the list of Favorite Channels follow step 1 above then highlight Add to Favorites and press To edit your list of favorite channels follow step 1 above then highlight and select Edit Favorites Analog The Analog feature takes you t...

Page 25: ...ous settings starts from page 26 Navigating Through Settings The Settings screen provides access to the features 1 Press MENU 2 Select 3 Highlight the item Picture Sound Screen Setup PC Settings Analog Setup Digital Setup 4 Press to select an option To exit Settings press MENU The options you can adjust vary depending on the situation Unavailable options are grayed out MENU Allows you to ...

Page 26: ...OOLS button on the remote control when in Analog TV Digital TV and External Inputs Reset Resets the current Picture Mode setting to the default values Backlight Adjust to brighten or darken the backlight Picture Adjust to increase or decrease picture contrast Brightness Adjust to brighten or darken the picture Color Adjust to increase or decrease color intensity Hue Adjust to increase or decrease ...

Page 27: ...es the contrast This setting is especially effective for dark images which increases the vibrancy of the picture Gamma Adjusts the balance between the light and dark areas of the picture Clear White Emphasizes white and light colors Live Color Makes colors more vivid MPEG Noise Reduction Reduces the mosaic effect in MPEG compressed video Effective for Digital TV programs If the function is set to ...

Page 28: ...etting to the default values except MTS Treble Adjust to increase or decrease higher pitched sounds Bass Adjust to increase or decrease lower pitched sounds Balance Adjust to emphasize left or right speaker balance Steady Sound On Select to stabilize the volume across all programs and commercials Off Select to turn off Steady Sound Surround TruSurround XT Select for surround sound for stereo progr...

Page 29: ...distortion Normal Select to display 4 3 picture in original size when the original source is 4 3 Normal is not available when you are watching 720p or 1080i sources Full Select to enlarge the picture horizontally to fill the screen when the original source is 4 3 Standard definition source When the original source is 16 9 High definition source select this mode to display 16 9 picture in original ...

Page 30: ...de setting as channels and inputs are changed set 4 3 Default to Off Display Area Select Normal to return to the default display area Select 1 or 2 to enlarge the picture so that the edges are outside the visible portion of the screen Horizontal Center Allows you to move the position of the picture left and right Press B b and press to choose a correction between Min 4 to 4 and Max Horizontal Cent...

Page 31: ... turned off CC1 CC2 CC3 CC4 Displays a printed version of the dialog or sound effects of a program Should be set to CC1 for most programs Text1 Text2 Text3 Text4 Displays network station information presented using either half or the whole screen if available Caption Vision can also be accessed using the TOOLS button on the remote control when in Analog TV Digital TV and External Inputs with the e...

Page 32: ...ssword for any future access into the Parental Lock settings If you lose your password see Lost password on page 42 Select Country U S A Select to use U S A ratings see page 34 Canada Select to use Canadian ratings see page 35 Label Video Inputs Allows you to identify A V equipment you connected to the TV such as a VCR DVD etc For example if you have a DVD player connected to the VIDEO 4 jack you ...

Page 33: ...tion channel number VHF UHF CATV or Digital and volume When Digital is selected the last digital channel you viewed will automatically show when the TV is turned on 3 Press MENU to exit Settings To return to the Timer Settings after programming the Timer or Current Time press B Timer will be set to Off when Auto Program for analog channels is executed the AC power cord is disconnected and then rec...

Page 34: ...ion Movie Rating G All children and general audience PG Parental guidance suggested PG 13 Parental guidance for children under 13 R Restricted viewing parental guidance is suggested for children under 17 NC 17 and X No one 17 or under allowed TV Rating Block programs by their rating content or both Age Based Ratings TV Y All children TV Y7 Directed to children age 7 and older TV G General audience...

Page 35: ...ental control feature off To reactivate the Parental Lock settings turn off the TV When the TV is turned on again your Parental Lock settings are reactivated Option Description English Rating C All children C8 Children 8 years and older G General programming PG Parental guidance 14 Viewers 14 and older 18 Adult programming French Rating G General programming 8 ans Not recommended for young childre...

Page 36: ... signals In such cases manually adjust the options below Auto Adjustment for PC can also be set using the TOOLS button on the remote control Phase Adjust after Pitch to fine tune overall sharpness Pitch Adjust uneven sharpness on screen For the PC Input Signal Reference Chart see page 45 Horizontal Center Allows you to move the position of the picture left and right Press B b and press to choose a...

Page 37: ... OK to start Auto Program When Auto Program is done the Show Hide Channels screen will appear See below Show Hide Channels Allows you to show or hide channels that appear when you use the CH buttons 1 Press V v to scroll through the channels until you find the channel you want to show or hide Then press to select it 2 Press V v to determine if the channel will be shown or hidden To show or hide mo...

Page 38: ... Start 2 Select OK to start Auto Program When Auto Program is done select OK Show Hide Channels Allows you to show or hide channels that appear when you use the CH buttons 1 Press V v to scroll through the channels until you find the channel you want to show or hide 2 Press to determine if the channel will be shown or hidden To show or hide more channels repeat steps 1 2 Channels that you set to b...

Page 39: ...ings allows you to set up the TV to block digital programs that contain digital ratings This setting is only available if digital ratings have been downloaded by your TV and ratings have been set for U S A in the Setup settings see page 31 Password If the password has not been set or to change the password use Change Password option in the Setup settings see page 32 Digital Rating Off Turn Parenta...

Page 40: ... to customize the following settings Character Size Small Standard Large Character Style Style 1 7 Character Color Color 1 8 Character Opacity Solid Translucent Edge Color Color 1 8 Edge Type None Raised Depressed Outline Left Shadow Right Shadow Background Color None Color 1 8 Background Opacity Solid Translucent Window Color None Color 1 8 Window Opacity Solid Translucent Option Description ...

Page 41: ...ings page 36 No picture from some video sources Check the connection between the optional video equipment and the TV Press TV VIDEO on the remote control page 19 If you connect video equipment to the S VIDEO input of the TV set Auto YC to On in the Setup settings page 33 Press MENU on the remote control Select your desired input from the External Inputs list Poor picture Double images or ghosts Ch...

Page 42: ...bottom of the screen For more details check the documentation that came with your DVD or contact your program provider Certain programs on DVD or other digital sources display a loss of detail especially during fast motion or dark scenes The compression used by certain digital broadcasts and DVDs may cause your TV s screen to display less detail than usual or cause artifacts small blocks or dots p...

Page 43: ...e sure to hold the Table Top Stand firmly while removing the last screw 6 Do not remove any other screws from the TV For bracket installation refer to the instruction guide provided by the Wall Mount Bracket model for your TV Sufficient expertise is required in installing this TV especially to determine the strength of the wall for withstanding the TV s weight For product protection and safety rea...

Page 44: ...r self For bracket installation refer to the instruction guide provided by the Wall Mount Bracket model for your TV Sufficient expertise is required in installing this TV especially to determine the strength of the wall for withstanding the TV s weight For product protection and safety reasons Sony strongly recommends that you use the Wall Mount Bracket model designed for your TV and the wall moun...

Page 45: ...elines 1024 768 56 5 70 VESA 1024 768 60 0 75 VESA WXGA 1280 768 47 4 60 VESA 1280 768 47 8 60 VESA 1360 768 47 7 60 VESA This TV s PC Input does not support Sync on Green or Composite Sync This TV s PC Input does not support interlaced signals This TV s PC Input supports signals in the above chart with a 60Hz vertical frequency For the best picture quality it is recommended to use signals with a ...

Page 46: ...control RM YD005 1 Size AA batteries 2 75 ohm coaxial cable 1 AC power cord 1 HD15 HD15 cable 1 Support belt 1 securing screw 1 and wood screw 1 Cable holder 1 Operating Instructions 1 Quick Setup Guide 1 Warranty Card 1 Online Registration Card U S A only 1 Optional accessories Headphones plug adapter Connecting cables Front Surround Home Theater Stand RHT G1000 Wall Mount Bracket SU PW2 KDL 40S2...

Page 47: ...d 22 Setting 33 M MENU Analog 24 Analog Favorites 24 Digital 24 Digital Favorites 24 Settings 25 MENU button 20 22 Mono MTS setting 28 Movie Rating 34 MTS 28 MUTING button 20 N Noise Reduction 26 O OPTICAL OUT 15 P Q Parental Lock 32 39 PC IN 14 Phase 36 PIC OFF LED 22 Picture 26 PICTURE button 19 Picture Mode 26 Pitch 36 POWER button 20 22 POWER LED 22 Power Management 36 Power Saving 33 Preparat...

Page 48: ...M EST Sat Sun Canada Please Do Not Return the Product to the Store 1 877 899 SONY 7669 8 00 AM 6 00 PM Eastern 8 00 AM 5 00 PM Western Please contact Sony directly if you Have questions on the use of your television after reading your manual Experience difficulty operating your televsion Sony will work to resolve your questions more quickly than your retailer or place of purchase z z Printed in U ...

Reviews: