


9 (E)
NSR-100/50/25 SYSETUPV3
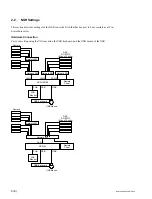
2-2-1. External Storage Device Connection Settings
1.
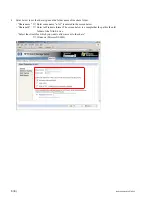
When the NSR GUI screen is displayed, execute the following to go to the command line mode.
Press Ctrl
+
Alt
+
F2 keys
n
Press Ctrl
+
Alt
+
F7 keys to return from the command line mode to the GUI screen.
2.
Login as below.
nsr login: nsradmin
Password: vespid175
Execute the following to display error messages correctly.
[nsradmin@nsr nsradmin]$ export LANG=C
n
When you execute a command with “sudo”, a password may be requested. In the case, enter
“vespid175”.
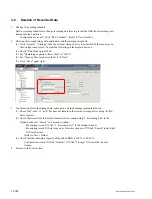
3.
Execute the following to set NAS connection.
Execute the following.
[nsradmin@nsr nsradmin]$ sudo /usr/Sony/bin/nsrnfsmounts.sh -1
The name, share, mount point, and status of existing NAS are displayed. When there is no
existing NAS, no one displayed.
Execute the following.
[nsradmin@nsr nsradmin]$ sudo /usr/Sony/bin/nsrnfsmounts.sh -a -s //
<server>/<path> -u <username> -p <password>
Enter the following into < > respectively.
<server>:
NAS IP address
<path>:
Share path name
<username>: User name for access to NAS (“Administrator” normally)
<password>: Password for access to NAS (“hpinvent” default)
[nsradmin@nsr nsradmin]$ sudo /usr/Sony/bin/nsrnfsmounts.sh -1
When the above settings were successfully completed, the name, share, mount point, and status of the
NAS set above are displayed.
(Ex)
name share mountpoint status
nfs1 //192.168.0.1/nfs1 /mnt/nfs/nfs1 OK
When these do not appear, check connection and settings of NASs, and then execute Step 3 again.
4.
Carry out Step 3 for other NAS to be connected.
5.
Reboot the NSR as below.
[nsradmin@nsr nsradmin]$ sudo /sbin/shutdown -r now
6.
Proceed to the next section.


