Sony HKSP-1125 User Manual Download Page 29

29

“メモリースティック”を使う

“メモリースティック”について

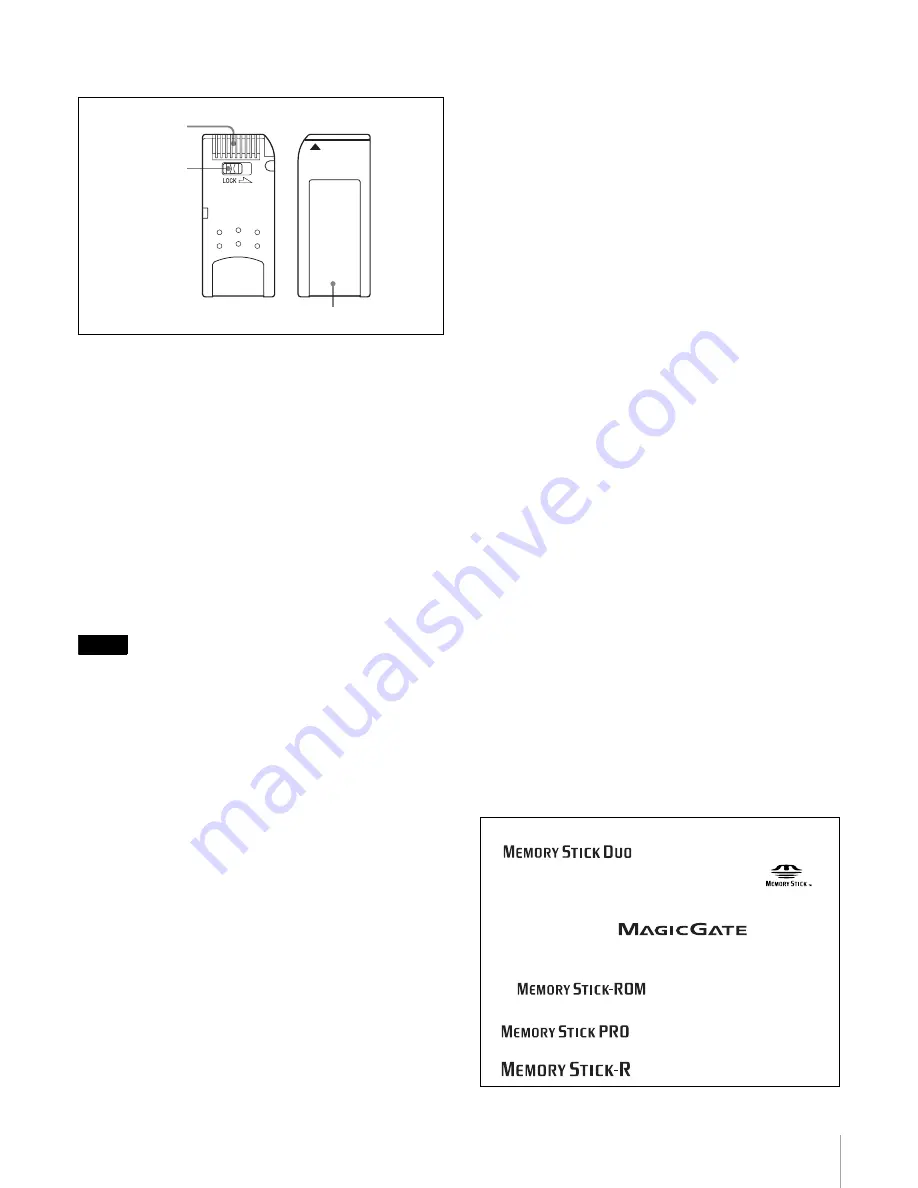
誤消去防止ツマミを「LOCK」にすると記録や編集、消
去ができなくなります。

誤消去防止ツマミの位置や形状は、お使いの“メモリー
スティック”によって異なることがあります。

“メモリースティック デュオ”の誤消去防止スイッチを

動かすときは、先の細いもので動かしてください。

以下の場合、データが破壊されることがあります。
― 読み込み中、書き込み中に“メモリースティック”を

取り出したり、本機の電源を切った場合

― 静電気や電気的ノイズの影響を受ける場所で使用した

場合

大切なデータは、バックアップを取っておくことをおす
すめします。

ご注意

ラベル貼り付け部には、専用ラベル以外は貼らないでく
ださい。

ラベルを貼るときは所定のラベル貼り付け部に貼ってく
ださい。はみ出さないようにご注意ください。

“メモリースティック デュオ”のメモエリアに書き込む

ときは、あまり強い圧力をかけないでください。

持ち運びや保管の際は、付属の収納ケースに入れてくだ
さい。

端子部には手や金属などで触れないでください。

強い衝撃を与えたり、曲げたり、落としたりしないでく
ださい。

分解したり、改造したりしないでください。

水にぬらさないでください。

以下のような場所でのご使用や保管は避けてください。
― 高温になった車の中や炎天下など気温の高い場所
― 直射日光のあたる場所
― 湿気の多い場所や腐食性のある場所

“メモリースティック”の初期化(フォー

マット)について

“メモリースティック”は、出荷時に専用の標準フォーマッ

ト形式でフォーマットされています。お客様ご自身で“メ
モリースティック”のフォーマットをされる場合には、本
機でフォーマットされることをおすすめします。

“メモリースティック”をパソコンでフォー

マットするときのご注意

お手持ちのパソコンなどで“メモリースティック”を
フォーマットする場合は、次の点にご注意ください。
パソコンでフォーマットした“メモリースティック”は、
本機での動作を保証いたしません。一度パソコンでフォー
マットした“メモリースティック”を、本機で使用するに
は、本機で再度フォーマットする必要があります。なお、
この場合“メモリースティック”内に記録してあるデータ
はすべて消去されますので、ご注意ください。

◆ メモリーステックのフォーマットのしかたについては、 

UCP-8060 の Operation Manual をご覧ください。

ステータスインジケーター点灯中および点
滅中は

データの読み込み(緑)、または書き込み(赤)を行ってい
ます。このとき、本機に振動や強い衝撃を与えないでくだ
さい。また、本機の電源を切ったり、“メモリースティッ
ク”を取りはずしたりしないでください。データがこわれ
ることがあります。

使用上のご注意

データの損失を防ぐため、データは頻繁にバックアップを取る
ようにしてください。万一、データが損失した場合、当社は一
切その責任を負いかねます。

あなたが記録したものは、個人として楽しむなどのほかは、著
作権上、権利者に無断で使用できません。

本機のソフトウェアの仕様は、改良のため予告なく変更するこ
とがありますが、ご了承ください。

ラベル貼り付け部

誤消去防止つまみ

端子

Memory Stick Duo(“メモリースティックデュオ”)および

は、ソニー株式会社の商標です。

Memory Stick(“メモリースティック”)および

は、

ソニー株式会社の商標です。

MagicGate Memory Stick(“マジックゲートメモリー 
スティック”)および

は、ソニー株

式会社の商標です。

Memory Stick-ROM(“メモリースティック -ROM”)およ

は、ソニー株式会社の商標です。

Memory Stick PRO(“メモリースティック PRO”)および

は、ソニー株式会社の商標です。

Memory Stick R(“メモリースティック R”)および

は、ソニー株式会社の商標です。

Summary of Contents for HKSP-1125

Page 1: ...Universal Control Panel UCP 8060 Operation Software for HD UP CONVERTER HKSP 1125 User s Guide Japanese English 1st Edition Revised 2 Software Version 1 11 and Later ...

Page 2: ...translated or reduced to any machine readable form without prior written approval from Sony Corporation SONY CORPORATION PROVIDES NO WARRANTY WITH REGARD TO THIS MANUAL THE SOFTWARE OR OTHER INFORMATION CONTAINED HEREIN AND HEREBY EXPRESSLY DISCLAIMS ANY IMPLIED WARRANTIES OF MERCHANTABILITY OR FITNESS FOR ANY PARTICULAR PURPOSE WITH REGARD TO THIS MANUAL THE SOFTWARE OR SUCH OTHER INFORMATION IN ...

Page 3: ...バージョンについて 4 各部の名称と働き 5 メニュー 7 メニューの構成 7 メニュー項目の機能 10 操作 21 オペレーションソフトウェアの起動と終了 21 調整項目の選択 21 調整値の設定 22 Unit ID の設定 22 オプションメニューの設定 23 ステータス表示 25 スナップショットデータのセーブとリストア 25 ロック機能 27 エラーおよび警告表示 27 メモリースティック を使う 28 メモリースティック について 28 日本語 ...

Page 4: ...HKSP 1125 用のオペレーションソフトウェアです ユニバーサルコン トロールパネル UCP 8060 にインストールして ネット ワーク上から複数の HKSP 1125 をコントロールすること ができます オペレーションソフトウェアの最新 バージョンについて オペレーションソフトウェアの最新バージョンの入手方法 は ソニーの営業担当にお問い合わせください インストール方法については UCP 8060 の Operation Manual をご覧ください ...

Page 5: ...号やエラー表示 など 現在のステータスを表示します g リストエリア このソフトウェアでコントロールできる項目がボタンとし て表示されます コントロールしたいボタンに触れると その項目を選択することができます h 調整値表示エリア 調整つまみ 1 2 3 4 に割り当てられているパラメー ターとその調整値を表示します 表示されている調整値は 対応する調整つまみを回して調整することができます ま た 調整したい調整値表示エリアに触れると数字入力画面 が表示され 数値を入力して調整することもできます i ジョグローラー 前後に回転し 項目の選択や数字の変更をします また ローラーを押すと 選択した項目を決定します j ジョグ L R ボタン 左側をジョグ L ボタン 右側をジョグ R ボタンと呼びま す 押して メニュー階層の移動などに使用します SYSTEM UCP 8060 b システムイ...

Page 6: ... に設定されています ファンクションボタン2 3 4 使用しません ファンクションボタン5 シフト メニュー画面を切り換 えます 緑色に点灯しているときに押すと次の画面に オレンジ色に点灯しているときに押すと前の画面に切 り換わります ロック機能については ロック機能 27 ページ をご覧く ださい l ステージパスエリア メニューのパスを表示します m タスクバー セレクト L R ボタンで実行できる項目やキーボードアイ コンなどが表示されます n セレクト L R ボタン 左側をセレクト L ボタン 右側をセレクト R ボタンと呼び ます タスクバーの各スイッチに対応する位置に表示され る機能を実行します o 調整つまみ 上から調整つまみ 1 2 3 4 と呼びます パラメーター の調整などに使用します ...

Page 7: ...t ON OFF Auto Aspect Auto Aspect Flag OFF ON Conversion Frame Field Adaptive Motion Select Position EC Position Control OFF ON LB Position Control OFF ON Edge Crop Position Letter Box Position Aspect Squeeze Semi Letter Box 13 9 Semi Letter Box 14 9 Semi Letter Box 15 9 Letter Box Edge Crop Setup Meta Data ARIB OFF ON Tx UMID OFF Line 9 Line 10 Line 11 Line 12 Line 13 Line 14 Line 15 Line 16 Line ...

Page 8: ... Ramp with Chroma 100 White Gray Recall Store Store User Save Recall Factory User Output FS Process Gray Freeze Format 720p 59 94 1080i 50 1035i 59 94 1080i 59 94 Input 9Pin Remote GPI HKDV 900 7 5 Setup Remove 7 5 Setup Remove OFF ON Ref Input Ref B Ref A Input Ref Format SD HD Input Video Analog D2 D1 Adjust Back Color Super Capture Left Position Right Position Mat Position Left Position Right P...

Page 9: ... Black Balance B Gamma Balance R Gamma Balance G Gamma Balance B HUE Video Gain Chroma Gain Hue Offset YPbPr YPbPr Master Gain Y Gain Pb Gain Pr Gain Setup Color Correct Mode RGB HUE YPbPr Off Enhancer Enhancer ON OFF Detail Gain Limiter Crisp Level Depend Frequency H V Ratio Gamma Gamma ON OFF Gamma Curve Delay Audio Delay Audio Delay OFF ON Audio Sample Sync Phase Sync Phase Coarse Sync Phase Fi...

Page 10: ...ます ご注意 調整つまみでは設定できません スロット名およびユニット名の設定方法は HKSP 300 のインストレーションマニュアルをご覧ください Convert コンバージョンモー ドの調整を行いま す Audio Rate Convert オーディオレートコンバートの制御を行います ON オーディオレートコンバートを働かせます OFF オーディオレートコンバートを働かせません ご注意 Ref Input の設定を Input にすると OFF 固定となります Auto Aspect オートアスペクトフ ラグの制御をおこな います Auto Aspect Flag ビデオ信号中のフラグに従うかどうかを設定します OFF オート OFF フラグに従いません ON オート ON フラグに従います Conversion コンバージョンモードを選択します Frame フレームモード Field ...

Page 11: ...きに調 整できます Letter Box Position 設定範囲 1080i 59 94 出力の場合 31 32 センターは Line52 Letter Box 時 10 9 センターは Line31 Semi Letter Box13 9 時 17 16 センターは Line38 Semi Letter Box14 9 時 24 24 センターは Line45 Semi Letter Box15 9 時 1080i 50 出力の場合 36 36 センターは Line59 720p 出力の場合 30 30 センターは Line52 Line 単位で可変 32 画像が下に張り付きます 31 画像が上に張 り付きます 工場出荷時の設定 0 ご注意 Aspect の設定が Letter Box および Semi Letter Box 3 種類 のときに調 整できます Aspect アスペクト...

Page 12: ...ine 17 ご注意 ライン選択は 各フォーマットごとに個々に設定されます Rx UMID UMID データ受信ライン番号を指定します Line 9 Line 22 UMID データ受信ライン番号を指定します 設定範囲 Line 12 Line 20 NTSC Line 9 Line 22 PAL ARIB ON のとき Line 18 Line 19 は選択できません 工場出荷時の設定 Line 17 ご注意 ライン選択は 各フォーマットごとに個々に設定されます Video SG 内部ビデオ信号の選 択を行います 以下の信号から選択します Off 内部信号発生回路を使用しません Color Bar 100 100 カラーバー Color Bar 75 75 カラーバー V Color Bar 100 100 縦カラーバー V Color Bar 75 75 縦カラーバー Ramp ランプ...

Page 13: ...59 94Hz インターレース 1080i 59 94 1080 ライン 59 94Hz インターレース Input 各種入力の設定を行 います 9Pin Remote 9ピンリモートコントロールの選択を行います GPI GPI HKDV 900 HD デジタルビデオコントローラー HKDV 900 7 5 Setup Remove セットアップ 7 5 を取り除きます OFF 通常の変換を行います ON セットアップ 7 5 を取り除き変換を行います 入力信号がアナログ NTSC もしくは D2 NTSC のときのみ有効です Ref Input 使用する同期信号を選択します Ref B REF IN B 端子に入力された信号 Ref A REF IN A 端子に入力された信号 Input ビデオ入力信号 ご注意 Output Delay の設定が Minimum または Adjust の...

Page 14: ...ラーのレベル調整を行います Y Level Y レベルを調整します デフォルト 0 設定範囲 0 100 Pb Level Pb レベルを調整します デフォルト 50 設定範囲 0 100 Pr Level Pr レベルを調整します デフォルト 50 設定範囲 0 100 Back Color Mode バックカラーのモードを選択します Super バックカラーモードが Super になります Mat バックカラーモードが調整可能となります Off バックカラーモードが調整不可能となります Color Correct カラーコレクト機能 の調整を行います CLIP クリッピングの調 整を行います ご注意 Color Correct Mode の設定が Off のときは タッチパネルのボ タンは暗く表示さ れ 選択できませ ん White Clip ホワイトクリップの調整を制御します OFF...

Page 15: ... Gain マスターゲインを調整します 設定範囲 0 141 0 1 単位 工場出荷時の設定 100 R Gain R ゲインを調整します 設定範囲 0 141 0 1 単位 工場出荷時の設定 100 G Gain G ゲインを調整します 設定範囲 0 141 0 1 単位 工場出荷時の設定 100 B Gain B ゲインを調整します 設定範囲 0 141 0 1 単位 工場出荷時の設定 100 Offset オフセットを調整します 設定範囲 10 10 0 5 単位 工場出荷時の設定 0 ファンクションボタン 5 シフト を押して 画面を切り換えてください White Clip R R チャンネルのホワイトクリップの調整を制 御します OFF R チャンネルのホワイトクリップ調整 不可能となります ON R チャンネルのホワイトクリップ調整可 能となります ご注意 Gamma の設定が...

Page 16: ...定が ON で かつ White Clip の設定が OFF のときのみ働きます White Clip R R チャンネルのホワイトクリップレベルを調 整します 設定範囲 93 107 3 5 単位 工場出荷時の設定 100 ファンクションボタン 5 シフト を押して 画面を切り換えてください ご注意 Gamma の設定が ON で かつ White Clip の設定が OFF のときのみ働きます White Clip G G チャンネルのホワイトクリップレベルを調 整します 設定範囲 93 107 3 5 単位 工場出荷時の設定 100 ファンクションボタン 5 シフト を押して 画面を切り換えてください ご注意 Gamma の設定が ON で かつ White Clip の設定が OFF のときのみ働きます White Clip B B チャンネルのホワイトクリップレベルを調 整します...

Page 17: ... Black Clip の 設定が OFF のときのみ働きます Black Balance B B チャンネルのブラックバランスを調整しま す 設定範囲 10 10 0 5 単位 工場出荷時の設定 0 ご注意 Offset の設定が 0 で かつ Black Clip の 設定が OFF のときのみ働きます Gamma Balance R R チャンネルのガンマバランスを調整します 設定範囲 0 38 0 52 0 01 単位 工場出荷時の設定 0 45 ご注意 Gamma の設定が ON のときのみ働きます Gamma Balance G G チャンネルのガンマバランスを調整します 設定範囲 0 38 0 52 0 01 単位 工場出荷時の設定 0 45 ご注意 Gamma の設定が ON のときのみ働きます Gamma Balance B B チャンネルのガンマバランスを調整します 設...

Page 18: ...出荷時の設定 0 YPbPr YPbPr モードでの 調整を行います ご注意 Color Correct Mode の設定が YPbPr のときに選 択できます YPbPr Master Gain マスターゲインを調整します 設定範囲 0 141 0 1 単位 工場出荷時の設定 100 Y Gain Y ゲインを調整します 設定範囲 0 141 0 1 単位 工場出荷時の設定 100 Pb Gain Pb ゲインを調整します 設定範囲 0 141 0 1 単位 工場出荷時の設定 100 Pr Gain Pr ゲインを調整します 設定範囲 0 141 0 1 単位 工場出荷時の設定 100 Setup セットアップを調整します 設定範囲 10 10 0 5 単位 工場出荷時の設定 0 ファンクションボタン 5 シフト を押して画面を切 り換えてください Color Correct Mode ...

Page 19: ...設定 32 Crisp ディテール信号にクリスピニングをかけるレベルを調整します 設定範囲 0 15 工場出荷時の設定 8 Level Depend 暗部のディテールの圧縮率を調整します 設定範囲 0 15 工場出荷時の設定 8 Frequency H ディテールの周波数を選択します 設定範囲 0 3 工場出荷時の設定 2 ファンクションボタン 5 シフト を押して画面を切り換えてください H V Ratio H V ディテール信号の混合比を選択します 設定範囲 0 7 工場出荷時の設定 3 ファンクションボタン 5 シフト を押して画面を切り換えてください Gamma ガンマの調整を行い ます Gamma ガンマ調整の制御を行います ON ガンマ調整可能となります OFF ガンマ調整不可能となります Gamma Curve ガンマ特性を調整します 設定範囲 0 38 0 52 0 01 ...

Page 20: ... サンプル 工場出荷時の設定 61 Sync Phase 同期信号の位相調整 を行います Sync Phase Coarse 粗調整します 調整範囲 128 127 1 ステップ単位 工場出荷時の設定 0 Sync Phase Fine 微調整します 調整範囲 0 1024 8 ステップ単位 工場出荷時の設定 0 2Frame Delay 2フレームディレイ を制御します OFF 変更なし ON 2 フレームディレイします Output Delay 出力のディレイ量を 調整します Minimum ディレイ量が最小となります Adjust ディレイ量を調整します ディレイ量は HD のライン単位で可変となります 設定範囲 740 1171 ライン 工場出荷時の設定 1125 ご注意 Output Delay の設定が Minimum または Reference のときは ボタンは 暗く表示さ...

Page 21: ...L ボタン Option を押す Option Menu が表示されます 2 ジョグローラーを回して 8 Exit Application を選択 する 3 ジョグローラーを押す HKSP 1125 が終了し UCP 8060 のメイン画面が 表示されます Option Menu の 8 Exit Application を押して終了するこ ともできます 調整項目の選択 画面に表示されているボタンに触れて希望する項目を選択 します 表示されるボタンには次の3種類の機能があります 次の選択肢をリスト表示する 表示されている項目を設定または実行する 押すたびに On Off の設定を交互に切り換える たとえば Output Delay を調整したいときは 次の手順で 調整項目を選択します 1 Output ボタンを押す 2 Output Delay ボタンを押す リストエリアの左から 3 列目...

Page 22: ...を押す 数字入力画面が消え 入力した数値が調整値表示エリ アに表示されます 入力した数値を取り消すには Enter または Trim ボタン を押す前に Clear ボタンを押します 数値入力を取り消すには Cancel ボタンを押します 設定されている値をデフォルトに戻すには Unity ボタンを押します ユーザーが設定したデフォルト 値に戻ります 詳しくは 13 ページをご覧ください Unit ID の設定 調整値表示エリアに表示される Unit ID の値は数値を入力 して設定します 1 リストエリアの Slot ボタンを押す 調整値表示エリアに Unit ID の調整値が表示されま す 2 Unit ID の調整値表示を押す 数字入力画面が表示されます 3 設定したい数値を入力し Connect ボタンを押す 数字入力画面が消え 入力した数値が調整値表示エリ アに表示されます 入力...

Page 23: ...決定します 各接続機器は本ルール で Category ID が決まっており 通常 Group ID は 1 に 設定し Unit ID の指定のみで接続することができます 通信履歴を消去するには 画面右下の Clear ボタンを押してから手順4を実行しま す Group ID と Unit ID の変更した値が保存され 通信 履歴が消去されます 手順4を実行する前に Clear ボタンを再度押すと 消去は キャンセルされます 3 Top Page 本ソフトウェアを起動するときに どの画面から起動する かを設定します Default Page トップ画面から起動します This Page Option Menu 選択直前の画面から起動しま す 1 3 Top Page を選択する 2 ジョグL RボタンでDefault PageまたはThis Pageを 選択する 3 セレクト R ボタン...

Page 24: ...ない場合は セレクト L ボタン Cancel を押します 6 Background 表示窓の背景色を設定します ご注意 タスクバーは固定色となっているため 背景色を変えるこ とはできません Present には現在の背景色が パレット A には選択中の背 景色が表示されます Select1 4 と Default から好きな 色を選択できます カラーバーを使って Present Default Select1 4 の パレットの色を基準に 次の手順で背景色を変更すること ができます Default と Select1 4 の色は 6 Background を再度選択すると元の色に戻り 変更され ません 変更した色が保持されるのは Present の背景色だ けです 1 6 Background を選択する 2 変更したいパレットを選択する 選択したパレットの色が A に表示されます 3 ...

Page 25: ...るには 1 ジョグ L R ボタンを押して Save を選択する 2 セレクト R ボタン OK を押す 3 メモリースティックを挿入する 4 セレクト R ボタン Go を押す Save Snapshot File スナップショットファイルセー ブ 画面が表示されます メモリースティックに保存するファイル名とファイル に追記するコメントが表示されます ファイル名は Unit ID とスロットを元に自動的に作成 され 拡張子は UPC となります コメントは HKSP 1125 の現在の動作モードとフォー マットの設定値になります Status Menu Exit Snapshot Slot Slot1 Mode Format Trs Mode Audio Channel Ref Format Ref Input Auto Freeze Test Image Ref Input Warni...

Page 26: ...スティックに ASCII コード以外の文字を使用 したファイル名やフォルダー名が存在すると ファイ ル一覧を表示しない場合があります 5 ジョグローラーを回して 設定したいファイル名を反 転表示させ セレクト L ボタン Select を押す ファイルが保持している設定情報の一覧 スナップ ショットファイルリストア画面 が表示されます Cancel Select Snapshot File List Restore Snapshot File 2003 04 21 19 21 2003 02 27 10 16 2003 02 26 20 37 2003 02 26 20 19 2003 02 26 19 07 2003 02 26 18 20 2003 02 26 16 03 2003 02 26 12 02 2003 02 26 09 34 2003 02 25 20 26 2003 0...

Page 27: ... Status Menu 画面では ファンクショ ンボタン1のロック機能は解除できません 数字入力画面が表示されているときは ロック機能を設 定することはできません ロック機能を解除するには ファンクションボタン1を消灯するまで押します ロック 機能が解除されます エラーおよび警告表示 エラーまたは警告状態のときにステータスエリアに次のア イコンが表示されます ステータスエリアに触れると エ ラーおよび警告コードを表示します コミュニケーションエラー 通信ができません 警告 ワーニングメッセージがあります エラー エラーメッセージがあります コミュニケーションエラーの場合は 接続機器の IP アドレ スおよび接続状態を確認し IP Address の設定をしてくだ さい IP Address の設定については 2 IP Address 23 ページ をご覧ください エラーおよび警告コードの...

Page 28: ...スティック PRO メモリースティック PRO 対応機器でのみお使いいただ ける 著作権保護技術 マジックゲート を搭載した メ モリースティック です メモリースティック メモリーセレクト機能付き 内部に複数のメモリー 128MB を搭載している メモ リースティック です メモリースティック 本体裏面のメモリーセレクトスイッ チにより 用途に応じてご使用になるメモリーを選択でき ます 各メモリーを同時に また連続でご使用することが できません 使用可能な メモリースティック 本機では メモリースティック メモリースティック PRO マジックゲート メモリースティック がご使用い ただけます ただし 本機はマジックゲート規格に対応し ていないため 本機で表示するデータはマジックゲートに よる著作権の保護の対象にはなりません メモリースティック PRO について 本機で使える メモリーステ...

Page 29: ...をおすすめします メモリースティック をパソコンでフォー マットするときのご注意 お手持ちのパソコンなどで メモリースティック を フォーマットする場合は 次の点にご注意ください パソコンでフォーマットした メモリースティック は 本機での動作を保証いたしません 一度パソコンでフォー マットした メモリースティック を 本機で使用するに は 本機で再度フォーマットする必要があります なお この場合 メモリースティック 内に記録してあるデータ はすべて消去されますので ご注意ください メモリーステックのフォーマットのしかたについては UCP 8060 の Operation Manual をご覧ください ステータスインジケーター点灯中および点 滅中は データの読み込み 緑 または書き込み 赤 を行ってい ます このとき 本機に振動や強い衝撃を与えないでくだ さい また 本機の電源を切ったり ...

Page 30: ...4 Functions of the Menu Items 37 Operations 49 Starting and Terminating the Operation Software 49 Selecting an Item to be Adjusted 49 Adjustment 50 Setting the Unit ID 50 Setting the Option Menu 51 Status Display 53 Saving and Restoring the Snapshot Data 53 Lock Function 55 Error and Warning Display 55 Using a Memory Stick 56 About a Memory Stick 56 English ...

Page 31: ...ed on the UCP 8060 Universal Control Panel and controls multiple HKSP 1125 units via the network Latest Version of the Operation Software As for the latest version of the operation software consult your Sony representative To install the latest version refer to the Operation Manual for the UCP 8060 ...

Page 32: ...nstalled error messages etc g List area Shows the items that are controlled with this operation software as buttons When you touch a button the function assigned to the button is performed h Adjusted value display area Shows the parameters assigned to the corresponding control knobs and the set values A value can be adjusted by turning the control knob You can directly enter the value on the numbe...

Page 33: ...appears and when you press the button lit in orange the previous page appears For details on the lock function see Lock Function on page 55 l Stage path area Shows the path of the menu m Task bar Shows the items performed by pressing the select L or R button keyboard icon etc n Select L R buttons The left button is the select L button and the right button is the select R button Press these buttons...

Page 34: ...udio Rate Convert ON OFF Auto Aspect Auto Aspect Flag OFF ON Conversion Frame Field Adaptive Motion Select Position EC Position Control OFF ON LB Position Control OFF ON Edge Crop Position Letter Box Position Aspect Squeeze Semi Letter Box 13 9 Semi Letter Box 14 9 Semi Letter Box 15 9 Letter Box Edge Crop Setup Meta Data ARIB OFF ON Tx UMID OFF Line 9 Line 10 Line 11 Line 12 Line 13 Line 14 Line ...

Page 35: ...V Ramp with Chroma 100 White Gray Recall Store Store User Save Recall Factory User Output FS Process Gray Freeze Format 720p 59 94 1080i 50 1035i 59 94 1080i 59 94 Input 9Pin Remote GPI HKDV 900 7 5 Setup Remove 7 5 Setup Remove OFF ON Ref Input Ref B Ref A Input Ref Format SD HD Input Video Analog D2 D1 Adjust Back Color Super Capture Left Position Right Position Mat Position Left Position Right ...

Page 36: ...G Black Balance B Gamma Balance R Gamma Balance G Gamma Balance B HUE Video Gain Chroma Gain Hue Offset YPbPr YPbPr Master Gain Y Gain Pb Gain Pr Gain Setup Color Correct Mode RGB HUE YPbPr Off Enhancer Enhancer ON OFF Detail Gain Limiter Crisp Level Depend Frequency H V Ratio Gamma Gamma ON OFF Gamma Curve Delay Audio Delay Audio Delay OFF ON Audio Sample Sync Phase Sync Phase Coarse Sync Phase F...

Page 37: ...annot be set using the control knob For details on setting the slot name and unit ID refer to the Installation Manual for the HKSP 300 Convert Adjusts the conversion mode Audio Rate Convert Controls the audio rate conversion ON The audio rate conversion is enabled OFF The audio rate conversion is disabled Note If Ref Input is set to Input this item is fixed to OFF Auto Aspect Controls the auto asp...

Page 38: ...tion Adjustable range For 1080i 59 94 output 31 to 32 Center Line 52 for Letter Box 10 to 9 Center Line 31 for Semi Letter Box 13 9 17 to 16 Center Line 38 for Semi Letter Box 14 9 24 to 24 Center Line 45 for Semi Letter Box 15 9 For 1080i 50 output 36 to 36 Center Line 59 For 720p output 30 to 30 Center Line 52 Adjustable in units of lines 32 Picture placed at the bottom 31 Picture placed at the ...

Page 39: ...or UMID data reception Line 9 to Line 22 Designates the line number for UMID data reception Adjustable range Line 12 to Line 20 for NTSC Line 9 to Line 22 for PAL If ARIB is set to ON Line 18 and Line 19 cannot be selected Factory setting Line 17 Note Line selection is set for each video format Video SG Selects the internal video signal Selects a signal from among the following Off The internal si...

Page 40: ...ced 1080i 59 94 1080 lines 59 94 Hz interlaced Input Setting for the input signal 9Pin Remote Selects a 9 pin remote control unit GPI GPI HKDV 900 HKDV 900 HD Digital Video Controller 7 5 Setup Remove Removes the 7 5 setup OFF Normal conversion is performed ON Conversion for removing the 7 5 setup is performed This is enabled only when the input signal is an analog NTSC signal or the D2 NTSC signa...

Page 41: ...in 2 steps Mat Position Adjusts the range for the back color Left position Left change position from 0 to 32 in 2 steps Right position Right change position from 0 to 32 in 2 steps Level Adjusts the back color Y Level The Y level is adjusted Default 0 Adjustable range 0 to 100 Pb Level The Pb level is adjusted Default 50 Adjustable range 0 to 100 Pr Level The Pr level is adjusted Default 50 Adjust...

Page 42: ...ecome invalid White Clip Controls the white clip level Adjustable range 93 to 108 in 1 steps Factory setting 100 Black Clip Adjusts the black clip level Adjustable range 6 to 7 in 1 steps Factory setting 0 RGB Adjusts in RGB mode Note If Color Correct Mode is set to RGB this is enabled RGB1 RGB Master Gain Adjusts the master gain Adjustable range 0 to 141 in 0 1 steps Factory setting 100 R Gain Ad...

Page 43: ...ed ON The white clip adjustment for the G channel is enabled Note This is enabled only when Gamma is set to ON and White Clip is set to OFF White Clip B Controls the white clip for the B channel OFF The white clip adjustment for the B channel is disabled ON The white clip adjustment for the B channel is enabled Note This is enabled only when Gamma is set to ON and White Clip is set to OFF White Cl...

Page 44: ...ion 5 button shift Note This is enabled only when Gamma is set to ON and White Clip is set to OFF RGB2 Black Balance R Adjusts the black balance for the R channel Adjustable range 10 to 10 in 0 5 steps Factory setting 0 Note This is enabled only when Offset is set to 0 and Black Clip is set to OFF Black Balance G Adjusts the black balance for the G channel Adjustable range 10 to 10 in 0 5 steps Fa...

Page 45: ...amma is set to ON Gamma Balance G Adjusts the gamma balance for the G channel Adjustable range 0 38 to 0 52 in 0 01 steps Factory setting 0 45 Note This is enabled only when Gamma is set to ON Gamma Balance B Adjusts the gamma balance for the B channel Adjustable range 0 38 to 0 52 in 0 01 steps Factory setting 0 45 Note This is enabled only when Gamma is set to ON ...

Page 46: ...YPbPr mode Note If Color Correct Mode is set to YPbPr this is enabled YPbPr Master Gain Adjusts the master gain Adjustable range 0 to 141 in 0 1 steps Factory setting 100 Y Gain Adjusts the Y gain Adjustable range 0 to 141 in 0 1 steps Factory setting 100 Pb Gain Adjusts the Pb gain Adjustable range 0 to 141 in 0 1 steps Factory setting 100 Pr Gain Adjusts the Pr gain Adjustable range 0 to 141 in ...

Page 47: ...ng 8 Level Depend Adjusts the compression ratio for the detail signal of dark area Adjustable range 0 to 15 Factory setting 8 Frequency Selects the frequency for the H detail Adjustable range 0 to 3 Factory setting 2 Change the page by pressing Function 5 button shift H V Ratio Selects the mixing ratio of the H V detail signal Adjustable range 0 to 7 Factory setting 3 Change the page by pressing F...

Page 48: ...rse For coarse adjustments Adjustable range 128 to 127 in 1 step Factory setting 0 Sync Phase Fine For fine adjustments Adjustable range 0 to 1024 in 8 steps Factory setting 0 2 Frame Delay Controls the 2 frame delay OFF No change ON The signal is delayed by two frames Output Delay Adjusts the delay of the output signal Minimum Minimum delay Adjust Adjusts the delay The signal is delayed according...

Page 49: ...ing the operation software 1 Press the select L button Option on the top page of this operation software The Option Menu appears 2 Turn the jog roller to select 8 Exit Application 3 Push the jog roller The operation software terminates and the Main Screen appears You can also select 8 Exit Application by touching in on the screen Selecting an Item to be Adjusted Touch a button on the touch panel t...

Page 50: ...before pressing the Enter or Trim button To cancel the entered value Press the Cancel button Retrieving the default values Press the Unity button The default values set by User Save is retrieved For details see page 40 Setting the Unit ID The Unit ID displayed in the adjusted value display area is set by entering the numeric value 1 Press the Slot button in the list area The Unit ID appears in the...

Page 51: ...d the Group ID is set to 1 so that specifying the Unit ID is enough to enable the connection To clear the communication history Press the Clear button inthe lower right of the display and perform step 4 The value whose Group ID and Unit ID have been changed is stored and the communication history is cleared If you press the Clear button again before performing step 4 clearing of the communication ...

Page 52: ...or of the task bar is fixed You cannot change the background color Palette Present shows the current background color and palette A shows the color to be adjusted You can select any desired color from Select 1 through 4 and Default The background color can be changed based on the color of Present Default and Select 1 to 4 with the following procedures When 6 Background is selected again the color ...

Page 53: ...File display appears Saving the snapshot data 1 Press the jog L or R buttons to select Save 2 Press the select R button OK 3 Insert the Memory Stick in the Memory Stick slot 4 Press the select R button Go The Save Snapshot File display appears File Name to store data in the Memory Stick and Comments appear The filename is automatically created based on the Unit ID and slot number and has the exten...

Page 54: ...on OK 3 Insert the Memory Stick into the Memory Stick slot 4 Press the select R button Go A list of files with the extension UPC in MSSONY PRO UCP in the Memory Stick Snapshot File List appears Note If a filename or folder name having any non ASCII characters exists in the Memory Stick the file list may not appear 5 Turn the jog roller to highlight the filename to be set on the HKSP 1125 then pres...

Page 55: ...n pressed until it goes out and the lock function is released Error and Warning Display If you touch the status area in error or warning status one of the following icons will appear If you touch the status area an error or warning code is displayed communication error A communication error has been generated warning A warning message is posted error An error message is generated If a communicatio...

Page 56: ...Memory Stick PRO Memory Stick with memory select function Equipped with the multiple memories 128 MB You can select the memory to use with the memory selects switch on the back of the Memory Stick You cannot use different memories simultaneously or continuously Available types of Memory Stick You can use various of Memory Stick Memory Stick and MagicGate Memory Stick with your product However beca...

Page 57: ... Stick on a personal computer Pay attention on the following points when formatting Memory Stick on a personal computer Operation of Memory Stick formatted on a personal computer is not guaranteed on this product To use a Memory Stick that has been formatted on a personal computer the Memory Stick must be reformatted on this product If it is not reformatted all data stored on the Memory Stick will...

Page 58: ... the property of Sony Corporation and is intended solely for use by the purchasers of the equipment described in this manual Sony Corporation expressly prohibits the duplication of any portion of this manual or the use thereof for any purpose other than the operation or maintenance of the equipment described in this manual without the express written permission of Sony Corporation ...

Page 59: ...HKSP 1125 UCP 8060 SY 3 776 983 03 1 2003 Sony Corporation ...

Reviews: