background image

3

  • When you select “Normal”

Repeat the procedure in step 2 to select 
the desired track.
The selected track starts playing.


• When you select “Group”, “Artist”, 

or “Album”

Repeat the procedure in step 2 to select 
the desired group, artist, or album, and 
then repeat the procedure in step 2 again 
to select the desired track.
The selected track starts playing.


• When you select “Bookmark”

Refer to “Listening to selected tracks 
only (Bookmark Play)” (

 this page).

Listening to selected 

tracks only 

(Bookmark Play)

You can bookmark tracks on a disc and play 
them only. The sequence of bookmarked 
tracks cannot be changed.

1

  While playing the track you want to 

bookmark, press the jog lever for 2 
seconds or more.

“ON” appears and “ ” flashes slowly in 
the display.

2

  Repeat step 1 to bookmark the 

other tracks.

3

  Do step 1 and select “Bookmark” 

in step 2 of “Playing tracks in the 
selected play mode” (

 this page).

4

  Move the jog lever toward 

/


to select a track, and then press the 
jog lever to enter.

The recorder plays from the selected 
bookmarked track to the last bookmarked 
track.

Selecting the play 

mode

This function can be set on the remote only.

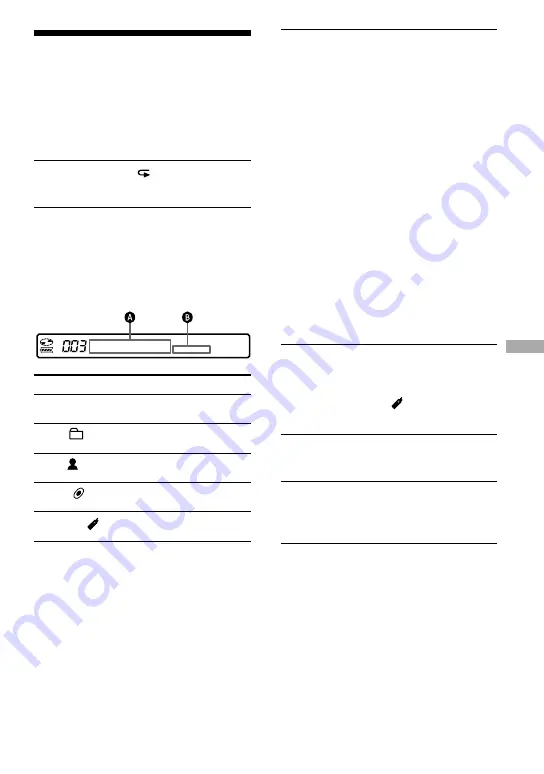
Playing tracks in the 

selected play mode

1

  Press P MODE/   for 2 seconds or 

more.

2

  Move the jog lever toward 

/


to select the desired play mode, and 
then press the jog lever.

When you move the jog lever, 

 changes, 

and when you press the jog lever, 


appears in the display.

Display 

/

Play mode

Normal/—

All tracks after the selected 
track are played.

Group/ 

Tracks in a specified group 
are played.

Artist/ 

 *

Tracks by a specified artist 
are played.

Album/ 

 *

Tracks in a specified album 
are played.

Bookmark/ 

Bookmarked tracks are 
played.

*Appears only for discs used in Hi-MD mode.

43

Playing a disc

MZ-RH1/MZ-M200.GB.2-669-084-11(1)

Summary of Contents for Hi-MD WALKMAN MZ-RH1

Page 1: ...Operating Instructions MZ RH1 MZ M200 2 669 084 11 2 Hi MD Walkman Portable MD Recorder 2006 Sony Corporation WALKMAN and WALKMAN logo are registered trademarks of Sony Corporation ...

Page 2: ...nly with the same or equivalent type Information IN NO EVENT SHALL SELLER BE LIABLE FOR ANY DIRECT INCIDENTAL OR CONSEQUENTIAL DAMAGES OF ANY NATURE OR LOSSES OR EXPENSES RESULTING FROM ANY DEFECTIVE PRODUCT OR THE USE OF ANY PRODUCT For customers who purchased this product in the USA Owner s Record The serial number is located at the rear of the disc compartment lid and the model number is locate...

Page 3: ...Remote control Earphones Declaration of Conformity Trade Name SONY Model No MZ RH1 MZ M200 Responsible Party Sony Electronics Inc Address 16530 Via Esprillo San Diego CA 92127 USA Telephone No 858 942 2230 This device complies with Part 15 of the FCC Rules Operation is subject to the following two conditions 1 This device may not cause harmful interference and 2 this device must accept any interfe...

Page 4: ...ge MD Simple Burner onto your computer 20 Connecting the recorder to your computer 21 Using SonicStage 23 Importing audio data 23 Transferring audio data from your computer to the recorder 24 Transferring audio data from the recorder to your computer 25 Viewing SonicStage Help 26 Using MD Simple Burner 27 Recording using the recorder operations Simple mode 27 Recording by computer operations Stand...

Page 5: ...d 45 Selecting the sound quality 6 Band Equalizer 45 Normalizing the playback sound level automatically Dynamic Normalizer 46 Editing Dividing a track Divide 47 Adjusting the dividing point before dividing a track Divide Rehearsal 47 Combining tracks Combine 48 Using the Menu Using the Menu 49 Menus for recording 50 Adjusting the recording level manually 52 Menu for playback 53 Menus for editing 5...

Page 6: ...he ability to display the languages on the software will depend on the installed OS on your PC For better results please ensure that the installed OS is compatible with the desired language you want to display We do not guarantee all the languages will be able to be displayed properly on the software User created characters and some special characters may not be displayed Depending on the type of ...

Page 7: ...rk of Intel Corporation MPEG Layer 3 audio coding technology and patents licensed from Fraunhofer IIS and Thomson All other trademarks and registered trademarks are trademarks or registered trademarks of their respective holders and marks are omitted in this manual CD and music related data from Gracenote Inc copyright 2000 2004 Gracenote Gracenote CDDB Client Software copyright 2000 2004 Gracenot...

Page 8: ...en manage the data on the computer Transfer music data recorded on the recorder or another MD component from the recorder to the computer Audio CDs Internet Music Files etc You can also transfer non audio data such as text data image data etc to the recorder Transfer audio data to the recorder LinearPCM ATRAC MP3 Recording by microphone Digital recording Analog recording The supplied optional head...

Page 9: ...nsfer for Mac 1 The shape of the plug differs according to the region where the recorder was purchased Two cords with differently shaped plugs are supplied with the models for Europe Asia and Chile Use the one that corresponds with the outlet configuration in the region where it is used 2 For the North American and Latin American models remote with a ferrite core is supplied 3 Do not play a CD ROM ...

Page 10: ...an Asian and Chilean models For the supplied remote control Wind the cord around the ferrite core once Approx 4 cm 1 6 in from the plug For the optional stereo microphone Wind the cord around the ferrite core twice Approx 1 cm 0 6 in from the plug For the optional line cable Wind the cord around the ferrite core once Approx 1 cm 0 6 in from the plug For the MZ RH1 North American and Latin American...

Page 11: ...hargeable battery When using optional headphones earphones use only headphones earphones with stereo mini plugs You cannot use headphones earphones with micro plugs You cannot use as follows Rotally commander RM WMC1 MD label printer MZP 1 IC memory repeat learning MD controller RPT M1 Your dealer may not handle some of the above listed accessories Please ask the dealer for detailed information ab...

Page 12: ...Guide to Parts and Controls Recorder Remote 12 ...

Page 13: ... pages 39 47 49 Move FF FR Push ENT FF FR Remote Jog lever play pause ENT AMS fast rewind AMS fast forward pages 39 49 USB cable connecting jack pages 14 21 37 Battery compartment page 14 group button pages 40 58 Clip page 10 P MODE repeat button pages 43 58 SOUND button pages 45 58 There is a tactile dot Locking the controls HOLD Slide the HOLD switch on the recorder or on the remote in the direc...

Page 14: ...SB cable AC power cord 5 Connect the other end of the USB cable to the recorder and the AC power cord to a wall outlet To a wall outlet Recorder To the USB cable connecting jack 6 Confirm that charging has started When charging starts and the charging time Charging min left appear at the start of charging When the charging time disappears charging ends once and the battery becomes sufficiently charg...

Page 15: ...hargeable battery to decrease over time As a result the displayed charging time will become shorter as the battery is used Stop the recorder before replacing the rechargeable battery Connecting the recorder to a wall outlet is recommended during times of long use as when recording It is possible to do operations on the recorder or the remote while charging the battery with the AC power adaptor as ...

Page 16: ...Playing 60 74 80 minute standard disc 15 5 17 5 19 Measured in accordance with the JEITA Japan Electronics and Information Technology Industries Association standard 1 Measured using a fully charged lithium ion rechargeable battery with EL Light in the menu set to Auto Off page 59 2 When transferring at 128 kbps 3 The recorder cannot record in MP3 mode Transfer MP3 audio data using the supplied So...

Page 17: ...standard disc The disc contains material recorded in Hi MD mode Blank disc The disc contains material recorded in MD mode Select the operation mode in the Disc Mode page 59 setting of the recorder menu or the operation mode setting of the supplied software Hi MD mode You can enjoy the Hi MD functions A disc recorded in Hi MD mode cannot be used on an MD player or MD Walkman that does not support H...

Page 18: ...recorder appears in the Windows Explorer as an external drive allowing you to transfer non audio data such as text and image files For details refer to Storing non audio data to a disc page 30 Charging the rechargeable battery of the recorder USB bus power You can charge the rechargeable battery while the recorder is connected to a computer When using a Macintosh computer Refer to the Hi MD Music T...

Page 19: ... Windows Millennium Edition Windows 98 Second Edition Display High Color 16 bit or higher 800 600 dots or better 1 024 768 dots or better is recommended Others Internet access for online registration and CDDB use Internet access and Microsoft Internet Explorer version 5 5 or higher for use of EMD services Windows Media Player version 7 0 or higher installed for playing WMA files This software is no...

Page 20: ...using Windows 2000 Windows XP Virus check software is activated Such software demands a large amount of system resources 2 Insert the supplied CD ROM into the CD drive of your computer The setup program starts up automatically and the installation window appears 3 When the Region Selection screen appears select the region where the SonicStage software will be used and then click Next When the Regi...

Page 21: ...vice appears in the computer display This is not a problem Merely click OK to make the message disappear Power bus power is supplied from the USB port of the computer so that the recorder can be used without power being supplied from the battery Computer To the USB port USB cable To the USB cable connecting jack 1 Insert a disc into the recorder 2 Make sure the recorder is stopped and HOLD is rele...

Page 22: ...unction or the destruction of audio data If you use the recorder connected to the computer it is recommended that you insert a fully charged rechargeable battery as a precaution against power failures disconnection of the USB cable or other unforeseen occurrences We do not assure the results should there be a mis operation transfer failures or destruction of audio data caused by unforeseen occurre...

Page 23: ...eration in the case of the copy controlled CDs Music Source CD Info 1 Double click SonicStage icon on the desktop SonicStage starts up 2 Insert the audio CD that you want to record into the CD drive of your computer 3 Point to of Music Source and click Import a CD 4 Click The recording starts To stop recording Click If you want to change the format recording mode and bit rate for audio CD recordin...

Page 24: ...recorder to your computer page 21 2 Point to of Transfer and click Hi MD or Net MD 3 Click the tracks you want to transfer in the My Library list 4 Click The operation lamp on the recorder lights up in red and transfer of the selected track starts To stop transferring Click If you want to change the format and bit rate click before clicking in step 4 and set the format and bit rate Note Make sure ...

Page 25: ... connect the recorder to your computer page 21 2 Point to of Transfer and click Hi MD or Net MD 3 In the list on the right side of the screen Hi MD or Net MD click to select the tracks you want to transfer to your computer 4 Click The transferring of the tracks selected in step 3 starts To stop transferring Click When tracks recorded on MD components are included on a disc a dialog box appears con...

Page 26: ...rom When you transfer tracks recorded in LinearPCM on the recorder to a computer for editing dividing page 47 or combining page 48 in My Library the editing may take a long time depending on the length of the tracks and capabilities of your computer This is due to limitations in the MiniDisc system If you want to edit long tracks recorded in LinearPCM we recommend that you do the editing on the re...

Page 27: ...starts All tracks on the CD are recorded as a new group Make sure not to disconnect the USB cable until the recording ends To stop recording Click on the computer display You can also stop recording by pressing CANCEL on the recorder Before starting recording you can set the following settings by right clicking the MD Simple Burner icon in the task tray on the computer display You can select the r...

Page 28: ... can operate MD Simple Burner from the following two display windows The window for recording all tracks on the CD REC STOP To start recording all tracks on the CD as a new group click here To stop recording click STOP CD icon Total time of the selected tracks of CD MD icon Disc name MD Artist name CD Album name CD Open To open the display as shown on page 29 click here Recording mode drop down me...

Page 29: ... the tracks that you want to record To select all tracks click here To deselect all tracks click here CD operating section Use these controls to confirm the tracks on audio CD to be recorded Get CD Info Information of an audio CD album name track name etc will be reflected in the track list Close To close the display as shown on page 28 click here Recording mode drop down menu New Group Track inform...

Page 30: ... not recognized as a data storage device If you format a disc on the computer make sure to format the disc using the SonicStage software Make sure not to delete the file management folder and file HMDHIFI folder and HI MD IND file on the Windows Explorer The storage space for each disc formatted with the recorder SonicStage The storage space is varied depending on disc type 1GB Hi MD disc 80 minute s...

Page 31: ... details on the optional stereo microphone see Optional accessories page 11 1 Connect the stereo microphone to MIC PLUG IN POWER To MIC PLUG IN POWER Stereo microphone The shape of the stereo microphone supplied with the MZ M200 is different 2 Press OPEN to open the lid Insert a disc in the direction of the arrow and close the lid OPEN with the label side facing up Continued 31 Recording on a disc...

Page 32: ...u Set Disc Mode to Hi MD or MD The disc contains material recorded in Hi MD mode Hi MD The disc contains material recorded in MD mode MD Refer to page 59 for Disc Mode in the menu 4 Press DISPLAY MENU repeatedly and confirm the recording level setting REC property The indication displayed will vary according to the REC Level page 50 setting in the menu REC Auto REC Level is set to REC AGC The recor...

Page 33: ... operation lamp disappears Pause Press The operation lamp flashes in red Press again to resume recording Remove the disc Press CANCEL and open the lid The lid does not open until SystemFILE WRITING disappears from the display and the operation lamp stops flashing Adding track marks Press T MARK The operation lamp disappears for a moment A track mark is added at the point where you press again to res...

Page 34: ...E on the remote is displayed If you do the data recorded up to that point may not be recorded to the disc or data on the disc may be damaged Recording cannot be done when the disc does not have enough space for recording If the power supply is disrupted i e the battery is removed or becomes exhausted or the AC power adaptor is disconnected during a recording or editing operation or while DATA SAVE...

Page 35: ...yzer Circle 2 3 1 Remaining free space appears only when the disc is used in Hi MD mode and the recorder is stopped 2 Appears only when the recorder is stopped 3 Shows the level of each of the following frequencies for both the L channel and R channel 100 Hz 250 Hz 630 Hz 1 6 kHz 4 kHz 10 kHz Displayed items during recording Display window on the recorder Battery indication page 15 Operation lamp ...

Page 36: ...urrent date and time 1 Remaining free space appears only when the disc is used in Hi MD mode and the recorder is stopped 2 Appears only when the recorder is stopped 3 The items that are displayed differ according to the selected play mode Example When the play mode is set to Group Group and Group name appear Notes Depending on the group settings the operating conditions and the disc settings you m...

Page 37: ...able connecting jack Recorder To a wall outlet 3 Connect the optical cable to the recorder and an external component For details on the optional optical cable see Optional accessories page 11 CD player MD player DVD Video player etc To a digital optical out jack Optical mini plug Optical plug Optical cable To LINE IN OPT 4 Press OPEN to open the lid and insert a disc in the recorder 5 Confirm the s...

Page 38: ...l connecting cord RK G129 etc connect the LINE IN OPT jack of the recorder to a LINE OUT jack of the radio cassette TV or other external component Connect the end of the connecting cord with the ferrite core to the recorder 2 Press and slide REC 3 Start playing the source The recorder is factory set to make a new group whenever recording is done If you do not want to make a group set Group REC to ...

Page 39: ...r beforehand Earphones with the remote with the label side facing up OPEN To the LINE OUT jack 2 Press the jog lever ENT to play and adjust the volume by pressing VOL The volume will be shown in the display Jog lever ENT VOL On the remote Press the jog lever ENT Playback starts You can adjust the volume by turning the VOL control VOL control Jog lever ENT 39 Playing a disc ...

Page 40: ... repeatedly Find the beginning of the next track Move the jog lever toward FF once Move the jog lever toward once Go backwards or forward During playback or pause move and hold the jog lever toward FR FF Move and hold the jog lever toward Cue to the next or previous group while playing track in a group Group skip Press on the remote repeatedly Remove the disc Press CANCEL and open the lid Press an...

Page 41: ... you press the button the display changes cyclically as follows While playing Group number track number and elapsed time Group number track number and remaining time of the current track Number of tracks after the current track and remaining time after the current location on the disc Recording date and time Spectrum Analyzer Standard Spectrum Analyzer Circle Recording date and time are displayed ...

Page 42: ... date and time2 Track number and audio format information3 1 The items that are displayed differ according to the selected play mode Example When the play mode is set to Group Group and Group name appear 2 Recording date and time are displayed if they have been recorded on the track 3 Recording mode codec and bitrate information appear for discs used in Hi MD mode and recording mode information ap...

Page 43: ...tep 1 to bookmark the other tracks 3 Do step 1 and select Bookmark in step 2 of Playing tracks in the selected play mode this page 4 Move the jog lever toward to select a track and then press the jog lever to enter The recorder plays from the selected bookmarked track to the last bookmarked track Selecting the play mode This function can be set on the remote only Playing tracks in the selected pla...

Page 44: ... A B A B Repeat play Tracks between the selected points A and B are played repeatedly Listening to a section of a track repeatedly A B Repeat You can listen to a specific section within a track repeatedly by selecting the starting point A and ending point B Make sure that points A and B are within the same track 1 While playing press P MODE repeatedly until A appears in the display A starting point...

Page 45: ...jog lever and changes as follows Studio SUR S Live SUR L Club SUR C Arena SUR A 4 Press the jog lever to enter the selection To cancel the setting Press SOUND repeatedly until Normal appears in the display Selecting the sound quality 6 Band Equalizer 1 While playing press SOUND repeatedly until SND appears in the display 2 Press SOUND for 2 seconds or more 3 Move the jog lever toward to select the...

Page 46: ...ning frequency ranges 6 Press the jog lever to enter the selection Normalizing the playback sound level automatically Dynamic Normalizer This function automatically normalizes the sound level of the recorded material for comfortable listening during playback 1 While playing press SOUND repeatedly until D Normal appears in the display d appears at 2 Turn the VOL control to adjust the volume Since t...

Page 47: ...seconds or more Four seconds of the track from the point T MARK is pressed is played back repeatedly The point T MARK is pressed Four seconds of the track plays back repeatedly 2 Move the jog lever toward FF FR to adjust the point to divide Moving the jog lever moves the dividing point forward or backwards The dividing point can be moved up to a maximum of 8 seconds forward or backwards from the p...

Page 48: ...y MARK appears in the display for a few seconds 3 Press T MARK to erase the mark MARK OFF appears in the display The track mark is erased and the two tracks are combined When a track mark is erased when you combine two tracks the title and the recording date of the second track changes to those of the first track Notes When you erase a track mark between the two consecutive tracks that are assigned...

Page 49: ...3 The setting will be entered On the remote Some menu items for playback and editing can also be set on the remote DISPLAY Jog lever ENT 1 Press DISPLAY for 2 seconds or more 2 Move the jog lever toward repeatedly to select the item 3 Press the jog lever ENT 4 Repeat steps 2 and 3 To return the preceding setting Press CANCEL on the remote To stop operation Press CANCEL on the remote for 2 seconds ...

Page 50: ...usts the recording level automatically Manual You can adjust the recording level manually page 52 MIC AGC Standard Microphone recording level adjustment mode for recording sources such as conversations The recording level is automatically adjusted to suppress distortion and produce clear recordings Can be selected while REC Level is set to Auto AGC For Music Microphone recording level adjustment m...

Page 51: ... the start of recording and after each 5 minute interval thereafter When the time interval set for Time Mark exceeds the elapsed recording time The recorder adds track marks when the set Time Mark time interval has elapsed Example Three minutes of recording has been completed when the Time Mark time interval is set to 5 minutes A track mark will be added at the 5 minute point after the start of re...

Page 52: ...ere is no sound on the sound source there may be cases when recording does not pause automatically during synchro recording due to the noise level emitted from the sound source If a silent portion is encountered for approximately 2 seconds during synchro recording from a sound source other than a CD or an MD a new track mark is automatically added at the point where the silent portion ends Adjusti...

Page 53: ...ng to On and start recording page 51 Menu for playback Menu for playback can be set with the remote only Items Options SpeedCtrl 100 50 Changes the playback speed The normal playback speed can be varied in 15 steps To return to normal speed Set the playback speed to 0 When you set a playback speed other than 0 SC appears to the left of the time display in the display window of the remote Notes Whe...

Page 54: ...roup order on the disc page 56 Erase Track Erase Erases a track Can be used when the track you want to erase is played Group Erase Erases a group and all tracks in a group Can be used when a track in the group you want to erase is played All Tr Erase Erases the entire disc Can be used while the recorder is stopped Format Formats a disc to restore it to the condition it was in at the time of purcha...

Page 55: ...rack Add track marks at the beginning and the end of the part you want to erase then erase the part page 47 Notes You cannot use the Erase function to delete non audio data for example text data or image data on a disc used in Hi MD mode When all tracks in a group are deleted using the Track Erase function that group is automatically deleted from the disc The Format function Format When formatting...

Page 56: ...re moving a track to a different group Move the jog lever toward FF FR to select the destination group number and then press the jog lever Select the destination group number 3 Move the jog lever toward FF FR to select the destination track number and then press the jog lever to enter the selection Select the destination track number Example when moving the selected track to the track number 10 in...

Page 57: ...per name Track names group names artist names album names and disc name Approx 200 each containing a mixture of all available characters Maximum number of characters that can be input per disc In Hi MD mode A maximum of about 55 000 characters In MD mode A maximum of about 1 700 characters The number of titles that can be stored on a disc depends on the number of characters that are input for trac...

Page 58: ... 2 seconds or more to enter the title Notes The recorder is able to display but cannot label using Japanese Katakana characters The recorder cannot rewrite a track name a group name an artist name an album name or a disc name of more than 200 letters that was created by another device in MD mode only Option menus Select Option in the menu Option menus can be used on both the recorder and the remot...

Page 59: ...ayback starts quickly after the playback button is pressed Disc Mode Hi MD When you insert a 60 74 80 minute standard disc that contains no audio data or no data such as images the disc mode is set to the Hi MD mode MD When you insert a 60 74 80 minute standard disc that contains no audio data or no data such as images the disc mode is set to the MD mode If you want to use the disc recorded on thi...

Page 60: ...e drained Setting for disc mode Disc Mode Notes Even if you select MD as the Disc Mode setting the operation mode can only be Hi MD when using a 1GB Hi MD disc The operation mode set in the Disc Mode menu is applied to a blank 60 74 80 minute standard disc used on the recorder even if a different operation mode was selected in the SonicStage software or a different operation mode appeared on the d...

Page 61: ...ent However if no power source is connected or the rechargeable battery becomes depleted the clock setting will change back to the factory setting after 3 minutes While setting the clock you can select the item to be set year month date etc by moving the jog lever toward FF FR If you connect the recorder to a computer and activate SonicStage the clock on the recorder will be automatically set to m...

Page 62: ...e surrounding temperature is too high or too low CHARGE 5 C 35 C 41F 95F appears in the display Charge the battery at a temperature of 5 C 41 F to 35 C 95 F The battery will take longer to charge if you operate the recorder while charging the battery with the AC power adaptor or do computer related operations while charging with USB bus power For faster charging do not operate the recorder You pre...

Page 63: ...der The software installation failed Disconnect the recorder and install the software again page 20 The recorder is not recognized as an external device in Windows Explorer The inserted disc is recorded in MD mode Insert a disc recorded in Hi MD mode A blank 60 74 80 minute standard disc has been inserted with Disc Mode in the menu set to MD Set Disc Mode to Hi MD page 59 Even though the USB cable...

Page 64: ...progress Wait a little while longer The progress bar on the display is not moving or the access lamp has not lit for a few minutes during the installation The installation is progressing normally Please wait The installation may take 30 minutes or more depending on your CD drive or system environment You cannot record audio data when you press and slide the REC switch while using the MD Simple Bur...

Page 65: ...s drained Reconnect the USB cable or insert a fully charged rechargeable battery into the recorder and then press CANCEL While recording Symptom Case and or corrective action The remaining recording time appears as R 00 00 and recording cannot be done even though 2 0 MB of free space is displayed This is a system limitation 2 0 MB is the capacity of the reserve domain The recorder always creates a...

Page 66: ...e disc Make recording again Recording may not be done if the remaining recordable time on the disc is 48 seconds or less DISC FULL appears Replace the disc The lid does not open after recording The lid does not open until SystemFILE WRITING disappears in the display TRACK FULL appears even before the disc has reached the maximum recording time and the recording cannot be done This occurs due to th...

Page 67: ...d the maximum track number or recording time This occurs due to the MiniDisc system limitation Repeated recording and erasing may cause fragmentation and scattering of data Although those scattered data can be read each fragment is counted as a track In this case the number of tracks may reach 2 047 on a disc used in Hi MD mode or 254 on a disc used in MD mode and further recording is not possible...

Page 68: ...the MiniDisc system limitation The fragmentation of data may cause sound dropout while searching because the tracks are played in higher speed than normal playback There is no R channel sound output when playing a track recorded from a cassette deck or through an amplifier or when listening to sound from a cassette deck or amplifier There is no R channel output if the cassette deck or an amplifier is...

Page 69: ...unction page 54 Tracks cannot be combined This occurs due to the MiniDisc system limitations When the tracks are scattered and the length of each track is short you may not be able to combine the tracks Combining tracks of the following lengths may not be possible Hi MD mode LinearPCM 9 seconds or less Hi SP 8 seconds or less Hi LP 32 seconds or less MD mode SP 12 seconds or less LP2 Monaural 24 s...

Page 70: ...eable battery page 14 or connect the recorder to a wall outlet The disc is damaged or does not contain proper recording or editing data Reinsert the disc Rerecord the disc If the error message still appears replace it with another disc There is a built in malfunction in the system While operating the recorder received a mechanical shock too much static abnormal power voltage caused by lightning et...

Page 71: ... CANNOT EDIT You tried to combine tracks recorded in different recording modes You tried to erase a track mark while selecting the first track in the disc You tried to overwrite track marks You tried to combine tracks whose combined length exceeds 999 minutes and 59 seconds You selected Edit in the recorder menu or Title in the remote menu while recording You selected Format in the menu while the r...

Page 72: ...ed Use the supplied AC power adaptor or the AC power cord DISC FULL You tried to record on a disc that does not have enough space END The recorder reached to the end of the last track in the selected play mode while playing or moving the jog lever toward FF on the remote You pressed the jog lever ENT ENT on the remote at the end of the last track on the disc ERROR There is a built in malfunction i...

Page 73: ...PED TRACK You selected Group Erase or Group Move in the menu on the recorder or Title Group in the menu on the remote while selecting a track that does not belong to a group NO TRACK You tried to play a disc used in Hi MD mode with no recorded tracks P B ONLY DISC You tried to record or edit on a premastered disc P B stands for playback Insert a recordable disc PC MD You operated the recorder or t...

Page 74: ...nd position from the memory to the disc page 80 Wait until this process is completed TEMP OVER REC STOP Heat has built up in the recorder Let the recorder cool down TitleFULL You tried to enter characters that exceeds the maximum number approximately 200 characters for a title You tried to enter characters that exceeds the maximum number approximately 55 000 characters in Hi MD mode or 1 700 chara...

Page 75: ...y this may render the disc unusable or data breakdown damage or loss may occur Do not get the recorder wet When you use the recorder in the rain or under similar conditions be careful not to get the recorder wet Your recorder is designed for use between the temperatures of 0 C and 40 C 32 F and 104 F Shooting in extremely cold or hot places that exceed this range is not recommended After using you...

Page 76: ...geable battery drops to half the normal amount replace with the new one If the recorder will be unused for a long time remove the rechargeable battery remove the USB cable from the recorder and remove the AC power cord from the wall outlet On the MiniDisc cartridge When carrying or storing the MiniDisc keep it in its case Do not break open the shutter Do not place the cartridge where it will be su...

Page 77: ...l that was supplied with another device On cleaning Clean the recorder casing with a soft cloth slightly moistened with water or a mild detergent solution Do not use any type of abrasive pad scouring powder or solvent such as alcohol or benzene as it may mar the finish of the casing Wipe the disc cartridge with a dry cloth to remove dirt Dust on the lens may prevent the unit from operating properly...

Page 78: ...od of time about an hour If moisture condensation occurs Turn off the recorder and wait about an hour for the moisture to evaporate Make sure the moisture has evaporated before using the recorder Specification Audio playing system MiniDisc digital audio system Systems MiniDisc system Hi MD system Laser diode properties Emission duration continuous Laser output less than 44 6 µW This output is the v...

Page 79: ...ni jack for optical digital input Output connector LINE OUT stereo mini jack dedicated remote jack regulated output 194 mV 10 k Maximum output DC Headphones 4 5 mW 4 5 mW 16 European model 5 mW 5 mW 16 Other models Power requirements Sony AC Power Adaptor DC 5 V AC 100 V 240 V 50 60 Hz Lithium ion rechargeable battery LIP 4WM 3 7 V 370 mAh Li ion Operating temperature 5 C 41 F to 35 C 95 F Battery...

Page 80: ...c Mode page 59 menu is applied Disc containing music in Hi MD mode Hi MD Disc containing music in MD mode MD About LinearPCM LinearPCM is a digital non compressed audio coding system You can enjoy high quality sound equal to that of CDs by recording in this mode The meaning of no sound No sound describes a recorder condition in which the input level is about 4 8 mV during analog input or less than...

Page 81: ...utes 21 minutes ATRAC ATRAC3plus 352 kbps 5 hours and 30 minutes 1 hour and 35 minutes 1 hour and 30 minutes 1 hour and 10 minutes ATRAC3plus 256 kbps 7 hours and 55 minutes 2 hours and 20 minutes 2 hours and 10 minutes 1 hour and 40 minutes ATRAC3plus 192 kbps 11 hours 3 hours and 10 minutes 3 hours 2 hours and 20 minutes ATRAC3plus 64 kbps 34 hours 10 hours and 10 minutes 9 hours and 20 minutes ...

Page 82: ...hour and 14 minutes 1 hour ATRAC3 132 105 kbps 2 hours and 40 minutes 2 hours and 28 minutes 2 hours ATRAC3 66 kbp 5 hours and 20 minutes 4 hour and 56 minutes 4 hours When transferring 4 minute tracks About playing recorded discs on other MD components The ability of an MD component to play back discs consisting of tracks recorded directly on the recorder or transferred from the computer depends ...

Page 83: ...adding track marks and erasing track marks do not function for tracks that have been transferred from your computer This is to prevent the loss of transfer authorization by the transferred tracks To edit these tracks first transfer them into the computer and then edit them on the computer About the DSP TYPE S for ATRAC ATRAC3 This recorder supports DSP TYPE S a specification for high level Sony Mini...

Page 84: ...ack marks Marked copied automatically at the same positions as the source when the sound source is a CD or an MD after more than 2 seconds of no sound page 80 or low level segment with a sound source other than a CD or an MD when the recorder is paused 3 seconds of no sound is encountered while synchro recording Marked automatically after more than 2 seconds of no sound page 80 or low level segmen...

Page 85: ...Storage space 30 Supplied accessories 9 Synchro recording 51 System File 80 System requirements 19 T Title input 57 Track mark 33 50 Transferring 24 U USB bus power 15 V Virtual Surround 45 Index Symbols 6 Band Equalizer 45 A A B Repeat 44 Analog recording 38 ATRAC 80 Audio format 79 AVLS 58 B Backlight 59 Basic operations 33 40 Battery life 16 Beep 58 Bookmark Play 43 C Charging 14 Cleaning 77 Co...

Page 86: ......

Page 87: ...This warranty is valid only in Canada ...

Page 88: ...Printed in Malaysia This warranty is valid only in the United States 2 6 6 9 0 8 4 1 1 2 ...

Reviews: