background image

44

Diagonal stripes appear in portions of the 
screen where brightness is at a preset level.
This is useful as a guide when adjusting the 
brightness. When you change the default 
setting, 

 is displayed. The zebra pattern 

is not recorded.

B

OFF

The zebra pattern is not displayed.

70

The zebra pattern appears at a screen 
brightness level of about 70 IRE.

100

The zebra pattern appears at a screen 
brightness level of about 100 IRE or 
higher.

b

Notes

• Portions of the screen where brightness is about 

100 IRE or higher may appear overexposed.

z

Tips

• IRE represents the screen brightness.

When you set [HISTOGRAM] to [ON], the 
[HISTOGRAM] (a graph to display a 
distribution of tones in your picture) 
window appears on the screen.
This item is useful when you adjust 
exposure. You can adjust the [EXPOSURE] 
or [AE SHIFT] checking the 
[HISTOGRAM] window. The 
[HISTOGRAM] will not be recorded on a 
tape or “Memory Stick Duo.” 

z

Tips

• The left area on the graph shows the darker 

areas of the picture while the right area shows 
the brighter areas.

A still image is recorded after about 10 
seconds.
Press PHOTO when [SELF-TIMER] is set 
to [ON] and   appears.
To cancel the count down, touch [RESET].
To cancel the self-timer, select [OFF].

You can select the maximum zoom level in 
case you want to zoom to a level greater 
than 10 × (the default setting) while 
recording on a tape. Note that the image 
quality decreases when you are using the 
digital zoom.

B

OFF

Up to 10 × zoom is performed optically.

20 ×

Up to 10 × zoom is performed optically, 
and after that, up to 20 × zoom is 
performed digitally.

You can compensate for camera shake (The 
default setting is [ON]). Set 
[STEADYSHOT] to [OFF] (

) when 

using a tripod (optional), then the image 
becomes natural.

ZEBRA

HISTOGRAM

80

Brighter

Darker

Brightness

Pi

xe

ls

SELF-TIMER

DIGITAL ZOOM

STEADYSHOT

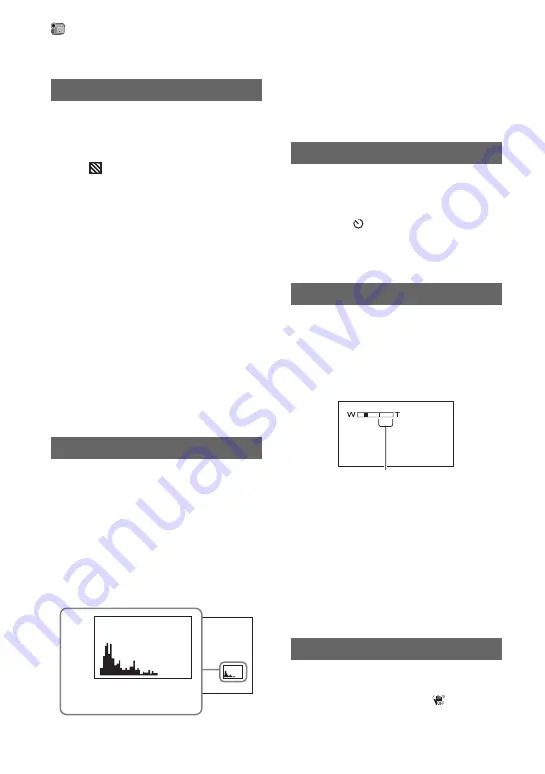
The right side of the bar shows the digital 
zooming factor. The zooming zone 
appears when you select the zooming 
level.

CAMERA SET menu (Continued)

Summary of Contents for HD1000N

Page 1: ...HD Video Camera Recorder Digital HD Video Camera Recorder Operating Guide Before operating the unit please read this manual thoroughly and retain it for future reference The supplied CD ROM includes Operating Guide for the HVR HD1000 series English French German Italian Spanish and Simplified Chinese versions For more details see Using the CD ROM Manual on page 11 HVR HD1000U HD1000N ...

Page 2: ...set should be operated only from the type of power source indicated on the marking label If you are not sure of the type of electrical power supplied to your home consult your dealer or local power company For those sets designed to operate from battery power or other sources refer to the operating instructions Polarization This set may be equipped with a polarized ac power cord plug a plug having...

Page 3: ...lightning storm or when it is left unattended and unused for long periods of time unplug it from the wall outlet and disconnect the antenna or cable system This will prevent damage to the set due to lightning and power line surges Damage Requiring Service Unplug the set from the wall outlet and refer servicing to qualified service personnel under the following conditions When the power cord or plu...

Page 4: ... limits are designed to provide reasonable protection against harmful interference in a residential installation This equipment generates uses and can radiate radio frequency energy and if not installed and used in accordance with the instructions may cause harmful interference to radio communications However there is no guarantee that interference will not occur in a particular installation If th...

Page 5: ...5 The supplied interface cable must be used with the equipment in order to comply with the limits for a digital device pursuant to Subpart B of Part 15 of FCC Rules Continued ...

Page 6: ... 90 Memory Stick Duo Memory Stick PRO Duo Memory Stick PRO HG Duo Memory Stick Duo This size can be used with your camcorder Memory Stick You cannot use with your camcorder You cannot use any type of memory card except Memory Stick Duo Memory Stick PRO Duo can be used only with Memory Stick PRO compatible equipment Do not attach a label or the like on a Memory Stick Duo or a Memory Stick Duo adapt...

Page 7: ... such as at dusk About changing the language setting The on screen displays in each local language are used for illustrating the operating procedures Change the screen language before using your camcorder if necessary p 18 On recording Before starting to record test the recording function to make sure the picture and sound are recorded without any problems Compensation for the contents of recordin...

Page 8: ... Zeiss lens which was developed jointly by Carl Zeiss in Germany and Sony Corporation and produces superior images It adopts the MTF measurement system for video cameras and offers a quality typical of a Carl Zeiss lens Also the lens for your camcorder is T coated to suppress unwanted reflections and faithfully reproduce colors MTF Modulation Transfer Function The number value indicates the amount...

Page 9: ...cent recording END SEARCH 30 Reviewing the most recently recorded scenes Rec review 30 Playing the picture on a TV 31 Connecting to a high definition TV 32 Connecting to a 16 9 wide or 4 3 TV 33 Using the menu items 36 Menu items 37 CAMERA SET menu 39 Settings to adjust your camcorder to the recording conditions MEMORY SET menu 46 Settings for the Memory Stick Duo PICT APPLI menu 49 Special effect...

Page 10: ...osis display Warning indicators 85 Using your camcorder abroad 88 Maintenance and precautions 89 Usable cassette tapes 89 About the Memory Stick 90 About the InfoLITHIUM battery pack 92 About i LINK 93 About x v Color 94 On using your camcorder 94 Specifications 98 Identifying parts and controls 101 Indicators displayed during recording playback 104 Index 108 Using a Computer Troubleshooting Addit...

Page 11: ...marks of Adobe Systems Incorporated in the United States and or other countries To read the Operating Guide contained on the CD ROM do the following 1 Insert the CD ROM in your CD ROM drive A cover page appears automatically in your browser If it does not appear automatically in the browser double click on the index htm file on the CD ROM 2 Select and click on the Operating Guide that you want to ...

Page 12: ... 15 A V connecting cable 1 p 31 62 Eye cup 1 Rechargeable battery pack NP F570 1 p 15 92 Lens hood 1 Lens cap 1 Wind screen 1 p 13 Microphone 1 p 13 CD ROM Manuals for Digital HD Video Camera Recorder 1 Operating Guide This manual 1 To attach the lens cap to the grip belt Remove the grip belt and attach the lens cap by leading the grip belt through the attachment on the lens cap string Then attach...

Page 13: ...er and lock the stopper securely Be sure to align the v mark on the microphone and the mark on the holder facing each other 4 Turn the plug of the microphone counter clockwise to 180 degrees in the direction of the arrow 5 and connect it to the Mic jack 4 Attach the eyecup aligned with the eyecup groove in the viewfinder You can attach the eyecup facing either the right or left side Attaching the ...

Page 14: ...site direction of the arrow as illustrated above while pressing the lever on the lens hood cover z Tips If you attach remove or adjust an 37mm 2 1 2in PL filter or MC protector remove the lens hood Attaching the lens cap Attach the lens cap by pressing both knobs on its sides Attaching the lens hood 1 2 1 2 Step 2 Attaching the supplied microphone and the lens hood Continued ...

Page 15: ...that the v mark on the DC plug is facing to the v mark on your camcorder 4 Connect the power cord mains lead to the AC Adaptor and the wall outlet wall socket The CHG charge lamp lights up and charging starts The CHG charge lamp turns off when the battery is fully charged b Notes Disconnect the AC Adaptor from the DC IN jack holding both the camcorder and the DC plug z Tips You can operate your ca...

Page 16: ... is displayed You can check the remaining battery charge on the LCD screen Charging time Approximate time min required when you fully charge a fully discharged battery pack Recording time Approximate time min available when you use a fully charged battery pack BATT battery RELEASE Indicator Status Sufficient power remaining Battery low recording playback will stop soon Replace the battery with a f...

Page 17: ...g playback time Times measured with the camcorder at 25 C 77 F 10 to 30 C 50 F to 86 F is recommended The recording and playback time will be shorter when you use your camcorder in low temperatures The recording and playback time will be shorter depending on the conditions under which you use your camcorder On the AC Adaptor Use the nearby wall outlet when using the AC Adaptor Disconnect the AC Ad...

Page 18: ...itch to OFF CHG To reset the date and time You can set the desired date and time by touching t MENU t TIME LANGU t CLOCK SET p 36 b Notes If you do not use your camcorder for about 3 months the built in rechargeable battery gets discharged and the date and time settings may be cleared from the memory In that case charge the rechargeable battery and then set the date and time again p 97 z Tips The ...

Page 19: ...perations See LCD VF SET LCD BRIGHT p 55 to adjust the brightness of the LCD screen Press DISPLAY BATT INFO to toggle the screen indicators such as Battery Info on or off Pull out the LCD panel block to adjust the position 1 and rotate the viewfinder to the best angle 2 You can view pictures using the viewfinder to avoid wearing down the battery or when the picture seen on the LCD screen is poor z...

Page 20: ...lides back in 3 Close the lid To eject the cassette Open the lid following the same procedure as described in step 1 and remove the cassette b Notes Do not force the cassette compartment closed by pressing the portion marked while it is sliding in It may cause a malfunction You can use only a Memory Stick Duo marked with or p 90 z Tips The number and time of recordable pictures vary depending on t...

Page 21: ...ng your camcorder is reading writing data Do not shake or knock your camcorder turn the power off eject the Memory Stick Duo or remove the battery pack Otherwise image data may be damaged If you force the Memory Stick Duo into the slot in the wrong direction the Memory Stick Duo the Memory Stick Duo slot or image data may be damaged When inserting or ejecting the Memory Stick Duo be careful that t...

Page 22: ...again z Tips The pictures are recorded in the HDV format in the default setting p 54 Recording movies PHOTO START STOP B START STOP A Note on the LOCK switch When you slide the LOCK switch to the lock position the POWER switch side the POWER switch can no longer be set to MEMORY accidentally The LOCK switch is set to the unlock position at the time of purchase LOCK switch LOCK UNLOCK 60min 60min 6...

Page 23: ...pressing the green button Press and hold PHOTO lightly to adjust the focus then press it fully to record A shutter sound is heard When disappears the image has been recorded To check the latest recording on a Memory Stick Duo Touch To delete the picture touch t YES z Tips See page 46 for the image quality image size and the number of recordable pictures Recording still images 6 1M 6 1M P MENU P ME...

Page 24: ...just the setting manually using the RING p 25 You can record high quality still images on the Memory Stick Duo during tape recording 1 Slide the POWER switch to TAPE then press START STOP to start tape recording 2 Press PHOTO fully For each separate time tape recording up to 3 still images can be recorded 3 Press START STOP to stop tape recording Stored still images appear one by one and the image...

Page 25: ... the RING and select a menu item to be assigned 3 Press the MANUAL button b Notes The menu item settings done before will be retained even if you set other menu item settings after that If EXPOSURE is set after AE SHIFT is set manually EXPOSURE will override AE SHIFT If you select RESET in step 2 all the settings set manually return to the default setting z Tips During playback you can adjust the ...

Page 26: ...backlit subjects press BACK LIGHT to display To cancel the back light function press BACK LIGHT again Open the LCD panel 90 degrees to the camcorder 1 then rotate it 180 degrees to the lens side 2 z Tips A mirror image of the subject appears on the LCD screen but the picture will be normal when recorded Adjusting the exposure for backlit subjects Recording in mirror mode Recording Continued ...

Page 27: ...VOLUME p 55 To search for a scene during playback Touch and hold during playback Picture Search or while fast forwarding or rewinding the tape Skip Scan z Tips You can play back in various modes VAR SPD PB p 52 Playing movies Playback automatically stops if pause is engaged for more than 3 minutes is displayed instead of when a Memory Stick Duo with recorded images is inserted and a tape is not be...

Page 28: ...k to the single display mode A Previous Next 6 pictures B The picture displayed before switching to the index screen To view pictures in other folders touch t t PB FOLDER select a folder with then touch p 48 Viewing still images P MENU 60 60min min 6 1M 60min 10 10 MEMORY PLAY MEMORY PLAY MEMORY PLAY Previous Next Switches the playback media Go to the index screen display A B Playback Continued ...

Page 29: ...the picture you want to magnify 2 Magnify the picture with T Telephoto 3 Touch the screen at the point you want to display in the center of the displayed frame 4 Adjust the magnification with W Wide angle T Telephoto To cancel touch END b Notes While using PB zoom images on the LCD panel and images that are output from the video signal are zoomed The i LINK output will not be affected Using PB zoo...

Page 30: ...ections on the tape z Tips You can also select END SEARCH from the menu When the POWER switch is set to PLAY EDIT select the END SEARCH short cut in Personal Menu p 36 You can view about 2 seconds of the scene recorded just before you stopped the tape Make sure that the POWER switch is set to TAPE Touch t The last 2 seconds approx of the most recently recorded scene are played back Then your camco...

Page 31: ...ideo signal properly if the VCR HDV DV or i LINK CONV setting is changed after the TV and your camcorder were connected with an i LINK cable Pictures recorded in the DV format are played back as SD standard definition images regardless of the connection When recording set X V COLOR to ON to play back on an x v Color compliant TV p 45 Some settings may need to be adjusted on the TV when playing bac...

Page 32: ...hite and red plugs of the A V connecting cable to the audio input jack of your TV B C A HDMI i LINK COMPONENT IN AUDIO for HDV1080i HD high definition image quality An HDV formatted picture is played back as it is HD image quality A DV formatted picture is played back as it is SD image quality A Component video cable optional A V connecting cable supplied Green Y Blue PB CB Red PR CR White Red Yel...

Page 33: ...jack compatible with HDV1080i specification For details confirm the specifications of your TV If your TV is not compatible with HDV1080i specification connect your camcorder and TV with the optional component video cable and supplied A V connecting cable as illustrated in The TV needs to be set so that it recognizes that the camcorder is connected See the instruction manuals supplied with your TV ...

Page 34: ...i 56 DOWN CONVERT t VIDEO OUT t SQUEEZE LETTER BOX EDGE CROP 56 A V connecting cable is also needed to output audio signals Connect the white and red plugs of the A V connecting cable to the audio input jack of your TV STANDARD SET VCR HDV DV t AUTO 53 DOWN CONVERT t i LINK CONV t ON SQUEEZE ON EDGE CROP 56 The TV needs to be set so that it recognizes that the camcorder is connected See the instru...

Page 35: ...o If you connect your camcorder to your TV using more than one type of cable to output images from a jack other than the i LINK jack the order of priority of the output signals is as follows HDMI t component video t S VIDEO t audio video See page 93 for the details of i LINK STANDARD SET VCR HDV DV t AUTO 53 DOWN CONVERT t VIDEO OUT t SQUEEZE LETTER BOX EDGE CROP 56 When connecting only an S VIDEO...

Page 36: ... you like p 60 1 Touch 2 Touch the desired item If the desired item is not displayed on the screen touch until the item is displayed 3 Select the desired setting then touch x To use menu items You can customize menu items that are not added to Personal Menu 1 Touch t MENU 2 Select the desired menu Touch to select the item then touch The process in step 3 is the same as that in step 2 3 Select the ...

Page 37: ... z CAMERA COLOR z z WB SHIFT z z SPOT FOCUS z z FOCUS z z TELE MACRO z z SUPER NS z NS LIGHT z z COLOR SLOW S z z ZEBRA z z HISTOGRAM z z SELF TIMER z z DIGITAL ZOOM z STEADYSHOT z z CONV LENS z z RING SETTING z z X V COLOR z MEMORY SET menu p 46 STILL SET z z ALL ERASE z FORMAT z z FILE NO z z NEW FOLDER z z REC FOLDER z z PB FOLDER z PICT APPLI menu p 49 FADER z INT REC STL z SLIDE SHOW z D EFFE...

Page 38: ...C LEVEL z AU LVL DISP z LCD VF SET z z z COMPONENT z z z DOWN CONVERT z z z STATUS CHECK z z GUIDEFRAME z z COLOR BAR z DATA CODE z REMAINING z z REC LAMP z z BEEP z z z DISP OUTPUT z z z MENU ROTATE z z z CALIBRATION z QUICK REC z TIME LANGU menu p 59 CLOCK SET z z z WORLD TIME z z z LANGUAGE z z z Position TAPE MEMORY PLAY EDIT Menu items Continued ...

Page 39: ...ions such as sunsets and sunrises FIREWORKS Select to record all the splendor of fireworks SCENE SELECT LANDSCAPE Select to shoot distant subjects clearly This setting also prevents your camcorder from focusing on glass or metal mesh in windows between the camcorder and the subject PORTRAIT Soft portrait Select to bring out the subject such as people or flowers while creating a soft background SPO...

Page 40: ...touch AUTO t z Tips You can also adjust the setting manually using the RING p 25 You can adjust the color balance to the brightness of the recording environment B AUTO The white balance is adjusted automatically OUTDOOR The white balance is appropriately adjusted for the following recording conditions Outdoors Night views neon signs and fireworks Sunrise or sunset Under daylight fluorescent lamps ...

Page 41: ...ting You can manually adjust and fix the shutter speed for your convenience Depending on the shutter speed you can make the subject look still or emphasize movement of the subject B AUTO Select to adjust the shutter speed automatically MANUAL Adjust the shutter speed using You can select a shutter speed between 1 3 and 1 10000 second when the POWER switch is set to TAPE and between 1 4 and 1 500 s...

Page 42: ...If you set SPOT FOCUS FOCUS is automatically set to MANUAL You can adjust the focus manually You can select this function also when you want to focus on a certain subject intentionally 1 Touch MANUAL 9 appears 2 Touch focusing on close subjects focusing on distant subjects to sharpen the focus appears when the focus cannot be adjusted any closer and appears when the focus cannot be adjusted farthe...

Page 43: ...ver the infrared port with your fingers or other objects Remove the conversion lens optional Adjust the focus manually FOCUS p 42 when it is hard to focus automatically The shutter speed of your camcorder changes depending on the brightness The motion of the picture may slow down in this case When using either the NightShot p 25 or SUPER NS p 43 function to record you can record clearer pictures b...

Page 44: ...orded on a tape or Memory Stick Duo z Tips The left area on the graph shows the darker areas of the picture while the right area shows the brighter areas A still image is recorded after about 10 seconds Press PHOTO when SELF TIMER is set to ON and appears To cancel the count down touch RESET To cancel the self timer select OFF You can select the maximum zoom level in case you want to zoom to a lev...

Page 45: ...etails see page 25 When recording set to ON to capture wider range of colors Various colors such as the brilliant color of flowers and turquoise blue of the sea can be more faithfully reproduced b Notes Set X V COLOR to ON only when the recorded content will be played back on an x v Color compliant TV Otherwise set to OFF the default setting If the movie recorded with this function ON is played ba...

Page 46: ...GE SIZE can be set only when the POWER switch is set to MEMORY STILL SET 6 1M 4 6M 3 1M Capacityof the MemoryStickDuo MB and the number of recordable pictures When the POWER switch is set to MEMORY When the POWER switch is set to TAPE 6 1M 2848 2136 4 6M 2848 1602 3 1M 2048 1536 VGA 640 480 128MB 41 98 55 130 80 185 780 1970 256MB 75 175 95 235 140 335 1400 3550 512MB 150 360 200 480 295 690 2850 ...

Page 47: ... Do not do any of the following while Erasing all data is displayed Operate the POWER switch operation buttons Eject the Memory Stick Duo The Memory Stick Duo has been formatted at the factory and does not require formatting at purchase To execute formatting touch YES twice t Formatting is completed and all the images will be deleted b Notes Do not do any of the following while Formatting is displ...

Page 48: ...Duo p 47 or delete them using your computer The number of recordable pictures on a Memory Stick Duo may decrease as the number of folders increases Select the folder to be used for recording with then touch b Notes As the default setting pictures are saved in the 101MSDCF folder Once you record a picture in a folder the same folder will be set as the default folder for playback Select the playback...

Page 49: ...ually changes from color to black and white FADER STBY REC Fading out Fading in You can record still images on the Memory Stick Duo at a selected interval This function is useful to observe the movement of clouds or the changes in daylight etc a Recording b Interval 1 Touch t a desired interval time 1 5 or 10 minutes t t ON t t 2 Press PHOTO fully stops flashing and the interval still image record...

Page 50: ... hue to pictures b Notes You cannot change to another digital effect while recording pictures on a tape with CINEMA EFECT selected Effects added to the playback pictures are not output via the HDV DV Interface i LINK Only the original pictures can be output While using D EFFECT you cannot use the review button for still images on the Memory Stick Duo If you set CINEMA EFECT SPOT METER and EXPOSURE...

Page 51: ...n VCR or DVD HDD recorders p 62 Fast moving subjects and actions which cannot be captured under general shooting conditions can be shot in smooth moving slow motion for about 3 seconds This is useful to shoot fast actions such as a golf or tennis swing Press START STOP on the SMTH SLW REC screen A 3 second movie approx is recorded as a 12 second slow motion movie Recording disappears when recordin...

Page 52: ...modes while viewing movies 1 Touch the following buttons during playback 2 Touch t To return to the normal playback mode touch Play Pause twice once from frame playback b Notes You will not hear the recorded sound You may see mosaic like images of the previously played picture Pictures in the HDV format are not output from the HDV DV Interface i LINK when they are paused or played back in any mode...

Page 53: ...K cable select the signal to input output from the HDV DV Interface i LINK The selected signal is recorded or played back B AUTO Switches the signals between HDV and DV format automatically when playing back a tape With an i LINK connection switches the signals between HDV and DV formats automatically and inputs outputs from the HDV DV Interface i LINK HDV Plays back only the portions recorded in ...

Page 54: ...mes the SP mode Long Play b Notes If you record in the LP mode pictures may appear mosaic like or sound may be interrupted when you play back the tape on other camcorders or VCRs When you mix recordings in the SP mode and in the LP mode on one tape the playback picture may be distorted or the time code may not be written properly between the scenes x WIDE SELECT You can select the aspect ratio acc...

Page 55: ...vel is other than default setting b Notes Use headphones to monitor the sound when adjusting it Since the default setting is ON the audio level meter is displayed The recorded picture will not be affected by this operation x LCD BRIGHT You can adjust the brightness of the LCD screen 1 Adjust the brightness with 2 Touch x LCD BL LEVEL You can adjust the brightness of the LCD screen s backlight B NO...

Page 56: ...displaying the 1080i signal You can set an output video signal type from HDV format signals x i LINK CONV When set to ON SQUEEZE ON EDGE CROP converts the HDV signal to the DV format and output it from the HDV DV Interface i LINK The DV format signal is output unchanged B OFF ON SQUEZE Output signals to a 16 9 wide TV or a TV compatible with 16 9 wide mode ON EDGE CROP Display the center of the pi...

Page 57: ...f your camcorder will be displayed with the total hours of operation drum rotation tape running or the total number of tape unthreading operations OPERATION Displays the total hours of operation in 10 hour increments DRUM RUN Displays the total hours of drum rotation in 10 hour increments TAPE RUN Display the total hours of tape running in 10 hour increments THREADING Displays the total number of ...

Page 58: ... When you set the POWER switch to PLAY EDIT or TAPE with a cassette inserted When you touch Play Pause ON Always displays the remaining tape indicator The camera recording lamp will not light up during recording when you set this to OFF The default setting is ON B ON A beeping sound starts when you start stop recording or operate the touch panel OFF Cancels the beeping sound and shutter sound B LC...

Page 59: ...nes freezes for a moment editing on your computer is recommended z Tips If the recording standby mode continues more than approximately 3 minutes the drum will stop rolling and the standby mode is canceled This is to protect the tape and to prevent from unnecessarily battery exhausting QUICK REC Quick recording TIME LANGU menu See page 36 for details on selecting menu items See page 18 When using ...

Page 60: ...a menu item then touch t YES t The menu item is added to the end of the list Adding a menu item OK END 0 00 00 60min Select the category CAMERA SET PICT APPLI EDIT PLAY ST ANDARD SET TIME LANGU STBY OK END 0 00 00 60min Select the item SCENE SELECT SPOT METER EXPOSURE WHITE BAL SHARPNESS STBY 1 Touch t P MENU SET UP t DELETE If the desired menu item is not displayed touch 2 Touch the menu item tha...

Page 61: ...ch to move the menu item to the desired place 4 Touch To sort more items repeat steps 2 to 4 5 Touch END t b Notes You cannot move P MENU SET UP Touch t P MENU SET UP t RESET t YES t YES t If the desired menu item is not displayed touch Arranging the order of menu items displayed on Personal Menu Initializing the Personal Menu settings Reset ...

Page 62: ...tible with HDV1080i specification is required For details refer to the instruction manuals supplied with the device to be connected When connecting your camcorder to a monaural device connect the yellow plug of the A V connecting cable to the video jack on the device and the white left channel or red right channel plug to the audio jack on the device i LINK cable optional HDV1080i compatible devic...

Page 63: ...ith the i LINK cable after pausing or stopping and then resuming the recording the images will be unstable or rough at that point Set DISP OUTPUT to LCD PANEL default setting when connecting with an A V connecting cable p 58 When connecting with the A V connecting cable with an S VIDEO optional Connect with S VIDEO jack instead of the video plug yellow This connection produces pictures more faithf...

Page 64: ...ith PICT EFFECT p 51 or D EFFECT p 50 Titles that are recorded on other camcorders Pictures recorded in the HDV format are not output from the HDV DV Interface i LINK during playback pause or in any playback mode other than normal playback Note the following when connecting with an i LINK cable The recorded picture becomes rough when a picture is paused on your camcorder while recording to a VCR o...

Page 65: ...nal of your camcorder Set VCR HDV DV to AUTO when recording from an HDV format compatible device Set VCR HDV DV to DV or AUTO when recording from a DV format compatible device p 53 3 Connect your VCR as a player to your camcorder b Notes When an i LINK cable is connected the format of the input signal or will be indicated on the LCD screen of your camcorder This indicator may appear on the screen ...

Page 66: ...NK cable The recorded picture becomes rough when a picture is paused on a VCR while recording to your camcorder You cannot record the picture and sound separately If you pause or stop the recording and restart it the picture may not be recorded smoothly When a 4 3 video signal is input it appears with black bands on the right and left sides on the screen of your camcorder 1 Perform steps 1 to 4 in...

Page 67: ...es will be fixed to image size 1 2M when playing back in the HDV format Still images will be fixed to image size 0 2M 16 9 or VGA 0 3M 4 3 when playing back in the DV format p 47 You cannot record still images while using PB zoom Deleting recorded pictures from the Memory Stick Duo 1 Slide the POWER switch to PLAY EDIT 2 Touch 3 Select a picture you want to delete with 4 Touch t YES b Notes The pi...

Page 68: ... you want to print out later 4 Touch t END b Notes To cancel Print mark touch the image again to cancel Print mark in step 3 Do not mark images on your camcorder if the Memory Stick Duo already has some images with the Print mark put on using other devices This may change the information of the images with the Print mark put on using the other device You can select and mark images to prevent accid...

Page 69: ...ing in the following orders t MENU t PICT APPLI t USB SELECT t PictBridge PRINT t MENU t PICT APPLI t PictBridge PRINT 1 Select the image to be printed with 2 Touch t COPIES 3 Select the number of copies to be printed with A maximum of 20 copies of the image can be printed 4 Touch t END To print the date time on the image touch t DATE TIME t DATE or DAY TIME t 5 Touch EXEC t YES When printing is f...

Page 70: ...rts may be largely cut off Some printer models may not support the date time printing function Refer to your printer s operating instructions for details We cannot guarantee the printing of images recorded with a device other than your camcorder PictBridge is an industry standard established by the Camera Imaging Products Association CIPA You can print still images without using a computer by conn...

Page 71: ...g to the correct procedure when disconnecting it from the computer p 73 Copying still images to a computer For Windows users OS Windows 2000 Professional Windows XP Home Edition Windows XP Professional Windows Vista Except for 64 bit version It is necessary that your OS is factory installed Operations are not guaranteed if your OS has been upgraded or is being used in a multi boot environment CPU ...

Page 72: ...the power source for your camcorder Use the supplied AC Adaptor to obtain AC power p 15 4 Set the POWER switch to PLAY EDIT 5 Touch t MENU t PICT APPLI t USB SELECT t Memory Stick 6 Connect the USB cable to the USB jacks on your camcorder and your computer It may take a while until your computer recognizes your camcorder for the first time For Windows users Double click the Removable Disk icon dis...

Page 73: ...k of your computer For Windows users If USB CONNECTING appears on the LCD screen follow the procedure below to disconnect the USB cable 1 Click the Unplug or eject hardware icon on the task tray 2 Click Safely remove USB Mass Storage Device Drive 3 Click OK 4 Disconnect the USB cable from the camcorder and computer If USB CONNECTING does not appear on the LCD screen do only step 4 b Notes Remove t...

Page 74: ...SB jack on the computer Operation is not guaranteed even for the recommended environments Copying movies on a tape to a computer Connect your camcorder to the computer with an i LINK cable The computer needs to have an i LINK connector and be installed with editing software that can copy video signals The software required depends on the format of the recorded pictures and the format for copying t...

Page 75: ...nging REC FORMAT setting while connected with an i LINK cable with the POWER switch set to TAPE or MEMORY p 54 Changing the POWER switch position while connected with an i LINK cable The format HDV or DV of input output signal appears on the LCD screen of your camcorder while connected with an i LINK cable Use the supplied AC Adaptor to obtain AC power p 15 1 Prepare editing software not provided ...

Page 76: ...mputer to your camcorder Set VCR HDV DV to HDV and i LINK CONV to OFF p 53 b Notes To copy an HDV format movie edited on a computer back onto a tape in HDV format is possible so long as your editing software supports copying HDV movies onto tape For details contact the software manufacturer When copying the movie in the DV format from the computer to your camcorder Set VCR HDV DV to DV p 53 Copyin...

Page 77: ...ight while the battery pack is being charged Slide the POWER switch to OFF CHG p 15 Attach the battery pack to the camcorder correctly p 15 Connect the power cord mains lead to the wall outlet wall socket properly The battery charge is completed p 15 The CHG charge lamp flashes while the battery pack is being charged Attach the battery pack to the camcorder correctly p 15 If the problem persists d...

Page 78: ... occurred inside the camcorder p 95 The Cassette Memory indicator or title display does not appear while using a cassette with Cassette Memory This camcorder does not support Cassette Memory so the indicator does not appear The remaining tape indicator is not displayed Set REMAINING to ON to always display the remaining tape indicator p 58 The cassette is noisier during rewinding or fast forwardin...

Page 79: ...nsert the cassette p 95 You cannot record on the Memory Stick Duo The Memory Stick Duo is full Insert another Memory Stick Duo or format the Memory Stick Duo p 47 Or delete unnecessary pictures recorded on the Memory Stick Duo p 67 When the POWER switch is set to TAPE you cannot record still images on the Memory Stick Duo with When SHUTTR SPEED is set between 1 725 to 1 10000 second While executin...

Page 80: ...g on the recording conditions The color of the picture is not correctly displayed Deactivate the NightShot function p 25 The screen picture is bright and the subject does not appear on the screen Set the NIGHTSHOT switch p 25 to OFF or cancel the BACK LIGHT function p 26 Horizontal bands appear This may occur when recording pictures under lighting from a discharge tube such as a fluorescent lamp s...

Page 81: ...s if the tape or video head is dirty p 95 Use the Sony mini DV cassette is displayed on the screen The tape you are playing was recorded without setting the date and time A blank section on the tape is being played The data code on a tape with a scratch or noise cannot be read Noises appear and or is displayed on the screen The tape was recorded in a TV color system other than that of your camcord...

Page 82: ...wide mode on a 4 3 TV This is not a malfunction Pictures from connected devices cannot be zoomed You cannot zoom pictures from connected devices on your camcorder p 29 Time code and other information appear on the display of the connected device Set DISP OUTPUT to LCD PANEL while connected with an A V connecting cable p 58 You cannot dub correctly using the A V connecting cable You cannot input ex...

Page 83: ... at the same time Functions that cannot be used together Not available If this function is set BACK LIGHT function FIREWORKS SPOT METER MANUAL of EXPOSURE SCENE SELECT NightShot TELE MACRO CINEMA EFECT OLD MOVIE COLOR SLOW S SPOT METER NightShot CINEMA EFECT EXPOSURE NightShot WHITE BAL NightShot SHARPNESS CINEMA EFECT SHUTTR SPEED of the RING NightShot CINEMA EFECT OLD MOVIE SMTH SLW REC AE SHIFT...

Page 84: ...EMA EFECT of D EFFECT SCENE SELECT SPOT METER MANUAL of EXPOSURE other than 0 in AE SHIFT PICT EFFECT when WIDE SELECT is set to 4 3 SMTH SLW REC CANDLE FIREWORKS MANUAL of SHUTTR SPEED SUPER NS COLOR SLOW S D EFFECT PICT EFFECT Not available If this function is set Troubleshooting Continued ...

Page 85: ...sation has occurred p 95 Remove the power source Reconnect it and operate your camcorder again Change the cassette Press RESET and operate your camcorder again E 61 ss E 62 ss E 91 ss Contact your Sony dealer or local authorized Sony service facility Inform them of the 5 digit code which starts from E 101 1001 Warning indicator pertaining to files The file is damaged The file is unreadable p 90 E ...

Page 86: ...er steady with both hands and shoot the image However note that the camera shake warning indicator does not disappear You hear a melody when the warning indicators appear on the screen p 58 If messages appear on the screen follow the instructions z Tips When is displayed the message can be turned into by touching Touch to display the message again x Moisture condensation Z Moisture condensation Ej...

Page 87: ...em using your computer x Dual Rec Cannot save still picture Do not eject Memory Stick Duo while still images are being stored onto it p 24 x PictBridge compliant printer Check the connected device Switch off the printer and switch it on again then disconnect the USB cable and reconnect it Cannot print Check the printer Switch off the printer and switch it on again then disconnect the USB cable and...

Page 88: ...d in DV format You need a TV or monitor with the AUDIO VIDEO input jack A connecting cable is also needed Simple setting of the clock by time difference You can easily set the clock to the local time abroad by entering the time difference between where you live and where you are Select WORLD TIME in the TIME LANGU menu then set the time difference p 59 System Used in NTSC Bahama Islands Bolivia Ca...

Page 89: ... camcorder can play back pictures recorded in the HDV 720 30p format but cannot output it from the HDV DV Interface i LINK To prevent a blank section from being created on the tape Go to the end of the recorded section using END SEARCH p 30 before you begin the next recording when you have played back the tape Copyright signal x When you play back If the cassette you play back on your camcorder co...

Page 90: ...ic Experts Group format The file extension is JPG File names of still images 101 0001 This file name appears on the screen of your camcorder DSC00001 JPG This file name appears on the display of a computer A Memory Stick Duo formatted by a computer Windows OS Mac OS does not have guaranteed compatibility with your camcorder Data read write speed may vary depending on the combination of the Memory ...

Page 91: ...o into the Memory Stick Duo adaptor in the wrong direction it may be damaged Do not insert a Memory Stick Duo adaptor without a Memory Stick Duo attached Doing so may result in malfunctions of the unit x On a Memory Stick PRO Duo The maximum memory capacity of a Memory Stick PRO Duo that can be used on your camcorder is 8 GB Notes on using Memory Stick Micro To use a Memory Stick Micro with the ca...

Page 92: ... a frequent playback fast forward or rewind operation wears out the battery pack faster We recommend using a large capacity battery pack NP F770 NP F970 optional Be sure to set the POWER switch to OFF CHG when not recording or playing back on your camcorder The battery pack is also consumed when your camcorder is in recording standby or playback pause Have spare battery packs ready for two or thre...

Page 93: ...s an international standard standardized by the Institute of Electrical and Electronics Engineers About the i LINK Baud rate i LINK s maximum baud rate varies according to the device There are 3 types S100 approx 100 Mbps S200 approx 200 Mbps S400 approx 400 Mbps The baud rate is listed under Specifications in the operating instructions of each piece of equipment It is also indicated near the i LI...

Page 94: ... the inside of the viewfinder or the LCD screen Anywhere very humid Operate your camcorder on DC 6 8 V battery pack or DC 8 4 V AC Adaptor For DC or AC operation use the accessories recommended in these operating instructions Do not let your camcorder get wet for example from rain or sea water If your camcorder gets wet it may malfunction Sometimes this malfunction cannot be repaired If any solid ...

Page 95: ...e as shown below When you bring your camcorder from a ski slope into a place warmed up by a heating device When you bring your camcorder from an air conditioned car or room into a hot place outside When you use your camcorder after a squall or a shower When you use your camcorder in a hot and humid place x How to avoid moisture condensation When you bring your camcorder from a cold place into a wa...

Page 96: ... socket using the supplied AC Adaptor during the operation 1 Slide the POWER switch to PLAY EDIT 2 Touch t MENU t STANDARD SET t CALIBRATION t 3 Touch the displayed on the screen with the corner of the Memory Stick Duo or the like The position of the changes To cancel touch CANCEL If you did not press the right spot start from step 3 again b Notes You cannot calibrate the LCD screen if it is rotat...

Page 97: ... battery pack attached Use your camcorder after charging the pre installed rechargeable battery However even if the pre installed rechargeable battery is not charged the camcorder operation will not be affected as long as you are not recording the date x Procedures Connect your camcorder to a wall outlet wall socket using the supplied AC Adaptor and leave it with the POWER switch set to OFF CHG fo...

Page 98: ...ing a DVM60 cassette and AC Adaptor Viewfinder Electric viewfinder color Image device 6 3 mm 1 2 9 type CMOS sensor Recording pixels still 4 3 Max 6 1 mega 2 848 2 136 pixels 2 Gross Approx 3 200 000 pixels Effective movie 16 9 Approx 2 280 000 pixels Effective movie 4 3 Approx 1 710 000 pixels Effective still 16 9 Approx 2 280 000 pixels Effective still 4 3 Approx 3 040 000 pixels Lens Carl Zeiss...

Page 99: ...cm 2 7 type aspect ratio 16 9 Total dot number 211 200 960 220 General Power requirements DC 7 2 V battery pack DC 8 4 V AC Adaptor Average power consumption During camera recording using the viewfinder with normal brightness HDV recording 4 6 W DV recording 4 4 W During camera recording using the LCD viewfinder with normal brightness HDV recording 5 0 W DV recording 4 8 W Operating temperature 0 ...

Page 100: ...lor is a trademark of Sony Corporation Microsoft Windows and Windows Media Windows Vista are trademarks or registered trademarks of U S Microsoft Corporation in the U S and other countries Macintosh and Mac OS are trademarks of Apple Inc in the U S and other countries HDMI the HDMI logo and High Definition Multimedia Interface are trademarks or registered trademarks of HDMI Licensing LLC Intel Int...

Page 101: ...utton 23 H POWER switch 18 I USB jack 69 J Access lamp 20 90 K Memory Stick Duo slot 20 L HDMI OUT jack Output only 31 The available video signals are read and the appropriate output format is selected and output automatically You can check the setup value of HDMI OUTPUT on STATUS CHECK p 57 M RESET button Initializes all the settings including the setting of the date and time Menu items customize...

Page 102: ...lder belt Attach the Shoulder belt optional H BATT battery RELEASE button 16 I Battery pack 15 J CHG charge lamp 15 K DC IN jack 15 L MANUAL button 25 M NIGHTSHOT switch 25 N BACK LIGHT button 26 O DISPLAY BATT INFO button 19 P MEMORY mode lamp 18 Q TAPE mode lamp 18 R PLAY EDIT mode lamp 18 F E D C B A G H J I K L M N O P Q R Identifying parts and controls Continued ...

Page 103: ...lights up in red during recording p 58 The REC lamp flashes if the remaining tape or battery power is low E Lens Carl Zeiss Lens 8 F Infrared port G Grip belt H RING 25 I Tripod receptacle Attach the tripod optional the length of the screw must be less than 5 5 mm 7 32 in to the tripod receptacle using a tripod screw A B C D E F G H I ...

Page 104: ...ec review display switch button 30 H Personal Menu button 36 Recording still images during tape recording Dual Rec I Recording folder 48 J Image size 46 K Quality FINE or STD 46 L Number of recorded still images 24 M Memory Stick Duo indicator and the number of images that can be recorded approx The date time during recording and the camera setting data will be recorded automatically They do not a...

Page 105: ...urrent folder is displayed and when there are multiple folders on the same Memory Stick Duo T Image delete button 67 U Tape playback select button 28 V Previous Next image button 28 W Index screen display button 28 X Image protection mark 68 Y Print mark 68 Viewing movies 2 4 5 8 1 qg qf Viewing still images Touch to move to the previous folder Touch to move to the next folder Touch to move to eit...

Page 106: ... REC Upper left Upper right Bottom Center M Indicator Meaning Color Slow Shutter 43 PictBridge connecting 69 EZ Warning 85 NightShot 25 Super NightShot 43 Indicator Meaning AE SHIFT 41 WB SHIFT 42 Picture effect 51 Digital effect 50 9 Manual focus 42 SCENE SELECT 39 Sharpness 41 Backlight 26 n White balance 40 SteadyShot off 44 Zebra 44 Tele macro 43 CAMERA COLOR 42 CONV LENS 45 X V COLOR 45 SPOT ...

Page 107: ...ference b Notes Indicators and their positions are approximate and differ from what you actually see Other indicator The setting can be made only for the pictures in the HDV format Indicator Meaning Information 86 ...

Page 108: ...56 Dual Rec 24 Dubbing 62 DV format 53 DV SET 54 D EFFECT Digital effect 50 83 E EDIT PLAY menu 52 END SEARCH 30 53 EXPOSURE 40 83 F FADER 49 83 FILE NO File number 47 FIREWORKS 39 FLASH Flash motion 50 FOCUS 42 80 FORMAT 47 Frame by frame Playback 52 G Getting Started 12 GUIDEFRAME 57 H HD high definition image quality 32 HDMI cable 33 HDMI OUT jack 31 HDV format 53 HDV1080i 54 HDV DV Interface 3...

Page 109: ...standard definition image quality 33 Searching for the starting point 30 SELF TIMER 44 SEPIA 51 SHARPNESS 41 83 SHUTTR SPEED 41 SKINTONE 51 SLIDE SHOW 49 SMTH SLW REC Smooth slow recording 51 84 SNOW 39 SOLARIZE 51 SP Standard Play 54 Specifications 98 SPOT FOCUS 42 83 SPOT METER Flexible spot meter 40 83 SPOTLIGHT 39 STANDARD 46 STANDARD SET menu 53 STATUS CHECK 57 STEADYSHOT 44 80 STILL 50 Still...

Page 110: ...110 X X V COLOR 45 94 Z ZEBRA 44 Zoom 24 Index Continued ...

Page 111: ...HD Video Camera Recorder Digital HD Video Camera Recorder Operating Guide Before operating the unit please read this manual thoroughly and retain it for future reference The supplied CD ROM includes Operating Guide for the HVR HD1000 series English French German Italian Spanish and Simplified Chinese versions For more details see Using the CD ROM Manual on page 11 HVR HD1000U HD1000N ...

Reviews: