


26
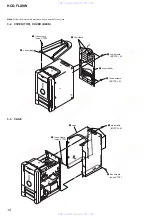
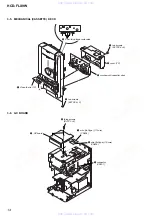
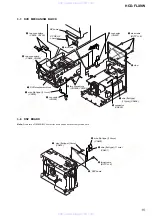
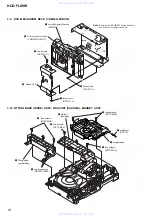
HCD-DFLX9W
[DVD TEST MODE GENERAL DESCRIPTION]
The Test Mode allows you to make diagnosis and adjustment easily
using the remote commander and monitor TV. The instructions,
diagnostic results, etc. are given on the on-screen display (OSD).
[TEST DISC LIST]
Use the following test disc on test mode.
TDV-520CSO (DVD-SL): PART No. J-2501-236-A
LUV-P01 (CD):
PART No. 4-999-032-01
TDV-540C (DVD-DL):
PART No. J-2501-235-A
Note:
Do not use existing test disc for DVD.
[STARTING DVD TEST MODE]
1. Press the
I
/
1
button to turn the power on.
2. Select the function “DVD”.
3. Press the
I
/
1
button to turn the power off.
4. While pressing the x button, press the
Z
(DVD) button and
turn the
[VOLUME]
knob in the clock wise.
5. It displays “SERVICE IN” on the fluorescent indicator tube,
and displays the Test Mode Menu on the monitor screen as
follows. (At the bottom of the menu screen, the model name
and revision number are displayed)
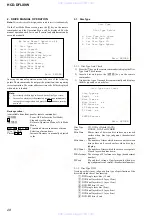
Test Mode Menu
0. Syscon Diagnosis
1. Drive Auto Adjustment
2. Drive Manual Operation
3. Mecha Aging
4. Emergency History
5. Mecha Error History
6. Version Information
7. Video Level Adjustment
Exit: POWER Key
Model :DHC-FLxx xx
Revision :x.xx
6. To execute each function, select the desired menu and press
its number on the remote commander (RM-SFL7).
7. To release from test mode, press the
I
/
1
button and turn the
power off.
[OPERATING DVD TEST MODE]
The same contents as board detail check by serial interface can be
checked from the remote commander operation.
On the Test Mode Menu screen, press
key on the remote
commander, and the following Check Menu will be displayed.
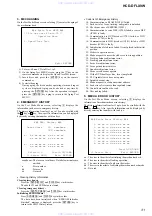
2. Version
3. EEPROM
4. GPIO
5. SD Bus
6. Video
7. Audio
0-0. Quit
Quit the Syscon Diagnosis and return to the Test Mode Menu.
0-1. All (All items continuous check)
This menu checks all diagnostic items continuously. Normally, all
items are checked successively one after another automatically
unless an error is found, but at a certain item that requires judgment
through a visual check to the result, the following screen is displayed
for the key entry.
•
Example display
### Syscon Diagnosis ###
Diag All Check
No.2 Version
2-3. ROM Check Sum
Check Sum = 2320
Press NEXT Key to Continue
Press PREV Key to Repeat
For the ROM Check, the check sum calculated by the Syscon is
output, and therefore you must compare it with the specified value
for confirmation.
Following the message, press the
NEXT
>
button to go to the next
item, or press the
PREV
.
button to repeat the same operation
again.
To quit the diagnosis and return to Check Menu screen, press the
[RETURN]
key on the remote commander to display Check Menu.
•
Error occurred
If an error occurred, the diagnosis is suspended and error is displayed.
Press the
[RETURN]
key on the remote commander to quit the
diagnosis, or press the
PREV
.
button to repeat the same check
where an error occurred, or press the
NEXT
>
button to continue
the check from the item next to faulty item.
General Description of Checking Method
Selecting 2 and subsequent items calls the submenu screen of each
item. And selecting 2 and subsequent items executes respective
menus and outputs the results.
For the contents of each submenu, see “Check Items List” as below.
Check Items List:
0-2.
Version
0-2-1. All
0-2-2. Revision
0-2-3. ROM Check Sum
0-2-4. Model Type
0-2-5. Region
0-3.
EEPROM Check
0-3-1. Sampling Check
0-4. GP I/O Check
0-5. SD Bus Check
0-6. Video Check
0-7. Audio Check
www. xiaoyu163. com
QQ 376315150
9
9
2
8
9
4
2
9
8
TEL 13942296513
9
9
2
8
9
4
2
9
8
0
5
1
5
1
3
6
7
3
Q
Q
TEL 13942296513 QQ 376315150 892498299
TEL 13942296513 QQ 376315150 892498299


