


25
HCD-LF1H
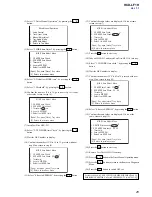
(3) Select “5. MIRR time Adjust”, by pressing the 5 “R” button.
(4) Select “5. Default set MIRR time”, by pressing the 5 “R”
button.
(5) Select “3. Threshold”, by pressing the 3 “R” button.
(6) Confirm the number. If it is 35, go to next step. If it is any
other value, return to step (4).
(7) Insert Test Disc HLX-513.
(8) Select “2. DVD MIRR time Check”, by pressing the 2 “R”
button.
(9) Wait for HEX number to display.
(10) Confirm the number, if XX is 1F to 35, proceed with next
step. If no, return to step (8).
(11) Select “4. Save to EEPROM”, by pressing the 4 “R” button.
Drive Manual Operation
1. Servo Control
2. Track/Layer Jump
3. Manual Adjustment
4. Tray Aging Mode
5. MIRR time Adjust
0. Return to Top Menu
MIRR time Adjust Menu
1. CD MIRR time Check:
2. DVD MIRR time Check:
3. Threshold:
4. Save to EEPROM
5. Default set MIRR time
[Open] Tray open [Close] Tray close
[0] Return to previous menu
MIRR time Adjust Menu
1. CD MIRR time Check:
2. DVD MIRR time Check:
3. Threshold: 35
4. Save to EEPROM
5. Default set MIRR time
[Open] Tray open [Close] Tray close
[0] Return to previous menu
MIRR time Adjust Menu
1. CD MIRR time Check:
2. DVD MIRR time Check: XX XX
3. Threshold:
4. Save to EEPROM
5. Default set MIRR time
[Open] tray open [close] Tray close
[0] Return to previous menu
(12) Confirm the same values are displayed. If it is not same,
return to step (7).
(13) Press the
A
button to eject tray.
(14) Take out HLX-513 and insert Test Disc HLX-A1 into tray.
(15) Select “1. CD MIRR time check”, by pressing the 1 “R”
button.
(16) Wait for HEX number to display.
(17) Confirm the number, if YY is 42 to 79, proceed with next
step. If no, return to step (15).
(18) Select “4. Save to EEPROM”, by pressing the 4 “R” button.
(19) Confirm the same values are displayed. If it is not the
same, return to step (15).
(20) Press the
A
button to eject tray.
(21) Remove Test Disc HLX-A1 from tray.
(22) Press the 0 “R” button to the Drive Manual Operation menu.
(23) Press the 0 “R” button to return to the Remocon Diagnosis
Menu.
(24) Press the
?/1
button to switch OFF set.
MIRR time Adjust Menu
1. CD MIRR time Check:
2. DVD MIRR time Check: XX XX
3. Threshold:
4. Save to EEPROM
5. Default set MIRR time
[Open] Tray open [close] Tray close
[0] Return to previous menu
MIRR time Adjust Menu
1. CD MIRR time Check: YY YY
2. DVD MIRR time Check: XX XX
3. Threshold:
4. Save to EEPROM
5. Default set MIRR time
[Open] Tray open [close] Tray close
[0] Return to previous menu
MIRR time Adjust Menu
1. CD MIRR time check: YY YY
2. DVD MIRR time check: XX XX
3. Threshold:
4. Save to EEPROM
5. Default set MIRR time
[Open] Tray open [close] Tray close
[0] Return to previous menu
(2) Select “2. Drive Manual Operation”, by pressing the 2 “R”
button.
For the sections 8-4-2. EXECUTING IOP MEASUREMENT and 8-5.
EMERGENCY HISTORY, refer to SUPPLEMENT-1 (9-887-283-8
[]
)
Ver. 1.1
Summary of Contents for HCD-LF1H
Page 78: ...78 HCD LF1H MEMO ...