background image

types

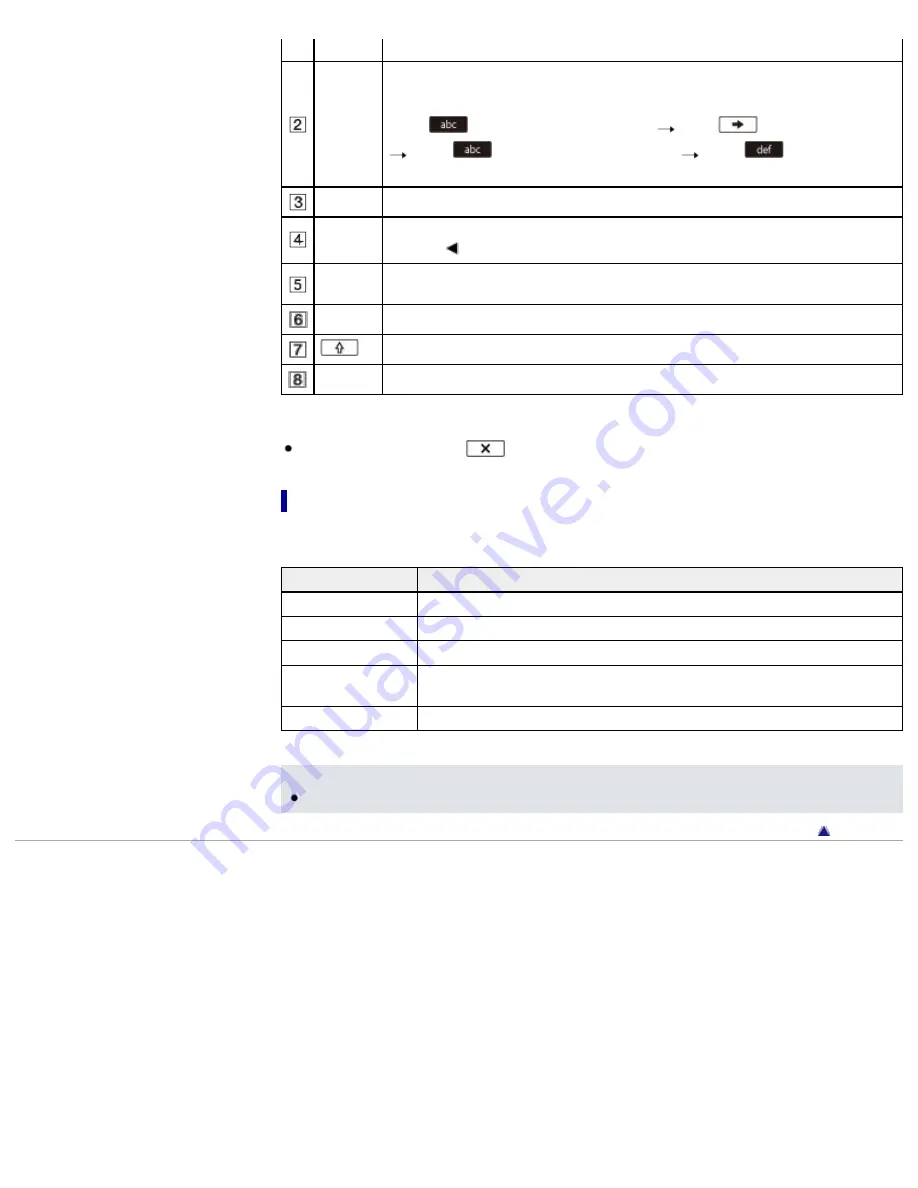
Keyboard

Each time you touch the key, the displayed character switches between the choices
available.
For example: If you want to enter “abd”

Select 

, touching it once to display “a” 

 touch 

 to move the cursor (5) 

 select 

, touching it twice to display “b” 

 select 

 touching it once to

display “d”.

Space

Enters a space.

Input box

The characters you entered are displayed. If you try to input more characters than

allowed, 

 is displayed on the screen.

Move
cursor

Moves the cursor in the input box to the right or left.

Delete

Deletes the character preceding the cursor.

Switches the next character to a capital or small letter.

Fix

Finalizes the entry.

To cancel text entry, select 

.

Other setting items

Depending on the status or the setting method of your access point, there may be more setting items.

Setting items

Functions

WPS PIN

Displays the PIN to enter to the connected device.

IP address setting

Selects [Auto] or [Manual setting].

IP address

If you are entering the IP address manually, enter the fixed address.

Subnet mask/Default
gateway

When you set [IP address setting] to [Manual setting], enter the IP address to
match your network environment.

Priority Connection

Selects [On] or [Off].

Notes

To give the registered access point priority, set [Priority Connection] to [On].


Back to top

Copyright 2013 Sony Corporation

126

Summary of Contents for Handycam HDR-PJ650E

Page 1: ...h an external device Using the Wi Fi function Customizing your camcorder Troubleshooting Maintenance and precautions Contents list Top page HDR PJ650E PJ650V PJ650VE PJ660 PJ660E PJ660V PJ660VE User Guide Use this manual if you encounter any problems or have any questions about the camcorder Back to top Copyright 2013 Sony Corporation 1 ...

Page 2: ... Playing images on a TV Saving images with an external device Using the Wi Fi function Customizing your camcorder Troubleshooting Maintenance and precautions Contents list Top page Operation Search Operation Search Operation Search Search by operation Back to top Copyright 2013 Sony Corporation 2 ...

Page 3: ...zing your camcorder Troubleshooting Maintenance and precautions Contents list Top page Before use Before use How to use this User Guide How to use this User Guide Model Information Parts and controls Screen indicators Parts and controls Parts and controls Wireless Remote Commander Screen indicators About language setting About language setting Back to top Copyright 2013 Sony Corporation 3 ...

Page 4: ... Top page Getting started Getting started Checking the supplied items Supplied items Attaching the supplied accessories Charging the battery pack Charging the battery pack using the AC Adaptor Charging the battery pack using your computer Turning the power on and setting the date and time Turning the power on and setting the date and time Preparing the recording media Selecting a recording medium ...

Page 5: ...es Zooming Capturing photos during movie recording Dual Capture Recording in mirror mode Intelligent Auto Recording the selected subject clearly Face Priority Recording movies in dim places Video Light Controlling the image settings manually with the MANUAL dial Recording information on your location GPS Features available using GPS Models with GPS Using the GPS function Models with GPS Obtaining ...

Page 6: ...ying movies and photos from a map Models with GPS Dividing a movie Capturing a photo from a movie Highlight playback Enjoying a digest of your movies Highlight Playback Changing the settings for Highlight Playback Saving Highlight Playback in high definition image quality HD Scenario Save Converting Highlight Playback scenes or Highlight Scenarios to standard definition image quality STD Highlight...

Page 7: ... on a high definition TV Connecting the camcorder to a high definition TV Playing images on a non high definition TV Connecting the camcorder to a non high definition TV Setting the aspect ratio according to the connected TV 16 9 4 3 When your TV is monaural When your TV has only one audio input jack Connecting the camcorder to a TV via a VCR Playing images on a TV supporting 5 1ch surround sound ...

Page 8: ...Memories Home software in your computer Disconnecting your camcorder from the computer The devices on which the created disc can be played back Starting the PlayMemories Home software Downloading the dedicated software for the camcorder Saving images on an external media device Saving images on an external media device easily Saving the desired images in the camcorder to the external media device ...

Page 9: ... function Using the Wi Fi function Using the Wi Fi function Using the Wi Fi function Attaching the wireless adaptor What you can do with the Wi Fi function What you can do with the Wi Fi function Available menus with the wireless adaptor attached Ctrl with Smartphone Send to Smartphone Send to Computer WPS Push Access point settings Edit Device Name Disp MAC Address SSID PW Reset Network Info Rese...

Page 10: ...ems Setting up menu items Shooting Mode Movie Photo Smth Slw REC Smooth slow rec Golf Shot Camera Mic White Balance Spot Meter Fcs Spot meter focus Spot Meter Flexible spot meter Spot Focus Exposure Focus IRIS Shutter Speed AGC Limit AE Shift White Balance Shift Low Lux Scene Selection Cinematone Fader Self Timer Tele Macro SteadyShot movie SteadyShot photo Digital Zoom Conversion Lens Auto Back L...

Page 11: ...ghlight Movie Scenario Edit Copy Delete Protect Copy Direct Copy Setup Media Select Media Info Format Repair Img DB F File Number Data Code Volume Download Music HDR PJ650V PJ660 PJ660V Empty Music HDR PJ650V PJ660 PJ660V TV Type HDMI Resolution CTRL FOR HDMI Control for HDMI USB Connect USB Connect Setting USB LUN Setting Beep LCD Brightness Your Location HDR PJ650V PJ650VE PJ660V PJ660VE Airplan...

Page 12: ...ing Calibration Battery Info Power Save Initialize Demo Mode Date Time Setting Area Setting Auto Clock ADJ HDR PJ650V PJ650VE PJ660V PJ660VE Auto Area ADJ HDR PJ650V PJ650VE PJ660V PJ660VE Back to top Copyright 2013 Sony Corporation 12 ...

Page 13: ...op page Troubleshooting Troubleshooting If you have problems If you have problems Troubleshooting Overall operations Wireless Remote Commander Batteries power sources LCD screen viewfinder Memory card Recording Playback Editing movies photos on your camcorder Playback on the TV Copying Connecting to other devices Connecting to a computer Self diagnosis display Warning indicators Self diagnosis dis...

Page 14: ...h GPS About the memory card About the InfoLITHIUM battery pack About handling of your camcorder On use and care On moisture condensation On charging the pre installed rechargeable battery Notes on disposal transfer the ownership of the camcorder Recording time of movies number of recordable photos Charging time Expected time of recording and playback with each battery pack Expected recording time ...

Page 15: ...ontrols Screen indicators Parts and controls Parts and controls Wireless Remote Commander Screen indicators About language setting About language setting Back to top Getting started Checking the supplied items Supplied items Attaching the supplied accessories Charging the battery pack Charging the battery pack using the AC Adaptor Charging the battery pack using your computer Turning the power on ...

Page 16: ...movie Highlight playback Enjoying a digest of your movies Highlight Playback Changing the settings for Highlight Playback Saving Highlight Playback in high definition image quality HD Scenario Save Converting Highlight Playback scenes or Highlight Scenarios to standard definition image quality STD Highlight Movie Using the built in projector Using the built in projector Using the projector for you...

Page 17: ...ck images in the external media device on the camcorder Devices that cannot be used as an external media device Creating a disc with a recorder Creating a standard definition image quality STD disc with a recorder Back to top Using the Wi Fi function Using the Wi Fi function Using the Wi Fi function Attaching the wireless adaptor What you can do with the Wi Fi function What you can do with the Wi ...

Page 18: ...Scene Selection Cinematone Fader Self Timer Tele Macro SteadyShot movie SteadyShot photo Digital Zoom Conversion Lens Auto Back Light Dial Setting Face Detection Smile Shutter Smile Sensitivity Flash Flash Level Red Eye Reduction Closer Voice Blt in Zoom Mic Auto Wind NR Audio Mode Audio Rec Level My Button Expanded Focus Grid Line Display Setting Zebra Peaking Light Bright Audio Level Display Ima...

Page 19: ...pty Music HDR PJ650V PJ660 PJ660V TV Type HDMI Resolution CTRL FOR HDMI Control for HDMI USB Connect USB Connect Setting USB LUN Setting Beep LCD Brightness Your Location HDR PJ650V PJ650VE PJ660V PJ660VE Airplane Mode HDR PJ650V PJ650VE PJ660V PJ660VE GPS Setting HDR PJ650V PJ650VE PJ660V PJ660VE REC Lamp Remote Ctrl Language Setting Calibration Battery Info Power Save Initialize Demo Mode Date T...

Page 20: ...and precautions About the AVCHD format About GPS Models with GPS About the memory card About the InfoLITHIUM battery pack About handling of your camcorder On use and care On moisture condensation On charging the pre installed rechargeable battery Notes on disposal transfer the ownership of the camcorder Recording time of movies number of recordable photos Charging time Expected time of recording a...

Page 21: ...hot Smth Slw REC Smooth slow rec Selecting the suitable setting automatically for the recording situation Intelligent Auto Recording people clearly Face Detection Recording the selected subject clearly Face Priority Smile Shutter Scene Selection Portrait Scene Selection Spotlight Scene Selection Night Portrait Closer Voice Recording images with the selected image quality REC Mode Frame Rate HD MP4...

Page 22: ...ntrolling the image settings manually with the MANUAL dial Dial Setting Playing movies and photos from an event Event View Playing movies and photos from a map Map View HDR PJ650V PJ650VE PJ660V PJ660VE Enjoying a digest of your movies Enjoying a digest of your movies Highlight Playback Using the built in projector Using the built in projector Playing images on a TV Connecting the camcorder to a h...

Page 23: ...uide Selecting a topic to display Searching a topic by keyword Returning to a previous page Printing out a page Marks and notations used in this User Guide This User Guide explains how to use each function of the camcorder how to change settings and how to troubleshoot a problem Selecting a topic to display The following illustrations take Internet Explorer 7 as an example 1 Click a title in the s...

Page 24: ...the font size setting refer to the Help of your web browser Searching a topic by keyword Enter the keyword in the search window then click the Search button Returning to a previous page Use the back button of your web browser or the breadcrumb trail navigation A to return to a page you previously viewed 24 ...

Page 25: ...e Click the Print button to print out a page you are viewing Marks and notations used in this User Guide In this User Guide the sequence of operations is shown by arrows A Operate the camcorder in the order indicated 25 ...

Page 26: ...Icons in the operating procedure sentences appear when the camcorder is in its default settings The default setting is indicated by Back to top Copyright 2013 Sony Corporation 26 ...

Page 27: ...like below confirm in this chapter whether the description applies to your camcorder Models with GPS Models with the NTSC color system To confirm the model name of your camcorder See the bottom of your camcorder A Model name HDR xxx Differences in functions Model name Signal format USB connection GPS HDR PJ650E PJ660E PAL Output only HDR PJ650V PJ660V NTSC Input Output HDR PJ650VE PJ660VE PAL Outp...

Page 28: ...ols Parts and controls Built in microphone Multi interface shoe For details on compatible accessories of the Multi interface shoe visit the Sony web site in your area or consult your Sony dealer or localauthorized Sony service facility Operations with other manufacture s accessories are not guaranteed Flash Video light Lens G lens Remote sensor Camera recording lamp The camera recording lamp light...

Page 29: ...Speakers PROJECTOR FOCUS lever Projector lens GPS antenna HDR PJ650V PJ650VE PJ660V PJ660VE A GPS antenna is located in the LCD panel Memory card access lamp While the lamp is lit or flashing the camcorder is reading or writing data Memory card slot HDMI OUT jack PROJECTOR IN jack MODE button PROJECTOR button View Images button LIGHT Video Light button POWER button 29 ...

Page 30: ...es jack Grip belt Loop for a shoulder belt Built in USB Cable Multi Micro USB Terminal Supports Micro USB compatible devices Tripod receptacle Attach a tripod sold separately the length of the screw must be less than 5 5 mm 7 32 in Depending on the specifications of the tripod your camcorder may not attach in the proper direction BATT battery release lever To fasten the grip belt 30 ...

Page 31: ...Back to top Copyright 2013 Sony Corporation 31 ...

Page 32: ...ded images from your camcorder DATA CODE button Displays the date and time camera setting data or coordinates HDR PJ650V PJ650VE PJ660V PJ660VE of the recorded images when you press this button during playback PHOTO button Records as a still image the image that is displayed on the screen when this button is pressed SCAN SLOW buttons Previous Next buttons PLAY button STOP button DISPLAY button Tra...

Page 33: ...Back to top Copyright 2013 Sony Corporation 33 ...

Page 34: ...d controls Screen indicators Screen indicators Screen indicators The following indicators appear when you change the settings Check also for the indicators that appear during recording or playing Indicator Meaning MENU button Self timer recording GPS triangulation status Airplane Mode set to On Video light Wide Mode Fader Face Detection set to Off Smile Shutter set to Off Manual focus Scene Select...

Page 35: ...Q LP and movie size 60min Remaining battery Recording playback editing media 0 00 00 Counter hour minute second 00min Estimated remaining recording time 9999 20 4M Approximate number of recordable photos and photo size Playback folder of the memory card 100 112 Current playing movie or photo Number of total recorded movies or photos Connection to the external media device Indicator Meaning Audio R...

Page 36: ...lligent Auto 101 0005 Data file name Protect Flash Flash Level Red Eye Reduction Indicators and their positions are approximate and may differ from what you actually see Some indicators may not appear depending on your camcorder model Back to top Copyright 2013 Sony Corporation 36 ...

Page 37: ...oting Maintenance and precautions Contents list Top page Before use About language setting About language setting About language setting Change the screen language before using the camcorder if necessary The on screen displays in each local language are used for illustrating the operating procedures Details Select Setup General Settings Language Setting a desired language Back to top Copyright 201...

Page 38: ...d items The numbers in indicate the supplied quantity Camcorder 1 AC Adaptor 1 Power cord mains lead 1 HDMI cable 1 USB connection support cable 1 The USB connection support cable is designed for use with this camcorder only Use this cable when the Built in USB Cable of the camcorder is too short for connection Lens hood 1 Step Down Ring 1 Wireless Remote Commander 1 Rechargeable battery pack NP F...

Page 39: ...Back to top Copyright 2013 Sony Corporation 39 ...

Page 40: ...of the lens hood with the flash emitting section of the camcorder properly To remove the lens hood turn the securing ring of the lens hood in the opposite direction from that of the arrow Remove the lens hood when you operate the camcorder with the supplied remote commander To attach the Step Down Ring Align the Step Down Ring with the camcorder properly then turn it in the direction of the arrow ...

Page 41: ...41 ...

Page 42: ...e sure to store the viewfinder first Align the indentation on the camcorder and projection on the battery pack then slide the battery pack upwards 2 Connect the AC Adaptor and the power cord mains lead to your camcorder and the wall outlet wall socket A Align the mark on the DC plug with that of DC IN jack The POWER CHG charge lamp turns orange The POWER CHG charge lamp turns off when the battery ...

Page 43: ...e battery pack Close the LCD screen Slide the BATT battery release lever and remove the battery pack To use your camcorder continuously for a long time Connect the AC Adaptor and the power cord mains lead to your camcorder and the wall outlet wall socket Details By using the AC Adaptor you can use your camcorder without worrying about the battery running out of charge Notes on the AC Adaptor Do no...

Page 44: ...using an AC UD10 USB charger AC Adaptor sold separately You can charge the battery by connecting the Built in USB Cable to a wall outlet wall socket using an AC UD10 USB charger AC Adaptor sold separately You cannot use a Sony CP AH2R CP AL or AC UP100 portable power supply device sold separately to charge the camcorder Charging time Approximate time min required to fully charge a fully discharged...

Page 45: ...Related topics Charging the battery pack using the AC Adaptor Back to top Copyright 2013 Sony Corporation 45 ...

Page 46: ...n the power on You can also turn on the camcorder by pressing POWER 2 Select the desired language then select Next Touch the button on the LCD screen 3 Select the desired geographical area with then select Next 4 Set Daylight Savings or Summer Time select the date format and the date and time If you set Daylight Savings or Summer Time to On the clock advances 1 hour When you select the date and ti...

Page 47: ... Off Pulled out On Notes Even if the LCD screen is closed if the viewfinder is pulled out the camcorder is not turned off When you turn off the power of the camcorder make sure that the viewfinder is retracted to the original position When you make recording with the viewfinder only Pull out the viewfinder and close the LCD panel and then adjust the angle you want If the indicator on the viewfinde...

Page 48: ...k time is automatically adjusted with Auto Clock ADJ and Auto Area ADJ set to On The clock may not automatically adjust to the correct time depending on the country region selected for your camcorder In this case set Auto Clock ADJ and Auto Area ADJ to Off models with GPS Related topics Information on your camcorder model Model Information To set the date and time again Date Time Setting To calibr...

Page 49: ...ing medium Selecting a recording medium The recording media that can be used are displayed on the screen of your camcorder as following icons Default recording medium Alternative recording medium Internal memory Memory card Notes You cannot select a different recording medium for movies and for photos You can select a recording medium from the menu 1 Select Setup Media Settings Media Select the de...

Page 50: ...on verified Described in this manual Memory Stick PRO Duo media Mark2 Up to 32 GB Memory Stick PRO Duo media Memory Stick PRO HG Duo media Memory Stick XC HG Duo media Up to 64 GB SD memory card Class 4 or faster SD card SDHC memory card SDXC memory card Operation with all memory cards is not assured Notes A MultiMediaCard cannot be used with this camcorder Movies recorded on the Memory Stick XC H...

Page 51: ...age Database File It may be possible that there is not enough free space is displayed format the memory card Details Confirm the direction of the memory card If you forcibly insert the memory card in the wrong direction the memory card memory card slot or image data may be damaged When inserting or ejecting the memory card be careful so that the memory card does not pop out and drop Related topics...

Page 52: ...s If you close the LCD screen while recording movies the camcorder stops recording only when the viewfinder is retracted The maximum continuous recordable time of movies is about 13 hours When a movie file exceeds 2 GB the next movie file is created automatically The flash does not work while the camera is in the Movie mode The following states will be indicated if data is still being written onto...

Page 53: ...ed recording time of movies Media Select To display items on the LCD screen all the time Display Setting Recordable time remaining capacity Media Info Zooming Screen indicators Back to top Copyright 2013 Sony Corporation 53 ...

Page 54: ...hotos Shooting photos In the default setting photos are recorded on the internal memory 1 Open the LCD screen and select MODE Photo on the LCD screen You can also switch between Movie Photo by pressing the MODE button 2 Press PHOTO lightly to adjust the focus then press it fully When the focus is adjusted properly AE AF lock indicator appears on the LCD screen Related topics Screen indicators duri...

Page 55: ...button in photo recording mode MENU button Status detected by Intelligent Auto Recording status STBY REC AE AF automatic exposure automatic focus lock GPS triangulating status models with GPS Tracking focus Zoom Remaining battery Counter hour minute second Capturing a photo Recording playback editing media Estimated recording remaining time Recording image quality Frame rate Recording mode HD STD ...

Page 56: ...Information on your camcorder model Model Information Back to top Copyright 2013 Sony Corporation 56 ...

Page 57: ...ever Move the power zoom lever slightly for a slower zoom Move it further for a faster zoom Notes Be sure to keep your finger on the power zoom lever If you move your finger off the power zoom lever the operation sound of the power zoom lever may also be recorded You cannot change the zoom speed with the button on the LCD screen The minimum possible distance between camcorder and subject while mai...

Page 58: ... Recording Useful functions for recording images Capturing photos during movie recording Dual Capture Capturing photos during movie recording Dual Capture 1 Press PHOTO during movie recording to capture still photos Notes You cannot use the Dual Capture function when is displayed You may not be able to shoot photos depending on the setting in REC Mode and Frame Rate The flash does not work when yo...

Page 59: ...der Troubleshooting Maintenance and precautions Contents list Top page Recording Useful functions for recording images Recording in mirror mode Recording in mirror mode 1 Open the LCD panel 90 degrees to the camcorder then rotate it 180 degrees to the lens side A mirror image of the subject appears on the LCD screen but the image will be normal when recorded Back to top Copyright 2013 Sony Corpora...

Page 60: ...r the situation automatically On is the default setting 1 Select On at the right bottom of the recording screen of movies or photos 2 Point the camcorder toward the subject and start recording The icons that correspond to the conditions detected are displayed Face detection Portrait Baby Scene detection Backlight Landscape Night Scene Spotlight Low light Macro Camera shake detection Walk Tripod So...

Page 61: ...ace Priority Your camcorder can track a face you select and adjust the focus exposure and skin tone of the face automatically 1 Touch one of the faces targeted A The double lined frame is displayed B You can release the selection Notes The subject you touched may not be detected depending on the surrounding brightness or hairstyle of the subject Make sure to set the Face Detection setting to other...

Page 62: ...ng movies in dim places Video Light 1 Press LIGHT A Flash Video light Each time you press the LIGHT button the setting changes as follows Off no indicator Auto On Notes Keep a distance of about 0 3 m to 1 5 m 1 foot to 5 feet between the camcorder and the subject The video light generates strong light Do not use the video light directly in front of the eyes at close range The battery drains quickl...

Page 63: ...e default setting to the MANUAL dial A MANUAL button B MANUAL dial 1 Press MANUAL to switch to manual operation mode Pressing MANUAL switches the operation mode between manual and automatic 2 Rotate the dial to make the adjustment Items you can control with the MANUAL dial Focus Exposure IRIS Shutter Speed AE Shift White Balance Shift To assign the menu item to the MANUAL dial Press and hold MANUA...

Page 64: ...he assigned item of the MANUAL dial However if you set Exposure after setting AE Shift manually Exposure will override AE Shift If you set either one of Exposure IRIS or Shutter Speed the settings of other 2 items are canceled Related topics Checking the camera data Data Code Back to top Copyright 2013 Sony Corporation 64 ...

Page 65: ...using GPS Models with GPS Features available using GPS Models with GPS The following features are available if you use the GPS Global Positioning System function Recording location information on movies or photos On is the default setting Playing movies and photos by searching for them from a map Map View Displaying a map of your current location GPS triangulating status A Number of dots changes w...

Page 66: ...ot have location information B The camcorder displays the location information that was previously obtained Related topics Information on your camcorder model Model Information Back to top Copyright 2013 Sony Corporation 66 ...

Page 67: ...Using the GPS function Models with GPS You can use the GPS function by selecting Setup General Settings GPS Setting On the default setting If you do not want to record location information Select Setup General Settings GPS Setting Off Notes It may take a while before the camcorder starts triangulating Use the GPS function outdoors and in open areas where the radio signals can be best received in s...

Page 68: ...of your current location while traveling 1 Select Setup General Settings Your Location A A marker that indicates your current location Notes If you select a certain point on the screen the map shows an area with that point at the center Select to move your current location back to the center again If the camcorder cannot acquire current location information the triangulating information appears If...

Page 69: ...he satellite map and triangulating gauge The center of the satellite map shows your current location You can check the direction north south east west of the satellites with the satellite icons that appear on the satellite map When the camcorder succeeds in triangulating your location the triangulating gauge turns to green How to check the GPS satellite icons triangulating gauge The color of the G...

Page 70: ... A display that allows you to triangulate the location again appears In this case follow the instructions that appears on the LCD screen Related topics Information on your camcorder model Model Information Back to top Copyright 2013 Sony Corporation 70 ...

Page 71: ...o your camcorder using the PlayMemories Home software the time it takes the camcorder to acquire your location information can be shortened Connect the camcorder to a computer that is connected to the Internet The GPS Assist Data will be updated automatically Notes In the following situations the current location of the camcorder shown on the map may be different from the actual location The margi...

Page 72: ...ch for recorded images by date and time of recording Event View 1 Open the LCD screen and press the button on the camcorder to enter the playback mode You can enter the playback mode by selecting on the LCD screen Details 2 Select to move the desired event to the center and then select it The camcorder displays recorded images as an event automatically based on the date and time 3 Select the image...

Page 73: ... to play movies slowly To repeat Slideshow select Slideshow Set when is selected with the Switch Image Type button Screen display on the Event View screen To the MENU screen Event name To the previous event Change to the movie photo recording mode To play back short movies Highlight Playback Remaining battery To the Map View screen models with GPS Events To the next event Time line bar Change Even...

Page 74: ...recorded on your camcorder normally Also you may not be able to play back images recorded on other devices with your camcorder Standard definition image quality STD movies recorded on SD memory cards cannot be played on AV equipment of other manufacturers Notes To prevent your image data from being lost save all your recorded images on external media periodically In the default setting a protected...

Page 75: ...s with GPS You can search for recorded images by location of recording Map View 1 Open the LCD screen and select View Images on the LCD screen to enter the playback mode 2 Switch to the Map View by touching Map View 3 Select the recording location Touch the direction on the map in which you want the map to be scrolled Keep touching that point to scroll the map continuously If you change the map sc...

Page 76: ...for the first time A message appears asking you to confirm whether you agree with the terms of the license agreement of the map data You can use the map data by touching Agree on the screen after agreeing to the terms of the license agreement For details on the license agreement refer to the Operating Guide supplied with your camcorder You cannot use the map data if you touch Not Agree However whe...

Page 77: ...es that were recorded on your camcorder normally Also you may not be able to play back images recorded on other devices with your camcorder Standard definition image quality STD movies recorded on SD memory cards cannot be played on AV equipment of other manufacturers Related topics Information on your camcorder model Model Information Back to top Copyright 2013 Sony Corporation 77 ...

Page 78: ...int with more precision Notes A slight difference may occur from the point where you select and the actual dividing point as your camcorder selects the dividing point based on about half second increments An MP4 movie cannot be divided Some basic editing operations can be done on the camcorder If you want to do advanced editing operations use the PlayMemories Home software Do not remove the batter...

Page 79: ...t with more precision If the movie was recorded with one of the following image quality levels the image size will be set as shown below High definition image quality HD or MP4 2 1 M 16 9 Wide aspect ratio 16 9 with standard definition image quality STD 0 2 M 16 9 4 3 aspect ratio with standard definition image quality STD VGA 0 3 M 4 3 Notes You cannot save captured images to the memory card mode...

Page 80: ... select Highlight A Volume adjustment B Context C To stop D Previous E To pause F Next 3 Select the desired operation when the highlight playback finishes A The camcorder plays the Highlight Playback scenes again B You can save the Highlight Playback scenes in standard definition image quality STD and share it upload it to the Web etc C You can change the settings for Highlight Playback Notes High...

Page 81: ...Changing the settings for Highlight Playback Back to top Copyright 2013 Sony Corporation 81 ...

Page 82: ... the Highlight Playback segment Highlight Point You can set the points in a movie or photo that will be used in a Highlight Playback Play the desired movie and select Or play the desired photo and select appears on the movie or photo that is used in a Highlight Playback To erase the points select Clear All Points Notes After the music file is transferred to the camcorder if you cannot play the mus...

Page 83: ...e Highlight Playback as a Scenario with high definition image quality HD Up to 8 scenarios can be saved 1 Select Replay on the screen after a Highlight Playback has finished 2 When the Highlight Playback starts again select Scenario Save To play back a saved scenario 1 Select Playback Function Scenario select the desired scenario and then select To erase a saved scenario select Erase Erase All whi...

Page 84: ...convert the data format of Highlight Playback or Highlight Scenarios to standard definition image quality STD and save them as a Highlight Movie Highlight movies can be uploaded to the Web 1 Select Save and Share on the screen after Highlight Playback or Highlight Scenario playback has finished 2 Select the desired operation when the item has been saved A Selecting Share allows you to upload the H...

Page 85: ...ll and then press PROJECTOR 2 Select Image Shot on This Device on the LCD screen 3 When the operating guide screen appears select Project This screen appears the first time you use the built in projector after the camcorder is turned on 4 Adjust the focus of the projected image using the PROJECTOR FOCUS lever A PROJECTOR FOCUS lever The projected image is larger when the distance between your camc...

Page 86: ...projector lens The LCD screen and the projector lens become hot while in use Using the projector shortens battery life using the supplied AC Adaptor is recommended The following operations are unavailable while you are using the projector Map operation models with GPS Output of Highlight Playback to a device such as a TV Operation of the camcorder with the LCD screen closed Several other functions...

Page 87: ...ards a surface such as a wall and then press PROJECTOR 3 Select Image from External Device on the LCD screen 4 Select Project on the LCD screen This screen appears the first time you use the built in projector after the camcorder is turned on 5 Adjust the focus of the projected image using the PROJECTOR FOCUS lever The projected image is larger when the distance between your camcorder and the refl...

Page 88: ...88 ...

Page 89: ...e camcorder and to the HDMI IN jack on the TV 3 Play a movie or a photo on the camcorder On an HDMI cable Use an HDMI cable with the HDMI logo Use an HDMI micro connector on one end for the camcorder and a plug suitable for connecting your TV on the other end Copyright protected images are not output from the HDMI OUT jack of your camcorder Some TVs may not function correctly e g no sound or image...

Page 90: ...nition TV When movies are recorded with standard image quality STD they are played back in standard definition image quality STD Signal flow 1 Switch the input on the TV to the connected jack 2 Connect your camcorder and the TV using an AV Cable sold separately 3 Play a movie or a photo on the camcorder Notes Refer to the instruction manuals of the TV as well Use the supplied AC Adaptor as the pow...

Page 91: ... your camcorder Troubleshooting Maintenance and precautions Contents list Top page Playing images on a TV Playing images on a non high definition TV Setting the aspect ratio according to the connected TV 16 9 4 3 Setting the aspect ratio according to the connected TV 16 9 4 3 Set TV Type to 16 9 or 4 3 according to your TV Related topics Wide Mode Back to top Copyright 2013 Sony Corporation 91 ...

Page 92: ... Contents list Top page Playing images on a TV Playing images on a non high definition TV When your TV is monaural When your TV has only one audio input jack When your TV is monaural When your TV has only one audio input jack Connect the yellow plug of an AV Cable sold separately to the video input jack and connect the white left channel or red right channel plug to the audio input jack of your TV...

Page 93: ...oubleshooting Maintenance and precautions Contents list Top page Playing images on a TV Playing images on a non high definition TV Connecting the camcorder to a TV via a VCR Connecting the camcorder to a TV via a VCR Connect your camcorder to the LINE IN input on the VCR using an AV Cable sold separately Set the input selector on the VCR to LINE VIDEO 1 VIDEO 2 etc Back to top Copyright 2013 Sony ...

Page 94: ...evices that support 5 1ch surround sound input A Built in microphone Notes The sound of MP4 movies is recorded in 2ch sound The built in speaker does not output 5 1ch surround sound even if you play back a movie recorded with 5 1ch surround sound on your camcorder To enjoy the 5 1ch surround sound of the movies recorded with high definition image quality HD in 5 1ch sound you need a device compati...

Page 95: ...with the HDMI cable You can operate the menu of your camcorder by pressing the SYNC MENU button of the remote commander of your TV You can display the camcorder screens such as Event View play selected movies or display selected photos by pressing up down left right enter buttons of the remote commander of your TV Notes There may be some operations you cannot do with the remote commander Set CTRL ...

Page 96: ...ies Home software Windows A Import images from the camcorder B View images in a calendar C Upload images to online services D Create a movie disc E Share images in PlayMemories Online PlayMemories Home can be downloaded from the following URL www sony net pm Notes An Internet connection is required to install PlayMemories Home An Internet connection is required to use PlayMemories Online and other...

Page 97: ... or faster is required when processing FX or FH movies and Intel Core 2 Duo 2 40 GHz or faster is required when processing PS movies Memory Windows XP 512 MB or more 1 GB or more is recommended Windows Vista Windows 7 Windows 8 1 GB or more Hard disk Disk volume required for installation Approximately 500 MB Display Minimum 1 024 768 dots 1 Standard installation is required Operation is not assure...

Page 98: ... with this camcorder will then be available If the PMB Picture Motion Browser software is installed on your computer it will be overwritten by the PlayMemories Home software In this case you cannot use some functions that were available with PMB with this PlayMemories Home software Notes When you access the camcorder from the computer use the PlayMemories Home software Operation is not guaranteed ...

Page 99: ...nts list Top page Saving images with an external device Using the PlayMemories Home software Disconnecting your camcorder from the computer Disconnecting your camcorder from the computer 1 Click the icon at the bottom right of the desktop of the computer Safely remove USB Mass Storage Device 2 Select Yes on the camcorder screen 3 Disconnect the USB cable If you are using Windows 7 or Windows 8 cli...

Page 100: ...ed in DVD players recorders Because DVD players recorders are not compatible with the AVCHD format DVD players recorders may fail to eject the disc Always keep your PlayStation 3 upgraded to the latest version of its system software The PlayStation 3 may not be available in some countries regions To create a Blu ray disc You can create a Blu ray disc with a high definition image quality HD movie p...

Page 101: ...on the computer screen The PlayMemories Home software starts up When using Windows 8 select the PlayMemories Home icon from the start screen 2 Double click the PlayMemories Home Help Guide short cut icon on the computer screen to see how to use PlayMemories Home When using Windows 8 select PlayMemories Home Help Guide from the help menu of PlayMemories Home If the icon is not displayed on the comp...

Page 102: ...l the dedicated software for the camcorder from the following URL For Windows http www sony co jp imsoft Win For Mac http www sony co jp imsoft Mac Main software Music Transfer for models with a USB input function Music Transfer allows you to change the music files that have been supplied with your camcorder to suit your tastes or to delete or add music files Furthermore this software can restore ...

Page 103: ...es Home software Notes For this operation you need the USB Adaptor Cable VMC UAM2 sold separately Connect the AC Adaptor and the power cord mains lead to the DC IN jack of your camcorder and the wall outlet wall socket Refer to the instruction manual supplied with the external media device 1 Connect your camcorder and the external media device using the USB Adaptor Cable sold separately A USB Adap...

Page 104: ...ts For details on available external media devices go to the Sony support website in your country region The number of scenes you can save on the external media device is as follows However even if the external media device has free space you cannot save scenes exceeding the following number High definition image quality HD movies Max 3 999 Standard definition image quality STD movies Max 9 999 MP...

Page 105: ...ely Connect the AC Adaptor and the power cord mains lead to the DC IN jack of your camcorder and the wall outlet wall socket Refer to the instruction manual supplied with the external media device 1 Connect your camcorder and the external media device using the USB Adaptor Cable sold separately A USB Adaptor Cable VMC UAM2 sold separately Make sure not to disconnect the USB cable while Preparing i...

Page 106: ...the AC Adaptor and the power cord mains lead to the DC IN jack of your camcorder and the wall outlet wall socket Refer to the instruction manual supplied with the external media device 1 Connect your camcorder and the external media device using the USB Adaptor Cable sold separately A USB Adaptor Cable VMC UAM2 sold separately 2 Select Play without copying and select the image you want to view You...

Page 107: ...Saving images with an external device Saving images on an external media device Devices that cannot be used as an external media device Devices that cannot be used as an external media device The following devices cannot be used as an external media device media devices with a capacity exceeding 2 TB ordinary disc drive such as CD or DVD drive media devices connected via a USB hub media devices wi...

Page 108: ...old separately A AV Cable sold separately Signal flow Connect your camcorder to the input jacks of the recording device 3 Start playback on your camcorder and record it on the recording device 4 When dubbing is finished stop the recording device and then your camcorder Notes Connect your camcorder to the wall outlet wall socket using the supplied AC Adaptor for this operation Refer to the instruct...

Page 109: ...eless adaptor ADP WL1M sold separately may not be available in some countries regions You cannot use the Wi Fi function of your camcorder to connect with public wireless network using the wireless adaptor Use the Wi Fi function in accordance with regulations that apply in the place where you use the camcorder In situations where use of Wi Fi is prohibited such as during airplane takeoff and landin...

Page 110: ...t Top page Using the Wi Fi function Using the Wi Fi function Attaching the wireless adaptor Attaching the wireless adaptor Open the Multi interface shoe cover on the camcorder Align the wireless adaptor ADP WL1M sold separately with the Multi interface shoe then attach it to the camcorder by pressing and sliding forward To remove the wireless adaptor Remove the wireless adaptor by sliding backward...

Page 111: ...can do with the Wi Fi function What you can do with the Wi Fi function What you can do with the Wi Fi function Attaching the wireless adaptor ADP WL1M sold separately to the camcorder following functions are available Saving movies and photos to your computer A computer connected to an access point is required Transferring movies MP4 and photos to your smartphone or tablet A smartphone or tablet i...

Page 112: ...Related topics Ctrl with Smartphone Send to Smartphone Send to Computer Back to top Copyright 2013 Sony Corporation 112 ...

Page 113: ...ies Mobile on your smartphone If PlayMemories Mobile is already installed in your smartphone update the software to the latest version For the latest supported OS refer to the download page of PlayMemories Mobile This application is not guaranteed to work on all smartphones and tablets 2 On the camcorder LCD screen select Camera Mic Shooting Assist Ctrl with Smartphone 3 Confirm that the SSID and ...

Page 114: ...you select Review Save Image you can store still images to your smartphone Notes The photo size stored on the smartphone is 2M Movies are recorded on the camcorder and are not stored on the smartphone If the distance between the camcorder and smartphone is too far a connection may not be established Connect the camcorder and smartphone within 5 m The operation methods and display screens for the a...

Page 115: ...3 Enter the password displayed on the camcorder To connect an iOS smartphone to the camcorder 1 Open the settings menu 2 Select Wi Fi 3 Select the SSID displayed on the camcorder 115 ...

Page 116: ...4 Enter the password displayed on the camcorder 5 Confirm that the SSID displayed on the camcorder is selected 6 Start up PlayMemories Mobile Back to top Copyright 2013 Sony Corporation 116 ...

Page 117: ...4 and photos to your smartphone or tablet 1 Install PlayMemories Mobile on your smartphone If PlayMemories Mobile is already installed in your smartphone update the software to the latest version For the latest supported OS refer to the download page of PlayMemories Mobile This application is not guaranteed to work on all smartphones and tablets 2 Press the button on the camcorder to enter the pla...

Page 118: ...assword displayed on the camcorder LCD screen A connection is established between the smartphone and camcorder 3 On your smartphone select the image you want to transfer and then select Copy or Upload The images are transferred from the camcorder to the smartphone Notes Send to Smartphone is not available when Setting is not set to MP4 Send to Smartphone is not available when MP4 movies or still i...

Page 119: ...2 Select the SSID displayed on the camcorder 3 Enter the password displayed on the camcorder To connect an iOS smartphone to the camcorder 1 Open the settings menu 2 Select Wi Fi 119 ...

Page 120: ...3 Select the SSID displayed on the camcorder 4 Enter the password displayed on the camcorder 5 Confirm that the SSID displayed on the camcorder is selected 6 Start up PlayMemories Mobile 120 ...

Page 121: ...Back to top Copyright 2013 Sony Corporation 121 ...

Page 122: ...yMemories Home is already installed in your computer update the software to the latest version 2 Connect the camcorder to the wireless network access point If your access point does not support the WPS push button refer to Access point settings Details If your access point supports the WPS push button refer to WPS Push Details Settings for steps 1 and 2 are required only the first time 3 Press the...

Page 123: ...Back to top Copyright 2013 Sony Corporation 123 ...

Page 124: ... that the security of the access point be WPA or WPA2 and that the WPS push button method is supported If the security of your access point is set to WEP and your access point does not support the WPS push button method register the access point manually Details For details on the supported functions and settings for your access point refer to the manual of your access point or contact the adminis...

Page 125: ...oint you want to register If you want to enter and register the WPS PIN code select Manual setting WPS PIN Within 2 minutes enter the PIN code displayed on the camcorder to the access point If the desired access point is not displayed select Manual setting Manual regist enter the SSID name of the access point and then select the encryption type 3 Enter the password and then select Next Register Ac...

Page 126: ...rsor Switches the next character to a capital or small letter Fix Finalizes the entry To cancel text entry select Other setting items Depending on the status or the setting method of your access point there may be more setting items Setting items Functions WPS PIN Displays the PIN to enter to the connected device IP address setting Selects Auto or Manual setting IP address If you are entering the ...

Page 127: ...ting Maintenance and precautions Contents list Top page Using the Wi Fi function Available menus with the wireless adaptor attached Edit Device Name Edit Device Name You can change the device name for Wi Fi Direct 1 Select Setup Connection Edit Device Name 2 Select the input box input the device name and then select For input method refer to How to use the keyboard Details Back to top Copyright 20...

Page 128: ...nction Customizing your camcorder Troubleshooting Maintenance and precautions Contents list Top page Using the Wi Fi function Available menus with the wireless adaptor attached Disp MAC Address Disp MAC Address Display the MAC address of the wireless adaptor 1 Select Setup Connection Disp MAC Address The MAC address is displayed Back to top Copyright 2013 Sony Corporation 128 ...

Page 129: ... Available menus with the wireless adaptor attached SSID PW Reset SSID PW Reset The camcorder shares the SSID password for Send to Smartphone and Ctrl with Smartphone with a device that has permission to connect If you want to change the device that is permitted to connect to the camcorder reset the SSID password by the following procedure 1 Select Setup Connection SSID PW Reset Notes After resett...

Page 130: ...e Wi Fi function Available menus with the wireless adaptor attached Network Info Reset Network Info Reset In addition to the SSID password you can also reset the information of the access point etc If you want to change the access point to connect to reset the connection information by the following procedure 1 Select Setup Connection Network Info Reset Notes After resetting the connection informa...

Page 131: ...nts list Top page Using the Wi Fi function Available menus with the wireless adaptor attached Airplane Mode Airplane Mode When you board an airplane you can deactivate the Wi Fi function temporarily 1 Select Setup Connection Airplane Mode On Notes When Airplane Mode is set to On the GPS function also is temporarily deactivated models with GPS Related topics Information on your camcorder model Mode...

Page 132: ...ubleshooting Troubleshooting Functions are not displayed in the MENU screen Check that the wireless adaptor ADP WL1M sold separately is attached properly select Disp MAC Address and check that a 12 digit number is displayed If a 12 digit number is not displayed even though the wireless adaptor is attached properly the camcorder or the wireless adaptor may be malfunctioning The Wi Fi function is no...

Page 133: ...6 menu categories Shooting Mode Items for selecting a shooting mode Camera Mic Items for customized shooting Image Quality Size Items for setting up image quality or size Playback Function Items for playback Edit Copy Items for editing images such as copy or protect Setup Other setup items 1 Select 2 Select a category 3 Select your desired menu item Notes Select to finish setting the menu or to re...

Page 134: ...enu item Grayed out menu items or settings are not available Your camcorder displays the reason why you cannot select the menu item or the instruction of under which condition you can set the menu item Back to top Copyright 2013 Sony Corporation 134 ...

Page 135: ... Saving images with an external device Using the Wi Fi function Customizing your camcorder Troubleshooting Maintenance and precautions Contents list Top page Customizing your camcorder Shooting Mode Movie Movie You can select the movie recording mode 1 Shooting Mode Movie Back to top Copyright 2013 Sony Corporation 135 ...

Page 136: ...V Saving images with an external device Using the Wi Fi function Customizing your camcorder Troubleshooting Maintenance and precautions Contents list Top page Customizing your camcorder Shooting Mode Photo Photo You can select the photo shooting mode 1 Shooting Mode Photo Back to top Copyright 2013 Sony Corporation 136 ...

Page 137: ...n approximately 12 second long slow motion movie 1 Shooting Mode Smth Slw REC 2 Press the START STOP button Recording disappears when recording is finished To change the timing at which the camcorder starts recording Select to make the setting 3sec After default setting The camcorder records a movie of approximately 3 seconds after the START STOP button is pressed 3sec Before The camcorder records...

Page 138: ... after the subject has taken a swing Timing that the camcorder starts recording If the moment when the largest sound in 1 second after the START STOP button is pressed has been detected the camcorder assumes the moment as the sound of a club hitting the ball When the sound of a club hitting the ball is detected the recording time period is automatically adjusted according to at that moment A The s...

Page 139: ...80 You cannot record sound Image quality is not as good as that of normal recording REC Mode will be set to Standard automatically Impact sound may be detected by the internal microphone even when an external microphone is attached The image recorded may be noisy when your camcorder has failed to analyze the shot properly because there may be movement in background of the Golf Shot recording scree...

Page 140: ...ut 10 seconds for better color balance adjustment Outdoor The white balance is appropriately adjusted for the following recording conditions Outdoors Night views neon signs and fireworks Sunrise or sunset Under daylight fluorescent lamps Indoor The white balance is appropriately adjusted for the following recording conditions Indoors At party scenes or studios where the lighting conditions change ...

Page 141: ...adjust the color in One Push under white or cool white fluorescent lamps While you are recording a movie One Push cannot be set If you set White Balance Scene Selection is set to Auto Back to top Copyright 2013 Sony Corporation 141 ...

Page 142: ...st Top page Customizing your camcorder Camera Mic Spot Meter Fcs Spot meter focus Spot Meter Fcs Spot meter focus Exposure and focus can be adjusted for the selected subject automatically 1 Camera Mic Manual Settings Spot Meter Fcs 2 Touch the subject of which you want to adjust the exposure and focus To adjust the brightness and focus automatically touch Auto Notes Exposure and Focus are automati...

Page 143: ...pot Meter Flexible spot meter Spot Meter Flexible spot meter Exposure can be adjusted and set for the selected subject automatically This function is useful when there is strong contrast between the subject and the background such as subjects in the spotlight on stage 1 Camera Mic Manual Settings Spot Meter 2 Touch the subject of which you want to adjust the exposure To return the setting to autom...

Page 144: ...leshooting Maintenance and precautions Contents list Top page Customizing your camcorder Camera Mic Spot Focus Spot Focus Focus can be adjusted automatically for the subject selected 1 Camera Mic Manual Settings Spot Focus 2 Touch the subject of which you want to adjust the focus To adjust the focus automatically touch Auto Notes Focus is automatically set to Manual Back to top Copyright 2013 Sony...

Page 145: ...ts list Top page Customizing your camcorder Camera Mic Exposure Exposure You can fix the brightness of a picture manually Adjust the brightness when the subject is too bright or too dark 1 Camera Mic Manual Settings Exposure 2 Select the desired item Auto The exposure is adjusted automatically Manual Select if the subject is white or the backlight is bright or select if the subject is black or the...

Page 146: ...her away To adjust the focus It is easier to focus on the subject by moving the power zoom lever towards T telephoto to adjust the focus then towards W wide angle to adjust the zoom for recording When you want to record a subject at close range move the power zoom lever to W wide angle then adjust the focus On focal distance information Your camcorder displays the focal distance information for a ...

Page 147: ...Back to top Copyright 2013 Sony Corporation 147 ...

Page 148: ...mera Mic Manual Settings IRIS 2 Select the desired item Auto The IRIS is adjusted automatically Manual Adjust the iris by selecting to sharpen the whole image increase the IRIS parameter and to sharpen the subject with its background blurred decrease the IRIS parameter To change the atmosphere of image by the IRIS parameter Smaller F value opening the iris narrows the range that is in focus Larger...

Page 149: ... The shutter speed is adjusted automatically Manual Adjust the shutter speed using to get a fast shutter speed and to get a slow shutter speed As the value becomes smaller slower shutter speed a trailing image of the movement of the subject is captured To change the atmosphere of image by changing the shutter speed When shooting a mountain stream for example a splash of water will be captured clea...

Page 150: ...ted 24dB 21dB 18dB 15dB 12dB 9dB 6dB 3dB 0dB The gain is automatically adjusted up to the selected limit Notes The upper limit you can select for the AGC Auto Gain Control depends on the status of the camcorder When the camcorder is set to the movie recording mode the upper limit is 24 dB When the camcorder is set to the photo shooting mode the upper limit is 18 dB When the camcorder is set to use...

Page 151: ...page Customizing your camcorder Camera Mic AE Shift AE Shift You can adjust the exposure based on the results of the automatic exposure measurement 1 Camera Mic Manual Settings AE Shift 2 Select the desired item Off The exposure is adjusted automatically On Adjusted number and EV Adjust the automatic exposure level using when the subject is white or the background is bright and when the subject is...

Page 152: ...precautions Contents list Top page Customizing your camcorder Camera Mic White Balance Shift White Balance Shift You can adjust the white balance manually 1 Camera Mic Manual Settings White Balance Shift 2 Select the desired item Off The white balance is adjusted automatically On and adjusted number Adjust the white balance using when the images appear bluish and when the images appear reddish Bac...

Page 153: ...n Customizing your camcorder Troubleshooting Maintenance and precautions Contents list Top page Customizing your camcorder Camera Mic Low Lux Low Lux You can record bright color images even in dim light 1 Camera Mic Manual Settings Low Lux 2 Select the desired item Off The Low Lux function is not used On The Low Lux function is used Back to top Copyright 2013 Sony Corporation 153 ...

Page 154: ...ene Selection 2 Select the desired item Auto Adjusts image quality automatically Night Scene 1 Maintains the darkening atmosphere of the distant surroundings in night scenes Night Portrait Enables to take photos of people and background using a flash Sunrise Sunset 1 Reproduces the atmosphere of scenes such as sunsets or sunrises Fireworks 1 Takes spectacular shots of fireworks Landscape 1 Shoots ...

Page 155: ...ght pictures of a white landscape 1 Adjusted to focus on subjects farther away only 2 Adjusted not to focus on subjects a short distance away Notes Even if you set Night Portrait the setting changes to Auto when the Movie mode is selected If you set Scene Selection the White Balance IRIS Shutter Speed and Cinematone settings are canceled Back to top Copyright 2013 Sony Corporation 155 ...

Page 156: ...c Cinematone Cinematone The camcorder automatically adjusts the image quality of the movie to resemble the atmosphere of film camera images when recording a movie 1 Camera Mic Camera Settings Cinematone 2 Select the desired item Off Does not use the Cinematone function On Uses the Cinematone function Notes When you switch the Cinematone function on or off the image will be paused temporarily When ...

Page 157: ...record a transition with the following effects adding to the interval between scenes Select the desired effect in STBY to fading in or REC to fading out mode 1 Camera Mic Camera Settings Fader 2 Select the desired item Off Does not use an effect White Fader Fades in out with the white effect Out In Black Fader Fades in out with the black effect Images recorded using the Black Fader effect may appe...

Page 158: ...ions Contents list Top page Customizing your camcorder Camera Mic Self Timer Self Timer Press PHOTO to start the count down A photo is recorded after about 10 seconds You can also operate by pressing PHOTO on the Wireless Remote Commander 1 Camera Mic Camera Settings Self Timer 2 Select the desired item Off Cancels the self timer On Starts the self timer recording To cancel the recording select Re...

Page 159: ...er This is useful to shoot small subjects such as flowers or insects 1 Camera Mic Camera Settings Tele Macro 2 Select the desired item Off Cancels Tele Macro Tele Macro is also canceled when you move the zoom lever to the W side On The zoom moves to the top of the T telephoto side automatically and allows recording subjects at close range down to about 25 cm 9 7 8 in Notes When recording a distant...

Page 160: ...h a wide angle shot 1 Camera Mic Camera Settings SteadyShot 2 Select the desired item Active In addition to the balanced optical SteadyShot function the camcorder compensates for camera shake in the rotation direction Standard The camcorder reduces camera shake using the balanced optical SteadyShot function in wide angle shooting Off The camcorder does not use the balanced optical SteadyShot funct...

Page 161: ...tenance and precautions Contents list Top page Customizing your camcorder Camera Mic SteadyShot photo SteadyShot photo You can compensate for camera shake Set SteadyShot to Off when using a tripod sold separately then the image becomes natural 1 Camera Mic Camera Settings SteadyShot 2 Select the desired item On The SteadyShot function is used Off The SteadyShot function is not used Back to top Cop...

Page 162: ...intenance and precautions Contents list Top page Customizing your camcorder Camera Mic Digital Zoom Digital Zoom You can select the maximum zoom level Note that the image quality decreases when you use the digital zoom 1 Camera Mic Camera Settings Digital Zoom Off Digital zoom cannot be used 160 Up to 160 zoom is performed digitally A The zooming zone appears when you select 160 Back to top Copyri...

Page 163: ...ersion Lens Conversion Lens Set this menu item when you want to use a conversion lens sold separately that is compatible with your camcorder When using a conversion lens sold separately use this function to record using the optimum compensation for camera shake and focus for the lens 1 Camera Mic Camera Settings Conversion Lens 2 Select the desired item Off Select this when you do not use a conver...

Page 164: ...Maintenance and precautions Contents list Top page Customizing your camcorder Camera Mic Auto Back Light Auto Back Light Your camcorder adjusts the exposure for backlit subjects automatically 1 Camera Mic Camera Settings Auto Back Light 2 Select the desired item On The exposure for backlit subjects is adjusted automatically Off Does not adjust the exposure for backlit subjects Back to top Copyrigh...

Page 165: ...MANUAL dial and select the item to be assigned Select RESET to reset the items adjusted manually to the default settings 3 Press MANUAL The camera data that appears on the LCD screen will differ depending on the recording settings of the camcorder The settings will be displayed with the following icons Automatic Exposure is set manually IRIS priority Shutter speed priority Notes Manual settings wi...

Page 166: ... subject 1 Camera Mic Face Face Detection 2 Select the desired item Auto Detects faces without distinction between adults and children Child Priority Gives faces of children priority Adult Priority Gives faces of adults priority Off Does not detect faces Recording conditions for better face detection performance Shoot in a sufficiently bright place The subject is not wearing glasses a hat or mask ...

Page 167: ...ange 1 Camera Mic Face Smile Shutter 2 Select the desired item Dual Capture Only during movie recording the shutter is released automatically when the camcorder detects a smile Always On The shutter is released when the camcorder detects a smile whenever the camcorder is in recording mode Off Smiles are not detected so photos are not recorded automatically Notes When set to the following you canno...

Page 168: ...Back to top Copyright 2013 Sony Corporation 168 ...

Page 169: ...oting Maintenance and precautions Contents list Top page Customizing your camcorder Camera Mic Smile Sensitivity Smile Sensitivity Sets the smile detection sensitivity for using the Smile Shutter function 1 Camera Mic Face Smile Sensitivity 2 Select the desired item Big Smile Detects a big smile Normal Smile Detects a normal smile Slight Smile Detects even a slight smile Back to top Copyright 2013...

Page 170: ...flash regardless of the surrounding brightness Off Records without flash If white circular spots appear on photos This is caused by particles dust pollen etc floating close to the lens When they are accentuated by the camcorder s flash they appear as white circular spots To reduce the white circular spots light the room and shoot the subject without a flash Notes The recommended distance to the su...

Page 171: ...Copyright 2013 Sony Corporation 171 ...

Page 172: ...t Top page Customizing your camcorder Camera Mic Flash Level Flash Level You can select the brightness of the flash light You can set this function when you record photos using the built in flash or an external flash sold separately that is compatible with your camcorder 1 Camera Mic Flash Flash Level 2 Select the desired item High Makes the flash level higher Normal Normal flash level Low Makes t...

Page 173: ...g the pre flash before the flash flashes You can set this function when you record photos using the built in flash or an external flash sold separately that is compatible with your camcorder 1 Camera Mic Flash Red Eye Reduction 2 Select the desired item Off Does not use Red Eye Reduction to prevent redeye On Uses Red Eye Reduction to prevent redeye Notes The redeye reduction may not produce the de...

Page 174: ...ecords the voice clearly 1 Camera Mic Microphone Closer Voice 2 Select the desired item On Detects faces and records the voices clearly Off Does not detect faces and record voices clearly Notes The Closer Voice function does not activate while an external microphone is connected to the camcorder When you set Audio Rec Level to Manual Closer Voice is set to Off automatically When you want to record...

Page 175: ...e Customizing your camcorder Camera Mic Blt in Zoom Mic Blt in Zoom Mic You can record a movie with vivid sound appropriate to the zoom position 1 Camera Mic Microphone Blt in Zoom Mic 2 Select the desired item Off The microphone does not record sound following zooming in or out On The microphone records sound following zooming in or out Notes When you set Audio Rec Level to Manual Blt in Zoom Mic...

Page 176: ...nd NR Auto Wind NR Your camcorder records a movie with less wind noise input from the built in microphone This function automatically cuts the low range wind noise according to the noise level 1 Camera Mic Microphone Auto Wind NR 2 Select the desired item Off Does not reduce the wind noise On Reduces the wind noise Notes When you set Auto Wind NR to Off Intelligent Auto is set to Off Auto Wind NR ...

Page 177: ...tomizing your camcorder Troubleshooting Maintenance and precautions Contents list Top page Customizing your camcorder Camera Mic Audio Mode Audio Mode You can change the recording sound format 1 Camera Mic Microphone Audio Mode 2 Select the desired item 5 1ch Surround Records sound in 5 1ch surround 2ch Stereo Records sound in 2ch stereo Back to top Copyright 2013 Sony Corporation 177 ...

Page 178: ...aise the audio recording level and to lower the audio recording level Notes The setting will be reset each time you switch between Auto and Manual When Audio Rec Level is set to Manual the following will switch to Off Closer Voice Blt in Zoom Mic It is recommended that you wear headphones to operate while checking the level When you record continuous loud sound you can record more true to life sou...

Page 179: ...intenance and precautions Contents list Top page Customizing your camcorder Camera Mic My Button My Button You can assign functions that you frequently use when recording to one of the My Buttons 1 Camera Mic Shooting Assist My Button 2 Select the menu item that you want to assign to a My Button using 3 Select one of the My Buttons to which the menu item will be assigned 4 Select Back to top Copyr...

Page 180: ...rder Camera Mic Expanded Focus Expanded Focus You can magnify an image that appears at the center of the LCD screen by about 2 0 times to confirm the sharpness of the focus 1 Camera Mic Shooting Assist Expanded Focus 2 Select the desired item Off Does not magnify images On Magnify images Notes Even though the images has been magnifyed on the camcorder the recorded image is not magnified The image ...

Page 181: ...a Mic Grid Line Grid Line You can display the lines and check that the subject is horizontal or vertical Positioning the subject at the cross point of the grid lines makes a balanced composition The lines is not recorded 1 Camera Mic Shooting Assist Grid Line 2 Select the desired item Off Does not display the grid lines On Displays the grid lines Notes The outer frame of grid lines shows the displ...

Page 182: ...Display Setting Display Setting You can set the duration of displaying the icons or indicators on the LCD screen while recording 1 Camera Mic Shooting Assist Display Setting 2 Select the desired item Auto Displays for about 3 seconds The rec zoom buttons on the LCD screen is displayed On Always displays The rec zoom buttons on the LCD screen is not displayed Notes You cannot change the setting of ...

Page 183: ...Shooting Assist Zebra 2 Select the desired item Off Does not display the zebra pattern 70 Displays the zebra pattern over the part of an image that exceeds the brightness level of about 70 IRE 100 Displays the zebra pattern over the part of an image that exceeds the brightness level of about 100 IRE IRE Institute of Radio Engineers is a measure of the video signal level that is used as the bases o...

Page 184: ...g You can display an image on the screen with its outlines enhanced with colors This function helps you to adjust the focus The enhanced outlines will not be recorded on the image 1 Camera Mic Shooting Assist Peaking 2 Select the desired item Off Does not display the enhanced outlines White Displays the enhanced outlines in white Red Displays the enhanced outlines in red Yellow Displays the enhanc...

Page 185: ...mcorder Troubleshooting Maintenance and precautions Contents list Top page Customizing your camcorder Camera Mic Light Bright Light Bright You can set the brightness of the video light 1 Camera Mic Shooting Assist Light Bright 2 Select the desired item Standard Standard brightness Bright Select this mode when you find the video light is not bright enough Back to top Copyright 2013 Sony Corporation...

Page 186: ...recautions Contents list Top page Customizing your camcorder Camera Mic Audio Level Display Audio Level Display You can select whether or not to display the audio level meter Shape of the audio level meter differs depending on the Audio Mode setting 1 Camera Mic Shooting Assist Audio Level Display 2 Select the desired item On Displays audio level meter Off Does not display the audio level meter Ba...

Page 187: ... the selected recording mode cannot be copied on that medium On image quality The image quality and the bit rate for each recording mode can be set as follows M such as in 24M means Mbps Models with the NTSC color system High definition image quality HD 60p Quality 1920 1080 60p quality AVC HD 28M PS 1 Highest Quality 1920 1080 60i or 1920 1080 24p quality AVC HD 24M FX High Quality 1920 1080 60i ...

Page 188: ...ved on will depend on the recording mode selected Types of media Recording mode PS FX FH HQ LP Internal memory on this camcorder Memory card inserted in this camcorder External media USB storage devices Blu ray discs AVCHD recording discs 60p Quality models with the NTSC color system or 50p Quality models with the PAL color system can be set only when the Frame Rate is set to 60p models with the N...

Page 189: ...g 60p 50p You can record movies with a volume of data twice that of 60i 50i with this setting and this will allow you to enjoy clear images When you play a movie recorded with this setting on a TV the TV must be compatible with 60p 50p movie playback and you have to set HDMI Resolution to 1080p 480p 1080p 576p If the TV is not compatible with 60p 50p movie playback the movie will be output as a 60...

Page 190: ... movies 1 Image Quality Size Setting 2 Select the desired item HD Quality Records movies in high definition image quality HD Enjoy beautiful images on a big screen MP4 Records movies in the MP4 format This format is easy for playing back your movies on a smartphone for uploading to a network or for uploading to the Web STD Quality Records movies in standard definition image quality STD This is use...

Page 191: ...ty Size Wide Mode Wide Mode When recording standard definition image quality STD movies you can select the horizontal to vertical ratio 1 Image Quality Size Wide Mode 2 Select the desired item 16 9 WIDE Records movies to the full screen on a 16 9 wide TV screen 4 3 Records movies to the full screen on a 4 3 TV screen Notes For details on the holizontal vertical ratio of the TV that will be connect...

Page 192: ...e wider range of colors Various colors such as the brilliant color of flowers and turquoise blue of the sea can be more faithfully reproduced Refer to the instruction manuals of the TV 1 Image Quality Size x v Color 2 Select the desired item On Select this setting if the recorded movies will be played back on an x v Color compliant TV Off Records in ordinary color range Notes If the movie recorded...

Page 193: ...d precautions Contents list Top page Customizing your camcorder Image Quality Size Image Size Image Size You can select a size for the photos you are going to shot 1 Image Quality Size Image Size 2 Select the desired image size Notes The image size selected with this setting takes effect for photos taken by the Dual Capture function Details Related topics Expected number of recordable photos Back ...

Page 194: ... the Wi Fi function Customizing your camcorder Troubleshooting Maintenance and precautions Contents list Top page Customizing your camcorder Playback Function Event View Event View You can display the Event View screen 1 Playback Function Event View Related topics Playing movies and photos from the Event View screen Back to top Copyright 2013 Sony Corporation 194 ...

Page 195: ...g your camcorder Troubleshooting Maintenance and precautions Contents list Top page Customizing your camcorder Playback Function Map View HDR PJ650V PJ650VE PJ660V PJ660VE Map View HDR PJ650V PJ650VE PJ660V PJ660VE You can display the Map View screen 1 Playback Function Map View Related topics Playing movies and photos from a map Models with GPS Back to top Copyright 2013 Sony Corporation 195 ...

Page 196: ...Maintenance and precautions Contents list Top page Customizing your camcorder Playback Function Highlight Movie Highlight Movie You can view the Highlight Movie you have saved 1 Playback Function Highlight Movie 2 Select the desired Highlight Movie Related topics Converting Highlight Playback scenes or Highlight Scenarios to standard definition image quality STD Highlight Movie Back to top Copyrig...

Page 197: ... your camcorder Troubleshooting Maintenance and precautions Contents list Top page Customizing your camcorder Playback Function Scenario Scenario You can view Highlight Scenario that you have saved 1 Playback Function Scenario 2 Select the desired scenario Related topics Saving Highlight Playback in high definition image quality HD Scenario Save Back to top Copyright 2013 Sony Corporation 197 ...

Page 198: ...to delete add check marks to the desired images and then select All In Event You can delete all images in the selected date at one time Select the date you want to delete using and then select To delete a part of a movie You can divide a movie and delete it Notes You cannot restore images once they are deleted Save important movies and photos in advance Do not remove the battery pack or the AC Ada...

Page 199: ...Related topics Release protection Protect Format To divide a movie Dividing a movie Back to top Copyright 2013 Sony Corporation 199 ...

Page 200: ... Multiple Images or Set All In Event Multiple Images Select the type of image you want to protect add check marks to the desired images and then select You can select multiple images Select the image with so that the mark disappears and you can remove the protection Set All In Event You can protect all images in the selected date at one time Select the date you want to protect using and then selec...

Page 201: ...Copyright 2013 Sony Corporation 201 ...

Page 202: ...ges to be copied appears Select the desired item 1 Edit Copy Copy 2 Select the desired setting Multiple Images or All In Event Multiple Images Select the type of image you want to copy add check marks to the desired images and then select You can select multiple images All In Event You can copy all images in the selected date at one time Select the type of image you want to copy select the date yo...

Page 203: ...memory card to the internal memory of the camcorder models without a USB input function Related topics Checking the image copied Media Select Saving images on an external media device easily Back to top Copyright 2013 Sony Corporation 203 ...

Page 204: ...r camcorder Edit Copy Direct Copy Direct Copy You can save images on an external media device USB storage device manually while the device is connected to your camcorder You can perform this operation while the camcorder is displaying the event view of the external device connected 1 Press View Images 2 Edit Copy Direct Copy 3 Follow the instructions that appear on the LCD screen Related topics Sa...

Page 205: ... the Wi Fi function Customizing your camcorder Troubleshooting Maintenance and precautions Contents list Top page Customizing your camcorder Setup Media Select Media Select You can select the recording medium on which the images will be saved 1 Setup Media Settings Media Select 2 Select the desired recording medium Back to top Copyright 2013 Sony Corporation 205 ...

Page 206: ...Customizing your camcorder Setup Media Info Media Info You can check the remaining recordable time for movies and the approximate free and used media storage space of the recording media 1 Setup Media Settings Media Info 2 Select the recording medium that you want to view the information Note Since there is a management file area the used space is not displayed as 0 even if you perform Format Deta...

Page 207: ...re not to do the following while Executing is displayed Open Close the LCD screen Operate buttons on the camcorder Eject the memory card from your camcorder Disconnect the AC Adaptor To prevent data on the internal memory from being recovered When you dispose of or transfer the camcorder it is recommended that you perform Empty to prevent the leakage of your personal data When the internal memory ...

Page 208: ...Back to top Copyright 2013 Sony Corporation 208 ...

Page 209: ...zing your camcorder Troubleshooting Maintenance and precautions Contents list Top page Customizing your camcorder Setup Repair Img DB F Repair Img DB F The camcorder may be able to repair the damaged database file using this menu item 1 Setup Media Settings Repair Img DB F 2 Select the recording medium that you want to repair and then select Back to top Copyright 2013 Sony Corporation 209 ...

Page 210: ...ile number of photos MP4 movies 1 Setup Media Settings File Number 2 Select the desired item Series Assigns file numbers of photos MP4 movies in sequence The file number becomes larger each time you record a photo MP4 movie Even if the memory card is replaced with another one the file number is assigned in sequence Reset Assigns file numbers in sequence following the largest file number existing o...

Page 211: ... Customizing your camcorder Setup Data Code Data Code During playback your camcorder displays the information recorded automatically at the time of recording You can check the following information 1 Setup Playback Settings Data Code 2 Select the desired item Off Data code is not displayed Date Time Displays the date and time Camera Data Displays camera setting data Coordinates Displays coordinate...

Page 212: ...e Gain Brightness Exposure Flash Coordinates Models with GPS Latitude Longitude Notes The data code is displayed on the TV screen if you connect your camcorder to a TV Depending on the recording media condition may appear Back to top Copyright 2013 Sony Corporation 212 ...

Page 213: ...th an external device Using the Wi Fi function Customizing your camcorder Troubleshooting Maintenance and precautions Contents list Top page Customizing your camcorder Setup Volume Volume You can adjust the volume of playback sound 1 Setup Playback Settings Volume 2 Adjust the volume using Back to top Copyright 2013 Sony Corporation 213 ...

Page 214: ...ist Top page Customizing your camcorder Setup Download Music HDR PJ650V PJ660 PJ660V Download Music HDR PJ650V PJ660 PJ660V You can transfer music files from audio CDs or MP3 files to your camcorder by connecting the camcorder to a computer To transfer music files use Music Transfer 1 Setup Playback Settings Download Music 2 Follow the instructions that appear on the display For details refer to M...

Page 215: ... and precautions Contents list Top page Customizing your camcorder Setup Empty Music HDR PJ650V PJ660 PJ660V Empty Music HDR PJ650V PJ660 PJ660V You can delete all music files stored on the camcorder 1 Setup Playback Settings Empty Music 2 Select OK or Cancel Notes If you delete music files using Empty Music the music data recorded on your camcorder at the factory will be deleted as well Back to t...

Page 216: ...rt the signal depending on the TV connected when playing back movies and photos The recorded movies and photos are played back as following illustrations 1 Setup Connection TV Type 2 Select the desired item 16 9 Select this to view your movies on a 16 9 wide TV Movies and photos recorded in 16 9 wide mode Movies and photos recorded in 4 3 mode 4 3 Select this to view your movies and photos on a 4 ...

Page 217: ...th a 1080p signal and standard image quality STD movies with a 480p 576p signal Select this setting when you watch movies that have been recorded with Frame Rate set to 60p 50p on the 60p 50p compliant TV 1080i 480i 1080i 576i Outputs high definition image quality HD MP4 movies with a 1080i signal and standard image quality STD movies with a 480i 576i signal 720p 480p 720p 576p Outputs high defini...

Page 218: ...our camcorder Setup CTRL FOR HDMI Control for HDMI CTRL FOR HDMI Control for HDMI When connecting your camcorder to a BRAVIA Sync compatible TV with a HDMI cable you can play back movies on your camcorder by aiming the TV s Remote Commander at the TV Details 1 Setup Connection CTRL FOR HDMI 2 Select the desired item On Operates your camcorder using the TV s Remote Commander Off Does not operate yo...

Page 219: ...Fi function Customizing your camcorder Troubleshooting Maintenance and precautions Contents list Top page Customizing your camcorder Setup USB Connect USB Connect Select this item when a USB connection does not start even when you connect the camcorder to an external device with the USB Cable 1 Setup Connection USB Connect Back to top Copyright 2013 Sony Corporation 219 ...

Page 220: ...th many types of USB devices Notes When you connect the camcorder to other devices using the MTP mode movies that have been recorded with the same image quality as the one currently selected selected with the Setting menu can only be displayed on the connected device When the camcorder is connected to an external device in the MTP mode movie files will be displayed with the recorded date however s...

Page 221: ...enance and precautions Contents list Top page Customizing your camcorder Setup USB LUN Setting USB LUN Setting Improves compatibility with external devices by limiting the functions of the USB connection 1 Setup Connection USB LUN Setting 2 Select the desired item Multi Use this setting for ordinary operations Single Try this setting only if you cannot connect to an external device Back to top Cop...

Page 222: ...n Customizing your camcorder Troubleshooting Maintenance and precautions Contents list Top page Customizing your camcorder Setup Beep Beep You can turn on or off the operation sound 1 Setup General Settings Beep 2 Select the desired item On A melody sounds when you start stop recording or operate your camcorder Off Cancels the melody Back to top Copyright 2013 Sony Corporation 222 ...

Page 223: ...enance and precautions Contents list Top page Customizing your camcorder Setup LCD Brightness LCD Brightness You can adjust the brightness of the LCD screen 1 Setup General Settings LCD Brightness 2 Select the desired item Normal Normal setting normal brightness Bright Select this when the LCD screen is not bright enough This adjustment does not affect the recorded images in any way Back to top Co...

Page 224: ... and precautions Contents list Top page Customizing your camcorder Setup Your Location HDR PJ650V PJ650VE PJ660V PJ660VE Your Location HDR PJ650V PJ650VE PJ660V PJ660VE You can display your current location 1 Setup General Settings Your Location Your current location appears on the Map View Related topics Obtaining a map of the current location triangulation priority mode Models with GPS Back to t...

Page 225: ...nd precautions Contents list Top page Customizing your camcorder Setup Airplane Mode HDR PJ650V PJ650VE PJ660V PJ660VE Airplane Mode HDR PJ650V PJ650VE PJ660V PJ660VE You can deactivate all GPS related settings temporarily when you are on board an airplane 1 Setup General Settings Airplane Mode 2 Select the desired item Off Normal setting On Use the setting when you are on board an airplane Back t...

Page 226: ...tup GPS Setting HDR PJ650V PJ650VE PJ660V PJ660VE GPS Setting HDR PJ650V PJ650VE PJ660V PJ660VE You can select whether the camcorder receives or does not receive GPS signals 1 Setup General Settings GPS Setting 2 Select the desired item On Receives GPS signals The location information will not be recorded until triangulating is finished successfully Off Does not receive GPS signals The location in...

Page 227: ...corder Troubleshooting Maintenance and precautions Contents list Top page Customizing your camcorder Setup REC Lamp REC Lamp You can make the camera recording lamp on the front of your camcorder not to turn on 1 Setup General Settings REC Lamp 2 Select the desired item On The camera recording lamp lights up Off The camera recording lamp does not light up Back to top Copyright 2013 Sony Corporation...

Page 228: ...oting Maintenance and precautions Contents list Top page Customizing your camcorder Setup Remote Ctrl Remote Ctrl 1 Setup General Settings Remote Ctrl 2 Select the desired item On Select this when you use the supplied Wireless Remote Commander Off Select this when you do not use supplied Wireless Remote Commander Related topics Parts and controls Wireless Remote Commander Back to top Copyright 201...

Page 229: ...leshooting Maintenance and precautions Contents list Top page Customizing your camcorder Setup Language Setting Language Setting You can select the language to be used on the LCD screen The camcorder offers ENG SIMP simplified English for when you cannot find your native tongue among the options 1 Setup General Settings Language Setting 2 Select the desired language Back to top Copyright 2013 Sony...

Page 230: ...t work correctly It is recommended that you connect your camcorder to the wall outlet wall socket using the supplied AC Adaptor during the operation 1 Setup General Settings Calibration 2 Touch displayed on the screen with the corner of memory card or the like 3 times Touch Cancel to cancel calibration Notes If you did not press the right spot try the calibration again Do not use a sharp pointed o...

Page 231: ... Using the Wi Fi function Customizing your camcorder Troubleshooting Maintenance and precautions Contents list Top page Customizing your camcorder Setup Battery Info Battery Info You can check the estimated remaining capacity of the battery 1 Setup General Settings Battery Info The battery information appears Back to top Copyright 2013 Sony Corporation 231 ...

Page 232: ...e LCD screen turns dark automatically if you do not attempt to operate your camcorder for more than about 1 minute The camcorder turns off automatically if you do not attempt to operate your camcorder for more than about 2 minutes Max The brightness of the LCD screen is adjusted to the surrounding brightness automatically The backlight of the LCD screen turns dark automatically if you do not attem...

Page 233: ...sing the Wi Fi function Customizing your camcorder Troubleshooting Maintenance and precautions Contents list Top page Customizing your camcorder Setup Initialize Initialize All the settings return to the default Even if you use this function all movies and photos are retained 1 Setup General Settings Initialize Back to top Copyright 2013 Sony Corporation 233 ...

Page 234: ... starts playing 1 Setup General Settings Demo Mode 2 Select the desired item On Make the settings for playback of the demonstration movie Off The demonstration does not appear Notes In the default setting the demonstration movie is in the Event View If you delete the demonstration movie you cannot recover it A movie you have recorded will be registered as the demonstration movie if it satisfies al...

Page 235: ...etup Date Time Setting Date Time Setting 1 Setup Clock Settings Date Time Setting 2 Select the desired item Date Time Format Daylight Savings Summer Time or Date Time Date Time Format You can select one from 4 types of date and time format Daylight Savings Summer Time You can change this setting without stopping the clock Off Does not set the summertime On Sets the summertime The clock is set to m...

Page 236: ...fference without stopping the clock Select your local area when using the camcorder in other time zones 1 Setup Clock Settings Area Setting 2 Select the desired item For models without GPS Home Select this item when you are going to use the camcorder in the area where you are living Destination Select this item when you want to use the camcorder with the area setting set to another place For model...

Page 237: ...lect the desired item On Maintains accurate time automatically Off Does not maintain accurate time using the GPS system Notes You must set the date and time on your camcorder before use Details There may be discrepancies of a few seconds even if Auto Clock ADJ is activated This function automatically adjusts the clock when the camcorder receives GPS signals and finishes triangulating successfully ...

Page 238: ...J660V PJ660VE The camcorder can compensate for time differences automatically by acquiring location information from the GPS system 1 Setup Clock Settings Auto Area ADJ 2 Select the desired item On Compensates for time differences automatically Off Does not compensate for time differences automatically Notes You must set the date and time on your camcorder before use Details The camcorder may not ...

Page 239: ...urn the camcorder on 3 Select Setup General Settings Initialize If you select Initialize all settings including the clock setting are reset 4 Contact your Sony dealer or local authorized Sony service facility You may need to initialize or change the current internal memory of your camcorder depending on the problem If you do so the data stored on the internal memory will be deleted Be sure to save...

Page 240: ... Disconnect the AC Adaptor from the wall outlet wall socket or remove the battery pack then reconnect it after about 1 minute The menu settings have been changed automatically While Intelligent Auto is active some menu settings related to image quality will be changed automatically The following menu items return to the default settings when you switch between movie recording and photo recording a...

Page 241: ...bstructions between the Wireless Remote Commander and the remote sensor Point the remote sensor away from strong light sources such as direct sunlight or overhead lighting Otherwise the Wireless Remote Commander may not function properly Another DVD device operates when you use the supplied Wireless Remote Commander Select a commander mode other than DVD 2 for your DVD device or cover the sensor o...

Page 242: ...k is being charged When the battery is being charged using the Built in USB Cable disconnect the Built in USB Cable and connect it again If the temperature of the battery pack is too high or too low you may not be able to charge it Details Attach the battery pack to the camcorder correctly If the problem persists disconnect the AC Adaptor from the wall outlet wall socket and contact your Sony deal...

Page 243: ...Back to top Copyright 2013 Sony Corporation 243 ...

Page 244: ...et Display Setting to On the buttons do not disappear from the LCD screen while in recording mode Details There are dots in the shape of a grid on the screen These dots are a normal result of the manufacturing process of the screen and do not affect the recording in any way The backlight of the LCD screen turns off if you do not attempt to operate your camcorder for a while In the default setting ...

Page 245: ... on a computer format it again on your camcorder Details Images stored on the memory card cannot be deleted The maximum number of images that you can delete on the index screen at one time is 100 You cannot delete the protected images The data file name is not indicated correctly or flashes The file is damaged The file format is not supported by your camcorder Details Images cannot be played back ...

Page 246: ...te unnecessary images Details Photos cannot be recorded You cannot record photos together with Smth Slw REC Golf Shot Fader The camcorder cannot shoot photos while it is in the movie recording mode depending on the REC Mode or Frame Rate selected The access lamp remains lit or flashing even if recording has stopped Your camcorder is recording the scene you have just shot on the memory card The ima...

Page 247: ...ls SteadyShot does not function Set SteadyShot to Active or Standard Details SteadyShot to On Details Even if SteadyShot is set to Active or Standard SteadyShot to On your camcorder may not be able to compensate for excessive vibrations Set Conversion Lens to Off Images cannot be recorded or played back correctly If you record and delete images repeatedly for a long time the files on the recording...

Page 248: ...orded correctly The sound will be recorded correctly by restoring the microphone connection at the start of movie recording If you turn the volume down to the minimum level by adjusting in Audio Rec Level the sound of movies cannot be recorded Details Photos are recorded automatically In the default setting photos are recorded automatically when the camcorder detects a smile Smile Shutter Details ...

Page 249: ... back continuously appears on a thumbnail This may appear on an image recorded on other devices edited on a computer etc You removed the AC Adaptor or the battery pack while the recording media icon at the top right corner of the screen flashes or before the access lamp is turned off after recording This may damage your image data and is displayed appears on a thumbnail The image data base file ma...

Page 250: ...t to 2ch Stereo Details The demonstration movies cannot be played Select the internal memory for the recording media and the high definition image quality HD A movie is played back automatically Movies play automatically as a demonstration movie when the filmed movie meets a certain condition on your camcorder This is not a malfunction Details Related topics Information on your camcorder model Mod...

Page 251: ... camcorder Editing movies photos on your camcorder Unable to edit Unable to edit because of the condition of the image You cannot edit the files based on Map View models with GPS A movie cannot be divided The following movies cannot be divided Movies that are too short MP4 movies Release the protection and then divide Details The demonstration movies cannot be deleted Release the protection and th...

Page 252: ...ght trimming of the top bottom right and left edges of images when played back on a TV which is not compatible with full pixel display It is recommended you record images using the outer frame of Grid Line as a guide Details The image appears distorted on the 4 3 TV This happens when viewing an image recorded in the 16 9 wide mode on a 4 3 TV Set TV Type correctly and play back the image Details B...

Page 253: ...s Contents list Top page Troubleshooting Troubleshooting Copying Connecting to other devices Copying Connecting to other devices Images are not copied correctly You cannot copy images using the HDMI cable An AV Cable sold separately is not connected properly Make sure that the cable is connected to the input jack of the device Details Related topics Information on your camcorder model Model Inform...

Page 254: ...uired to install PlayMemories Home PlayMemories Home does not work correctly Quit PlayMemories Home and restart your computer The camcorder is not recognized by the computer Disconnect all USB devices from the USB jack of your computer except the keyboard mouse and your camcorder Disconnect the Built in USB Cable from the computer and restart the computer then connect the computer and your camcord...

Page 255: ...f diagnosis display C 04 The battery pack is not an InfoLITHIUM battery pack V series Use an InfoLITHIUM battery pack V series Details Connect the DC plug of the AC Adaptor securely to the DC IN jack of your camcorder Details C 06 The battery pack temperature is high Change the battery pack or place it in a cool place C 13 C 32 Remove the power source Reconnect it and operate your camcorder again ...

Page 256: ...dicator pertaining to the external device The image data base file may be damaged Check the data base file by selecting Setup Media Settings Repair Img DB F the recording medium The external device is damaged Warning indicators pertaining to external device formatting The external device is damaged The external device is not formatted correctly Warning indicator pertaining to camera shake warning ...

Page 257: ...recording movies Related topics Information on your camcorder model Model Information Back to top Copyright 2013 Sony Corporation 257 ...

Page 258: ...on is damaged Create new information The management file is damaged When you select Yes a new management file is created The old recorded images on the media cannot be played back Image files are not damaged If you execute Repair Img DB F after creating new information playing back the old recorded images may become possible If it does not work copy the image using the PlayMemories Home software T...

Page 259: ...ering data Your camcorder tries to recover data automatically if the data writing was not performed properly Cannot recover data Writing data onto the media of the camcorder has failed Attempts were made to recover the data but they were unsuccessful Reinsert the memory card Reinsert the memory card a few times If the indicator continues to flash even after reinserting the memory card could be dam...

Page 260: ...ernal media Use the external media device in stable condition the environment such as no vibration and room temperature etc Make sure that the power source of the external media device is connected Others Maximum number of images already selected You can select only 100 images at one time for Deleting movies photos Protecting movies photos or releasing the protection Copying movies photos Data pro...

Page 261: ...ition digital video camera format used to record a high definition HD signal using efficient data compression coding technology The MPEG 4 AVC H 264 format is adopted to compress video data and the Dolby Digital or Linear PCM system is used to compress audio data The MPEG 4 AVC H 264 format is capable of compressing images at higher efficiency than that of the conventional image compressing format...

Page 262: ...e of buildings Between tall buildings or at narrow streets surrounded by buildings In underground locations locations surrounded by dense trees under an elevated bridge or in locations where magnetic fields are generated such as near high voltage cables Near devices that generate radio signals of the same frequency band as the camcorder near 1 5 GHz band mobile telephones etc When you upload to or...

Page 263: ...the map You cannot update the map data The scale of the map is 25 m to 6 000 km models available in the US 100 feet to 6 000 miles On the geographic coordinate system The WGS 84 geographic coordinate system is used On copyright The map data of the camcorder is copyrighted Unauthorized copying or other usage of the map data may be contrary to the copyright laws On the navigation function The camcor...

Page 264: ... of small children There is danger that a child might swallow it Do not insert anything other than the compliant size of memory card into the memory card slot Doing so may cause a malfunction Do not use or keep the memory card in the following locations Places subject to extremely high temperature such as a car parked outside in the sun Places under direct sunlight Places with extremely high humid...

Page 265: ...dia This product cannot record or play back data that uses MagicGate technology MagicGate is a copyright protection technology that records and transfers the contents in an encrypted format Back to top Copyright 2013 Sony Corporation 265 ...

Page 266: ... pack is high Remove the battery pack from your camcorder and put it in a cool place To use the battery pack effectively Battery pack performance decreases when the ambient temperature is 10 C 50 F or below and the length of time you can use the battery pack becomes shorter If that happens one of the following is recommended to enable longer use of the battery pack Put the battery pack in a pocket...

Page 267: ...your camcorder completely select Setup General Settings Power Save Off and leave your camcorder in recording standby until the power goes off Details About battery life Battery capacity decreases over time and through repeated use If the interval between charges becomes significantly short the battery pack may need to be replaced with a new one Each battery s life depends on storage operating and ...

Page 268: ...lems Compensation for the contents of recordings cannot be provided even if recording or playback is not possible due to a malfunction of the camcorder recording media etc TV color systems differ depending on the country region To view your recordings on a TV you need a TV that supports the signal format for your camcorder For details on the signal format refer to Model Information Television prog...

Page 269: ...with high definition image quality HD is called AVCHD recording disc On use and care The camcorder is not dustproofed dripproofed or waterproofed Do not hold the camcorder by the following parts and also do not hold the camcorder by the jack covers Shoe cover Lens hood LCD screen Battery pack Built in USB Cable Viewfinder Do not aim the camcorder at the sun Doing so might cause your camcorder to m...

Page 270: ...r When not using your camcorder for a long time To keep your camcorder in optimum state for a long time turn it on and let it run by recording and playing back images about once a month Use up the battery pack completely before storing it Note on the camcorder battery pack temperature When the temperature of the camcorder or battery pack becomes extremely high or extremely low you may not be able ...

Page 271: ...tion sheet A before using the Wireless Remote Commander Point the Wireless Remote Commander towards the remote sensor to operate your camcorder When no commands have been sent from the Wireless Remote Commander within a certain period the light blue frame disappears When you press any of or ENTER again the frame appears at the position where it was last displayed You cannot select some buttons on ...

Page 272: ... clean the camcorder casing and the lens with a soft cloth lightly moistened with water and then wipe the casing and the projector lens with a dry soft cloth Avoid the following so as not to deform the casing damage the finish or scratch the lens Using chemicals such as thinner benzine alcohol chemical cloths insect repellent insecticide and sunscreen Handling the camcorder with the above substanc...

Page 273: ... 1 hour without turning it on Note on moisture condensation Moisture may condense when you bring your camcorder from a cold place into a warm place or vice versa or when you use your camcorder in a humid place as follows You bring your camcorder from a ski slope into a place warmed up by a heating device You bring your camcorder from an air conditioned car or room into a hot place outside You use ...

Page 274: ...s closed The pre installed rechargeable battery is always charged while your camcorder is connected to the wall outlet wall socket via the AC Adaptor or while the battery pack is attached The rechargeable battery will be fully discharged in about 3 months if you do not use your camcorder at all Charge the pre installed rechargeable battery before you start using your camcorder However even if the ...

Page 275: ...enance and precautions About handling of your camcorder Notes on disposal transfer the ownership of the camcorder Notes on disposal transfer the ownership of the camcorder Note on disposal transfer the ownership of the camcorder Even if you delete all movies and still images or perform Format data on the internal memory may not be completely erased It is recommended that you perform Empty to preve...

Page 276: ...rging time Approximate time min required when you fully charge a fully discharged battery pack Battery pack Charging time AC Adaptor Built in USB Cable when using your computer NP FV50 supplied 155 280 NP FV70 195 545 NP FV100 390 1 000 The charging times shown in the table above are measured when charging the camcorder at a temperature of 25 C 77 F It is recommended that you charge the battery in...

Page 277: ...4 STD NP FV50 supplied 120 130 130 140 130 140 60 65 65 70 65 70 NP FV70 250 270 270 290 270 290 125 135 135 145 135 145 NP FV100 500 540 535 580 535 580 250 265 265 290 265 290 Top When the LCD screen is opened Bottom When recording with the viewfinder without opening the LCD screen Each recording time is measured when the camcorder is recording high definition image quality HD movies with REC Mo...

Page 278: ...NP FV100 830 870 830 925 830 925 Top When the LCD screen is opened Bottom When recording with the viewfinder without opening the LCD screen Back to top Copyright 2013 Sony Corporation 278 ...

Page 279: ...650E PJ650V PJ650VE High definition image quality HD in h hour and min minute Recording mode Recording time HDR PJ650E HDR PJ650V PJ650VE 60p Quality 50p Quality 2 h 30 min 2 h 30 min 2 h 15 min 2 h 15 min Highest Quality 3 h 3 h 2 h 40 min 2 h 40 min High Quality 4 h 5 min 4 h 5 min 3 h 40 min 3 h 40 min Standard 7 h 15 min 5 h 30 min 6 h 30 min 4 h 55 min Long Time 12 h 30 min 10 h 15 min 11 h 1...

Page 280: ...J660E HDR PJ660V PJ660VE 22 h 22 h 20 h 55 min 20 h 55 min Standard definition image quality STD in h hour and min minute Recording mode Recording time HDR PJ660 PJ660E HDR PJ660V PJ660VE Standard 15 h 5 min 13 h 50 min 14 h 20 min 13 h 10 min If you want to record up to the maximum recording time indicated in the table you need to delete the demonstration movie on your camcorder Memory card High ...

Page 281: ...rding time Bit rate and recording pixels The following list shows the bit rate pixels and aspect ratio of each recording mode for movies movie audio etc Models with the NTSC color system High definition image quality HD PS Max 28 Mbps 1 920 1 080 pixels 60p AVC HD 28 M PS 16 9 FX Max 24 Mbps 1 920 1 080 pixels 60i or 1 920 1 080 pixels 24p AVC HD 24 M FX 16 9 FH Approx 17 Mbps average 1 920 1 080 ...

Page 282: ...ndard definition image quality STD HQ Approx 9 Mbps average 720 576 pixels 50i STD 9 M HQ 16 9 4 3 Related topics Information on your camcorder model Model Information Expected number of recordable photos Back to top Copyright 2013 Sony Corporation 282 ...

Page 283: ...rd The number of recordable photos of memory card shown is for the maximum image size of your camcorder The actual number of recordable photos is displayed on the LCD screen during recording Details The number of recordable photos of memory card may vary depending on the recording conditions Recording pixels The photo recording pixels and the aspect ratio Photo recording mode Dual capture 6 016 3 ...

Page 284: ...quality STD with your camcorder you need to connect your camcorder using an AV cable to a TV or monitor that supports the signal format of your camcorder and is equipped with AUDIO VIDEO input jacks On TV color systems For signal formats supported by your camcorder refer to Model Information To view images in your camcorder on TV use a TV or monitor that supports the signal format of your camcorde...

Page 285: ... Singapore Beijing 09 00 Tokyo Seoul 09 30 Adelaide Darwin 10 00 Melbourne Sydney 11 00 Solomon Is 12 00 Fiji Wellington 11 00 Midway Island 10 00 Hawaii 09 00 Alaska 08 00 LosAngeles Tijuana 07 00 Denver Arizona 06 00 Chicago MexicoCity 05 00 New York Bogota 04 00 Santiago 03 30 St John s 03 00 Brasilia Montevideo 02 00 Fernando de Noronha 01 00 Azores Cape Verde Is Related topics Information on ...

Page 286: ...tered trademarks of HDMI Licensing LLC in the United States and other countries Microsoft Windows Windows Vista and DirectX are either registered trademarks or trademarks of Microsoft Corporation in the United States and or other countries Mac Mac OS and App Store are registered trademarks of Apple Inc Intel Intel Core and Pentium are trademarks or registered trademarks of Intel Corporation or its...

Page 287: ...TP WWW MPEGLA COM We provide the software in your camcorder based on license agreements with the owners of the respective copyrights Based on requests by the owners of copyright of these software applications we have an obligation to inform you of the following Please read the following sections Copies of the licenses in English are stored in the internal memory of your camcorder Establish a Mass ...

Reviews: