background image

US

Creating a disc with 

one touch

(One Touch Disc Burn)

Movies and photos recorded on your 

camcorder that have not yet been saved 

with One Touch Disc Burn function can be 

saved on a disc automatically.

Install “PMB” beforehand (p. 35), however, do 

not start “PMB.”

Connect your camcorder to the wall outlet (wall 

socket) using the AC Adaptor supplied for this 

operation (p. 15).

With One Touch Disc Burn function on your 

camcorder, you can save movies and photos 

recorded on the internal recording media only 

(DCR-SR20).

1


Turn on your computer, and place 
an unused disc on the DVD drive.

See page 35 for the type of discs you can 

use.

If any other software than “PMB” starts 

automatically, shut it down.

2


Turn on your camcorder, then 
connect the camcorder to the 
computer using the supplied USB 
cable.

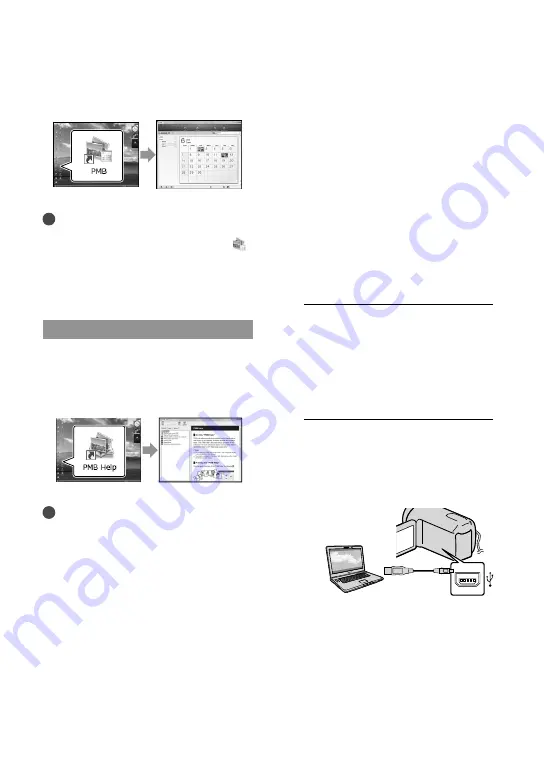
Starting PMB 

(Picture 

Motion Browser)

Double-click the “PMB” short-cut icon on 

the computer screen.

Notes

If the icon is not displayed on the computer 

screen, click [Start] 

 [All Programs] 

 [  

PMB] to start “PMB.”

You can view, edit, or create discs of movies 

and photos using “PMB.”

Reading “PMB Help”

For details on how to use “PMB,” read the 

“PMB Help.” Double-click the “PMB Help” 

short-cut icon on the computer screen to 

open the “PMB Help.”

Notes

If the icon is not displayed on the computer 

screen, click [Start] 

 [All Programs] 


[PMB] 

 [PMB Help]. You can also open the 

“PMB Help” from [Help] of “PMB.”

Summary of Contents for HANDYCAM DCR-SR20

Page 1: ...corder 2010 Sony Corporation Operating Guide US Mode d emploi FR DCR SR20 SX20 SX20K Additional information on this product and answers to frequently asked questions can be found at our Customer Support Website http www sony net Printed in China ...

Page 2: ...d do not expose the unit to rain or moisture Do not expose the batteries to excessive heat such as sunshine fire or the like This symbol is intended to alert the user to the presence of uninsulated dangerous voltage within the product s enclosure that may be of sufficient magnitude to constitute a risk of electric shock to persons This symbol is intended to alert the user to the presence of import...

Page 3: ...utlet consult an electrician for replacement of the obsolete outlet Protect the power cord from being walked on or pinched particularly at plugs convenience receptacles and the point where they exit from the apparatus Only use attachments accessories specified by the manufacturer Use only with the cart stand tripod bracket or table specified by the manufacturer or sold with the apparatus When a ca...

Page 4: ... 1 15P plug rated for 125 V 15 A Europe Countries regions Voltage Frequency Hz Plug type Austria 230 50 C Belgium 230 50 C Czech 220 50 C Denmark 230 50 C Finland 230 50 C France 230 50 C Germany 230 50 C Greece 220 50 C Hungary 220 50 C Iceland 230 50 C Ireland 230 50 C BF Italy 220 50 C Luxemburg 230 50 C Netherlands 230 50 C Norway 230 50 C Poland 220 50 C Portugal 230 50 C Romania 220 50 C Rus...

Page 5: ...60 A Jamaica 110 50 A Mexico 120 127 60 A Nicaragua 120 240 60 A Panama 110 220 60 A South America Countries regions Voltage Frequency Hz Plug type Argentina 220 50 C BF O Brazil 127 220 60 A C Chile 220 50 C Colombia 120 60 A Peru 220 60 A C Venezuela 120 60 A Middle East Countries regions Voltage Frequency Hz Plug type Iran 220 50 C BF Iraq 220 50 C BF Israel 230 50 C Saudi Arabia 127 220 50 A C...

Page 6: ...se the AC Adaptor placed in a narrow space such as between a wall and furniture Use the nearby wall outlet wall socket when using the AC Adaptor Disconnect the AC Adaptor from the wall outlet wall socket immediately if any malfunction occurs while using your camcorder Even if your camcorder is turned off AC power source mains is still supplied to it while connected to the wall outlet wall socket v...

Page 7: ...ofed See Precautions p 62 Menu items LCD panel and lens A menu item that is grayed out is not available under the current recording or playback conditions The LCD screen is manufactured using extremely high precision technology so over 99 99 of the pixels are operational for effective use However there may be some tiny black points and or bright points white red blue or green in color that appear ...

Page 8: ...move the battery pack or the AC Adaptor after turning off the camcorder Disconnect the AC Adaptor from the camcorder holding both the camcorder and the DC plug Note on the camcorder battery pack temperature When the temperature of the camcorder or battery pack becomes extremely high or extremely low you may not be able to record or play back on the camcorder due to the protection features of the c...

Page 9: ...ages may be impossible to play back or may be lost or other malfunctions could occur Eject the memory card when the access lamp p 21 is lit or flashing Remove the battery pack or AC Adaptor from the camcorder or subject the camcorder to shock or vibration when the POWER lamp p 16 or the access lamp p 21 are lit or flashing When using a shoulder belt sold separately do not crash the camcorder again...

Page 10: ... photos p 26 Playing movies and photos Playback on the camcorder p 28 Playing images on a TV p 31 Saving images Saving movies and photos with a computer p 35 Saving movies and photos in external media p 42 Saving images with a DVD writer recorder p 45 Deleting movies and photos p 33 If you delete the image data that has been saved on your computer or a disc you can record new images on the free me...

Page 11: ...nal recording media to memory card DCR SR20 22 Recording Playback Recording 23 Playback on the camcorder 28 Playing images on a TV 31 Making good use of your camcorder Deleting movies and photos 33 Saving movies and photos with a computer Preparing a computer Windows 35 When using a Macintosh 35 Starting PMB Picture Motion Browser 38 Creating a disc with one touch One Touch Disc Burn 38 Importing ...

Page 12: ...ing detailed information from the Handycam Handbook 56 Additional information Troubleshooting 57 Recording time of movies number of recordable photos 60 Precautions 62 Specifications 64 Quick reference Screen indicators 66 Parts and controls 67 Index 70 ...

Page 13: ...M battery pack V series after attaching it to your camcorder DCR SX20 Battery pack DC IN jack DC plug AC Adaptor Power cord Mains lead CHG charge lamp To the wall outlet wall socket Battery pack DC IN jack CHG charge lamp DC plug AC Adaptor To the wall outlet wall socket Power cord Mains lead DCR SR20 ...

Page 14: ...arts The CHG charge lamp turns off when the battery pack is fully charged 4 When the battery is charged disconnect the AC Adaptor from the DC IN jack of your camcorder Tips See page 60 on recording and playing time When your camcorder is on you can check the approximate amount of remaining battery power with the remaining battery indicator at the upper left on the LCD screen Charging time Approxim...

Page 15: ...arge lamp flashes during charging under the following conditions The battery pack is not attached correctly The battery pack is damaged The temperature of the battery pack is low Remove the battery pack from your camcorder and put it in a warm place The temperature of the battery pack is high Remove the battery pack from your camcorder and put it in a cool place In the default setting the power tu...

Page 16: ...urned on a light See page 18 for the detail of the using the multi selector To set the date and time again operate the multi selector to select MENU Show others CLOCK LANG under GENERAL SET category CLOCK SET When an item is not on the screen select until the item appears 3 Select NEXT with of the multi selector then press the center of the multi selector 4 Select setting of DST SET or SUMMERTIME ...

Page 17: ...ct NEXT with of the multi selector then press the center of the multi selector The clock starts Notes The date and time do not appear during recording but they are automatically recorded on the recording media and can be displayed during playback To display the date and time select MENU Show others PLAYBACK SET under PLAYBACK category DATA CODE DATE TIME You can turn off the operation beeps by sel...

Page 18: ...multi selector Press the center of the multi selector to confirm your selection Changing the language setting You can change the on screen displays to show messages in a specified language Select MENU Show others CLOCK LANG under GENERAL SET category LANGUAGE SET a desired language Multi selector ...

Page 19: ...dia You can perform recording playback and editing operations on the selected medium Select with and press the button in the center of the multi selector to confirm your selection Tips See page 60 for the recordable time of movies See page 61 for the number of recordable photos Selecting the recording media for movies DCR SR20 Select MENU Show others MEDIA SETTINGS under MANAGE MEDIA category MOVI...

Page 20: ...er can be used with this camcorder Operation with all memory cards is not assured Memory Stick PRO Duo media of up to 32 GB and SD memory cards of up to 64 GB have been tested and proven to operate with your camcorder For recording movies on Memory Stick PRO Duo media it is recommended that you use Memory Stick PRO Duo media of 512 MB or larger In this manual Memory Stick PRO Duo media and Memory ...

Page 21: ... new memory card In that case select YES If you record only photos on the memory card select NO Confirm the direction of the memory card If you forcibly insert the memory card in the wrong direction the memory card memory card slot or image data may be damaged Notes If Failed to create a new Image Database File It may be possible that there is not enough free space is displayed initialize the memo...

Page 22: ...2 US Dubbing or copying movies and photos from the internal recording media to memory card DCR SR20 Select MENU Show others MOVIE DUB PHOTO COPY under EDIT category then follow the displays on the screen ...

Page 23: ...owing recording media DCR SX20 Memory card DCR SR20 Internal hard disk Tips See page 19 on changing the recording media DCR SR20 To open the lens cover Slide the LENS COVER switch to open Tips When you finish recording or when you play back images close the lens cover 1 Fasten the grip belt DCR SR20 DCR SX20 ...

Page 24: ...urns on You can switch recording modes by pressing MODE Press MODE until the desired mode icon appears Recording movies Press START STOP to start recording To stop recording press START STOP again MODE button Movie When recording a movie STBY REC START STOP button ...

Page 25: ... Access lamp p 21 is lit or flashing The media icon in the upper right of the LCD screen is flashing Tips When a face is detected a white frame appears and the image quality around the face is optimized automatically FACE DETECTION You can capture photos from recorded movies See page 60 on the recordable time of movies You can check the recordable time estimated remaining capacity etc by selecting...

Page 26: ...ct MENU Show others PLAYBACK SET under PLAYBACK category a desired setting Shooting photos In the default setting photos are recorded on the following recording media DCR SX20 Memory card DCR SR20 Internal hard disk Tips See page 19 on changing the recording media DCR SR20 Press MODE until the Photo icon appears The LCD screen display switches for photo recording mode and the screen aspect ratio b...

Page 27: ... When disappears the photo is recorded Tips See page 61 on the recordable number of photos To change the image size select MENU Show others IMAGE SIZE under PHOTO SETTINGS category a desired setting You can check the recordable number of photos on the LCD screen p 66 Flashes Lights up ...

Page 28: ...ia DCR SR20 1 Open the LCD screen of your camcorder Your camcorder turns on 2 Press VIEW IMAGES The VISUAL INDEX screen appears after some seconds 3 Select the Movie a desired movie to play back a movie Select the Photo a desired photo to view a photo Movies are displayed and sorted by recording date To MENU screen Displays movies recorded on the previous next date Displays the previous next movie...

Page 29: ...ies are played as fast as about 5 times about 10 times about 30 times about 60 times You can display the VISUAL INDEX by selecting MENU Show others VISUAL INDEX under PLAYBACK category The recording date time and shooting conditions are recorded automatically during recording This information is not displayed during recording but you can display it during playback by selecting MENU Show others PLA...

Page 30: ...g photos Your camcorder displays the selected photo Tips When viewing photos recorded on a memory card playback folder appears on the screen Previous To the VISUAL INDEX screen To start stop slide show Next OPTION ...

Page 31: ... refer to the instruction manuals supplied with the TV Connect your camcorder to a TV with the A V connecting cable supplied Connect your camcorder to the input jack of the TV Play back movies and photos on your camcorder p 28 To set the aspect ratio according to the connected TV 16 9 4 3 Select MENU Show others OUTPUT SETTINGS under GENERAL SET category TV TYPE 16 9 or 4 3 When connecting to your...

Page 32: ...the instruction manuals supplied with your TV When you set TV TYPE to 4 3 the image quality may deteriorate Also when the recorded image s aspect ratio switches between 16 9 wide and 4 3 the image may jitter On some 4 3 TVs the photos recorded in 4 3 aspect ratio may not be displayed full screen This is not a malfunction When you play back an image recorded in 16 9 wide aspect ratio on a 4 3 TV no...

Page 33: ...the Playlist Tips You can delete an image on the playback screen from OPTION MENU To delete all images recorded in the recording media and recover all the recordable space of the media format the media Reduced size images which enable you to view many images at the same time on an index screen are called thumbnails 1 Select MENU Show others DELETE under EDIT category 2 To delete movies select DELE...

Page 34: ... all photos on the same day at one time select DELETE DELETE by date Select to select the recording date of the desired movies photos then select Press LIGHT when thumbnail is selected to confirm the image Select to return to the previous screen Select YES ...

Page 35: ...cessary when creating DVD discs Display Minimum 1 024 dots 768 dots Others USB port this must be provided as standard Hi Speed USB USB 2 0 compatible DVD burner CD ROM drive is necessary for installation 1 Standard installation is required Operation is not assured if the OS has been upgraded or in a multi boot environment 2 64 bit editions and Starter Edition are not supported Windows Image Master...

Page 36: ...ee to the terms change to and then click Next Install Turn on your camcorder then connect the camcorder to the computer using the supplied USB cable The USB SELECT screen appears on the camcorder screen automatically Select the one of the media types displayed on the screen to make the computer recognize your camcorder USB CONNECT Internal hard disk DCR SR20 USB CONNECT Memory card The displayed r...

Page 37: ...installation You may install Image Mastering API v2 0 for Windows XP in response to the message displayed when you try to start those functions To disconnect your camcorder from the computer Click the icon at the bottom right of the desktop of the computer Safely remove USB Mass Storage Device Select END YES on the camcorder screen Disconnect the USB cable Notes Access from the computer using the ...

Page 38: ...ive See page 35 for the type of discs you can use If any other software than PMB starts automatically shut it down 2 Turn on your camcorder then connect the camcorder to the computer using the supplied USB cable Starting PMB Picture Motion Browser Double click the PMB short cut icon on the computer screen Notes If the icon is not displayed on the computer screen click Start All Programs PMB to sta...

Page 39: ...he wall outlet wall socket using the supplied AC Adaptor for this operation p 15 1 Turn on your camcorder then connect the camcorder to the computer using the supplied USB cable The USB SELECT screen appears on the camcorder screen 2 Select the recording media that contains the images you want to save on the camcorder screen USB CONNECT Internal hard disk USB CONNECT Memory card The displayed reco...

Page 40: ... side in the window and select the folder or date then select the movies To select plural movies hold the Ctrl key down and click thumbnails 4 At the top of the window click Create DVD Video Format Discs STD The window used to select movies appears To add movies to the previously selected ones select the movies in the main window and drag and drop onto the window for selecting movies 3 Click Impor...

Page 41: ...sc Copier help on the operation Editing movies You can cut out only necessary parts from a movie and save it as another file Double click the movie to be edited on PMB then click Show Edit Palette on the right side of the screen Trim Video or select the Manipulate menu Edit Trim Video See PMB Help p 38 for details Capturing photos from a movie You can save a frame of a movie as a photo file Double...

Page 42: ...on your camcorder before use The format screen appears when the external media is connected to your camcorder The format screen may appear even in the case of media utilizing the FAT file system Operation is not assured with every connectable device Connect your camcorder to the wall outlet wall socket using the supplied AC adaptor p 15 Refer to the instruction manual supplied with the external me...

Page 43: ...DEX screen change as illustrated below You can make menu settings of the external media such as deleting images Select MENU Show others on the VISUAL INDEX screen To save desired movies and photos You can also save images recorded on memory cards Notes You cannot search or copy photos recorded on memory card by recording date Select Play without copying in step 5 above The VISUAL INDEX screen of t...

Page 44: ...nected to your camcorder p 31 Notes The Date Index of photos cannot be displayed If your camcorder does not recognize the external media try the following operations Reconnect the USB Adaptor Cable to your camcorder If the external media has the AC power cable connect it to the wall outlet wall socket To finish the external media connection Select on the VISUAL INDEX screen of the external media D...

Page 45: ...ferred to as DVD writer in this section Connect the AC Adaptor and the power cord mains lead to the DC IN jack of your camcorder and the wall outlet wall socket p 15 Turn on your camcorder and connect the DVD writer to the USB jack of your camcorder with the USB cable of the DVD writer Insert an unused disc into the DVD writer and close the disc tray The DISC BURN screen appears on the screen Pres...

Page 46: ...k a disc on the DVD writer Connect the AC Adaptor and the power cord mains lead to the DC IN jack of your camcorder and the wall outlet wall socket p 15 Turn on your camcorder and connect the DVD writer to the USB jack of your camcorder with the USB cable of the DVD writer You can play back movies on the TV screen by connecting the camcorder to a TV p 31 Insert a created disc into the DVD writer T...

Page 47: ... to disc creation devices such as a Sony DVD writer other than DVDirect Express with the USB cable Refer also to the instruction manuals supplied with the devices to be connected Notes Sony DVD writer may not be available in some countries regions Connect your camcorder to the wall outlet wall socket using the supplied AC Adaptor for this operation p 15 Connect the AC Adaptor and the power cord ma...

Page 48: ...the A V connecting cable supplied Refer also to the instruction manuals supplied with the devices to be connected Notes Connect your camcorder to the wall outlet wall socket using the supplied AC Adaptor for this operation p 15 Sony DVD writer may not be available in some countries regions Insert the recording media in the recording device If your recording device has an input selector set it to t...

Page 49: ...Show others OUTPUT SETTINGS under GENERAL SET category DISP OUTPUT LCD PANEL the default setting To record the date time or camera settings data select MENU Show others PLAYBACK SET under PLAYBACK category DATA CODE a desired setting In addition select MENU Show others OUTPUT SETTINGS under GENERAL SET category DISP OUTPUT V OUT PANEL When the screen size of display devices TV etc is 4 3 select ME...

Page 50: ...r customized shooting p 53 PHOTO SETTINGS Items for recording photos p 53 PLAYBACK Items for playback p 53 EDIT Items for editing p 54 OTHERS Items for other settings p 54 MANAGE MEDIA Items for recording media p 54 GENERAL SET Other setup items p 55 Operating menus Select with and press the center of the multi selector to confirm your selection An orange frame appears on the selected item To fini...

Page 51: ... recording or playback conditions Grayed out menu items or settings are not available Tips Depending on the menu items being changed your camcorder switches between playback mode and recording mode movie photo Using MY MENU You can use the menu items more easily by registering the menu items you use most often on MY MENU You can register 6 menu items on each MY MENU of the MOVIE PHOTO and PLAYBACK...

Page 52: ...en is displayed at bottom right of the screen you can use the OPTION MENU You select and the menu items you can change in the context appear Select OPTION Select the desired tab the item to change the setting After completing the setting select Notes Grayed out menu items or settings are not available When the item you want is not on the screen select another tab There may be no tab The tabs and i...

Page 53: ... automatically FACE DETECTION Adjusts the image quality of the face s automatically AUDIO REC SET BLT IN ZOOM MIC Records movies with vivid sound appropriate to the zoom position MICREF LEVEL Sets the microphone level OTHER REC SET DIGITAL ZOOM Sets the maximum zoom level of the digital zoom that exceeds the zoom level of the optical zoom WIDE SELECT Sets the horizontal to vertical ratio when reco...

Page 54: ...s from a playlist ERASE ALL Erases all movies from a playlist MOVE Changes the order of movies in a playlist OTHERS category USB CONNECT USB CONNECT 1 Connects the internal hard disk via USB USB CONNECT Connects the memory card via USB DISC BURN Allows you to save images onto discs p 38 45 BATTERY INFO Displays the battery information MANAGE MEDIA category MEDIA SETTINGS 1 MOVIE MEDIA SET Sets the...

Page 55: ... are displayed on the LCD screen OUTPUT SETTINGS TV TYPE Converts the signal depending on the TV connected p 31 DISP OUTPUT Sets whether the on screen displays appears on the TV screen or not CLOCK LANG CLOCK SET Sets the date and time p 16 AREA SET Adjusts for a time difference without stopping the clock p 16 DST SET SUMMERTIMESets the summertime p 16 LANGUAGE SET Sets the display language p 18 P...

Page 56: ...Handbook 3 Select the desired language and the model name of your camcorder then click Install Install by following the instructions on the screen The model name of your camcorder is printed on its bottom surface To view the Handycam Handbook double click the short cut icon on the computer screen When using a Macintosh open the Handbook US folder in the CD ROM then copy Handbook pdf You need Adobe...

Page 57: ...nect the plug of the AC Adaptor to the wall outlet wall socket p 15 The camcorder does not operate even when the power is set to on It takes a few seconds for your camcorder to be ready to shoot after the power is turned on This is not a malfunction Disconnect the AC Adaptor from the wall outlet wall socket or remove the battery pack then reconnect it after about 1 minute If your camcorder still d...

Page 58: ... code beginning with C or E C 04 The battery pack is not an InfoLITHIUM battery pack V series Use an InfoLITHIUM battery pack V series p 13 Connect the DC plug of the AC Adaptor to your camcorder securely p 13 C 06 The battery pack temperature is high Change the battery pack or place it in a cool place C 13 C 32 Remove the power source Reconnect it and operate your camcorder again E Follow the ste...

Page 59: ...emory card is damaged Format the memory card with your camcorder p 54 Incompatible memory card is inserted p 21 Access to the memory card was restricted on another device The camcorder is unsteady Hold the camcorder steady with both hands However note that the camera shake warning indicator does not disappear The drop sensor function is activated You may not be able to record nor play back images ...

Page 60: ...g the camcorder at 25 C 77 F 10 C to 30 C 50 F to 86 F is recommended The recording and playback time will be shorter when you use your camcorder in low temperatures The recording and playback time will be shorter depending on the conditions under which you use your camcorder Playing time Approximate time available when you use a fully charged battery pack DCR SR20 unit minute Battery pack NP FV30...

Page 61: ...2MB 2800 1GB 5700 2GB 11500 4GB 23000 8GB 47000 16GB 95000 32GB 185000 The indicated number of recordable photos on a memory card is based on the maximum image size of your camcorder The actual number of recordable photos is displayed on the LCD screen during recording p 66 The maximum number of recordable photos on a memory card may vary depending on the recording conditions Tips You can also use...

Page 62: ...r Do not wrap your camcorder with a towel for example and operate it Doing so might cause heat to build up inside When disconnecting the power cord mains lead pull it by the plug and not the cord lead Do not damage the power cord mains lead such as by placing anything heavy on it Do not use a deformed or damaged battery pack Keep metal contacts clean If the battery electrolytic liquid has leaked C...

Page 63: ...pre installed rechargeable battery However even if the pre installed rechargeable battery is not charged the camcorder operation will not be affected as long as you are not recording the date Procedures Connect your camcorder to a wall outlet wall socket using the supplied AC Adaptor and leave it with the LCD screen closed for more than 24 hours Note on disposal transfer of the camcorder DCR SR20 ...

Page 64: ...cond Input Output connectors A V OUT jack Video audio output jack USB jack mini AB LCD screen Picture 6 7 cm 2 7 type aspect ratio 16 9 Total number of pixels 230 400 960 240 General Power requirements DC 6 8 V 7 2 V battery pack DC 8 4 V AC Adaptor Average power consumption During camera recording using LCD screen at normal brightness DCR SR20 2 1 W DCR SX20 1 9 W Operating temperature 0 C to 40 ...

Page 65: ...emarks or registered trademarks of Sony Corporation InfoLITHIUM is a trademark of Sony Corporation DVDirect is a trademark of Sony Corporation Dolby and the double D symbol are trademarks of Dolby Laboratories Microsoft Windows Windows Vista and DirectX are either registered trademarks or trademarks of Microsoft Corporation in the United States and or other countries Macintosh and Mac OS are regis...

Page 66: ...remaining time FADER Drop sensor off Drop sensor activated 9999 9999 Approximate number of recordable photos and recording media Playback folder of memory card 100 112 Current playing movie or photo Number of total recorded movies or photos Bottom Indicator Meaning FACE DETECTION set to OFF Manual focus SCENE SELECTION White balance SteadyShot off EXPOSURE TELE MACRO Backlight OPTION button VIEW I...

Page 67: ...u rotate the LCD panel 180 degrees you can close the LCD panel with the LCD screen facing out This is convenient during playback operations LIGHT button Press to light up the LIGHT Multi selector 18 VIEW IMAGES button 28 DCR SR20 Speaker USB jack 36 39 42 45 A V OUT jack 31 MODE button 24 Backlight button RESET button Press RESET using a pointed object Press RESET to initialize all the settings in...

Page 68: ...tton 27 POWER lamp CHG charge lamp 13 Battery pack 13 START STOP button 24 DC IN jack 13 Grip belt 23 Hook for a shoulder belt Access lamp memory card 20 While the lamp is lit or flashing the camcorder is reading or writing data BATT battery release lever 15 Tripod receptacle Attach a tripod sold separately to the tripod receptacle using a tripod screw sold separately the length of the screw must ...

Page 69: ...lt 23 DC IN jack 13 Access lamp memory card 20 While the lamp is lit or flashing the camcorder is reading or writing data BATT battery release lever 15 Tripod receptacle Attach a tripod sold separately to the tripod receptacle using a tripod screw sold separately the length of the screw must be less than 5 5 mm 7 32 in Memory card slot 20 ...

Page 70: ...cators 66 Self diagnosis display 58 Setting the date and time 16 Software 35 Specifications 64 Supplied items 7 T Thumbnail 33 Tripod 69 Troubleshooting 57 Turning the power on 16 TV 31 TV TYPE 31 U USB cable 45 47 USB CONNECT 45 47 V VBR 60 VIEW IMAGES 28 VISUAL INDEX 28 Volume 29 W Wall outlet wall socket 13 Warning indicators 58 Windows 35 Z Zoom 68 Symbols 16 9 31 4 3 31 A A V connecting cable...

Page 71: ......

Page 72: ...r cet appareil à l abri de la pluie et de l humidité N exposez pas les piles à une chaleur excessive notamment aux rayons directs du soleil à une flamme etc Ce symbole avise l utilisateur de la présence de pièces sous tension dangereuse non isolées à l intérieur du boîtier de l appareil leur tension est suffisante pour représenter un risque d électrocution pour les personnes Ce symbole avise l uti...

Page 73: ...la terre Une fiche polarisée dispose de deux broches dont l une est plus large que l autre Une broche de mise à la terre dispose de deux broches et d une troisième pour la mise à la terre Cette broche plus large ou cette troisième broche visent à assurer votre sécurité Si la fiche fournie ne s adapte pas à votre prise murale consultez un électricien afin de remplacer la prise obsolète Faites en so...

Page 74: ...e de fiche représentatifs sont décrits dans le tableau suivant Il est possible que plusieurs types de fiches et tensions d alimentation soient utilisés dans une région Attention il convient d utiliser un cordon d alimentation satisfaisant aux exigences de chaque pays Pour les États Unis uniquement Utilisez dans la liste UL un cordon d alimentation de 1 5 à 3 m 5 à 10 pieds type SPT 2 ou NISPT 2 AW...

Page 75: ...che Australie 240 50 O Nouvelle Zélande 230 240 50 O Amérique du nord Pays régions Tension Fréquence Hz Type de fiche Canada 120 60 A États Unis 120 60 A Amérique centrale Pays régions Tension Fréquence Hz Type de fiche Bahamas 120 240 60 A Costa Rica 110 60 A Cuba 110 220 60 A C République dominicaine 110 60 A El Salvador 110 60 A Guatemala 120 60 A Honduras 110 60 A Jamaïque 110 50 A Mexique 120...

Page 76: ...e saoudite 127 220 50 A C BF Turquie 220 50 C EAU 240 50 C BF Afrique Pays régions Tension Fréquence Hz Type de fiche Algérie 127 220 50 C République démocratique du Congo 220 50 C Egypte 220 50 C Ethiopie 220 50 C Kenya 240 50 C BF Nigéria 230 50 C BF Afrique du Sud 220 230 50 C BF Tanzanie 230 50 C BF Tunisie 220 50 C ...

Page 77: ...pe équivalent recommandé par Sony Mettez les batteries au rebut sans attendre de la manière décrite dans les instructions Remplacez la batterie par une batterie du type spécifié uniquement Sinon vous risquez de provoquer un incendie ou des blessures Remarques sur l adaptateur CA N utilisez pas l adaptateur CA dans un espace étroit entre un mur et un meuble par exemple Branchez l adaptateur CA à un...

Page 78: ...a capacité du support 1 Go est égal à 1 milliard d octets dont une partie est utilisée pour la gestion du système et ou les fichiers d application La capacité dont dispose l utilisateur est d environ 3 83 Go Voir la page 23 pour la carte mémoire que vous pouvez utiliser avec ce caméscope Utilisation du caméscope Ne tenez pas le caméscope par les parties suivantes ni par les caches des prises Écran...

Page 79: ...es films les cassettes vidéo et les autres enregistrements peuvent faire l objet d une protection des droits d auteur Leur enregistrement non autorisé peut être contraire aux lois sur les droits d auteur Remarque sur la lecture Les images enregistrées sur votre caméscope pourraient ne pas pouvoir être lues correctement par d autres appareils À l inverse les images enregistrées sur d autres apparei...

Page 80: ...illustrations de votre caméscope de même que les indications à l écran sont exagérées ou simplifiées afin d être plus claires Dans ce manuel le disque dur interne DCR SR20 du caméscope et la carte mémoire sont appelés support d enregistrement La conception et les caractéristiques techniques de votre caméscope et des accessoires sont sujettes à modification sans préavis Confirmer le nom du modèle d...

Page 81: ...tection du caméscope lorsque cette fonction est activée risquent également d être enregistrés Si le capteur de chute détecte une chute répétée il est possible que la prise de vue ou la lecture s arrête Remarque concernant l utilisation du caméscope à haute altitude DCR SR20 N allumez pas le caméscope dans une zone de basse pression où l altitude est supérieure à 5 000 mètres 16 000 pieds Cela pour...

Page 82: ... photos Lecture avec le caméscope p 30 Lecture des images sur un téléviseur p 33 Sauvegarde des images Sauvegarde de films et de photos sur un ordinateur p 37 Sauvegarde de films et de photos sur un support externe p 45 Sauvegarde d images à l aide d un graveur enregistreur DVD p 48 Suppression de films et de photos p 35 Si vous supprimez les données d image qui ont été sauvegardées sur votre ordi...

Page 83: ... carte mémoire DCR SR20 24 Enregistrement Lecture Enregistrement 25 Lecture avec le caméscope 30 Lecture des images sur un téléviseur 33 Bien se servir de son caméscope Suppression de films et de photos 35 Sauvegarde de films et de photos sur un ordinateur Préparation de l ordinateur Windows 37 Utilisation d un Macintosh 37 Lancement de PMB Picture Motion Browser 40 Création d un disque à l aide d...

Page 84: ... détaillée provenant du Guide pratique de Handycam 59 Informations complémentaires Dépannage 60 Durée d enregistrement des films et nombre de photos pouvant être enregistrées 63 Précautions 66 Spécifications 68 Consultation rapide Icônes d écran 70 Pièces et contrôles 72 Index 75 ...

Page 85: ...les InfoLITHIUM série V après l avoir inséré dans le caméscope Bloc piles Prise DC IN Témoin CHG charge Fiche CC Adaptateur CA Vers la prise murale Cordon d alimentation DCR SR20 DCR SX20 Bloc piles Prise DC IN Fiche CC Adaptateur CA Cordon d alimentation Témoin CHG charge Vers la prise murale ...

Page 86: ... s éteint lorsque le bloc piles est entièrement chargé 4 Lorsque le bloc piles est chargé débranchez l adaptateur CA de la prise DC IN du caméscope Conseils Consultez la page 63 pour en savoir plus sur la durée d enregistrement et de lecture Lorsque votre caméscope est en marche l autonomie approximative du bloc piles est indiquée par l icône située dans le coin supérieur gauche de l écran LCD Dur...

Page 87: ...p 23 sont éteints Le témoin CHG charge clignote pendant la charge lorsque Le bloc piles est mal installé Le bloc piles est endommagé La température du bloc piles est basse Retirez le bloc piles de votre caméscope et rangez le dans un endroit chaud La température du bloc piles est élevée Retirez le bloc piles de votre caméscope et rangez le dans un endroit frais Par défaut l appareil s éteint autom...

Page 88: ...r l utilisation du multi sélecteur Pour régler la date et l heure à nouveau utilisez le multi sélecteur pour sélectionner MENU Afficher autres RÉG HOR LAN sous la catégorie RÉGL GÉNÉRAUX RÉGL HORLOGE Si une option n apparaît pas à l écran sélectionnez jusqu à ce qu elle s affiche 3 Sélectionnez SUIVANT avec du multi sélecteur puis appuyez au centre du multi sélecteur 4 Sélectionnez le réglage de H...

Page 89: ...ntre du multi sélecteur L horloge démarre Remarques La date et l heure ne s affichent pas pendant l enregistrement mais elles sont sauvegardées automatiquement sur le support et peuvent être affichées pendant la lecture Pour afficher la date et l heure sélectionnez MENU Afficher autres RÉGL DE LECTURE sous la catégorie LECTURE CODE DONNÉES DATE HEURE Vous pouvez désactiver les bips en sélectionnan...

Page 90: ...u multi sélecteur Appuyez au centre du multi sélecteur pour confirmer votre sélection Modification du réglage de la langue Vous pouvez modifier la langue des messages affichés à l écran Sélectionnez MENU Afficher autres RÉG HOR LAN sous la catégorie RÉGL GÉNÉRAUX RÉGL LANGUE une langue voulue Multi sélecteur ...

Page 91: ...trement l édition et la lecture Sélectionnez avec et appuyez sur la touche au centre du multi sélecteur pour confirmer votre sélection Conseils Consultez la page 63 pour en savoir plus sur la durée d enregistrement des films Consultez la page 64 pour en savoir plus sur le nombre de photos à enregistrer Sélection du support d enregistrement pour les films DCR SR20 Sélectionnez MENU Afficher autres ...

Page 92: ...our enregistrer les films et les photos sur une carte mémoire DCR SR20 Types de cartes mémoire pouvant être utilisés avec le caméscope Seules les cartes mémoire Memory Stick PRO Duo Memory Stick PRO HG Duo SD Classe 2 ou plus rapide SDHC Classe 2 ou plus rapide et SDXC Classe 2 ou plus rapide sont compatibles avec ce caméscope Le fonctionnement avec toutes les cartes mémoire n est pas garanti Les ...

Page 93: ...ron la moitié de la taille d un Memory Stick standard et des cartes mémoire SD de taille standard Ne fixez pas d étiquette ou d équivalent sur une carte mémoire ou sur un adaptateur pour carte mémoire Cela pourrait entraîner un problème de fonctionnement Ouvrez le couvercle orientez le coin entaillé de la carte mémoire conformément à l illustration puis insérez la carte mémoire dans la fente jusqu...

Page 94: ...éjecter la carte mémoire Ouvrez le couvercle et poussez légèrement sur la carte mémoire une fois N ouvrez pas le couvercle en cours d enregistrement Lors de l insertion ou de l éjection de la carte mémoire veillez à ce qu elle ne soit pas éjectée et projetée au sol Duplication de films ou copie de photos depuis la mémoire interne vers la carte mémoire DCR SR20 Sélectionnez MENU Afficher autres DUP...

Page 95: ...0 Carte mémoire DCR SR20 Disque dur interne Conseils Voir page 21 à propos du changement de support d enregistrement DCR SR20 Pour ouvrir le capuchon d objectif Faites glisser le commutateur du LENS COVER pour l ouvrir Conseils Fermez le capuchon d objectif après l enregistrement ou lorsque vous regardez des images 1 Attachez la dragonne DCR SR20 DCR SX20 ...

Page 96: ...ent à un autre en appuyant sur MODE Appuyez sur MODE jusqu à ce que l icône du mode souhaité s affiche Enregistrement de films Appuyez sur START STOP pour commencer l enregistrement Pour arrêter l enregistrement appuyez de nouveau sur START STOP VEILLE ENR Touche START STOP Touche MODE Film lors de l enregistrement d un film ...

Page 97: ...u clignote L icône de support d enregistrement clignote dans le coin supérieur droit de l écran LCD Conseils Lorsqu un visage est détecté un cadre blanc apparaît et la qualité d image est optimisée automatiquement autour du visage DÉTECT VISAGES Vous pouvez prendre des photos à partir des films enregistrés Consultez la page 63 pour en savoir plus sur la durée d enregistrement des films Vous pouvez...

Page 98: ...er autres RÉGL DE LECTURE sous la catégorie LECTURE un réglage souhaité Prise de photos Par défaut les photos sont enregistrées sur les supports d enregistrement suivants DCR SX20 Carte mémoire DCR SR20 Disque dur interne Conseils Voir page 21 à propos du changement de support d enregistrement DCR SR20 Appuyez sur MODE jusqu à ce que l icône Photo s affiche L affichage de l écran LCD passe au mode...

Page 99: ...né lorsque disparaît Conseils Consultez la page 64 pour en savoir plus sur le nombre de photos pouvant être enregistrées Pour modifier la taille de l image sélectionnez MENU Afficher autres TAIL IMAGE sous la catégorie RÉGL PHOTO APP un réglage souhaité Vous pouvez aussi consulter sur l écran LCD le nombre de photos pouvant être enregistrées p 70 Clignote S allume ...

Page 100: ...l écran LCD de votre caméscope Votre caméscope se met sous tension 2 Appuyez sur AFFICHER LES IMAGES L écran VISUAL INDEX apparaît après quelques instants 3 Sélectionnez Film le film souhaité pour en faire la lecture Sélectionnez Photo la photo souhaitée pour la regarder Les films sont affichés et triés par date d enregistrement Vers l écran de MENU affiche les films enregistrés à la date précéden...

Page 101: ...lus à une vitesse d environ 5 fois environ 10 fois environ 30 fois environ 60 fois la normale Vous pouvez afficher l écran VISUAL INDEX en sélectionnant MENU Afficher autres VISUAL INDEX sous la catégorie LECTURE La date l heure et les conditions d enregistrement sont sauvegardées automatiquement durant l enregistrement Cette information ne s affiche pas durant l enregistrement Vous pouvez cependa...

Page 102: ...scope affiche la photo sélectionnée Conseils Pendant le visionnement de photos enregistrées sur une carte mémoire dossier de lecture s affiche à l écran Précédente Vers l écran VISUAL INDEX Pour lancer arrêter un diaporama Suivante OPTION ...

Page 103: ...iseur à l entrée à laquelle sera raccordé votre caméscope Consultez également le mode d emploi fourni avec le téléviseur pour avoir plus de détails Raccordez votre caméscope au téléviseur au moyen du câble de raccordement A V fourni Raccordez votre caméscope à la prise d entrée du téléviseur Visionnez des films et des photos sur votre caméscope p 30 Réglage du format en fonction du téléviseur racc...

Page 104: ... FORMAT TV à 16 9 Le téléviseur passe automatiquement en mode plein écran Consultez également le mode d emploi fourni avec votre téléviseur Lorsque vous réglez FORMAT TV sur 4 3 la qualité d image peut diminuer Aussi lorsque le format de l image enregistrée passe de 16 9 grand écran à 4 3 l image peut sautiller Sur certains téléviseurs 4 3 les photos enregistrées en format 4 3 peuvent ne pas être ...

Page 105: ... partir du menu OPTION MENU Pour supprimer toutes les images du support d enregistrement et en récupérer tout l espace formatez le Les vignettes sont des images de taille réduite qui permettent d afficher plusieurs images en même temps sur un écran d index 1 Sélectionnez MENU Afficher autres SUPPRIMER sous la catégorie MONT 2 Pour supprimer des films sélectionnez SUPPRIMER SUPPRIMER Pour supprimer...

Page 106: ...trées le même jour sélectionnez SUPPRIMER SUPPR date Sélectionnez pour sélectionner la date d enregistrement des films et photos souhaités puis sélectionnez Appuyez sur LIGHT lorsqu une vignette est sélectionnée pour confirmer l image Pour retourner à l écran précédent sélectionnez Sélectionnez OUI ...

Page 107: ...cessaire d avoir DirectX installé Mémoire 256 Mo ou plus Se conformer aux autres exigences système pour le système d exploitation Disque dur Volume disque nécessaire pour l installation environ 500 Mo 5 Go ou plus peuvent être nécessaires lors de la création de disques DVD Affichage Au minimum 1 024 points 768 points Autres Port USB doit être fourni standard Hi Speed USB compatible USB 2 0 graveur...

Page 108: ...ation se connecter en tant qu administrateur Fermez toutes les applications en cours d exécution sur l ordinateur avant de procéder à l installation du logiciel Placez le CD ROM fourni dans le lecteur de l ordinateur L écran d installation s affiche Si l écran ne s affiche pas cliquez sur Démarrer Ordinateur dans Windows XP Poste de travail puis cliquez deux fois sur SONYPMB E CD ROM Les noms des ...

Page 109: ...cher vous permet de lancer PMB ou un autre logiciel ou d ouvrir des sites Web D autres icônes peuvent s afficher Selon la procédure d installation aucune icône peut s afficher Remarques Pour créer des disques ou utiliser d autres fonctions sur Windows XP il faut installer Image Mastering API v2 0 pour Windows XP Si Image Mastering API v2 0 pour Windows XP n a pas encore été installé le sélectionne...

Page 110: ...de l opération n est pas garanti Lancement de PMB Picture Motion Browser Cliquez deux fois sur l icône du raccourci de PMB sur l écran de l ordinateur Remarques Si l icône n est pas affichée à l écran de l ordinateur cliquez sur Démarrer Tous les programmes PMB pour lancer PMB Vous pouvez regarder modifier ou créer des disques des films et des photos à l aide de PMB Lecture de Aide PMB Pour des dé...

Page 111: ...e de la fonction One Touch Disc Burn de votre caméscope vous pouvez sauvegarder des films et des photos enregistrés sur le support d enregistrement interne seulement DCR SR20 1 Mettez l ordinateur sous tension et placez un disque neuf dans le lecteur DVD Voir page 37 pour le type de disque qui peut être utilisé Si un logiciel autre que PMB démarre automatiquement l arrêter 2 Mettez le caméscope so...

Page 112: ...affiche alors sur le caméscope 2 Sélectionnez le support d enregistrement qui contient les images à sauvegarder sur l écran du caméscope CONNEXION USB Disque dur interne CONNEXION USB Carte mémoire Selon le modèle le support d enregistrement affiché peut être différent Si l écran SÉLECT USB ne s affiche pas sélectionnez MENU Afficher autres CONNEXION USB sous la catégorie AUTRES La fenêtre Importe...

Page 113: ... s affiche Pour ajouter des films à ceux qui ont déjà été choisis sélectionnez les films dans la fenêtre principale et glissez les dans la fenêtre de sélection des films 5 Suivez les instructions à l écran pour créer un disque La durée de création d un disque peut être longue Copie d un disque Vous pouvez copier un disque enregistré vers un autre disque à l aide de Video Disc Copier Cliquez sur Dé...

Page 114: ...us pouvez sauvegarder une image d un film comme fichier photo Cliquez deux fois sur le film à monter sur PMB puis cliquez sur Afficher la palette d édition sur le côté droit de l écran Enregistrer l image Voir Aide PMB p 40 pour plus de détails ...

Page 115: ...code Le système de fichiers FAT est disponible sur votre caméscope Si le support externe a été formaté selon le système de fichiers NTFS etc formatez le support externe sur votre caméscope avant de l utiliser L écran de formatage s affiche lorsque le support externe est raccordé à votre caméscope L écran de formatage peut apparaître même lorsque le support utilise le système de fichiers FAT Il n e...

Page 116: ...rt externe est le suivant Films 9 999 films Photos 9 999 images 899 dossiers Le nombre de scènes pouvant être sauvegardées peut être moindre et varie selon le type d images enregistrées Lors du raccordement d un support externe Les images sauvegardées sur le support externe s affichent à l écran LCD Les touches d affichage des films et des photos de l écran VISUAL INDEX varient tel qu illustré ci ...

Page 117: ... En sélectionnant la date vous pouvez rechercher des images par date Sélectionnez OUI sur l écran du caméscope Pour lire sur le caméscope des images qui se trouvent sur le support externe Sélectionnez Lire sans copier à l étape 5 ci dessus L écran VISUAL INDEX du support externe s affiche Visionnez l image p 30 Vous pouvez aussi regarder des images sur un téléviseur raccordé à votre caméscope p 33...

Page 118: ...Express est appelé graveur DVD Raccordez l adaptateur CA et le cordon d alimentation à la prise DC IN de votre caméscope et à la prise murale p 17 Mettez le caméscope sous tension avant de brancher le graveur DVD à la prise USB de votre caméscope avec le câble USB du graveur DVD Insérez un disque inutilisé dans le graveur DVD et refermez le plateau L écran GRAVURE DISQUE s affiche alors sur l écra...

Page 119: ...des images par date Sélectionnez OUI sur l écran du caméscope Pour créer un autre disque avec le même contenu insérez un nouveau disque et sélectionnez CRÉER MÊME DISQUE Une fois l opération terminée sélectionnez QUITTER FIN sur l écran du caméscope Débranchez le câble USB de votre caméscope Pour lire un disque sur le graveur DVD Raccordez l adaptateur CA et le cordon d alimentation à la prise DC ...

Page 120: ...enregistrement choisi ou le nombre de scènes Si vous ne pouvez pas lire les disques créés sur un lecteur DVD quelconque raccordez le caméscope à un graveur DVD et lisez les ensuite Création d un disque avec un graveur DVD etc autre qu un graveur DVDirect Express Vous pouvez enregistrer des films sur un disque en raccordant votre caméscope à un périphérique de création de disques comme le graveur D...

Page 121: ...eur etc Vous pouvez reproduire des images lues à partir du caméscope sur un disque ou une cassette vidéo en raccordant le caméscope entre autres à un enregistreur un graveur Sony DVD par exemple autre que DVDirect Express à l aide du câble de raccordement A V fourni Consultez également les modes d emploi fournis avec les appareils à raccorder Remarques Raccordez votre caméscope à la prise murale à...

Page 122: ...d affichage de l appareil raccordé sélectionnez MENU Afficher autres RÉGLAGES SORTIE sous la catégorie RÉGL GÉNÉRAUX SORTIE AFF LCD le réglage par défaut Pour enregistrer la date l heure ou les données de réglage de la caméra sélectionnez MENU Afficher autres RÉGL DE LECTURE sous la catégorie LECTURE CODE DONNÉES le réglage souhaité De plus sélectionnez MENU Afficher autres RÉGLAGES SORTIE sous la...

Page 123: ...sonnalisées p 56 RÉGL PHOTO APP options pour l enregistrement de photos p 56 LECTURE options pour la lecture p 56 MONT options pour l édition p 57 AUTRES options pour autres réglages p 57 GÉRER SUPPORT options pour support d enregistrement p 57 RÉGL GÉNÉRAUX autres options de réglage p 58 Menus de fonctionnement Sélectionnez avec et appuyez au centre du multi sélecteur pour confirmer votre sélecti...

Page 124: ...tions de menu ou les réglages en grisé ne sont pas disponibles Conseils Selon les options de menu qui sont modifiées votre caméscope passe du mode de lecture au mode d enregistrement film photo Utilisation de MON MENU Vous pouvez plus facilement utiliser les éléments de menu en mémorisant les éléments que vous utilisez le plus souvent sur MON MENU Vous pouvez mémoriser 6 éléments de menu sur chaqu...

Page 125: ...e au coin inférieur droit de l écran vous pouvez utiliser le OPTION MENU Vous sélectionnez et les options du menu que vous pouvez modifier dans le présent contexte s affichent Sélectionnez OPTION Sélectionnez l onglet souhaité l option dont le réglage doit être modifié Après avoir terminé le réglage sélectionnez Remarques Les options de menu ou les réglages en grisé ne sont pas disponibles Lorsque...

Page 126: ...Règle la vitesse de l obturateur automatiquement DÉTECT VISAGES Règle automatiquement la qualité d image des visages RÉGL ENR AUDIO MIC ZOOM INTÉG Enregistre des films avec un son vif adapté à la position du zoom NIV RÉF MIC Règle le niveau du microphone RÉGL ENR AUTRE ZOOM NUM Règle le niveau de zoom maximum du zoom numérique qui dépasse le niveau de zoom du zoom optique SÉL GD FRMAT Règle le rap...

Page 127: ...AJOUTER date Ajoute des films enregistrés un même jour à un moment donné dans une liste de lecture SUPPRIMER Efface des films d une liste de lecture SUPPR TOUT Efface tous les films d une liste de lecture DÉPLACER Modifie l ordre des films dans une liste de lecture Catégorie AUTRES CONNEXION USB CONNEXION USB 1 Raccorde le disque dur interne au moyen d un câble USB CONNEXION USB Raccorde la carte ...

Page 128: ...e l écran LCD RÉGL AFFICH Règle la durée d affichage des icônes ou des indicateurs à l écran LCD RÉGLAGES SORTIE FORMAT TV Convertit le signal en fonction du téléviseur raccordé p 33 SORTIE AFF Règle si l affichage à l écran sur le téléviseur est activé ou non RÉG HOR LAN RÉGL HORLOGE Règle la date et l heure p 18 RÉGL ZONE Règle un décalage horaire sans arrêter l horloge p 18 HEURE D ÉTÉ Règle l ...

Page 129: ...lectionnez la langue voulue et le nom de modèle de votre caméscope puis cliquez sur Installation Procédez à l installation en suivant les instructions à l écran Le nom de modèle de votre caméscope est imprimé sur la surface inférieure Pour regarder le Guide pratique de Handycam cliquez deux fois sur l icône de raccourci sur l écran de l ordinateur Lors de l utilisation d un Macintosh ouvrez le dos...

Page 130: ...r le Guide pratique de Handycam p 59 pour des détails sur les symptômes de votre caméscope et Aide PMB p 40 sur la connexion du caméscope à un ordinateur Le caméscope ne s allume pas Insérez un bloc piles chargé dans le caméscope p 15 Branchez la fiche de l adaptateur CA à une prise murale p 17 Le caméscope ne fonctionne pas même lorsqu il est mis en marche Lors de la mise en marche du caméscope q...

Page 131: ...ris et le caméscope Débranchez le câble USB de l ordinateur et du caméscope et redémarrez l ordinateur puis raccordez de nouveau ce dernier et le caméscope en séquence Codes d autodiagnostic témoins d avertissement Lorsque des témoins apparaissent sur l écran LCD vérifiez les points suivants Si le problème persiste après quelques tentatives de votre part pour le résoudre communiquez avec votre dét...

Page 132: ...é les images sur un autre support Le fichier de base de données d images est endommagé Vérifiez le fichier de base de données en sélectionnant MENU Afficher autres RÉPAR F BD IM sous la catégorie GÉRER SUPPORT le support d enregistrement DCR SR20 La carte mémoire est endommagée Formatez la carte mémoire à l aide du caméscope p 57 Une carte mémoire incompatible est insérée p 23 L accès à la carte m...

Page 133: ...nregistrement type correspond à la durée de marche arrêt de l enregistrement lorsque le mode de film ou photo est sélectionné et que le zoom est utilisé Durées mesurées lorsque le caméscope est utilisé à 25 C 77 F 10 C à 30 C 50 F à 86 F est recommandé La durée d enregistrement et de lecture est réduite lorsque vous utilisez votre caméscope à basse température La durée d enregistrement et de lectu...

Page 134: ...s valeurs entre indiquent la durée d enregistrement minimale Nombre prévu de photos pouvant être enregistrées Support d enregistrement interne DCR SR20 Vous pouvez enregistrer un maximum de 9 999 photos Carte mémoire VGA 0 3M 512 Mo 2800 1 Go 5700 2 Go 11500 4 Go 23000 8 Go 47000 16 Go 95000 32 Go 185000 Le nombre indiqué de photos pouvant être enregistrées sur une carte mémoire est basé sur la ta...

Page 135: ...es FR Les pixels et le format d enregistrement des photos Mode d enregistrement des photos 640 pixels 480 pixels 4 3 640 pixels 360 pixels 16 9 Prise de photo à partir d un film 640 pixels 360 pixels 16 9 640 pixels 480 pixels 4 3 ...

Page 136: ...t Sony avant de l utiliser de nouveau Évitez toute manipulation brusque de l appareil tout démontage toute modification ou tout impact avec un marteau le sol les pieds etc Prenez particulièrement soin de l objectif Laissez le caméscope hors tension lorsque vous ne l utilisez pas N enveloppez pas le caméscope dans du tissu par exemple une serviette quand il fonctionne Cela pourrait entraîner une su...

Page 137: ...argée lorsque le caméscope est connecté à une prise murale à l aide de l adaptateur CA ou lorsque le bloc piles est fixé La pile rechargeable se décharge complètement après environ 3 mois si le caméscope n est pas du tout utilisé Utilisez le caméscope après avoir chargé la pile rechargeable pré installée Toutefois même si la pile rechargeable pré installée n est pas chargée le fonctionnement du ca...

Page 138: ... K EXTÉRIEUR 5 800 K Éclairage minimum 3 lx lux OBT LENTE AUTO est réglé à MARCHE vitesse de l obturateur 1 30 de seconde Connecteurs d entrée sortie Connecteur A V OUT prise de sortie vidéo audio Prise USB mini AB Écran LCD Image 6 7 cm type 2 7 format 16 9 Nombre total de pixels 230 400 960 240 Généralités Alimentation électrique 6 8 V CC 7 2 V CC bloc piles 8 4 V CC adaptateur CA Consommation m...

Page 139: ... Stick Duo sont des marques de commerce ou des marques déposées de Sony Corporation InfoLITHIUM est une marque de commerce de Sony Corporation DVDirect est une marque de commerce de Sony Corporation Dolby et le symbole double D sont des marques de commerce de Dolby Laboratories Microsoft Windows Windows Vista et DirectX sont des marques de commerce ou des marques déposées de Microsoft Corporation ...

Page 140: ...utes secondes Icône Signification 00min Durée d enregistrement restante prévue TRANS FONDU Capteur de chute désactivé Capteur de chute activé 9999 9999 Nombre approximatif de photos pouvant être enregistrées et support d enregistrement Dossier de lecture de la carte mémoire 100 112 Film ou photo en cours de lecture Nombre total de films ou de photos enregistrés En bas Icône Signification DÉTECT VI...

Page 141: ...onsultation rapide FR Les icônes et leur position sont fournies à titre d indication et peuvent différer de l affichage réel à l écran Certaines icônes peuvent ne pas apparaître selon le modèle de caméscope ...

Page 142: ...ivoter le panneau LCD de 180 degrés vous pouvez le rabattre avec l écran LCD orienté vers l extérieur Cette position est très pratique pour la lecture Touche LIGHT Appuyez pour allumer LIGHT Multi sélecteur 20 Touche AFFICHER LES IMAGES 30 DCR SR20 Haut parleur Prise USB 38 42 46 48 Prise A V OUT 33 Touche MODE 26 Touche rétroéclairage Touche RESET Appuyez sur RESET à l aide d un objet pointu Appu...

Page 143: ...émoin POWER Témoin CHG charge 15 Bloc piles 15 Touche START STOP 26 Prise DC IN 15 Dragonne 25 Crochet pour sangle à bandoulière Témoin d accès carte mémoire 22 Lorsque le témoin d accès est allumé ou clignote le caméscope est en train de lire ou d écrire des données Levier de dégagement BATT bloc piles 17 Réceptacle pour trépied Fixez le trépied vendu séparément au réceptacle à l aide d une vis p...

Page 144: ...te mémoire 22 Lorsque le témoin d accès est allumé ou clignote le caméscope est en train de lire ou d écrire des données Levier de dégagement BATT bloc piles 17 Réceptacle pour trépied Fixez le trépied vendu séparément au réceptacle à l aide d une vis pour trépied vendue séparément la longueur de la vis doit être inférieure à 5 5 mm 7 32 po Fente de la carte mémoire 22 ...

Page 145: ... Sauvegarde d images à l aide d un support externe 45 Séquence des opérations 12 Spécifications 68 Support amovible 45 Support d enregistrement 21 SUPPRIMER 35 T Témoins d avertissement 61 Trépied 74 TV 33 V VBR 63 Vignettes 35 VISUAL INDEX 30 Volume 31 W Windows 37 Z Zoom 73 Symboles 16 9 33 4 3 33 A Accessoires fournis 8 Affichage d autodiagnostic 61 AFFICHER LES IMAGES 30 Aide PMB 40 Altitude 1...

Page 146: ......

Page 147: ......

Reviews: