28
Troubleshooting
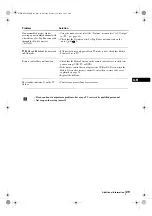
Here are some simple solutions to problems which may affect the picture and sound.
Problem
No picture (screen is dark) and no
sound.
Poor or no picture (screen is dark), but
good sound.
No picture or no menu information
from equipment connected to the
Scart connector.
Good picture, no sound.
No colour on colour programmes.
When you switch on the TV the last
channel you were watching before
switching the TV off does not appear.
Distorted picture when changing
programmes or selecting teletext.
Wrong characters appear when
viewing NexTView.
Picture slanted.
Snowy picture when viewing a TV
channel.
Solution
• Check the aerial connection.
• Plug the TV in and press the
button on the front of the TV.
• If the standby indicator
is on, press TV
button on
the remote control.
• Using the menu system, select the “Picture Adjustment” menu and select
“Reset” to return to the factory settings (see page 11).
• Check that the optional equipment is on and press the
button
repeatedly on the remote control until the correct input symbol is
displayed on the screen (see page 23).
Press the
+ button on the remote control.
Check that “TV Speakers” is “On” in the “Sound Adjustment”
menu(see page 13).
Check that headphones are not connected.
• Using the menu system, select the “Picture Adjustment” menu and select
“Reset” to return to factory settings (see page 11).
• This is not a malfunction. Press the number buttons on the remote control
to select the desired channel.
• Turn off any equipment connected to the Scart connector on the rear of the
TV.
• Use the menu system to enter the “Language” menu (see page 16) and
select the same language that NexTView is broadcast in.
• Using the menu system, select the “Picture Rotation” option in the
“Features” menu to correct the picture slant (see page 15).
• Using the menu system, select the “Manual Programme Preset” menu and
adjust Fine Tuning (AFT) to obtain better picture reception (see page 18).
• Using the menu system, select the “Noise Reduction” option in the
“Picture Adjustment” menu and select “Auto” to reduce the noise in the
picture (see page 11).
Additional Information
continued...
01GBKV29FQ86B.fm Page 28 Monday, February 16, 2004 10:18 AM

