background image

l  

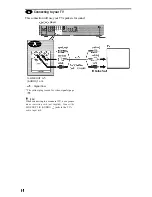
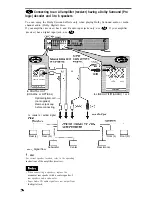
To check the current setting of the player’s color

system, press 

 The power indicator lights up

in green. If “NTSC” appears on the front panel

display, the color system of the player is set to
NTSC. If not, the color system is set to PAL.

When connecting to a monaural TV, use a 

mono conversion cord (not supplied). Connect the

LINE OUT (VIDEO) 

 jack on the player to the

TV’s video input jack, and connect the LINE

OUT L/R (AUDIO) 

 jacks to the TV’s audio

input jack.

18

Summary of Contents for DVP-NS755V

Page 1: ...3 075 803 11 l CD DVD Player Operating Instructions V I D E O SUPER AUDIO CD Q IGITAL VIDEO DVP NS755V DVP NS915V 0 2002 Sony Corporation ...

Page 2: ...ude to constitute a risk of electric shock to persons n 1 This symbol is intended to alert the user to the presence l of important operating and maintenance servicing instructions in the literature accompanying the appliance CAUTION TO PREVENT ELECTRIC SHOCK MATCH WIDE BLADE OF PLUG TO WIDE SLOT FULLY INSERT This equipment has been tested and found to comply with the limits for a Class B digital d...

Page 3: ...lined position It is designed to be operated in a horizontal position only l Keep the player and discs away from equipment with strong magnets such as microwave ovens or large loudspeakers l Do not place heavy objects on the player On operation l If the player is brought directly from a cold to a warm location or is placed in a very damp room moisture may condense on the lenses inside the player S...

Page 4: ...Playing Discs 3 3 Searching for a Particular Point on a Disc Search Scan Slow motion Play Freeze Frame 35 Resuming Playback From the Point Where You Stopped the Disc Multi disc Resume 37 Using the DVD s Menu 38 Selecting ORIGINAL or PLAY LIST on a DVD RW Disc 38 Selecting a Playback Area for a Super Audio CD Disc 3 9 Playing VIDEO CDs With PBC Functions PBC Playback 4 0 Playing an MP3 Audio Track ...

Page 5: ...ONTROL 65 Operation Sound Effects Sound Feedback 69 Controlling Your TV or AV Amplifier Receiver With the Supplied Remote 70 Settings and Adjustments 73 Using the Setup Display 73 Setting the Display or Sound Track Language LANGUAGE SETUP 74 Settings for the Display SCREEN SETUP 7 5 Custom Settings CUSTOM SETUP 77 Settings for the Sound AUDIO SETUP 7 8 Settings for the Speakers SPEAKER SETUP 81 Ad...

Page 6: ... RWs in video CD format Functions available for Super Audio CDs Functions available for music m CDs or CD Rs CD RWs in music CD format Functions available for DATA CDs CD ROMs CD Rs CD RWs containing MP3 audio tracks k MP3 MPEG 1 Audio Layer 3 is a standard format defined by ISO MPEG which compresses audio data This Player Can Play the Following Discs Format of discs DVD VIDEO page 87 DVD RW page ...

Page 7: ...if it has not been correctly finalized Also images in DVD RW discs with CPRM protection may not be played if they contain a copy protection signal Copyright lock appears on the screen For more information see the operating instructions for the recording device Note that discs created in the Packet Write format cannot be played CPRM Content Protection for Recordable Media is a coding technology tha...

Page 8: ...uch as hot air ducts or leave it in a car parked in direct sunlight as the temperature may rise considerably inside the car l After playing store the disc in its case l Clean the disc with a cleaning cloth Wipe the disc from the center out l Do not use solvents such as benzine thinner commercially available cleaners or anti static spray intended for vinyl LPs 8 ...

Page 9: ...en playing a Super Audio C D 41 MULTI CHANNEL indicator Lights up when playing a disc that contains multiple audio signal channels the disc is not inserted 151 Disc tray 33 61 open close button 33 171 l44 I previous next buttons 34 181 f W ENTER buttons 38 191 Click shuttle 36 1101 JOG button indicator 36 1111 TOP MENU button 38 1121 MENU button 38 41 111 oL RETURN button 34 1141 DISPLAY button 13...

Page 10: ...ene 52 For DVP NS915V Lights up when the player outputs the signal in NTSC format When playing back a CD Super Audio CD DATA CD MP3 audio or VIDEO CD without PBC Lights up when playing the multi channel Disc type Playing status playback area on Super audio CDs Playing time 52 Current play mode 43 Lights up when playing MP3 audio tracks 41 Current track and index 52 For DIVP NS915V Lights up when t...

Page 11: ... VIDEO OUT l 2 jacks 20 12 DIGITAL OUT OPTICAL jack 25 171 COMPONENT VIDEO OUT jacks 26 27 20 131 5 1CH OUTPUT jacks 27 The jack names differ depending on the 141 LINE OUT L R AUDIO l 2 jacks models 24 25 26 DVP NS755V Y PB PR DVP NS915V Y PBICB PR CR 181 COMPONENT VIDEO OUT SCAN SELECT switch 76 continued 11 ...

Page 12: ...button 33 The D button has a tactile dot 1141 II PAUSE button 34 1151 C q buttons 38 116 DISPLAY button 13 1171 TOP MENU button 38 1181 l f on standby button 33 1191 VOL volume buttons 70 The button has a tactile dot 1201 TV VIDEO button 70 1211 ENTER button 1221 WIDE MODE button 70 1231 SHUFFLE button 45 1241 A B button 46 1251 PICTURE NAVI picture navigation button 49 1261 ANGLE button 60 1271 P...

Page 13: ...nding on the disc type For details about each item please refer to the pages in parentheses Example Control Menu display 1 when playing a DVD VIDEO Currently playing chapter number Currently playing title number Total number of titles Total number of chapters I Playback status Playback II Pause W Stop etc Control Menu items Type of disc being played Playing time Selected item Current setting Optio...

Page 14: ...Menu Items pe of titles DVD RW to be played the ORIGINAL one or Checks the ela Displays the DVD Super Audio CD CD Selects the surroun it rate or layer of the disc currently playing Returns the settings in SETUP to the ...

Page 15: ...osaic like patterns that Tl e Caat rol Menu icon indicator lights up in green 4 when you select any item except OFF SURROUND PROGRAM SHUFFLE REPEAT A B REPEAT BNR DIGITAL VIDEO ENHANCER only The ANGLE indicator lights up in green only when the angles can be changed The CUSTOM PICTURE MODE indicator lights up in green when any setting other than STANDARD is selected 15 ...

Page 16: ...atteries 2 Step 2 Inserting Batteries Into the Remote You can control the player using the supplied remote Insert two Size AA R6 batteries by matching the and 0 ends on the batteries to the markings inside the compartment When using the remote point it at the remote sensor q on the player l Do not leave the remote in an extremely hot or humid place l Do not drop any foreign object into the remote ...

Page 17: ...screen If this happens change the aspect ratio page w When connecting to a TV that accepts progressive 480 525 format signals You need to use the COMPONENT VIDEO OUT jacks to view progressive signals Hook up your TV using pattern on page 20 and then run Quick Setup on page 29 To change the color system DVP NS915V only The color system of the player can be set to NTSC or PAL If the on screen displa...

Page 18: ... panel display the color system of the player is set to NTSC If not the color system is set to PAL l When connecting to a monaural TV use a stereo mono conversion cord not supplied Connect the LINE OUT VIDEO l 2 jack on the player to the TV s video input jack and connect the LINE OUT L R AUDIO l 2 jacks to the TV s audio input jack 18 ...

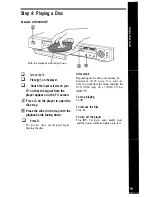
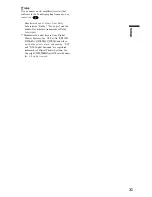
Page 19: ... B Place the disc on the tray with the playback side facing down q Press D The disc tray closes and the player begins playing the disc After step 6 Depending on the disc a menu may be displayed on the TV screen If so select the item you want from the menu and play the DVD VIDEO page 38 or VIDEO CD disc page 40 To stop playing Press n To remove the disc Press To turn off the player Press I e The pl...

Page 20: ...the instructions supplied with the components to be connected Step 1 Connecting the Video Cords Connect this player to your TV monitor projector or AV amplifier receiver using a video cord Select one of the patterns through according to the input jack on your TV monitor projector or AV amplifier receiver In order to view progressive signal pictures with a compatible TV projector or monitor you mus...

Page 21: ...quality images If your TV accepts progressive 480 525 format signals you must use this connection and set COMPONENT OUT to PROGRESSIVE in SCREEN SETUP page 76 Green Blue Red Green Blue Red For DVP NS91 5V You can switch the player s color system to match the color system of the connected TV page 17 l Do not connect a VCR etc between your TV and the player If you pass the player signals via the VCR...

Page 22: ...k Surround effects TVS STANDARD page 58 4V amplifier receiver having a Dolby surround Pro Logic decoder and 3 to 6 speakers 1Surround effects Dolby Surround Pro Logic page 87 4V amplifier receiver with 5 1 ch input jacks md 4 to 6 speakers 1Surround effects Dolby Digital 5 1 ch page 87 DTS 5 1 ch page 87 Super Audio CD Multi channel page 88 MPEG audio 5 1 ch page 88 jr 4V amplifier receiver with d...

Page 23: ...nd the double D symbol are trademarks of Dolby Laboratories Manufactured under license from Digital Theater Systems Inc US Pat No 45 1 942 5 956 674 5 974 380 5 978 762 and other world wide patents issued and pending DTS and DTS Digital Surround are registered trademarks of Digital Theater Systems Inc Copyright 1996 200O Digital Theater Systems Inc All rights reserved 23 ...

Page 24: ...er red AU A diohideo cot l d supplied to LINE OUT L R AUDIO 1 or 2 A Signal flow The yellow plug is used for video signals page 20 l Hint When connecting to a monaural TV use a stereo mono conversion cord not supplied Connect the LINE OUT L R AUDIO l 2 jacks to the TV s audio input jack ...

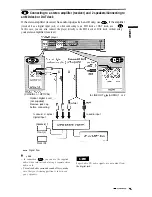
Page 25: ...our stereo amplifier receiver CDIDVD player or COAXIAL or OPTICAL Optical digital cord RAI not supplied Remove jack cap before connecting or to LINE OUT L R AUDIO 1 or 2 white to coaxial or optical digital input to audio input Speakers Front L Front R A Signal flow l p Hints l In connection m you can use the supplied audio video cord instead of using a separate stereo audio cord l To realize bette...

Page 26: ...D player to DIGITAL OUT COAXIAL or OPTICAL Optical digital cord not supplied Remove jack cap before connecting or or to coaxial or optical digital to LINE OUT L R AUDIO 1 or 2 Rear L Rear R f rrrrr am 6Hsms rr ms f 1 Front L Front R Subwoofer Center Signal flow Rear mono l c Hint For correct speaker location refer to the operating instructions of the amplifier receiver l When connecting 6 speakers...

Page 27: ...to its digital jack using m With the following connections you can enjoy a more realistic audio presence in the comfort of your own home CD DVD player to DIGITAL OUT COAXIAL or OPTICAL Stereo audio car I Obtical diaital cord not supplied Remove jack cap before connecting Coaxial digital cord not supplied or to coaxial or optical U 7J or digital input to audio input Speakers I v Speakers AV amplifi...

Page 28: ...nection a For correct speaker placement refer to the instructions of the connected components l To enhance the sound performance Use high performance speakers Use front rear and center speakers of the same size and performance Place the subwoofer between the left and right front speakers l When you connect an amplifier receiver that conforms to the 96kHz sampling frequency set 48kHz 96kHz PCM in A...

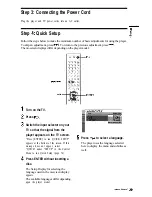
Page 29: ...input selector on your TV so that the signal from the player appears on the TV screen Press ENTER to run QUICK SETUP appears at the bottom of the screen If this message does not appear select QUICK under SETUP in the Control Menu to run Quick Setup page 74 4 Press ENTER without inserting a disc The Setup Display for selecting the language used in the on screen display appears The available languag...

Page 30: ...10Press ENTER The Setup Display for selecting the type of jack used to connect your amplifier receiver appears 11 Press to select the type of jack if any you are using to connect to an amplifier receiver then press ENTER Choose the item that matches the audio connection you selected on pages 24 to 27 m through m m A l If you connect just a TV and nothing else select NO Quick Setup is finished and ...

Page 31: ...l If your AV amplifier receiver has an MPEG audio decoder set MPEG to MPEG page 80 When DIGITAL 5 1CH OUTPUT is selected in step m l The Setup Display for SPEAKER SETUP appears 16Press IV to select the size of the center speaker If no center speaker is connected select NONE page 8 1 17Press ENTER REAR is selected 18Press IV to select the size of the rear speakers If no rear speaker is connected se...

Page 32: ...o Connection pages 24 to 27 m l No additional settings are needed QpaD l Set DOWNMIX to DOLBY SURROUND page 79 l If the sound distorts even when the volume is turned down set AUDIO ATT to ON page 78 4B m l Set DOWNMIX to DOLBY SURROUND page 79 l Set DIGITAL OUT to ON page 79 l Set 48kHz 96kHz PCM to 96kHz 24bit only if you connect an amplifier receiver that conforms to the 96 kHz sampling frequenc...

Page 33: ...y With the playback side facing down 5 Press D The disc tray closes and the player starts playback continuous play Adjust the volume on the TV or the amplifier receiver Depending on the disc a menu may appear on the TV screen For DVD VIDEOS see page 38 For VIDEO CDs see page 40 To turn off the player Press I The player enters standby mode SF Hint For DVP NS915V The player will turn off automatical...

Page 34: ... or dialog that you missed locking the disc tray Child lock You can lock the disc tray to prevent children from opening it ENTER ENTER l O 43 RETURN When the player is in standby mode press 09 RETURN ENTER and then I on the remote The player turns on and LOCKED appears on the front panel display The button on the player or the remote does not work while the Child Lock is set To unlock the disc tra...

Page 35: ...g on the DVDNIDEO CD you may not be able to do some of the operations described Opposite direction DVD only SLOW2 44 SLOW1 44 locating a point quickly Search lilrliFllnm ammmm During playback keep pressing 611 to locate a point in the playback direction or keep pressing 4I to locate a point in the opposite direction When you find the point you want release the button to return to normal playback s...

Page 36: ... direction 1 SLOW21 playback direction slower than SLOW 1 I b 1 PAUSEI I r SLOW2rl opposite direction slower than SLOW 144 DVD only 1 36 SLOW 1 r l opposite direction DVD only To return to normal play Press D Playing a disc frame by frame using the click shuttle Jog mode inm mm m 1 Press JOG The indicator lights up and the player enters pause mode 2 Turn the click shuttle Depending on the turning ...

Page 37: ...pped the disc in step 1 l To play from the beginning of the disc press n twice then press D l For DVD RWs in VR mode CDs Super Audio CDs and DATA CDs the player remembers the resume playback point for the current disc unless the disc tray is opened the power cord is disconnected or only for DATA CDs the player enters standby mode l MULTI DISC RESUME in CUSTOM SETUP must be set to ON default for th...

Page 38: ...ents of the menu vary from disc to disc 2 Press WW or the number buttons to select the item you want to play or change 3 Press ENTER l Hint The disc s menu also appears when the TOP MENU or MENU button on the player is pressed Selecting ORIGINAL or PLAY LIST on a DVD RW DiscEEEEI Some DVD RW discs in VR Video Recording mode have two types of titles for playback originally recorded titles ORIGINAL ...

Page 39: ...ti channel Super Audio CD Some Super Audio CDs consist of a 2 channel playback area and a multi channel playback area You can select the playback area you want to listen to 1 Press SACD MULTV2CH in stop mode The following display appears y gz z g 2CH I 2 Press SACD MULTV2CH repeatedly to select the item l MULTI plays a multi channel playback area l 2CH plays a 2 channel playback area The MULTI ind...

Page 40: ...88 l Each play mode function works only within the selected layer or playback area Playing VIDEO CDs With PBC Functions PBC Playback m PBC Playback Control allows you to play VIDEO CDs interactively by following the menu on the TV screen Number buttons c 1 Start playing a VIDEO CD with PBC functions The menu for your selection appears 2 Select the item number you want by pressing Irk or the number...

Page 41: ...do not work with this player Super VCDs are played in continuous play mode only Playing an MP3 Audio Track m You can play back DATA CDs CD ROMs CD R D RWs recorded in MP3 MPEGl Audio Layer 3 format D lwd ENTER or RETURN MENU 1 Press and place a DATA CD on the disc tray 2 Press D The disc tray closes and the player starts to play the first MP3 audio track in the first album on the disc l The player...

Page 42: ...an also play discs recorded in Multi Session See the instructions of the CD R RW device or recording software not supplied for details on the recording format To play a Multi Session CD This player can play Multi Session CDs when an MP3 audio track is located in the first session Any subsequent MP3 audio tracks recorded in the later sessions can also be played back When audio tracks and images in ...

Page 43: ...ums and tracks in the DATA CD l The player can recognize up to 499 albums the player will count just albums including albums that do not contain MP3 audio tracks The player will not play any albums beyond the first 499 albums Of the first 499 albums the player will play no more than a combined total of 999 albums and tracks Various Play Mode Functions Program Play Shuffle Play Repeat Play A B Repe...

Page 44: ...and chapter When playing a VIDEO CD Super Audio CD or CD For example select track 02 Press JI or the number buttons to select 02 under T then press ENTER The track number may be displayed in 3 digits for a Super Audio CD Selected track Total time of the programmed tracks 6 To program other titles chapters or tracks repeat steps 4 to 5 The programmed titles chapters and tracks are displayed in the ...

Page 45: ...me of the programmed tracks does not appear on the screen Playing in random order Shuffle Play mm cm Ema m You can have the player shuffle titles chapters or tracks Subsequent shuffling may produce a different playing order CLEAR SHUFFLE 1 Press SHUFFLE during playback The following display appears 2 Press SHUFFLE repeatedly to select the item to be shuffled w ET S When playing a DVD VIDEO l TITLE...

Page 46: ... DISC repeats all of the tracks l TRACK repeats the current track When playing a DATA CD MP3 audio l DISC repeats all of the albums l ALBUM repeats the current album l TRACK repeats the current track When Program Play or Shuffle Play is activated l ON repeats Program Play or Shuffle Play To return to normal play Press CLEAR or select OFF in step 2 l e Hints l You can set Repeat Play while the play...

Page 47: ... play Press CLEAR l Hint You can also select A B REPEAT from the Control Menu page 13 l When you set A B Repeat Play the settings for Shuffle Play Repeat Play and Program Play are canceled l A B Repeat Play does not work for titles containing still pictures on a DVD RW in VR mode l A B Repeat Play does not work across multiple titles on a DVD RW in VR mode 47 ...

Page 48: ...the time code n playing a VIDEO CD TRACK INDEX When playing a VIDEO CD with PBC When playing a Super Audio CD CD TRACK INDEX n playing a DATA CD MP3 audio ALBUM TRACK 3 Select the number of the title track scene time code etc you want by pressing the number buttons to select the digit For example to find the scene at 2 hours 10 minutes and 20 seconds after the beginning select TIME TEXT in step 2 ...

Page 49: ...TER or RETURN I Press PICTURE NAM during playback The following display appears 2 Press PICTURE NAVI repeatedly to select the item Refer to the explanations given for each item in the following sections l TITLE VIEWER for DVD VIDEO only l CHAPTER VIEWER for DVD VIDEO only l TRACK VIEWER for VIDEO CD only l STROBE PLAYBACK DVD VIDEO VIDEO CD only l ANGLE VIEWER for DVD VIDEO only continued 49 ...

Page 50: ...ore than 9 titles chapters or tracks v is displayed at the bottom right To display the additional titles chapters or tracks select the bottom right scene the position 9 and press To return to the previous scene select the top left scene the position 1 and press Dividing a scene into 9 sections STROBE PLAYBACK lim 1 m You can display 9 consecutive moving pictures on the screen When you press I I af...

Page 51: ... functions l minutes seconds Playing time of the current scene When playing a VIDEO CD without 5 PBC functions Super Audio CD or CD 2 l T minutes seconds 5 ln Playing time of the current track 5 l T 3 Remaining time of the current track i g l D Playing time of the current disc g l D e E Remaining time of the current disc s When playing a DATA CD MP3 audio l minutes seconds F Playing time of the cu...

Page 52: ...bum number Track name UlWfiF7pPs BIRTl When playing a VIDEO CD without PBC functions Super Audio CD or CD Track playing time and the current track and index number TMCI MD I I 2 5 M N SLC 1 3 Remaining time of the current tracl Playing time of the disc Remaining time of the disc Text 5 u hl Y l When playing VIDEO CDs with PBC functions the scene number and the playing time are displayed l Long tex...

Page 53: ...an display either BIT RATE or LAYER whichever was selected in ADVANCED BIT RATE Audio Video When playing MPEG audio sound tracks Audio Video Bit rate refers to the amount of video audio data per second in a disc While playing a disc an approximate bit rate of the playback picture is displayed as Mbps Mega bit per second and the audio as kbps kilo bit per second The higher the bit rate the larger t...

Page 54: ...ng the play information of By pressing TIME TEXT while playing MP3 audio tracks on a DATA CD you can display the audio bit rate the amount of data per second of the current audio Bit rate Album name Traikname ...

Page 55: ...hen the same language is displayed two or more times the DVD VIDEO is recorded in multiple audio formats When playing a DVD RW The types of sound tracks recorded on a disc are displayed The default setting is underlined Example v l 1 MAIN main sound s l 1 SUB sub sound 2 s l 1 MAIN SUB main and sub sound 2 When playing a VIDEO CD CD or 3 DATA CD MP3 audio 2 The default setting is underlined G l ST...

Page 56: ...orded channels may differ Current audio format Currently playing program format PCM MPEG DTS or DOLBY DIGITAL is displayed In the case of DOLBY DIGITAL the channels in the playing track are displayed by numbers as follows For Dolby Digital 5 1 ch Rear component 2 Front compdnent 2 LFE Low Frequency Center component 1 Effect component 1 The letters in the program format display indicate the followi...

Page 57: ...ereo TV or 2 front speakers TVS TV Virtual Surround lets you enjoy surround sound effects by using sound imaging to create virtual rear speakers from the sound of the front speakers L left R right without using actual rear speakers If the player is set up to output the signal from the DIGITAL OUT OPTICAL or COAXIAL jack the surround effect will be heard only when DOLBY DIGITAL and DTS are set to D...

Page 58: ...CS uses sound imaging to shift the sound of the rear speakers away from the actual speaker position or create entire sets of virtual rear speakers from one set of actual rear speakers VIRTUAL REAR SHIFT VIRTUAL MULTI REAR and VIRTUAL MULTI DIMENSION make use of this technology NORMAL SURROUND Software with 2 channel audio signals is decoded with the Dolby Surround Pro Logic decoder to create surro...

Page 59: ...et each speaker position and distance page 81 l When the playing signal does not contain a signal for the rear speakers it may be difficult to hear the surround effect l When you select one of the TVS modes the player does not output the sound of center speaker l When you select one of the surround modes turn off the surround setting of the connected TV or amplifier receiver l Make sure that your ...

Page 60: ...l Menu page 13 Depending on the DVD VIDEO you may not be able to change the angles even if multi angles are recorded on the DVD VIDEO Dis lm alaying the Subtitles NaaiEI If subtitles are recorded on the discs you can change the subtitles or turn them on and off whenever you want while playing a DVD SUBTITLE I Press SUBTITLE during playback The following display appears 2 Press SUBTITLE repeatedly ...

Page 61: ...eduction BNR function adjusts the picture quality by reducing the block noise or mosaic like natterns that appear on your TV screen E N T E R I DISPLAY 1 Press DISPLAY twice aurmg playback The Control Menu appears 2 Press Wf to select then press ENTER The options for BNR appear 3 Press to select a level l 1 reduces the block noise l 2 reduces the block noise more than 1 l 3 reduces the block noise...

Page 62: ...ch element of the picture color brightness etc l If the outlines of the images on your screen should become blurred set BNR to OFF l Depending on the disc or the scene being played the BNR effect may be hard to discern PICTURE MODE E N T E R ori RETURN 1 Press PICTURE MODE during playback The following display appears 2 Press PICTURE MODE repeatedly to select the setting you want The default setti...

Page 63: ...y appears You can check each adjustment Adjusting the picture items in MEMORY You can adjust each element of the picture individually l PICTURE changes the contrast l BRIGHTNESS changes the overall brightness l COLOR makes the colors deeper or lighter l HUE changes the color balance 1 Press PICTURE MODE repeatedly to select MEMORY and press ENTER The PICTURE adjustment bar appears To turn off the ...

Page 64: ...l l 1 enhances the outline l 2 enhances the outline more than 1 l 3 enhances the outline more than 2 l SOFT softens the image DVD only 4 Press ENTER The disc plays with the setting you selected To cancel the DIGITAL VIDEO ENHANCER setting Select OFF in step 3 To turn off the Control Menu Press DISPLAY repeatedly until the Control Menu is turned off Depending on the disc or the scene being played n...

Page 65: ...the disc you want to lock If the disc is playing press H to stop playback 2 Press DISPLAY while the player is in stop mode The Control Menu appears 5 Press IV to select PARENTAL CONTROL then press ENTER The options for PARENTAL CONTROL appear Press IV to select ON _ then press ENTER If you have not entered a password The display for registering a new password appears PARENTAL CONTROL Enter a new 4...

Page 66: ...he CUSTOM PARENTAL CONTROL display asks you for your password then press ENTER The display will ask you to enter a new 4 digit password Number buttons xs D DISPLAY Parental Control limited playback m Playback of some DVD VIDEO S can be limited according to a predetermined leve such as the age of the users The 1 PARENTAL CONTROL function allows you to set a playback limitation level 1 Press DISPLAY...

Page 67: ...Control setting is complete PARENTAL CONTROL The lower the value the stricter the limitation To turn off the Parental Control Set LEVEL to OFF in step 8 To play a disc for which Parental set 1 Insert the disc and press lB 5 Function 4 e I s Control is E B g z The display for entering your password z appears s 2 Enter your 4 digit password using the g 5 number buttons then press ENTER The player st...

Page 68: ...6 2304 2363 2362 2376 2390 2379 2427 2424 2436 2489 2501 2149 2499 2086 2528 2184 Changing the password 1 2 Press DISPLAY while the player is in stop mode The Control Menu appears Press I to select PARENTAL CONTROL then press ENTER 3 The options for PARENTAL CONTROL appear Press to select PASSWORD then press ENTER The display for entering the password appears 4 5 6 Enter your 4 digit password usin...

Page 69: ...ation Operation sound Power is turned on One beep Power is turned off Two beeps D is pressed One beep II is pressed Two beeps Playback is stopped One long beep Operation is not possible Three beeps Setting Sound Feedback Power indicator A 1 Press lK l on the player or the remote The power indicator lights up in green When there is a disc in the player press 62 and remove the disc Then press 6 agai...

Page 70: ...tons 2 TV VIDEO WIDE MODE DVP NS915V only 1 Slide the TWDVD switch to TV 2 Hold down l 6 and enter your TV s manufacturer code see Code numbers of controllable TV s below using the number buttons 3 Release I When the TV DVD switch is set to TV the remote performs the following I I o Turns the TV on or off VOL Adjusts the volume of the TV For DVP Switches to or from the wide NS755V mode of a Sony w...

Page 71: ... Curtis Mathes Aiwa 32 Daytron Akai 68 Blaupunkt Fisher Grundig Hitachi LG JVC Loewe Mitsubishi Mivar NEC Nokia Orion 10 ll 24 06 c 2 33 2 45 d 27 28 50 09 P Cc 66 15 16 69 2 47 48 z Panasonic 17 49 s WI Philips 06 07 08 General Electric 06 lO Gold Star Hitachi 02 03 J C Penney 04 12 Magnavox 03 08 12 Marantz 04 13 MGA Mitsubishi 04 12 13 17 NEC 04 12 Panasonic 06 19 Philips 08 21 Pioneer 16 Portl...

Page 72: ...control the TV s volume Slide the TWDVD switch to TV Code numbers of controllable AV amplifiers receivers If more than one code number is listed try entering them one at a time until you find the one that works with your AV amplifier receiver Manufacturer Code number Sony 80 88 89 91 Denon 84 85 86 Kenwood 92 93 Onkyo 81 82 83 Pioneer 99 Sansui 87 Technics 97 98 Yamaha 94 95 96 If you want to cont...

Page 73: ...isc take priority over the Setup Display settings and not all the functions described may work DISPLAY E N T E R 1 Press DISPLAY when the player is in stop mode The Control Menu appears 2 Press IW to select SETUP then press ENTER The options for SETUP appear I 3 Press IV to select CUSTOM then press ENTER The Setup Display appears 4 Press IV to select the setup item from the displayed list LANGUAGE...

Page 74: ...you to set various languages for the on screen display or sound track Select LANGUAGE SETUP in the Setup Display To use the display see Using the Setup Display page 73 I I OSD On Screen Display Switches the display language on the screen MENU DVD VIDEO only You can select the desired language for the disc s menu AUDIO DVD VIDEO only Switches the language of the sound track When you select ORIGINAL...

Page 75: ...TER BOX may be selected automatically instead of 4 3 PAN SCAN or vice versa COLOR SYSTEM VIDEO CD only DVP NS91 5V only Selects the color system when you play a VIDEO CD AUTO P A L NTSC Outputs the video signal in the system of the VIDEO CD either PAL or NTSC If your TV is the DUAL system select AUTO Changes the video signals of an NTSC VIDEO CD and outputs it in the PAL system Changes the video s...

Page 76: ...SELECT switch on the back panel of the player to INTERLACE Then set COMPONENT OUT to INTERLACE when you can see the TV screen correctly and reset the COMPONENT VIDEO OUT SCAN SELECT switch to SELECTABLE When PROGRESSIVE is selected in COMPONENT OUT You can fine tune the Progressive 480 525p video signal output when you select PROGRESSIVE in COMPONENT OUT of the SCREEN SETUP display and connect the...

Page 77: ...PAUSE MODE DVD VIDEO DVD RW only Selects the picture in pause mode AUTO The picture including subjects that move dynamically is output with no jitter Normally select this position FRAME The picture including subjects that do not move dynamically is output in high resolution PLAYBACK MEMORY DVD VIDEO VIDEO CD only The player can store SUBTITLE and other settings of each disc for up to 40 discs Play...

Page 78: ...CDs with DTS tracks ON Eliminates the use of unnecessary circuits needed to play CDs If you select ON when playing CDs with DTS tracks the sound will become noisy Settings for the Sound AUDIO SETUP AUDIO SETUP allows you to set the sound according to the playback and connection conditions Select AUDIO SETUP in the Setup Display To use the display see Using the Setup Display page 73 The default set...

Page 79: ...DIGITAL OUT Select this if audio signals are to be output via the DIGITAL OUT OPTICAL or COAXIAL jack ON Normally select this position When you select ON see Setting the digital output signal for further settings O F F The influence of the digital circuit upon the analog circuit is minimal Super Audio CD audio signals are not output from a digital jack Setting the digital output signal Switches th...

Page 80: ... stereo signals via the DIGITAL OUT OPTICAL or COAXIAL jacks Select this when the player is connected to an audio component with a built in DTS decoder 48kHz196kHz PCM DVD VIDEO only Selects the sampling frequency of the audio signal The audio signals of DVD VIDEOS are always converted to 48kHz l6bit All types of signals including 96kHz 24bit are output in their original format However if the sign...

Page 81: ...s or the surround effects are difficult to hear LARGE SMALL l REAR NONE LARGE SMALL Select this if you do not connect a center speaker Normally select this position Select this when the sound distorts or the surround effects are difficult to hear Select this if you do not connect rear speakers REAR SIDE Normally select this position Select according to the rear speaker position REAR SIDE Select th...

Page 82: ...lue in the Setup Display when you move the speakers The default adjustments are in parentheses For DVP NS755V Set this between 4 and 50 feet in 1 foot increments Set this within 5 and 2 feet of the FRONT setting in 1 foot increments For example if FRONT is set to 6 feet CENTER can be set between 1 and 8 feet REAR 10 ft Set this between the FRONT setting and 16 feet in 1 foot increments For example...

Page 83: ...the amplifier s receiver s volume control TEST TONE The speakers will emit a test tone Use this when you use the 5 1CH OUTPUT jacks and adjust the BALANCE and LEVEL O F F ON The test tone is not emitted from the speakers The test tone is emitted from each speaker in sequence while adjusting balance or level Adjusting the speaker volume and level 1 Select SPEAKER SETUP in the Setup Display 2 Select...

Page 84: ...rogressive format In this case set the COMPONENT VIDEO OUT SCAN SELECT switch on the back panel of the player to INTERLACE Then set COMPONENT OUT to INTERLACE after you can see the TV screen correctly and reset the COMPONENT VIDEO OUT SCAN SELECT switch to SELECTABLE Even if your TV is compatible with progressive format 480 525 signals the image may be affected when you set COMPONENT OUT to PROGRE...

Page 85: ...ormat Copyright lock appears and the screen turns blue when playing a DVD RW disc Images taken from digital broadcasts etc may contain copy protection signals such as complete copy protection signals single copy signals and restriction free signals When images that contain copy protection signals are played a blue screen may appear instead of the images It may take a while when looking for playabl...

Page 86: ... be changed when the ANGLE indicator lights up on the front panel display page 10 I The DVD prohibits changing of the angles The player does not operate properly When static electricity etc causes the player to operate abnormally unplug the player Nothing is displayed on the front panel display I DIMMER in CUSTOM SETUP is set to OFF or AUTO OFF Set DIMMER to any setting other than OFF or AUTO OFF ...

Page 87: ...in this format Dolby Digital provides the same 5 1 discrete channels of high quality digital audio found in Dolby Digital cinema audio systems Good channel separation is realized because all of the channel data are recorded discretely and little deterioration is realized because all channel data processing is digital Dolby Surround Pro Logic page 26 Audio signal processing technology that Dolby La...

Page 88: ...oint you want on a CD or VIDEO CD Depending on the disc no index may be recorded Interlace format page 76 Interlace format shows every other line of an image as a single field and is the standard method for displaying images on television The even number field shows the even numbered lines of an image and the odd numbered field shows the odd numbered lines of an image MPEG audio page 27 80 Interna...

Page 89: ...yer Also as the dual layers are on one side only you do not have to turn the disc over during playback You can play the CD layer using a conventional CD player CD layer HD layer l 2 channel Multi channel Super Audio CD This disc consists of the 2 channel playback area and the multi channel playback area Title page 10 The longest section of a picture or music feature on a DVD movie etc in video sof...

Page 90: ... COMPONENT VIDEO OUT Y PB CB PR CR Phono jack Y 1 O VP P PB CB PR CR 0 7 Vp p 75 ohms LINE OUT VIDEO l 2 Phono jack 1 O Vp p 75 ohms S VIDEO OUT l 2 4 pin mini DIN Y 1 O Vp p C 0 3 Vp p PAL 0 286 Vp p NTSC 75 ohms Genera I Power requirements llOVAC60Hz 120 V AC 60 Hz 220 V AC 60 Hz 220 240 V AC 50 60 Hz See page 3 for further information Power consumption 15 w 16W 17w See page 3 for further inform...

Page 91: ...7 Georgian 1297 Kazakh 1298 Greenlandic 1299 Cambodian 1300 Kannada 130 1 Korean 1305 Kashmiri 1307 Kurdish 1311 Kirghiz 1313 Latin 1326 Lingala 1327 Laothian 1332 Lithuanian 1334 Latvian Lettish 1345 Malagasy 1347 Maori 1349 Macedonian 1350 Malayalam 1352 Mongolian 1353 Moldavian 1356 Marathi 1357 Malay 1358 Maltese 1363 Burmese 1365 Nauru 1369 Nepali 1376 Dutch 1379 Norwegian 1393 Occitan 1403 A...

Page 92: ...7 DOWNMIX 79 DTS 27 55 80 87 DVD 6 33 87 DVD RW 6 38 88 F Fast forward 35 Fast reverse 35 Front panel display 10 H Handling discs 8 Hooking up 20 I INDEX 48 Index 88 INTERLACE 76 J Jog mode 36 L LANGUAGE SETUP 74 LEVEL 83 Locating a specific point by watching the TV screen 35 M MENU 74 Menu DVD s menu 38 top menu 38 MODE 76 MP3 6 41 MPEG 27 56 80 88 MULTI DISC RESUME 37 78 0 On screen display Cont...

Page 93: ...TIME TEXT 48 5 1 TITLE 48 Title 89 TITLE VIEWER 49 TOP MENU 38 TRACK 48 Track 89 TRACK SELECTION 77 TRACK VIEWER 49 Troubleshooting 84 TV TYPE 75 TVS TV Virtual Surround 57 U Usable discs 6 V VIDEO 76 VIDEO CD 6 33 93 ...

Page 94: ......

Page 95: ......

Page 96: ......

Page 97: ......

Page 98: ......

Page 99: ......

Page 100: ......

Page 101: ......

Page 102: ......

Reviews: