
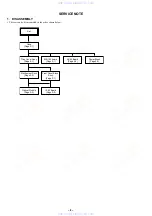


1-11
46
Checking the Play
Information
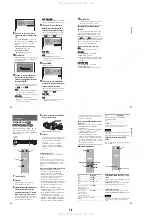
You can check information such as the bit
rate or the disc layer that is being played.
Checking the play information of
a DVD (ADVANCED)
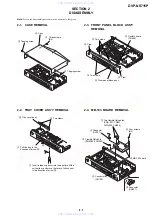
1
Press DISPLAY during playback.
The Control Menu is displayed.
2
Press
X
/
x
to select
(ADVANCED), then press ENTER.
The options for “ADVANCED” appear.
3
Press
X
/
x
to select items.
For each item, please refer to “Displays
of each item.”
• BIT RATE: displays the bit rate.
• LAYER: displays the layer and the
pick-up point.
4
Press ENTER.
To close the ADVANCED window
Select “OFF” in Step 3.
To turn off the Control Menu
Press DISPLAY repeatedly until the Control
Menu is turned off.
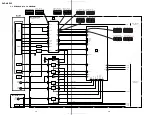
Displays of each item
By pressing DISPLAY repeatedly, you can
display either “BIT RATE” or “LAYER,”
whichever was selected in “ADVANCED.”
◆
BIT RATE
Bit rate refers to the amount of video/audio
data per second in a disc. While playing a
disc, an approximate bit rate of the playback
picture is displayed as Mbps (Mega bit per
second) and the audio as kbps (kilo bit per
second). The higher the bit rate, the larger the
amount of data. However, this does not
always mean that you can get higher quality
pictures or sounds.
◆
LAYER
Indicates the approximate point where the
disc is playing.
If it is a dual-layer DVD, the player indicates
which layer is being read (“Layer 0” or
“Layer 1”).
For details on the layers, see page 73 (DVD
VIDEO).
ENTER
X
/
x
DISPLAY
TIME/TEXT
1 8 ( 3 4 )
1 2 ( 2 7 )
T
1 : 3 2 : 5 5
BIT RATE
DVD VIDEO
BIT RATE
0
5
10
kbps
Mbps
384
OFF
BIT RATE
LAYER
PLAY
BIT RATE
0
5
10
kbps
Mbps
384
Audio
Video
Appears when the DVD
has dual layers
47
Vi
e
w
ing
In
fo
rm
at
io
n
Ab
out
t
h
e
D
is
c
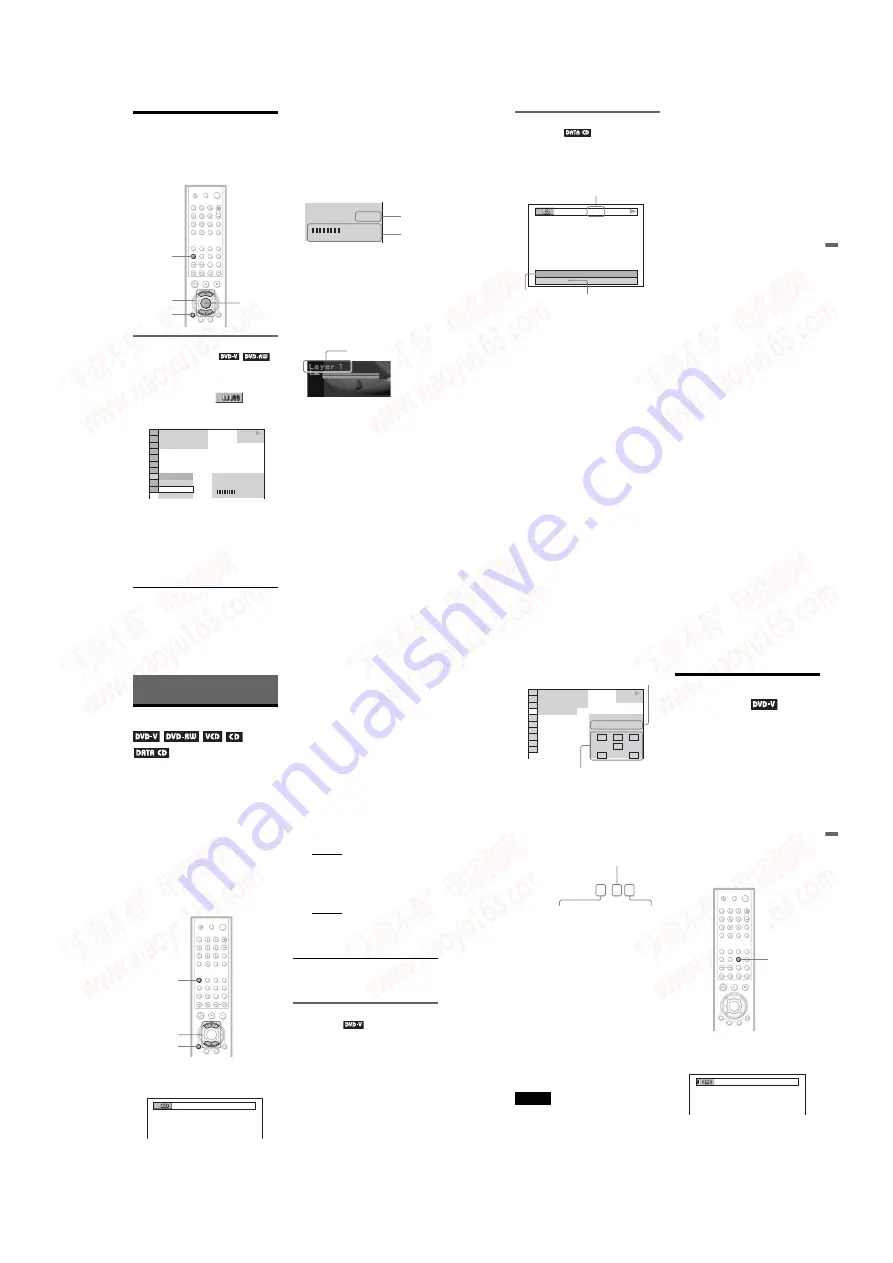
Checking the play information of
a DATA CD
By pressing TIME/TEXT while playing MP3
audio tracks on a DATA CD, you can display
the audio bit rate (the amount of data per
second of the current audio).
PLAY
T
17:30
128k
JAZZ
RIVER SIDE
Bit rate
Album name
Track name
48
Sound Adjustments
Changing the Sound
When playing a DVD VIDEO recorded in
multiple audio formats (PCM, Dolby Digital,
or DTS), you can change the audio format. If
the DVD VIDEO is recorded with
multilingual tracks, you can also change the
language.
With CDs, DATA CDs, or VIDEO CDs, you
can select the sound from the right or left
channel and listen to the sound of the selected
channel through both the right and left
speakers. For example, when playing a disc
containing a song with the vocals on the right
channel and the instruments on the left
channel, you can hear the instruments from
both speakers by selecting the left channel.
1
Press AUDIO during playback.
The following display appears.
2
Press AUDIO repeatedly to select
the desired audio signal.
◆
When playing a DVD VIDEO
Depending on the DVD VIDEO, the
choice of language varies.
When 4 digits are displayed, they
indicate a language code. Refer to
“Language Code List” on page 76 to see
which language the code represents.
When the same language is displayed two
or more times, the DVD VIDEO is
recorded in multiple audio formats.
◆
When playing a DVD-RW
The types of sound tracks recorded on a
disc are displayed. The default setting is
underlined.
Example:
• 1: MAIN (main sound)
• 1: SUB (sub sound)
• 1: MAIN+SUB (main and sub sound)
◆
When playing a VIDEO CD, CD, or
DATA CD (MP3 audio)
The default setting is underlined.
• STEREO: The standard stereo sound
• 1/L: The sound of the left channel
(monaural)
• 2/R: The sound of the right channel
(monaural)
z
Hint
You can also select “AUDIO” from the Control
Menu (page 12).
Displaying the audio information
of the disc
Press DISPLAY during playback to display
the Control Menu. Select “AUDIO” using
X
/
x
. The channels being played are displayed
on the screen.
For example, in Dolby Digital format,
multiple signals ranging from monaural to 5.1
channel signals can be recorded on a DVD
VIDEO. Depending on the DVD VIDEO, the
number of the recorded channels may differ.
DISPLAY
X
/
x
1:ENGLISH
49
Sou
nd Adj
us
tm
en
ts
*“PCM,” “DTS,” or “DOLBY DIGITAL” is
displayed.
In the case of “DOLBY DIGITAL,” the
channels in the playing track are displayed
by numbers as follows:
For Dolby Digital 5.1 ch:
**The letters in the program format display
mean the following sound component:
L:
Front (left)
R:
Front (right)
C:
Center
LS: Rear (left)
RS: Rear (right)
S:
Rear (monaural): The rear
component of the Dolby
Surround processed signal and
the Dolby Digital signal
LFE: Low Frequency Effect signal
z
Hint
For Dolby Digital and DTS, “LFE” is always
enclosed in a solid line regardless of the LFE signal
component being output.
Note
If “DTS” is set to “OFF” in “AUDIO SETUP”
(page 69) the DTS track selection option will not
appear on the screen even if the disc contains DTS
tracks.
TV Virtual Surround
Settings
(TVS)
When you connect a stereo TV or 2 front
speakers, TVS (TV Virtual Surround) lets
you enjoy surround sound effects by using
sound imaging to create virtual rear speakers
from the sound of the front speakers (L: left,
R: right) without using actual rear speakers.
TVS was developed by Sony to produce
surround sound for home use using just a
stereo TV.
This function is designed to work with the
LINE OUT L/R (AUDIO) 1/2 jacks.
Note that if you select one of the TVS
settings, the player does not output Dolby
Digital signals from the DIGITAL OUT
(OPTICAL or COAXIAL) jack. (when you
set “DOLBY DIGITAL” in “AUDIO
SETUP” to “D-PCM”) (page 69)
1
Press SUR during playback.
The following display appears.
DVD VIDEO
1: ENGLISH
1 8 ( 3 4 )
1 2 ( 2 7 )
T
1 : 3 2 : 5 5
L
R
C
DOLBY DIGITAL 3/2.1
PROGRAM FORMAT
LFE
LS
RS
PLAY
Current audio format
*
Currently playing program format
**
DOLBY DIGITAL 3 / 2 . 1
LFE (Low Frequency
Effect) component 1
Rear component 2
Front component 2+
Center component 1
SUR
TVS DYNAMIC
,
continued
www. xiaoyu163. com
QQ 376315150
9
9
2
8
9
4
2
9
8
TEL 13942296513
9
9
2
8
9
4
2
9
8
0
5
1
5
1
3
6
7
3
Q
Q
TEL 13942296513 QQ 376315150 892498299
TEL 13942296513 QQ 376315150 892498299