


1-6
26
5
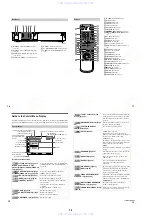
Press
X
/
x
to select a language.
The player uses the language selected here to display the DVD menu and subtitles as well.
6
Press ENTER.
The Setup Display for selecting the aspect ratio of the TV to be connected appears.
7
Press
X
/
x
to select the item.
8
Press ENTER.
The Setup Display for selecting the type of video signal appears.
9
Press
X
/
x
to select the item.
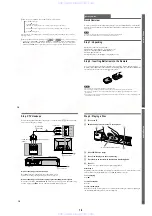
Select PROGRESSIVE only if you have made video connection
C
(page 18) and wish to
view progressive video signals.
q;
Press ENTER.
The Setup Display for selecting the type of jack used to connect your amplifier (receiver)
appears.
TV Type
You select
Page
4:3 standard TV
4:3 LETTER BOX or 4:3 PAN
SCAN
69
A wide-screen TV or 4:3 standard TV with a
wide-screen mode
16:9
69
TV Type
You select
Page
Interlace format TV (standard TV)
INTERLACE
70
Progressive format TV
PROGRESSIVE
70
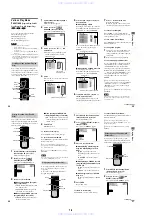
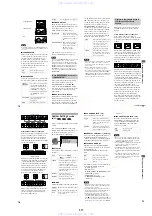
SCREEN SETUP
TV TYPE:
SCREEN SAVER:
BACKGROUND:
COMPONENT OUT:
16:9
4:3 LETTER BOX
4:3 PAN SCAN
MODE:
AUTO
4:3 LETTER BOX
SCREEN SETUP
TV TYPE:
SCREEN SAVER:
BACKGROUND:
4:3 LETTER BOX
ON
JACKET PICTURE
COMPONENT OUT:
INTERLACE
MODE:
INTERLACE
PROGRESSIVE
YES
NO
Is this player connected to an amplifier
(receiver) ? Select the type of jack you
are using.
LINE OUTPUT L/R (AUDIO)
DIGITAL OUTPUT
Hookups
27
qa
Press
X
/
x
to select the item, then press ENTER.
•
When
“
NO
”
or
“
LINE OUTPUT L/R (AUDIO)
”
is selected, Quick Setup is finished and
connections are complete.
•
When
“
DIGITAL OUTPUT
”
is selected, the Setup Display for
“
DOLBY DIGITAL
”
appears. Proceed to Step
qs
.
qs
Press
X
/
x
to select the item.
Choose the item that matches the audio connection you selected in page 22 to 24 (
through ).
qd
Press ENTER.
DTS is selected.
qf
Press
X
/
x
to select the item.
Choose the item that matches the audio connection you selected in page 22 to 24 (
through ).
qg
Press ENTER.
Quick Setup is finished. All connections and setup operations are complete.
Note
You can directly start Quick Setup only when you run it for the first time.
To run Quick Setup a second time, select
“
QUICK
”
under
“
SETUP
”
in the Control Menu (page 67).
Audio Cord Connection Type
You select
Page
D-PCM
75
DOLBY DIGITAL (only if the
amplifier/receiver has a Dolby
Digital decoder)
75
Audio Cord Connection Type
You select
Page
OFF
75
ON (only if the amplifier/receiver
has a DTS decoder)
75
B
D
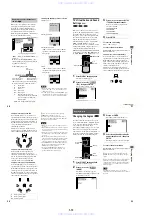
AUDIO SETUP
AUDIO ATT:
AUDIO DRC:
DIGITAL OUT:
DOLBY DIGITAL:
DTS:
OFF
STANDARD
ON
DOWNMIX:
DOLBY SURROUND
DOLBY DIGITAL
D-PCM
D-PCM
B-2
C-2
D
AUDIO SETUP
AUDIO ATT:
AUDIO DRC:
DIGITAL OUT:
DOLBY DIGITAL:
DTS:
OFF
STANDARD
ON
DOWNMIX:
DOLBY SURROUND
D-PCM
OFF
OFF
ON
B
D
B-2
C-2
D
continued
28
To enjoy the surround sound effects of this player or your amplifier (receiver), the following
items must be set as described below for the audio connection you selected in page 20 to 24
(
through
). Each of these are the default settings and do not need to be adjusted when
you first connect the player. Refer to page 67 for using the Setup Display.
Audio Connection (page 20 to 24)
No additional settings are needed.
If the sound distorts even when the volume is turned down, set
“
AUDIO ATT
”
to
“
ON
”
(page 74).
Enjoying the surround sound effects
Page
74
Page
74
75
B
D
A
B-1
C-1
P
lay
ing Disc
s
29
Playing Discs
Playing Discs
Depending on the DVD or VIDEO CD, some
operations may be different or restricted.
Refer to the operating instructions supplied
with your disc.
1
Turn on your TV.
2
Switch the input selector on the TV
to the player.
When using an amplifier (receiver)
Turn on the amplifier (receiver) and
select the appropriate channel.
3
Press POWER on the player.
The player enters standby mode and the
power indicator lights up in red.
4
Press
A
on the player, and place a
disc on the disc tray.
The player automatically turns on and
the power indicator lights up in green.
5
Press
H
.
The disc tray closes, and the player
starts playback (continuous play).
Adjust the volume on the TV or the
amplifier (receiver).
After following Step 5
Depending on the disc, a menu may appear
on the TV screen. You can play the disc
interactively by following the instructions on
the menu. DVD (page 32), VIDEO CD (page
33).
To turn on the player
Press POWER on the player. The player
enters standby mode and the power indicator
lights up in red. Press
[
/
1
on the remote. The
player turns on and the power indicator lights
up in green. In standby mode, the player also
turns on by pressing
A
on the player or by
pressing
H
.
To turn off the player
Press
[
/
1
on the remote. The player enters
standby mode and the power indicator lights
up in red. To turn off the player completely,
press POWER on the player. While playing a
disc, do not turn off the player by pressing
POWER. Doing so may cancel the menu
settings. When you turn off the player, first
press
x
to stop playback and then press
[
/
1
on the remote.
POWER
A
H
1
2
3
4
5
6
7
8
9
0
Power indicator
[
/
1
H
x
AUDIO
x
With the playback side facing down
continued
www. xiaoyu163. com
QQ 376315150
9
9
2
8
9
4
2
9
8
TEL 13942296513
9
9
2
8
9
4
2
9
8
0
5
1
5
1
3
6
7
3
Q
Q
TEL 13942296513 QQ 376315150 892498299
TEL 13942296513 QQ 376315150 892498299