


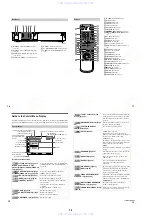


1-3
14
z
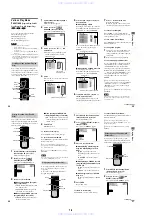
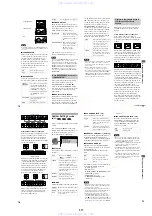
Each time you press DISPLAY, the Control Menu display changes as follows:
You can display the Control Menu display 1 only during CD playback. The Control Menu items are different
depending on the disc.
z
The Control Menu icon indicator lights up in green
t
when you select any item except
“
OFF.
”
(
“
TVS,
”
“
PROGRAM,
”
“
SHUFFLE,
”
“
REPEAT,
”
“
A-B REPEAT,
”
“
BNR,
”
“
DIGITAL VIDEO
ENHANCER
”
only). The
“
ANGLE
”
indicator lights up in green only when the angles can be changed. The
“
VIDEO EQUALIZER
”
indicator lights up in green when any setting other than
“
STANDARD
”
is selected.
Control Menu display 1
m
Control Menu display 2
(The items except the first three items from the top are changed to other items.)
m
ADVANCED display (Appears if you select any setting other than
“
OFF.
”
See page 48.)
m
Control Menu display off
,
Ge
tti
ng S
ta
rte
d
15
Getting Started
Quick Overview
A quick overview presented in this chapter will give you enough information to start using the
player for your enjoyment. To use the surround sound features of this player, refer to
“
Hookups
”
on page 18.
Note
You cannot connect this player to a TV that does not have a video input jack.
Be sure to turn off the power of each component before connecting.
Step 1: Unpacking
Check that you have the following items:
•
Audio/video cord (pinplug
×
3
y
pinplug
×
3) (1)
•
Remote commander (remote) RMT-D129A (1)
•
Size AA (R6) batteries (2)
•
Component video cord (pinplug
×
3
y
pinplug
×
3) (1)
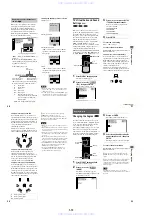
Step 2: Inserting Batteries into the Remote
You can control the player using the supplied remote. Insert two size AA (R6) batteries by
matching the
3
and
#
ends on the batteries to the markings inside the compartment. When using
the remote, point it at the remote sensor
on the player.
Notes
•
Do not leave the remote in an extremely hot or humid place.
•
Do not drop any foreign object into the remote casing, particularly when replacing the batteries.
•
Do not expose the remote sensor to direct light from the sun or a lighting apparatus. Doing so may cause a
malfunction.
•
If you do not use the remote for an extended period of time, remove the batteries to avoid possible damage from
battery leakage and corrosion.
16
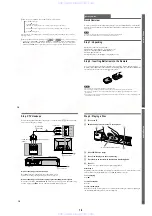
Step 3: TV Hookups
Connect the supplied audio/video cord and power cord in the order (
1
~
3
) shown below. Be
sure to connect the power cord last.
When connecting to a wide screen TV
Depending on the disc, the image may not fit your TV screen.
If you want to change the aspect ratio, please refer to page 69.
When connecting to a TV that accepts progressive (480p) format signals
You need to use the COMPONENT VIDEO OUT jacks to view progressive signals. Hook up
your TV using pattern
C
on page 18, and then run Quick Setup on page 25.
VIDEO
AUDIO
INPUT
L
R
(yellow)
(white)
(red)
3
Power source
CD/DVD Player
TV
2
Power source
to video input
1
Audio/video
cord (supplied)
to audio input
17
Ge
tti
ng S
ta
rte
d
Step 4: Playing a Disc
1
Turn on the TV.
2
Switch the input selector on the TV to the player.
3
Press POWER on the player.
4
Press
A
on the player to open the disc tray.
5
Place the disc on the tray with the playback side facing down.
6
Press
H
.
The disc tray closes and the player begins playing the disc.
After Step 6
Depending on the disc, a menu may be displayed on the TV screen. If so, select the item you want
from the menu and play the DVD (page 32) or VIDEO CD disc (page 33).
To stop playing
Press
x
.
To take out the disc
Press
A
.
To turn off the player
Press
[
/
1
on the remote. The player is set to standby mode and the power indicator lights up in
red. Press POWER on the player to turn off completely.
With the playback side facing down
www. xiaoyu163. com
QQ 376315150
9
9
2
8
9
4
2
9
8
TEL 13942296513
9
9
2
8
9
4
2
9
8
0
5
1
5
1
3
6
7
3
Q
Q
TEL 13942296513 QQ 376315150 892498299
TEL 13942296513 QQ 376315150 892498299