background image

104

Additional Information

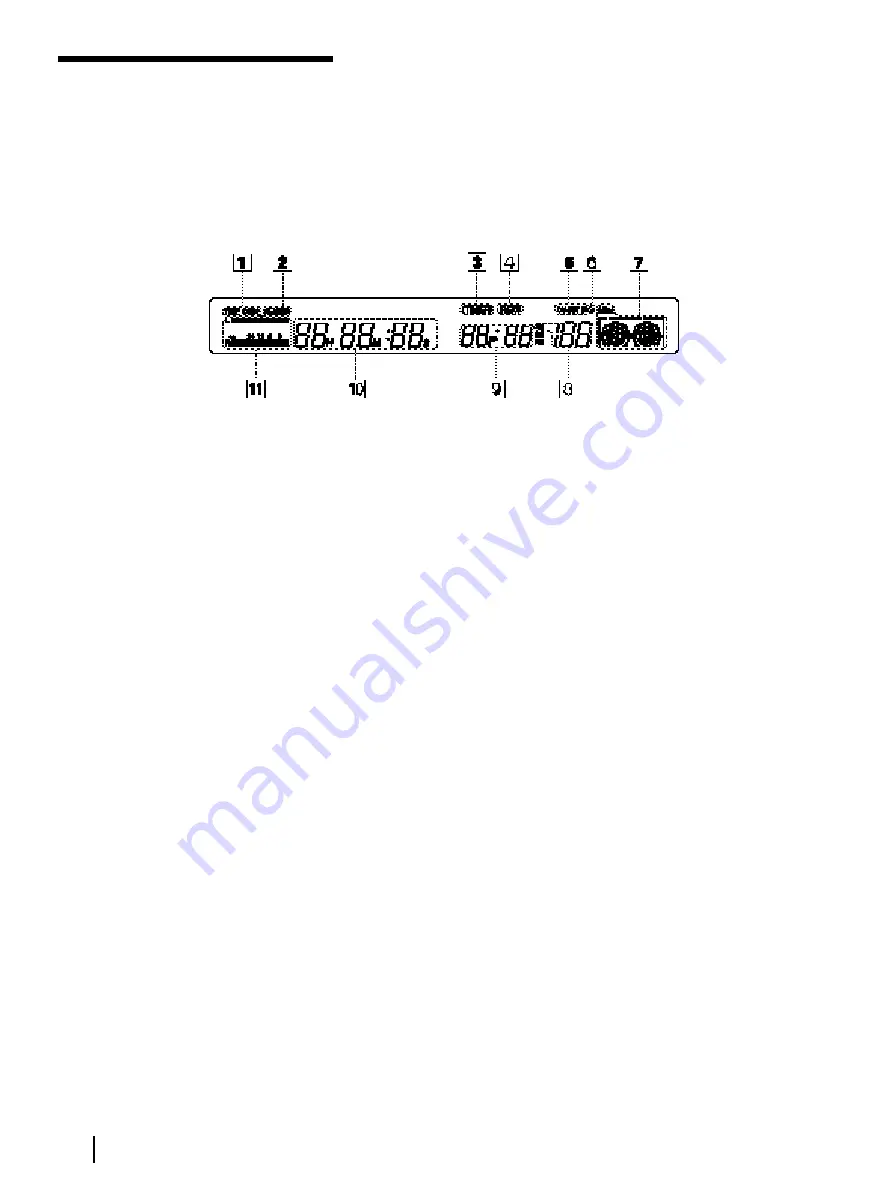
Display window

7

  Cassette indicator

8

Channel indicator (39)

9

Current time/Quick timer/Frame indicator (39, 45,
48, 62)

0

Tape counter (45, 62)

Peak level meter (86)

1

TIME CODE indicator (45, 62)

2

REMAIN (remaining time) indicator (45)

3

TIMER indicator (40, 42)

4

  REC (recording) indicator

5

DV OUT/IN indicator

6

S video input indicator (64, 77)

Index to parts and controls

(continued)

Summary of Contents for DHR-1000

Page 1: ...3 800 999 13 1 1997 by Sony Corporation DHR 1000 Digital Video Cassette Recorder Operating Instructions ...

Page 2: ...f the following measures Reorient or relocate the receiving antenna Increase the separation between the equipment and receiver Connect the equipment into an outlet on a circuit different from that to which the receiver is connected Consult the dealer or an experienced radio TV technician for help You are cautioned that any changes or modifications not expressly approved in this manual could void y...

Page 3: ...51 Checking changing cancelling timer settings 53 Adjusting the picture Y C delay 54 Changing menu options 57 Erasing the cassette memory Editing 58 Before editing Editing with LANC cable 64 Connections 67 Copying a tape 68 Cutting out unwanted scenes 70 Assemble editing 73 Video insert editing 75 Audio insert editing Editing without LANC cable 77 Connections 79 Copying a tape 80 Cutting out unwan...

Page 4: ... and played back at 12 bit quantization and 32kHz sampling frequency This mode provides two stereo sound tracks Clear Frame Technology that enables clear still pictures Conventional VCRs normally display still pictures by skipping every other scanning line This VCR substitutes data for the missing lines and displays the still picture in more detail Advanced editing features DV With digital to digi...

Page 5: ...he recording date and time are recorded onto the tape Information such as the shutter speed program AE mode white balance iris and gain are also recorded with a Sony digital camcorder You can call up this information on the TV screen Cassette memory search When you record programs on a tape with cassette memory the programs are displayed as a list Choose a program from the list and the VCR will lo...

Page 6: ...e tape are stored in the cassette memory so that you can quickly search for the program later on DV tapes with cassette memory are marked with the mark indicates that 4 kbits of data can be stored on that cassette This VCR can retrieve up to 16 kbits of data Notes You cannot play back a DV tape recorded in other color systems on this VCR and are trademarks To save a recording To prevent accidental...

Page 7: ...ecord a program that is encoded with copyright protection signals the VCR will continue recording but the video and audio signals will not be recorded on tape On playback When you play back software having copyright protection signals on this VCR you may not be able to copy it onto other equipment Video sector Video signals recording data etc Sub code sector Index signals time codes etc 10 tracks ...

Page 8: ... Remote commander Size AA R6 batteries Audio video cable 3 phono to 3 phono Cable Mouse cable box controller 75 ohm coaxial cable with F type connectors AC power cord Control S cable LANC cable S Video cable Cleaning Cassette Getting Started Step 1 Unpacking ...

Page 9: ...ntrol the VCR with the commander set COMMAND MODE on the remote commander to the same position as that on the VCR Usually set to VCR 4 If the other VCR does not have a COMMAND MODE switch use the following setting VTR 1 For Sony Betamax format VCRs VTR 2 For Sony 8mm format VCRs VTR 3 For Sony VHS format VCRs VTR 4 For Sony DV format VCRs VTR 5 and 6 reserve Using the remote commander You can use ...

Page 10: ...onado 03 Curis Mathes 12 Daytron 12 Emerson 03 04 14 Fisher 11 General Electric 06 10 Goldstar 03 04 17 Hitachi 02 03 J C Penney 04 12 JVC 09 KMC 03 KTY 03 04 Magnavox 03 08 12 Marantz 04 13 MGA Mitsubishi 04 12 13 NEC 04 12 Manufacturer Code number Panasonic 06 19 Philco 03 04 Philips 08 Pioneer 16 Portland 03 Quasar 06 Radio Shack 05 14 RCA 04 10 Sampo 12 Samsung 03 12 Sanyo 11 Scott 12 Sears 07...

Page 11: ...ion Selecting the best hookup option There are many ways in which your VCR can be hooked up To hook up your VCR so that it works best for you first scan through the table below Then use the accompanying diagrams and procedures on the following pages to set up your VCR If you have TV that has audio video inputs Cable box that is compatible with the VCR s cable box control feature No cable box or in...

Page 12: ... hookups If you re planning to use your VCR only to play back pictures and movies you re finished setting up the VCR after you ve made these connections If you want to record off air or off your cable TV system complete these connections first and then go to the following pages for antenna or cable hookups A Use this hookup if your TV has stereo jacks B Use this hookup if your TV doesn t have ster...

Page 13: ...e A V inputs for your VCR when you play back or operate menu on the VCR A V hookup VCR setup After you ve connected your TV and completed antenna or cable hookup use the following procedure to set up the VCR Press MENU and select ADVANCED OPTIONS Set AUTO ANT SEL to OFF and press EXECUTE For details see page 54 Audio video cable supplied VCR TV Stereo receiver Control S cable supplied Audio cable ...

Page 14: ... do with this hookup Record any channel using the VCR s cable box control feature to select channels on the cable box What you can t do with this hookup Record with the cable box turned off Record one channel while watching another channel Using cable box control VCR Cable Mouse Rear of TV Match the type of connector on your TV A B or C or or UHF VHF Positioning the Cable Mouse Place the Cable Mou...

Page 15: ...CR Plus Channel Listing see page 36 2 If the channels in the program guide are different from the channels that you actually use on your TV set the channels that are different as follows Automatic clock setting Once you ve set up the VCR it automatically sets the clock the first time you turn off the VCR After that whenever you turn off the VCR it checks the time and adjusts the clock even for Day...

Page 16: ...his hookup Record any unscrambled channel by selecting the channel on the VCR What you can t do with this hookup Record scrambled channels that require a cable box Hookup 2 No cable box or Incompatible cable box with only a few scrambled channels VCR Rear of TV UHF UHF VHF Match the type of connector on your TV A B or C VHF or or VHF UHF C A B For connector types B and C no UHF connection is requi...

Page 17: ... program guide are different from the channels that you actually use on your TV set the channels that are different as follows Automatic clock setting Once you ve set up the VCR it automatically sets the clock the first time you turn off the VCR After that whenever you turn off the VCR it checks the time and adjusts the clock even for Daylight Saving Time The VCR sets the clock by picking up a tim...

Page 18: ...ot connect your antenna cable to the VCR directly If your antenna cable is a flat cable 300 ohm twin lead cable attach an external antenna connector not supplied so that you can connect the cable to the VHF UHF IN connector If you have separate cables for VHF and UHF antennas you may use a U V band mixer not supplied For details see page 92 VCR VHF UHF B A C UHF VHF or or VHF UHF Rear of TV Match ...

Page 19: ... feature leave the cable box on Depending on your area the automatic clock setting feature may not set the clock correctly In this case set the clock manually according to the procedure on page 29 Hookup 3 VCR setup 1 Set the RF UNIT switch to CH 3 or CH 4 whichever channel is not used in your area If both are used set the switch to either channel If you made A V connections from page 12 you can s...

Page 20: ... or most channels What you can do with this hookup Record any channel by selecting the channel on the cable box What you can t do with this hookup Record with the cable box turned off Record one channel while watching another channel Record by selecting channels directly with the VCR Cable box VHF UHF Rear of TV A B C Match the type of connector on your TV A B or C or or UHF UHF VHF VHF For connec...

Page 21: ...e To use the automatic clock setting feature leave the cable box on Depending on your area the automatic clock setting feature may not set the clock correctly In this case set the clock manually according to the procedure on page 29 Hookup 4 VCR setup 1 Set the RF UNIT switch to CH 3 or CH 4 whichever channel is not used in your area If both are used set the switch to either channel If you made A ...

Page 22: ...gram guides that are sorted by program categories What you can do with this hookup Record any channel using the VCR s cable box control feature to select channels on the DSS receiver What you can t do with this hookup Record any channel from cable or an antenna To record channels from cable or an antenna turn off the cable box control feature Use a cable box Record programs with VCR Plus DSS Digit...

Page 23: ... this case set the clock manually according to the procedure on page 29 You are now ready to use your VCR Procedures differ slightly depending on the hookup used Make a note of which hookup you used Hookup 5 so that you can always follow the correct instructions Notes To successfully record a program from the DSS receiver proceed as follows Leave the DSS receiver on all the time Turn off the displ...

Page 24: ... set to A Record any scrambled channel by selecting the channel on the cable box the A B switch is set to B What you can t do with this hookup Record one scrambled channel while watching another channel Incompatible cable box with only a few scrambled channels using an A B switch Hookup 6 Cable box VHF UHF UHF or or VHF UHF VHF Rear of TV A B C B A A B switch VCR Splitter Match the type of connect...

Page 25: ... can skip this step 2 Set the A B switch to A 3 Press EASY SET UP on the VCR The SET UP menu appears 1 The CLOCK SET menu appears Select AUTO and press EXECUTE For details see page 27 Normal display 4 The AUTO PRESET starts For details see page 30 3 The TUNER PRESET menu appears Set ANTENNA CABLE to CABLE and press EXECUTE For details see page 30 2 The CABLE BOX menu appears Set CABLE BOX CONTROL ...

Page 26: ...tch to B 2 Select channels on the cable box for details on the cable box see page 33 To watch TV 1 Turn off your VCR or press the VCR s TV VTR button until the VTR indicator in the display window goes off 2 Set the A B switch to B 3 Turn on your cable box 4 Set the TV to the cable box output channel usually 2 3 or 4 5 Set the cable box to the channel you want to watch Hookup 6 continued ...

Page 27: ...UTO then press EXECUTE 4 To activate the Auto Clock Set function turn the VCR off The VCR automatically sets the clock The VCR automatically searches for a channel that carries a time signal and sets your time zone and daylight saving time if applicable If your clock is set but displays the wrong time zone or daylight saving time you can adjust these settings without turning off the Auto Clock Set...

Page 28: ...D DAYLIGHT SAVING TIME menu appears 5 Press the CURSOR buttons to select AUTO or MANUAL If you select AUTO The VCR automatically sets your time zone and daylight saving time if applicable If you select MANUAL 1 Press EXECUTE then set the time zone of your area using the CURSOR buttons 2 Press EXECUTE then select STANDARD TIME or DAYLIGHT SAVING TIME using the CURSOR buttons 6 Press EXECUTE 7 To ac...

Page 29: ...e month using the CURSOR buttons 5 Press CURSOR to highlight the day and set the day using the CURSOR buttons The day of the week is set automatically 6 Press CURSOR to highlight the year and set the year using the CURSOR buttons 7 Press CURSOR to highlight the hour and set the hour using the CURSOR buttons 8 Press CURSOR to highlight the minutes and set the minutes using the CURSOR buttons 9 Pres...

Page 30: ...n the VCR s display window Presetting all receivable channels automatically 1 Press MENU then press the CURSOR buttons to move the cursor to TUNER PRESET and press EXECUTE When using the EASY SET UP procedure skip this step 2 Press the CURSOR buttons to move the cursor to ANTENNA CABLE 3 Select ANT or CABLE using the CURSOR buttons To preset cable TV channels select CABLE To preset VHF and UHF cha...

Page 31: ...et or delete To preset a channel enter the channel number by pressing the number buttons then ENTER To delete a channel select the channel number by pressing CH 3 Set MANUAL SET to ADD or ERASE using the CURSOR buttons To preset a channel select ADD To delete a channel select ERASE 4 Repeat steps 2 and 3 to preset or delete channels as required then press EXECUTE CH Number buttons ENTER MENU EXECU...

Page 32: ...nstructions follow steps 1 and 2 in Presetting all receivable channels automatically on page 30 2 Select the channel you want to fine tune by pressing the number buttons and then ENTER 3 Press the CURSOR buttons to move the cursor to FINE TUNING The fine tuning meter appears 4 Press the CURSOR buttons to get a clearer picture then press EXECUTE Note that the AFT setting switches to OFF Presetting ...

Page 33: ...uced that cannot be controlled with this VCR s Cable Mouse If you have a cable box that is incompatible with this VCR contact your cable operator they may be able to provide you with a compatible cable box Before you start Turn on your TV and set it to the video channel Turn on your cable box DSS receiver Press POWER to turn on the VCR 1 Press MENU then press the CURSOR buttons to move the cursor ...

Page 34: ...ode number is listed try entering them one by one until you come to the correct code for your equipment Setting up cable box control continued DSS receiver brand Sony RCA Cable box brand ABC Antronix Archer BBT Cable Star Cabletenna Cable time Century Citizen Clyde Cablevision Color Voice Comband Comtronics Decsat Diamond Eagle Comtronics Eastern Electricord Electus Filmnet Focus Garrard GC Electr...

Page 35: ...he answer to both 1 and 2 is yes you have made the correct setting If you cannot get your VCR to control the cable box DSS receiver Check that the Cable Mouse is connected to the CABLE BOX CONTROL jack on the VCR Check the position of the Cable Mouse Place the cable box DSS receiver and VCR away from each other Do not place the cable box DSS receiver on top of the VCR Try the setup again making su...

Page 36: ...ves coordinating the TV channel number the number you turn to on your TV or VCR to watch a program with the guide channel the number that s assigned to that channel in your program guide To get the guide channel numbers find the Channel Line up Chart in the program guide for your area that features VCR PlusCodes It usually looks like the example to the left For each channel your VCR receives use t...

Page 37: ...our TV and VCR and press ENTER If you made Hookup 4 enter the cable output channel usually 2 3 or 4 and press ENTER If you made Hookup 5 enter the actual number on your TV and VCR for an unscrambled channel and press ENTER For a scrambled channel enter the cable box output channel usually 2 3 or 4 and press ENTER 4 Repeat steps 3 and 4 for each channel whose numbers don t match 5 When you have set...

Page 38: ...CR turns on To insert a Mini DV cassette place it in the center of the tray 4 Press PLAY to start playing When the tape reaches the end it automatically rewinds to the beginning The power remains on Additional tasks To Stop play Pause play Resume play after pause Search forward Search backward Fast forward the tape Rewind the tape View the picture during fast Eject the tape Basic Operations Playin...

Page 39: ...ing To stop recording Press p STOP Watching a TV program while recording another You can watch a TV program and record another at the same time If the TV is connected to the VCR using the audio video cable set the TV to TV input If the TV is connected to the VCR using only the antenna cable press TV VTR to turn off the VTR indicator on the front panel then select the desired channel on the TV Reco...

Page 40: ...AILY or WEEKLY To record Press Only once ONCE Everyday Monday to Friday DAILY Once a week WEEKLY The date start and stop times and channel number appear on the screen Check that the information is correct If it is not press TIMER CLEAR to cancel 4 To preset another timer setting repeat steps 1 to 4 5 Press POWER to turn off the VCR TIMER appears in the display window and the VCR stands by for reco...

Page 41: ...he counter Display the tape counter on the TV screen with the DISPLAY button Check the timer settings Watch another TV program Tip To cancel the procedure press VCR Plus before pressing ONCE DAILY or WEEKLY Notes If the VCR beeps repeatedly this means that The PlusCode is incorrect ONCE DAILY or WEEKLY was selected incorrectly You cannot select DAILY or WEEKLY for a program that airs more than sev...

Page 42: ...d channel 1 Press CURSOR to highlight each item in turn 2 Press CURSOR to set each item To correct a setting press CURSOR to return to that setting and reset To record a source connected to one of the inputs select L1 or L2 in the CH position 3 Press CURSOR to confirm the setting The cursor appears in the leftmost column To preset another timer setting move the cursor to the next line and repeat s...

Page 43: ...rent date SUN SAT MON SAT MON FRI EVERY SAT EVERY MON EVERY SUN 1 month later dates count down the current date SUN SAT from Sunday to Saturday MON SAT from Monday to Saturday MON FRI from Monday to Friday EVERY SAT every Saturday EVERY MON every Monday EVERY SUN every Sunday Tips To set the channel for timer recording you can also use CH or the number buttons To change or correct a setting before...

Page 44: ...g buttons on the remote commander Playback options Play at twice the normal speed Viewing in a high speed picture Play in slow motion Play frame by frame To resume normal playback Press PLAY Using shuttle ring Playback options Play at various speeds Fast forward rewind To resume normal playback Press PLAY Using jog dial During playback or pause turn the jog dial to play the picture at a speed slow...

Page 45: ...to find later press COUNTER RESET on the operation panel to reset the counter to 0H00M00S Search for the point afterwards by referring to the counter Displaying tape information Data display off Recording data and time Sony camcorder settings Shutter speed AE mode White balance Gain When the tape was recorded on this VCR appears instead DISPLAY DATA CODE COUNTER RESET COUNTER SELECT Tip The displa...

Page 46: ...n corresponding to the desired audio tracks with AUDIO MONITOR selector on the control panel To listen to stereo 1 track set to STEREO 1 To listen to stereo 2 track set to STEREO 2 To listen to both stereo 1 and stereo 2 tracks set to MIX You can adjust the audio balance between the stereo 1 track and stereo 2 track by using the AUDIO MIX BALANCE control when you select MIX Selecting the sound AUD...

Page 47: ...e bilingual sound while recording Press AUDIO MONITOR to select the sound you want This operation does not effect to the recording Selecting the sound during playback Press AUDIO MONITOR to select the sound you want Indicator MAIN L and SUB R or STEREO MAIN L SUB R Recording stereo and bilingual programs AUDIO MONITOR Tips When a stereo program is received the STEREO indicator lights up When a bil...

Page 48: ... stops recording and turns off automatically To extend the duration Press QUICK TIMER repeatedly to set the new duration To stop recording To stop the VCR while recording press p STOP Recording TV programs using the quick timer Remaining recording time QUICK TIMER Tip You can also set the quick timer and start recording when the VCR is in stop mode Recording starts when you press QUICK TIMER more ...

Page 49: ...ars on the monitor screen 2 Press or to select a recording The VCR starts searching and when it locates the recording begins playback During Photo search the VCR pauses Searching in the order of the actual positions of the recordings on the tape When you use a tape without a cassette memory the VCR searches in the order of the actual positions of the recordings regardless of the setting of CASSETT...

Page 50: ...remote commander If you use a tape with mark the cassette memory stores up to 33 index signals The number changes depending on the combination of index date and photo data stored This VCR is capable of storing and retrieving up to 16 kbits of cassette memory To locate recordings whose signals are not stored in the cassette memory or to locate recordings in order of their position on the tape set C...

Page 51: ...e setting you want to change or cancel 4 Change or cancel the timer setting To change the setting press the CURSOR buttons to highlight the item you want to change and reset it using the CURSOR buttons Then press CURSOR to move the cursor to the leftmost column To cancel the setting press the TIMER CLEAR button on the rear of the remote commander 5 Press EXECUTE If any settings remain turn off the...

Page 52: ... settings overlap When the timer settings are overlapped overlapped programs or part painted as below are not recorded 7 00 Program 1 Program 2 20 seconds will be cut off Program 2 Program 1 Program 2 Program 1 20 seconds will be cut off 7 00 7 00 8 00 8 00 8 00 9 00 9 00 9 00 10 00 10 00 10 00 ...

Page 53: ... from the DV connector 1 During playback or pause or when the DV input is displayed press MENU 2 Press the CURSOR buttons to move the cursor to Y C DELAY then press EXECUTE 3 Press the CURSOR buttons to correct the color shift of the picture 4 Press EXECUTE to return to the original screen MENU EXECUTE CURSOR Tips The video signals are composed of Y luminance and C chrominance signals The Y C dela...

Page 54: ... on the TV screen 3 Press the CURSOR buttons to move the cursor to the option you want to change If you press at the lowest line the next page appears 4 Press CURSOR to change the setting 5 Press EXECUTE to return to the original screen Changing menu options CURSOR MENU EXECUTE Tips The menu settings are held until the AC plug is disconnected Page 1 Page 2 ...

Page 55: ...sound becomes monaural r M to control another VCR from this VCR using the l LANC connection S to control this VCR from another equipment using the l LANC connection A to control via the l LANC connection a VCR that doesn t have a reverse slow motion function r B to control via the l LANC connection VCR that has a reverse slow motion function ON to listen to the sound when playing the tape frame by...

Page 56: ...2 to record the audio in 12 bit recording mode AUTO to record SAP sound r OFF to record the main sound r S to select the S video signal when both the S video and video jacks are connected The video signal is selected automatically when only the video jack is connected NORM to select the video signal when both the S video and video jacks are connected When you use the S video picture make sure to s...

Page 57: ...OR buttons to select the data to erase then press CURSOR to set it to YES Select To erase ALL DATA The entire memory INDEX DATA Signals for INDEX SEARCH DATE DATA Signals for DATE SEARCH PHOTO DATA Signals for PHOTO SEARCH 4 Press EXECUTE A message appears to confirm the operation 5 Press EXECUTE The data you selected is erased then the VCR returns to the original screen Notes You cannot erase the...

Page 58: ...s You can cut out unwanted scenes or assemble your favorite scenes in the order you prefer To edit tapes you need to connect another VCR or camcorder Copying a whole tape You can copy the contents of one tape to another Cutting out unwanted scenes While making a copy of a tape you can cut out unwanted scenes Assemble editing You can select various scenes from a source tape and record them in any o...

Page 59: ...d on another VCR including other DHR 1000s copy the tape on this VCR and use the copied tape Tips By executing video insert and audio insert editing at the same time you can replace both the video and the audio at the same time With this VCR you can execute V O S video on sound editing where you can record audio first then insert video to match the previously recorded audio Source tape Edited tape...

Page 60: ...in 12 bit audio mode The sound is recorded on the stereo 2 track Before editing continued Note Use a source tape recorded on this VCR for insert editing Otherwise editing may result in poor sound and picture If the source tape was recorded on another VCR including other DHR 1000s copy the tape on this VCR and use the copied tape ...

Page 61: ... audio mode as the source tape When recording from the LINE IN connectors you can select the audio mode by setting LINE IN AUDIO in the ADVANCED OPTIONS menu on page 54 When recording TV programs using the tuner of this VCR the sound is recorded in 16 bit mode Tip The DCR VX1000 VX700 PC7 digital video camera recorders record the sound in 12 bit audio mode Stereo 1 16 bit mode The 16 bit mode uses...

Page 62: ...M On the VCR to be controlled from the other VCR or editing machine set LANC mode to S In a case of a commander that does not have a LANC mode switch or a LANC mode menu LANC mode is usually set to S Time code Time codes are signals recorded on the tape so that you can precisely specify a point on the tape This signal is recorded on the tape for every frame about 30 frames per second On this VCR t...

Page 63: ...ng When connecting the lLANC jack set LANC MODE in the ADVANCED OPTIONS menu to S page 54 If the other VCR has the time code function press DISPLAY on this VCR so that the time code counter appears in the display window If you play back an audio dubbed tape and connect the other VCR to this VCR s LINE OUT jacks set the AUDIO MONITOR selector on the VCR to MIX Then select the precise balance betwee...

Page 64: ...CR Camcorder This VCR TV This VCR Another VCR TV Recorder Player Notes If you connect both LINE IN and LINE OUT jacks of this VCR to the other VCR select the input correctly to prevent a humming noise If you connect the cables to both the LINE 1 IN VIDEO and LINE 1 IN S VIDEO jacks the signal from the S VIDEO jack is sent to the VCR and S lights in the display window If you want to use the video s...

Page 65: ...onaural VCR use LINE 2 IN jack and connect to the L jack white leave the red audio plug unconnected The monaural audio from the L jack will be recorded on both left and right tracks Notes If you connect the cables to both the LINE 2 IN VIDEO and LINE 2 IN S VIDEO jacks the signal from the S VIDEO jack is sent to the VCR and S lights in the display window If you want to use the video signal from th...

Page 66: ...djust the controls so that the red indicators of the level meter do not light up Select the balance according to your need normally set it to the center Controlling the other VCR with LANC connection With the LANC connection you can control the other VCR by using the operation panel of this VCR synchronized editing feature Notes The VCR recorder receives the time code data from the LANC jack only ...

Page 67: ...s on pages 64 to 66 1 Press DUPLICATE ENTIRE TAPE The indicator lights up To cancel copying press DUPLICATE ENTIRE TAPE again 2 Press START PAUSE Both tapes are rewound to the beginning The source tape starts playing and a few seconds later this VCR starts recording When either tape reaches its end both tapes stop To stop copying To stop while copying press p STOP Editing with LANC cable Copying a...

Page 68: ...STANDBY indicator lights This VCR is set to recording pause and the other VCR is set to playback pause 3 Press START PAUSE Playback starts on the other VCR and recording starts on this VCR 4 Press START PAUSE just before the beginning of the unwanted scene A Both VCRs are set to pause If the tape passes the desired point Press RECORDER and rewind the tape to point A with the shuttle ring or jog di...

Page 69: ...ing the source picture may be recorded after it stops This procedure is not possible if you connect this VCR to the DCR VX1000 VX700 PC7 digital video camera via the DV cable and you use this VCR as the playback machine If you record on the beginning part of the tape or on the part just after an unrecorded portion the first part of the recording may be dropped When you record on a new or fully rew...

Page 70: ... editing procedure is the same as when editing with the Edit Window Note Horizontal lines may appear in the top left or right screen However this will not affect the edited picture Picture of the other VCR MARK PLAY PLAYER P PAUSE RECORDER Shuttle ring Jog dial Indicates for the status of the other VCR If you press RECORDER to select this VCR the picture of this VCR is displayed on the right and t...

Page 71: ... execute assemble editing Do not select an other input while assemble editing is being executed Editing may not function correctly This VCR may malfunction if the IN OUT points are not separated by more than two seconds If an event you want to record is marked with a time code of less than 0 01 00 00 the event will be edited inaccurately In this case use the manual editing procedure If the time co...

Page 72: ...peat steps 2 to 7 To stop assemble editing To stop while editing press START PAUSE This VCR is set to recording pause and you can check the events or change the recording starting point When you press START PAUSE again editing restarts from the first event To end assemble editing Press ASSEMBLE All the IN OUT points are erased Editing with LANC cable Assemble editing continued Note The recording d...

Page 73: ...er appears 2 Locate the end point A of the scene to be recorded over 1 Press RECORDER 2 Press PLAY then locate the recording end point with the jog dial or shuttle ring 3 Press COUNTER RESET Editing with LANC cable Video insert editing continued Notes Do not change the counter display during insert editing Editing may not function accurately Insert editing cannot be made on a blank portion of the ...

Page 74: ... The other VCR starts playback and this VCR starts recording When the tape counter reached 0H00M00S the EDIT STANDBY indicator turns off and this VCR stops while the other VCR continues playing To stop the other VCR press PLAYER then p STOP To stop recording manually press START PAUSE Editing with LANC cable Video insert editing continued Tips To execute V O S video on sound editing 1 Record the a...

Page 75: ...r stereo 2 track only When you record from LINE inputs To record in 16 bit audio press both STEREO 1 INSERT and STEREO 2 INSERT To record in 12 bit audio on the stereo 1 track press STEREO 1 INSERT To record in 12 bit audio on the stereo 2 track press STEREO 2 INSERT For more information refer to the chart on the next page A few seconds after you press the button the sound switches to the source t...

Page 76: ...STEREO 2 INSERT buttons When you record from LINE inputs The sound is recorded in the audio mode selected in LINE IN AUDIO in the ADVANCED OPTIONS menu Normally choose the original audio mode of the tape to be edited Select the track to be replaced according to the audio recording mode Original audio Menu Pressed Editing result mode of the choice button s edited tape 12 bit 12 bit STEREO 1 STEREO ...

Page 77: ...f you connect both LINE IN and LINE OUT jacks of this VCR to the other VCR select the input correctly to prevent a humming noise If you connect the cables to both the LINE 1 IN VIDEO and LINE 1 IN S VIDEO jacks the signal from the S VIDEO jack is sent to the VCR and S lights in the display window If you want to use the video signal from the VIDEO jack set L1 IN VIDEO in the ADVANCED OPTIONS menu t...

Page 78: ...h editing set EDIT switch to OFF Notes The REC LEVEL and REC BALANCE controls do not function on a source input through the DV jack With the DV connection the playback VCR s AUDIO MONITOR and AUDIO MIX BALANCE do not function on the source audio output through the DV jack Tip To connect a monaural VCR use LINE 2 IN jack and connect to the L jack white leave the red audio plug unconnected The monau...

Page 79: ...et to recording pause 3 Search for the point to start playback on the other VCR and set it to playback pause For best results pause the tape a few seconds before the beginning of the scene 4 Press the pause button on the other VCR to start playback At the beginning of the scene you want to record press P PAUSE on this VCR to start recording To stop copying Press p STOP on this VCR and the other VC...

Page 80: ...r the point to start playback on the other VCR and set it to playback pause For best results pause the tape a few seconds before the beginning of the scene 4 Press the pause button on the other VCR to start playback At the beginning of the scene you want to record press P PAUSE on this VCR to start recording Source tape Edited tape Unwanted scene A B Editing without LANC cable Cutting out unwanted...

Page 81: ...scenes repeat steps 5 to 7 To finish editing Press p STOP on both VCRs Notes If you press p STOP to stop editing the source picture may be recorded after it stops If you record on the beginning part of the tape or on the part just after an unrecorded portion the first part of the recording may be dropped When you record on a new or fully rewound tape do a trial recording for about 15 seconds then ...

Page 82: ...ver 1 Press PLAY then locate the recording end point with the jog dial or shuttle ring 2 Press COUNTER RESET 3 Locate the start point B of the scene to be recorded over Locate the beginning of the scene to be recorded over with the jog dial or shuttle ring 4 Press VIDEO INSERT The indicator lights up Editing without LANC cable Video insert editing Notes Do not change the counter display during ins...

Page 83: ...this VCR to start recording Video insert editing starts When the tape counter reaches 0H00M00S recording stops automatically 7 Press p STOP on the other VCR Tips To execute V O S video on sound editing 1 Record the audio 2 Follow the insert editing procedure to record the video You can insert audio with the video by pressing the STEREO 1 INSERT or and STEREO 2 INSERT button s in step 4 If you do n...

Page 84: ...ude other DHR 1000s first you have to dub it to the tape on this VCR then edit it If you edit the tape recorded by the other VCRs the sound quality may be reduced and the picture may be noisy 1 Press COUNTER SELECT so that the tape counter appears 2 Locate the end point of the scene to be recorded over 1 Press PLAY then locate the recording end point with the jog dial or shuttle ring 2 Press COUNT...

Page 85: ...NE inputs The sound is recorded in the audio mode selected in LINE IN AUDIO in the ADVANCED OPTIONS menu Normally choose the original audio mode of the tape to be edited Select the track to be replaced according to the audio recording mode Original audio Menu Pressed Editing result mode of the choice button s edited tape 12 bit 12 bit STEREO 1 STEREO 2 STEREO 1 and STEREO 2 16 bit STEREO 1 and STE...

Page 86: ...he MENU screen appears on the TV screen 2 Select ADVANCED OPTIONS by pressing the CURSOR buttons and press EXECUTE 3 Select LINE IN AUDIO by pressing the CURSOR buttons 4 Select 12 by pressing CURSOR buttons Adjust the recording level and balance with the REC LEVEL and REC BALANCE controls While playing the source or speaking into the microphone adjust the controls so that the red indicators of th...

Page 87: ...tomatically 6 Stop playback of the audio equipment Tips If you do not want to stop insert editing when the counter comes to 0H00M00S change the counter display to the time code For fade in operation turn the REC LEVEL control clockwise from the zero point For fade out operation turn the REC LEVEL control counterclockwise to the zero point Notes Do not change the counter display during insert editi...

Page 88: ...h stereo 1 and stereo 2 tracks set to MIX When you select MIX you can adjust the audio balance between the stereo 1 and stereo 2 tracks with the AUDIO MIX BALANCE control The PCM MODE indicators light according to the contents of the tape Lights while playing back a tape recorded in 12 bit mode Lights when stereo 2 track is recorded in 12 bit mode Lights when stereo 1 track is recorded in 12 bit m...

Page 89: ...s Connecting a titler Notes You cannot make the DV connection when using the titler To use a digital SEG connect it with the LINE jacks You cannot make the DV connection Titler continued Another VCR To LINE output Audio video cable TV This VCR Audio video cable S video cable To LANC jack When the other VCR has a LANC jack ç Signal flow ...

Page 90: ...troller and this VCR is set up as the recording machine without the DV connection occasionally editing may start about one second later than the IN point In this case try changing the player search mode FF REW or CUE REV on the editing controller Connections differ depending on the controller model Refer to the manual of the connected equipment To use a controller equipped with a titler function y...

Page 91: ...not have an S VIDEO input jack connect to the video input jack on your video printer with a video cable If your video printer has a LANC jack connect the LANC jacks on your VCR and video printer with the LANC cable and set LANC MODE in the ADVANCED OPTIONS menu on your VCR to S You can print out with the PRINT button on the remote commander of this VCR For further instructions refer to the manual ...

Page 92: ...made the correct setting Whenever you use the VCR set the TV to the channel selected in step 1 Attaching the external antenna connector When using a 300 ohm twin lead cable for VHF UHF antenna use the EAC 32 antenna connector not supplied to connect the antenna to the VCR 1 Loosen the screws on the antenna connector 2 Wind the twin leads around the screws on the antenna connector 3 Retighten the s...

Page 93: ...often used for the surface finishing of the recorder Do not spray a volatile solvent such as an insecticide toward the cabinet or place rubber or vinyl products on the cabinet for a long time If you do the finish of the cabinet may be damaged or the coating may come off Do not clean the cabinet with thinner or benzine The cabinet may be damaged or its coating may come off When you use a chemical i...

Page 94: ...r you have cleaned the video heads with the cleaning cassette the video heads may have worn out In that case you have to replace the video heads with new ones Please consult your Sony dealer Notes on the video cassettes Usable cassettes We recommend to use the Standard DV Mini DV cassettes to get the most out of high reliability of DV format Cleaning the terminal If the terminal of the DV or Mini ...

Page 95: ...door location The unit is brought from the air conditioned indoors to the hot outdoors The unit is used in a place subject to cold currents from an air conditioner When bringing the unit from a cold place to a warm place or vice versa put it in a plastic bag and seal the bag tightly After bringing it into the new place leave the bag on for about an hour and remove the bag when the air temperature ...

Page 96: ...s defective Use a new tape Use Sony brand DV tapes Press INPUT SELECT to select the correct input If you connect cables to both audio video jacks and S VIDEO jack of LINE 1 IN LINE 2 IN signals from the S VIDEO jack take priority S lights in the display window To select signals from the LINE 1 IN video jack set L1 IN VIDEO in the ADVANCED OPTIONS menu to NORM To select signals from the LINE 2 IN j...

Page 97: ... clock stops if the power to the VCR is interrupted for more than 30 minutes Reset the clock and timer Make sure the cable box or and DSS receiver is are turned on Replace the Cable mouse Make sure the connections between VCRs are firm Select the correct input with the INPUT SELECT or CH button s Check that the protect tab is set to the recording enable position You cannot copy any software having...

Page 98: ...tors of this VCR and other Sony video equipment are set to the same number Change the setting of the COMMAND MODE selector on this VCR Check that a tape isn t already in the tape compartment Moisture condensation has occurred With the power left on leave the VCR to dry for one to two hours The counter display stops when an unrecorded portion is displayed The counter display may stop when you fast ...

Page 99: ...ore than 500 lines Audio Quantization word length 16 bit linear or 12 bit non linear Sampling frequency 32 kHz 12 bit recording mode 48 kHz 16 bit recording mode 44 1 kHz 16 bit playback only 32 kHz 16 bit playback only Tuner section Tuning system PLL synthesizer system Audio tuning system Inter carrier system Channel coverage VHF 2 to 13 UHF 14 to 69 CATV A 8 to A 1 A to W W 1 to W 84 Antenna 75 ...

Page 100: ...k plug in power 1 CONTROL S IN Mini jack 1 DV IN OUT DV type 4 pin jack 1 LINE IN 1 and 2 VIDEO IN pin jack 1 each Input signal 1 Vp p 75 ohms unbalanced sync negative AUDIO IN pin jack 2 each Input level 2 Vrms full bits Input impedance more than 47 kohms S VIDEO IN Mini DIN 4 pin connector 1 each Y luminance signal 1 Vp p 75 ohms unbalanced sync negative C colour signal 0 286 Vp p 75 ohms unbala...

Page 101: ... S VIDEO jack 65 78 4 DV IN OUT jack 64 77 A 1 MIC microphone jack 86 2 PHONES jack 3 CL button 92 4 PHONE LEVEL control 1 16BIT 12BIT indicator 61 2 Cassette panel 38 3 6 EJECT button 38 4 See section A below 5 OPERATION PANEL OPEN CLOSE button 102 6 Audio indicators 7 Display window 104 8 VTR indicator 39 9 See section B below 0 Remote sensor Power switch continued ...

Page 102: ...QUICK TIMER button 48 See section E on the next page COMMAND MODE switch 1 Menu buttons MENU CURSOR and EXECUTE buttons 27 54 2 See section C on the next page 3 PCM MODE indicators 88 4 See section D on the next page 5 MARK button 70 6 play button 66 7 p stop button 66 8 P pause button 66 9 PLAYER button 66 º RECORDER button 66 Shuttle ring 66 Jog dial 66 Index to parts and controls continued ...

Page 103: ...UNTER RESET button 45 73 5 COUNTER SELECT button 45 73 6 index search previous next buttons 49 7 SEARCH SELECT button and indicators 49 8 DISPLAY button 45 9 INPUT SELECT button 65 78 D 1 VIDEO INSERT button 74 82 2 STEREO 1 INSERT button 75 84 3 STEREO 2 INSERT AUDIO DUB button 75 84 87 4 ASSEMBLE button 71 5 EVENT BACK FWD buttons 71 6 START PAUSE button 67 7 EDIT STANDBY button 68 8 DUPLICATE E...

Page 104: ...nt time Quick timer Frame indicator 39 45 48 62 0 Tape counter 45 62 Peak level meter 86 1 TIME CODE indicator 45 62 2 REMAIN remaining time indicator 45 3 TIMER indicator 40 42 4 REC recording indicator 5 DV OUT IN indicator 6 S video input indicator 64 77 Index to parts and controls continued ...

Page 105: ... 2 OUT jacks 7 CABLE BOX CONTROL CONTROL S OUT jack 14 22 8 S LINK CONTROL S IN jack 13 9 VHF UHF IN OUT connectors 14 1 RF UNIT CH3 CH4 switch 15 92 2 lLANC jack 62 64 3 LINE 1 IN jacks 64 77 4 AC IN connector 5 LINE 1 OUT jacks 12 13 continued ...

Page 106: ...MODE switch 9 3 POWER button 40 4 AUDIO MONITOR buttons 46 5 TV VTR button 9 6 CHANNEL buttons 39 7 VOL volume buttons for TV only 9 8 r REC button 39 9 FF button 38 0 P PAUSE button 38 p STOP button 38 Shuttle ring 44 Jog dial 44 PLAY button 38 0 REW button 38 SEARCH 3 buttons 38 ENTER button 31 Number buttons 31 ª 6 EJECT button 38 ...

Page 107: ...CH SELECT button 49 7 SEARCH button 49 8 SEARCH button 49 9 EXECUTE button 27 54 0 CURSOR buttons 27 54 MENU button 27 54 FRAME 7 buttons 44 SLOW button 44 2 button 44 DISPLAY button 45 3 5 are also used as Teletext buttons for TV 1 VCR Plus number buttons 40 2 ONCE button 40 3 DAILY button 40 4 WEEKLY button 40 5 TIMER CLEAR button 40 6 VCR Plus button 40 Rear with cover opened ...

Page 108: ...ide channels to the broadcasts you preset or changing the program position order CABLE BOX CONTROL 33 Setting the cable box DSS receiver CASSETTE MEMORY ERASE 57 Erasing the contents of the cassette memory of the DV or Mini DV tape Y C DELAY 53 Adjusting the difference in time between Y luiminance and C chrominance ADVANCED OPTIONS Page 1 Page 2 54 Changing the optional setup choices MENU chart Th...

Page 109: ...109 Additional Information ...

Page 110: ...110 Additional Information ...

Page 111: ...111 Additional Information ...

Page 112: ...4 77 controls 66 copy a tape 67 79 cutting out unwanted scenes 68 80 methods 58 video insert 73 82 Edit Window 4 70 Hook ups 11 I Insert editing audio insert 75 84 video insert 73 82 video on sound 74 83 Index search 49 J K Jog dial 44 L LANC connection 64 jack 62 mode 55 M N Menu changing options 54 chart 108 O Operation panel 102 P Photo search 49 Playback 38 at various speeds 38 44 Protect tab ...

Reviews: